Pages

Showing posts with label Clouds In My Coffee Stencil. Show all posts

Camping Adventure

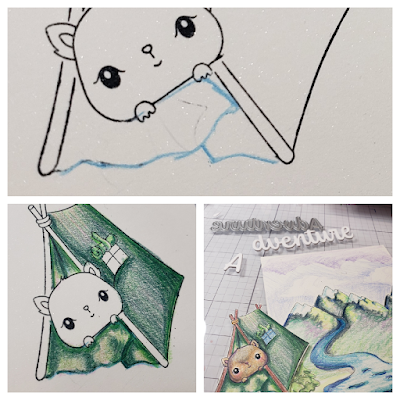
Hello crafty friends! Jenn Gross here sharing an adventure card today, you can also follow me on Social media @journeycoachjenn. I love this vibrant card.  I pulled out my colored pencils for a coloring adventure. The images are from The Rabbit Hole Designs New June Release. The three stamp sets; Glamping with Tailette, Tenting with Tailette, and Let's Wander are all illustrated by Agota Pop.

I masked off the cute squirrel head from the Glamping with Tailette stamp set and put her inside the tent from the Tenting with Tailette stamp set.  You can see how I drew the tent flap to place it in Tailette hands.  She is taking a look outside to appreciate her surrounding.  

The background is created by extending the Let's Wander stamp set by masling and stamping an extra mountain. 

The sky is  created with color pencils and the Clouds in My Coffee stencil.  I die cut the word "Adventure" from the Adventure Word with Shadow Layer die glueing three word layers together.  The "awaits" sentiment is from the Adventure Word stamp set.  The sentiment is glued to the top of the card front following the mountain's ascent.
I added the Tented Tailette to the bottom right of the card front using foam squares.

Supplies List
Liquid glue 
Colored pencils 

Thank you for taking the te to checkout  today's vibrant card camping adventure with Tailette.  I hope you are inspired to create something lovely today!

Be Creative ~ Stay Inspired

Jenn Gross


Follow me, Journey Coach Jenn, on 

Instagram - https://www.instagram.com/journeycoachjenn/

YouTube - http://www.youtube.com/c/JourneyCoachJenn

Blog - https://journeycoachjenn.blogspot.com/  


For more inspiration, updates, and news make sure to check out these places


The Rabbit Hole Designs

The Rabbit Hole Designs Instagram

The Rabbit Hole Designs Facebook Page

The Rabbit Hole Designs Pinterest

The Rabbit Hole Designs YouTube


Dreamy Little Pup


 Hi! It's Lauren here today sharing this sweet little card featuring the new Naps stamp set illustrated by Agota Pop. 

I used an embossing ink pad to stamp the image onto black cardstock. Then I used the Clouds in My Coffee stencil as a template to help me create puffy clouds.


I then used my colored pencils to color my pup and the clouds.


Once everything was coloured up, I added "stars" using a white acrylic paint pen.


I trimmed my panel to 4.23x5.48 and then adhered it to a white, top folding A2 sized (4.25x5x5) card base. Then I adhered some small star bling from my stash to finish off this cute card.


I had tons of fun creating this card and I hope it inspires you to get coloring! I've linked the products I used below. Thanks for visiting! 


Purrfect Erie Evening - Created with The Rabbit Hole Designs Meowgical Stamp Set


Hello crafty friends!  Today I am sharing this Too Cute to Spook Halloween card created with The Rabbit Hole Designs new Meowgical stamp set along with the Torn Paper stencil, and Clouds In My Coffee stencil.  Tools include Cottontail Embossing Powder Tool, and TRHD blending brushes.

Card Step Tutorial 
A & B - On a piece of 4" x 5 1/4" navy cardstock, use the Torn Paper stencil and Bitty Blending Brushes with two Distress Oxide green inks to create a blended dimensional ground

C & D - Use the Clouds In My Coffee stencil with Cottontail Blending Brush, Shark Tooth White ink and Carved Pumpkin Distress Oxide ink to blend the clouds. Use a stencil with small stars or circles and add it to the night sky
E & F - Treat the op left of the card front with the Cottontail Embossing Powder Tool and stamp the spider web stamp (from the Meowgical stamp set) with Versamark Clear ink. Heat set the stamped spiderweb with silver embossing powder.  Glue tree branches die cut  using a die from your stash on the card front in front of the spider web

G - The Vampire cat is stamped and color with Olo Markers in Blue Violet, Violet, Red Gray and Blue Green markers. Color one of two of the small Matte White Enamel Dots blue green and the other purple with Olo Markers. Add the colored dots to create the body of the spiders

H - Attach adhesive double-sided foam to the back of the colored and die cut Vampire cat and attach it to the card front. Mount the card front onto a white A2 card base


Products used
Meowgical stamp set                        Meowgical die set
            
              Torn Paper stencil                         Clouds In My Coffee stencil 
                   
                  Matte White Enamel Dots               Cottontail Embossing Powder Tool
            
                   Bitty Blending Brushes                Cottontail Blending Brushes         
                 

Thank you, I appreciate you taking time from your day to stop by and check out today's Card - Purrfect Erie Evening, created with The Rabbit Hole Designs new Meowgical stamp set. I hope you are inspired to create something lovely today!


Be Creative ~ Stay Inspired

Jenn Gross


Follow me, Journey Coach Jenn, on 

Instagram - https://www.instagram.com/journeycoachjenn/

YouTube - http://www.youtube.com/c/JourneyCoachJenn

Blog - http://www.journeycoachjenn.com/


For more inspiration, updates, and news make sure to check out these places


The Rabbit Hole Designs

The Rabbit Hole Designs Instagram

The Rabbit Hole Designs Facebook Page

The Rabbit Hole Designs Pinterest

The Rabbit Hole Designs YouTube


Disclosure - I love designing and creating cards and papercrafts.  I hope sharing my creations, some tips and techniques inspires you to create something lovely.  Please know, I have an affiliate relationship with some of the companies and the product links found on this blog. I love the products the I use and find joy in creating with them. I will occasionally try out a new product and will give you my honest opinion.  If you purchase products from these links, I will receive a small portion of your purchase at no additional cost to you. I use affiliate links of artist and crafters that inspire me.  It is a great way to support a fellow creator.  Find additional affiliate links at https://hype.co/@journeycoachjenn


I Really Dig You

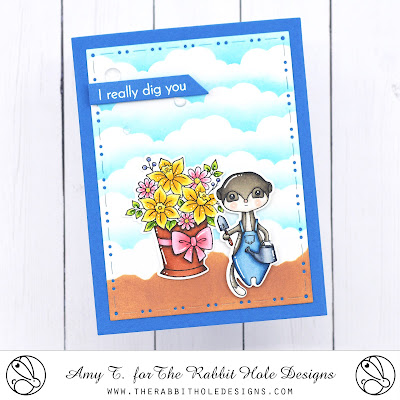
 Hi everyone!  Amy here with you today sharing a card I created featuring the super cute I Really Dig You and Meaningful Meerkat Stamp Sets illustrated by Agota Pop!

I Really Dig You Stamp and Die Set, Meaningful Meerkat Stamp and Die Set illustrated by Agota Pop, Clouds in my Coffee Stencil, Torn Paper Stencil, You've Been Framed - Layering Dies by The Rabbit Hole Designs #therabbitholedesignsllc #therabbitholedesigns #trhd

I started this card by die cutting a piece of smooth white cardstock with the second largest die from the You've Been Framed - Layering Dies.  I used the Clouds in my Coffee Stencil with Distress Oxide Inks Tumbled Glass and Salty Ocean to create the sky, and the Torn Paper Stencil with Vintage Photo and Walnut Stain to create the ground.

I stamped out this adorable meerkat image from the I Really Dig You Stamp Set, colored it with copic markers, and cut it out using the coordinating die set.  I then stamped the gorgeous floral image from the Meaningful Meerkat Stamp Set, colored it, and cut it out using the coordinating die set.

I Really Dig You Stamp and Die Set, Meaningful Meerkat Stamp and Die Set illustrated by Agota Pop, Clouds in my Coffee Stencil, Torn Paper Stencil, You've Been Framed - Layering Dies by The Rabbit Hole Designs #therabbitholedesignsllc #therabbitholedesigns #trhd

Next, I die cut a blue banner using the You've Been Framed Die Set.  I stamped the sentiment from the I Really Dig You Stamp Set and white heat embossed.

I assembled my card using blue cardstock for the base.  I used foam tape to pop up the image and sentiment banner for some dimension!

I Really Dig You Stamp and Die Set, Meaningful Meerkat Stamp and Die Set illustrated by Agota Pop, Clouds in my Coffee Stencil, Torn Paper Stencil, You've Been Framed - Layering Dies by The Rabbit Hole Designs #therabbitholedesignsllc #therabbitholedesigns #trhd

For finishing touches on this card I added white gel pen accents, glitter, glossy accents, and a few Clear Enamel Dots!  Thank you and I hope you enjoyed my card today!

For more inspiration, updates, and news make sure to check out these places:

Adventures with Friends


Hi! Lauren Here with another of my favorites from the past year. This one is special to me because I helped bring this stamp set to life. I love these bunnies from Tatsiana Zayats and the adventures they are going on! 

Full card details can be found on my blog: https://laurenzrdh.wixsite.com/queenlorecreations/post/adventures-with-friends

Here are the links to the products I used for this card 


Sail & Soar Coordinating Die Set: Sail & Soar Dies – The Rabbit Hole Designs


Clarence Has Regrets!


Hello! It's Lauren here today to share this fun card featuring a skydiving Clarence! By the look on his face, I think he is regretting being talked into this skydiving adventure! Poor Clarence! 

I started out by stamping the Clarence image a few times onto a white A2 (4.25x5.5") cardstock panel. Then colored them all up using colored pencils. 


I then stamped and fussy cut a few masks to cover the images I colored so I could ink blend the sky. 


With the images colored I used the individual clouds from the Clouds in My Coffee Stencil to create my sky with Distress Oxide ink that I had left on my blue blending brush. 


Next, I stamped my sentiment in black ink and used a stitched rectangle, A2 sized die from my stash to trim the panel. 


I adhered the panel to a white, top folding, A2 sized card base to finish this fun card. 

I hope this inspires you to create something fun! Thanks for visiting and have a wonderful day!

Here are the links to the products I used for this card:


You can find me, Lauren, at these places: 


Lauren Zertuche (@laurenllz) • Instagram photos and videos

Blog | Mysite (laurenzrdh.wixsite.com)

YouTube channel: Lauren Z. – Queenlore Creations – YouTube


For more inspiration, updates, and news make sure to check out these places


Breakfast in the Clouds


Hello! It's Lauren here on the blog today. Do you ever dream of waking up to enjoy a beautiful breakfast on a big, fluffy, soft cloud? That is exactly what I envisioned for this sweet little bunny.

To create this dreamy card, I stamped the image onto white cardstock using black ink. I knew I wanted to paper piece the pillow and bed comforter, so I picked a paper from my stash that I thought would work well with my cloud vision. I stamped the bunny in bed image onto the patterned paper as well. 

Next, I colored the areas of the image on the white cardstock that were not going to be paper pieced using colored pencils.


Then, I fussy cut out the colored image and also the patterned paper pieces for the pillow and the comforter. With everything cut out, I adhered the patterned paper pieces onto the colored image. 

To create my cloud background, I used the Clouds in my Coffee stencil with blue Distress oxide ink that was left on my blender brush. I blended clouds all over a white A2 (4.24x5.5") cardstock panel. I then trimmed it using an A2 sized stitched rectangle die from my stash. 


I adhered my cloud background panel onto a white, top folding, A2 card base. Then adhered my bunny in bed image onto the card. The final step was to stamp the sentiment in black below the image directly onto the background. 

That completes my card for today. I hope this inspires you to create a fun setting for this bunny to enjoy breakfast! Thanks for visiting!

Below are The Rabbit Hole Designs products used to create this card: 


For more inspiration, updates, and news make sure to check out these places


Good Friends and Great Adventures!


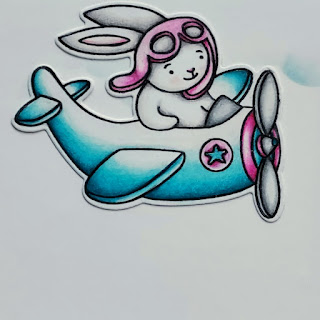
Hello! It's Lauren here on the blog today sharing a fun scene using the adorable new Sail & Soar stamp set illustrated by Tatsiana Zayats. This set is perfect for creating so many adorable and whimsical cards. 

To start my card, I first stamped the cute bunny images onto white cardstock in black ink. Then, I colored them using colored pencils and die cut them using the coordinating dies for the set. 


Once my images were ready, I created the background for them. I used the Clouds in my Coffee Stencil with Tumbled Glass Distress Oxide ink to create soft clouds along the top long edge of an 8.5x3.5" slimline cardstock panel. 


For the water I created a straight line across the bottom of my panel with washi tape, leaving approximately 0.5" below the tape. In that open area at the bottom of the panel, I ink blended Mermaid Lagoon Distress Oxide ink. Then I spritzed it with a little water, and carefully removed the tape. Tip: if the tape is sticking too much, you can warm it up using your embossing heat gun and it will come off the paper more easily. 


Next, I adhered the bunny boat and bunny plane onto the panel. Then, I stamped the sentiment in between the two. 


The last step was to adhere the panel onto a white slimline card base. I love how this sweet scene turned out and I hope it has inspired you to create a cute scene using this new set! Thanks for visiting!

Here are the links for The Rabbit Hole Designs products used for this card:


Sail & Soar Coordinating Die Set: Sail & Soar Dies – The Rabbit Hole Designs