Pages

Showing posts with label card-making. Show all posts

Holiday Smooch With "Love You More"

Happy Holidays!
New DTM Kelly here and I am excited to share my first project for

I took a their romantic Valentine themed stamp set, "Love You More" and 
set the couple in a holiday theme under the mistletoe.  
I use their incredibly sweet "Candy Twist" stencil on the background panel with red glitz gel.  
I used the large heart in the set upside down to create the mistletoe.


I was inspired by Kristina Werner's guest post to add snow to their hair.
They are both dressed in holiday colors. 


Products Used:

https://static.wixstatic.com/media/e7803a_2256ead09d6b489cbf739f529b83c3ac~mv2.png/v1/fill/w_660,h_924,al_c/e7803a_2256ead09d6b489cbf739f529b83c3ac~mv2.png


I hope you enjoyed my holiday take on this very versatile set "Love You More"!

For more information, news and updates check out these links:


Thank you for stopping by and have a great day!
Kelly


Born to the a Unicorn with Maria

Hello The Rabbit Hole Designs fans! It's Maria back on the blog with you today sharing yet another unicorn card, showcasing the Sassy stamp set.


Here's my card:


To begin, I stamped the image on some Neenah solar white card stock and colored the images in with my Spectrum Noir and Copic alcohol markers.  I also used some Stardust stickles to cover the unicorn and set it aside to dry.

I used a rainbow die from my stash to die-cut different colors of card stock and put these pieces together with some adhesive.   I also die-cut a huge cloud from the same die set with some glittered card stock.

I used the same rainbow die to die-cut a window on my white card stock.  I foam-mounted this piece and adhered it onto an A2 size card base to create some dimension. I added my rainbow die-cut with liquid adhesive.

I used different sequins and star confetti to adhere on top of the rainbow.  

I stamped some cloud images on my card front with some fog ink.   Lastly, I stamped the sentiment on my card with some Worn Lipstick distress oxide.  Here's a closer look:


Isn't she a cutie??  This Sassy stamp set is now available for purchase at the Rabbit Hole Designs and Simon Says Stamps. I hope you like my card and got inspired.  If you are looking for further details about my project including supplies used, I would be so grateful if you can stop by my blog today at:


For more inspiration, updates, and news make sure to check out these places.  Happy stamping!

Caffeinated Fox with Maria

Hello The Rabbit Hole Designs fans!  Maria here on the blog with you today.   I am back to share this simple coffee-themed card, showcasing the Caffeinated Fox stamp set and the Perfectly Blended stamp set.


.


Here's my card using the stamp set:


I stamped the images on some Neenah solar white card stock and colored the images in with my Spectrum Noir alcohol markers.  I used the Gold Brown, Light Pink and Blue Turquoise blend.  Since this stamp set didn't come with coordinating dies, I used my Brother Scan N Cut 2 machine to cut the image.

I used a Scalloped Border die to die-cut a Bristol smooth white panel and ink-blended this with Tattered Rose distress oxide ink. I adhered a pink patterned paper on my card base and added the inked backdrop to the card.  Lastly, I adhered my image and stamped the sentiment on my card.  

To finish my design, I added some glossy accents to the fox's nose.  Here's a closer look:


I hope you like my card and got inspired.  If you are looking for further details about my project including supplies used, I would be so grateful if you can stop by my blog today at:


For more inspiration, updates, and news make sure to check out these places.  Happy stamping!

Current Mewed - Cat

Hello The Rabbit Hole Designs fans!  Maria here on the blog with you today.   I am back to share with you another cat-themed project, showcasing the new Cattitude stamp set.


Here's my card using the stamp set:


I stamped the images on Neenah solar white card stock and colored the images in with my Spectrum Noir alcohol markers.  Since this stamp set didn't come with coordinating dies, I used my Brother Scan N Cut 2 machine to cut the images.

The background was dry-embossed with a star embossing folder.  I adhered this piece on an A2-size side fold card base.

I used a die from my stash to die-cut the little windows on another piece of Neenah solar white card stock.  I used the small mouse and paw print stamps (included in the set) to stamp this piece.  I used fun foam to adhere this piece on my card.

I adhered the cats on the card front and finished my design by adding the sentiment that I heat-embossed on black card stock.  Here's a closer look:


I hope you like my card and got inspired.  If you are looking for further details about my project including supplies used, I would be so grateful if you can stop by my blog today at:


For more inspiration, updates, and news make sure to check out these places.  Happy stamping!

Whale Hello there!


Hi everyone! Shanna here from Caffeinated Craftiness today with another adorable card featuring TRHD's Beach Day stamp set.  I thought the whales in the set were cute enough to have their own card, and thus this card was born!

I started by cutting out die cut circle out of a panel I had previously stenciled some clouds on with distress ink.  I took an acrylic block, that happened to have a wavy edge to it and smooshed on a decent amount of Salty Ocean distress ink.  I spritzed it and then played it over the bottom half of the circle.  I sat a glass of water on top for some weight, and then let it dry.  I find that if I don't rush it and lift the block off sooner, I don't get the deeper color I am wanting.  
While it was drying I stamped, colored, and cut out my Beach Day images using my Scan n' Cut.  I thought the whale would enjoy having a few friends, so the seagulls joined him while he visited his own little uncharted island.  
Next I dry embossed a solid white A2 panel and added a couple strips of nautical and gold washi.  After the circle had fully dried, I affixed it to the panel and then glued my images on it.  I had a sentiment all ready to go (Whale Hello! of course) but at the last minute decided I wanted to leave the card open to other possibilities if I needed a quick card to grab.  That is the beauty of a genuinely versatile stamp set, it can literally pull off any occasion from Thank you, Happy Birthday, I miss you, or just a plain Hello!  I like having options some times, and will leave the sentiment off for that reason.


I love visiting the ocean, being a California girl.....That's exactly where this card transports me!  Are you more of a lake or ocean type of person?  Does your crafting style ever reflect your preference?  


For more inspiration, updates, and news make sure to check out these places:


See you all again soon, and thanks for stopping by!!
~Shanna

Framed Pretty Peony

Hello TRH fans!  Shanna here today with my very first post as an official member of the ahh-making design team for The Rabbit Hole Designs...I am so excited to be a part of this team, and of course to share some fabulous projects showing off such a fun line of stamps! I am sharing another fabulous card showcasing the TRH Pretty in Peony that was just released this month! I am in love with the versatility that a good floral stamp set provides, and let me tell you friends....this one does NOT disappoint!


I started off by stamping my flowers all on Canson mixed media paper. I tend to use that paper when I am undecided in what coloring medium I plan on using as it works well with a good variety.  I ended up coloring them with my Tombow markers and blending with a small water brush.  I love the corally-pink!


I cut a wavy frame shape using my Cameo and then arranged the flowers carefully begins the frame and glued them directly to the card front.  I popped up my frame with some foam tape and the mounted a final flower on the front of it.  I really like the dimension the simple framing gave the whole card, super easy but really effective.

I finished it off by heat embossing one of the sentiments included in the set on a strip of black card stock and then adhering it to the card front as well.


For more inspiration, updates, and news make sure to check out these places.


What is your favorite technique for adding dimension to your cards?
See you all again soon!
-Shanna

By The Shore Cards by Maria


Hello The Rabbit Hole Designs fans!  Maria here with you.   I forgot to add these projects to my blog post on release day so I thought I'd share them with you.  For today's post, I am showcasing the By The Shore stamp set.


Here's my card using the stamp set:


Here's how I made the card:
  • stamp the image on Neenah solar white card stock and color the images in with Spectrum Noir alcohol markers (or any medium of your choice.
  • die-cut this colored piece using a polaroid die from my stash.
  • on another piece of A2 110 lb white card stock, use the Sun-rays embossing folder.
  • Assemble the card.

Here's a closer look:


And here's another card that I made using the set:


I stamped the image on an A2 size Neenah solar white card stock and colored the images in with Spectrum Noir markers.  I used my alcohol markers to create the sand.  Also used a clouds stencil to add the clouds on the background. 

I stamped the sentiment on some piece of black card stock with Versamark ink and heat-set with my heating tool and adhered this piece on the card.

Here's a closer look:


If you are looking for further details about my project including supplies used, I would be so grateful if you can stop by my blog today at:


I hope you like my cards and got inspired.  Have an amazing day and happy crafting!

For more inspiration, updates, and news make sure to check out these places.

Foxy Dad-isms


Hello again!  Shanna here from Caffeinated Craftiness again to share a fabulous Father's Day card using The Rabbit Hole Design's slightly cranky, under-caffeinated, just waking up Caffeinated Fox! I really wanted to use this guy for a Father's Day card for my husband, and the Sassy Sentiments paired perfectly with him for a "dad-ism" card.  My favorite is "Here, hold my beer".  I picked my favorites and stamped directly onto my coffee sleeve after dry embossing with a striped folder.  Sooo many to pick from, but I narrowed it down to the 4 that reminded me most of him. 


The coffee-shaped card was die-cut, then after fussy cutting my Caffeinated Fox, I mounted him directly onto the sleeve so he can slide off and the card can open.  He was watercolored using my Zig real brush markers on Canson Mixed Media paper. I chose to paper-piece his robe with a small print I had in my scraps though, I like how it looks like a pattered fabric! Add "#1 Dad" to the mug and Voila! I plan on inserting a gift card or two inside for a sweet little gift from me and the kids.  That along with his favorite meal, and we will have a successful Father's Day in the books!

Well, that's all for today.. Guest Designing for The Rabbit Hole Designs has been a ton of fun this month for such a fresh, fun company...Thanks for stopping by!  If you would like to follow along with my caffeinated adventures, stop by my blog here and say hi!

Best Day Ever


Hello The Rabbit Hole Designs fans!  Maria here on the blog with you with you today!  I am so looking forward to seeing my children next month and be able to spend some quality time with them.  This is my inspiration for today to create this card, showcasing the We are Family stamp set.


CARD RECIPE:
  • Stamp the images on smooth white card stock and color the images in with Copic markers (or any coloring medium of your choice).
  • Die-cut the image with an electronic die-cutting machine or fussy cut with scissors.  I used my Brother Scan N Cut 2.
  • Cut an A2 size piece of Bristol smooth white card stock and use the Drifts and Hills stencil to create the grassy hills with Mowed Lawn distress oxide ink.
  • Use the Winter Wonder background stencil to create the mountain with Pumice stone distress oxide ink.  Cover this with painter's tape to mask the background.
  • Use the Ray of Light stencil to add the sunrays with Fossilized Amber and Spiced Marmalade distress oxide inks.

  • Here's what it looks like when the background is completely finished:

  • Use the distress sprayer to spritz some water on the colored background and dab it dry with some paper towel.
  • Adhere the colored background on an A2 size side-fold card base.
  • Adhere the colored images on the card with Nuvo liquid adhesive and some foam adhesive.
  • Die-cut the sentiment using the Best Day Ever fri-dies and adhere to the foreground with liquid glue.

Here's a little close-up:


I absolutely ADORE this stamp set.  


If you are looking for further details about my project including supplies used, I would be so grateful if you can stop by my blog today at:


I hope you like my card today.  Happy crafting!

For more inspiration, updates, and news make sure to check out these places.

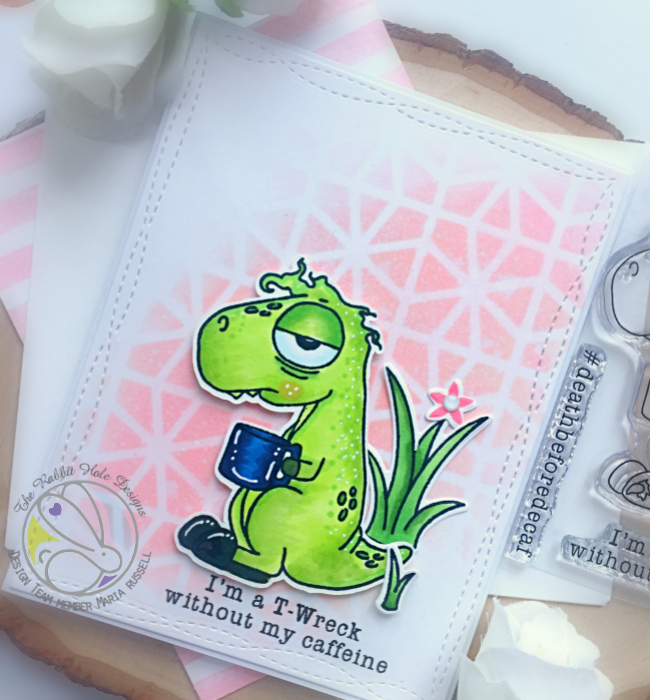
I'm a T-Wreck Without My Caffeine


Hello The Rabbit Hole Designs fans!  Maria here on the blog with you.  April is almost here and do you know what is happening tomorrow down at the rabbit hole?  Tomorrow is the start of our April release and you will be seeing some AWESOME stamp sets and projects made by the entire design team.  Oh yeah, be prepared to ooohhh and aaaahhhh!  You definitely need to stay tuned! 


For my project today, I am showcasing the adorable Caffeinated Dino 3x4 stamp set.   Here's what it looks like:


HERE'S HOW I MADE MY CARD:
  • Stamp the images on smooth white card stock and color the images in with Copic markers (or any coloring medium of your choice).
  • Die-cut the image with an electronic die-cutting machine or fussy cut with scissors.  I used my Brother Scan N Cut 2.
  • Cut an A2 size piece of Bristol smooth white card stock and use the geometric stencil to ink up the background.  I used Worn Lipstick and Antique Linen distress oxide inks.
  • Use the distress sprayer to spritz some water on the colored background and dab it dry with some paper towel.
  • Adhere the colored background on an A2 size side-fold card base.
  • Adhere the images on the card with either Nuvo liquid adhesive and foam adhesive.
  • Stamp the sentiment using Versafine Onyx black ink.

Here's a closer look:


I finished my design by using my Sakura white gel pen to add some dot details to my Dino and the coffee cup.  Here's another look:


If you are looking for further details about my project including supplies used, I would be so grateful if you can stop by my blog today at:


I hope you like my coffee-themed card today.  Have an amazing day and happy crafting!

For more inspiration, updates, and news make sure to check out these places.

Caffeinated Bee with Martha Lucia

Hello everyone Martha Lucia here with you! Do you know the Caffeinated Bee
Well today I am featuring this fabulous stamp set created by The Rabbit Hole Designs, that is part of their amazing collection of Caffeinated Stamp Sets.


I created this card in a different way from normally I made. Today, I first stamped the Caffeinated Bee over a whisper white card stock and colored it with Alcohol Markers. Then I started playing with the layers and after saw the eyes of the Caffeinated Bee, I though that it to be the focal point because it reflect our faces many times!


On this card I combined different colors and different textures. First I embossed a basic black layer and pasted it directly over the whisper white card base, then I created a set of banner on three different colors of card stock that I coordinate with the background piece of designer paper. At the end I attached the banners with two yellow brads and added my stamped images, the Caffeinated Bee and the #Buzzed sentiment with double sided foam tape over the colorful card base.

I hope that you like me explore all the possibilities with the caffeinated images and be ready to start every day with the energy of the Caffeinated Bee!

For more inspiration, updates, and news make sure to check out these places.

If you are looking for further details about my project including links to instruction and products not listed please feel free to drop on by my Stampartpapel Blog.


See you soon!

All You Need is a Little Vitamin Sea


Hello The Rabbit Hole Designs fans!  Maria here on the blog with you .  Before I start with my post, I just want to let you all know that TRHD is having a St. Patrick's day special (see details below).   Take advantage and order your favorites now!


For my project today, I am showcasing the beautiful Sofishticated 6x8 stamp set.   Here's what it looks like:


HERE'S HOW I MADE MY CARD:
  • Stamp the images on smooth white card stock and color the images in with Copic markers (or any coloring medium of your choice).
  • Die-cut the image with an electronic die-cutting machine or fussy cut with scissors.  I used my Brother Scan N Cut 2.
  • Use some 110 lb card stock to die-cut using the Coral Collage die and the Under the Sea Collage die.
  • Color with copic markers.


  • Use the Under the Sea Collage die again to die-cut fun foam.  Adhere this piece on top of the "colored" Coral Collage to give them dimension.
  • Adhere the colored images on the foreground.
  • Use Peacock Feathers distress oxide ink to stamp the sentiment "All you need is a little vitamin sea" with your MISTI stamping tool.
Here's a closer look:


I finished my design by adding some sparkling clear jewels to make them look like bubbles.  Here's another look:


If you are looking for further details about my project including supplies used, I would be so grateful if you can stop by my blog today at:


I hope you like my sea-themed card today.  Have an amazing day and happy crafting!

For more inspiration, updates, and news make sure to check out these places.