Pages

Showing posts with label Dotted Flower Stencil. Show all posts

Happy Valentines Day - Using those stenciled backgrounds

 MaryAnn, here to share some inspiration using backgrounds created with some of our stencils.

Many of you may recognize these backgrounds from the examples of the stencil on our website.  Why is that you may ask? Well because I am the one testing the stencils when they first arrive and then I use the test to take and post pictures to our website of what the final stenciled image will look like for you all.  I have amassed quite the stack of examples and decided to take over the blog today to show you how I used them.  There are no recipes, just pictures.  I hope you enjoy them.


Corner Mandala Stencil


Thank you for falling down The Rabbit Hole for a few minutes!
MaryAnn - Co-Founder The Rabbit Hole Designs

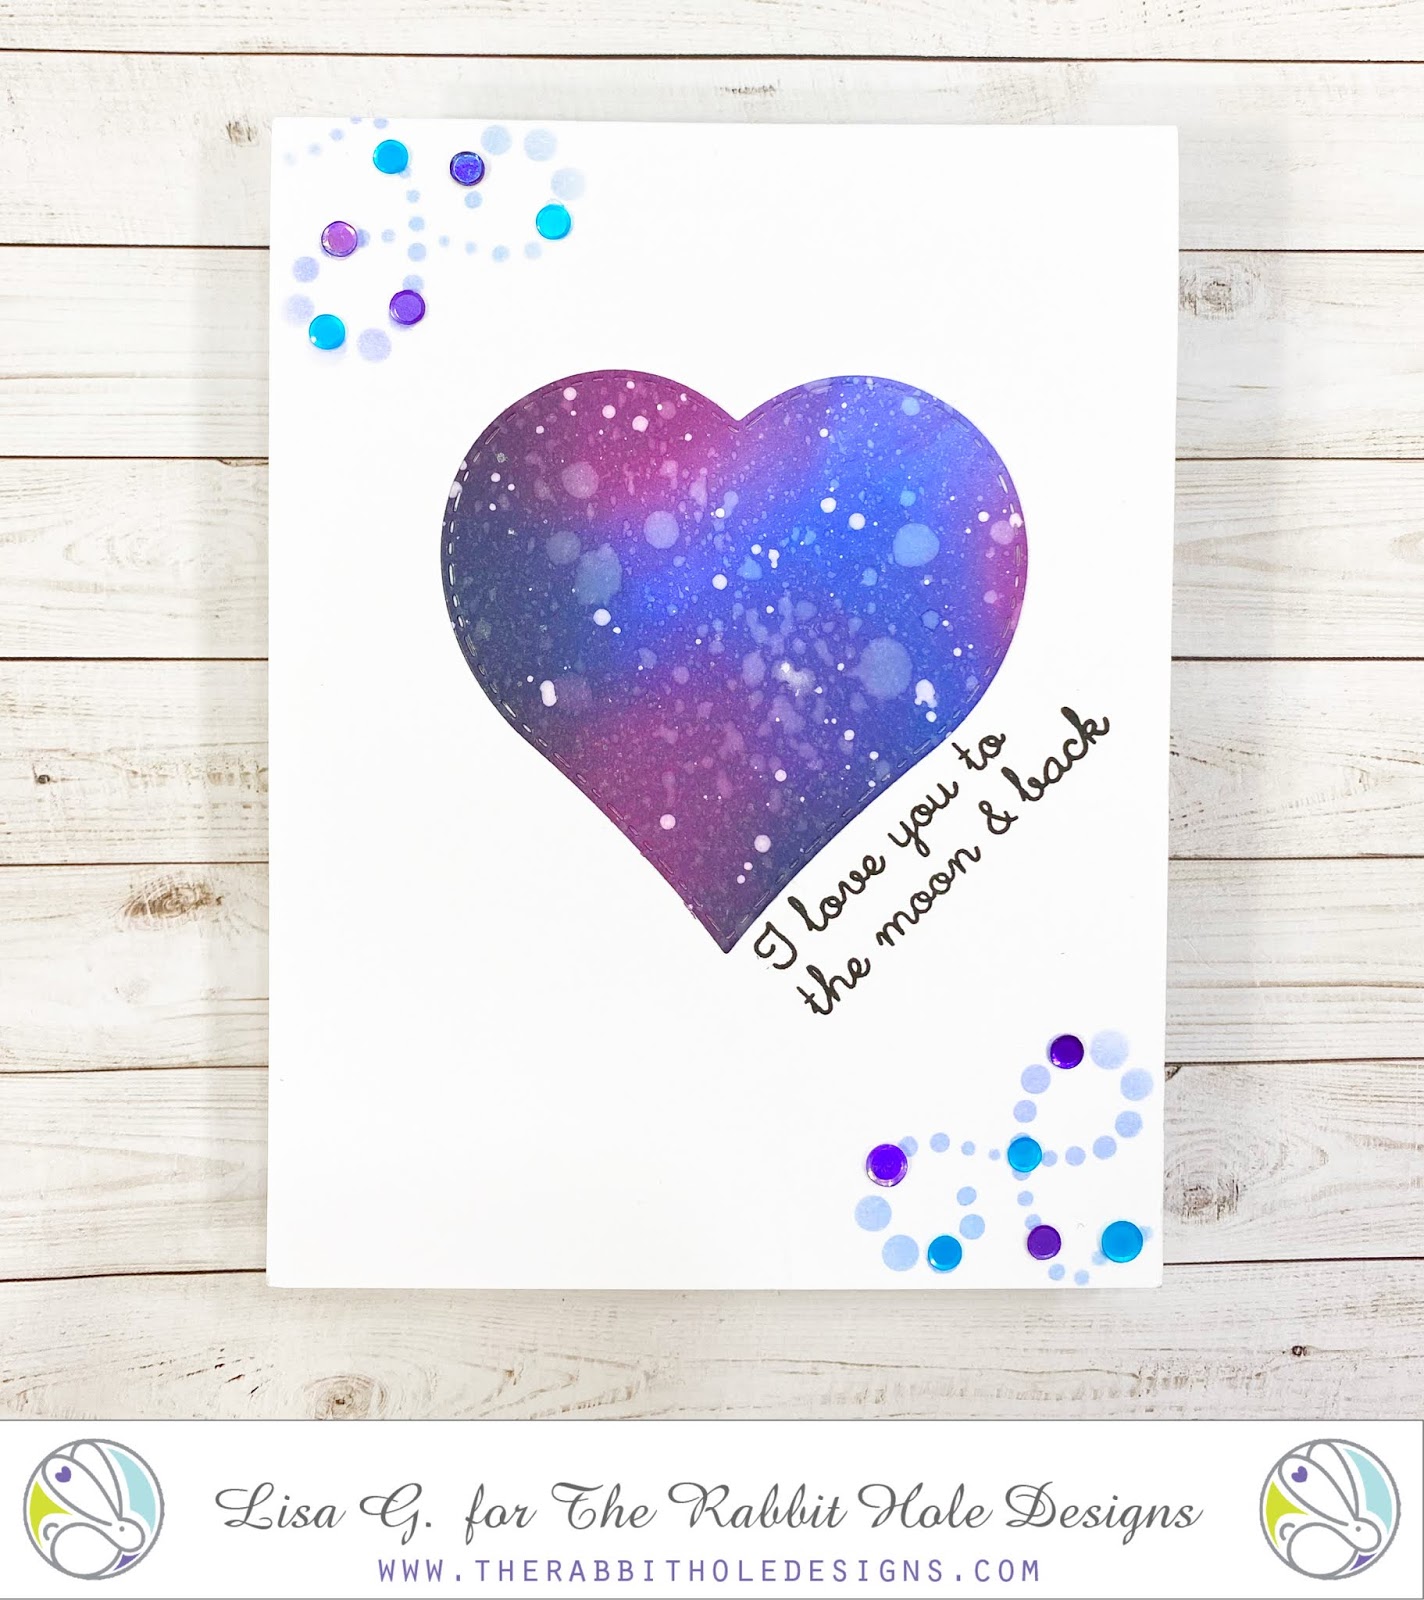
Love You to the Moon and Back!


Welcome to The Rabbit Hole Designs blog! 
It's Lisa here with you today and I am featuring a CAS card I made using one of the new stamp sets from the June release.
 The theme is all about space and the card above uses a sentiment from the 
Infinity and Beyond stamp set.


One of the things I love about this stamp set is the fun font that all of the sentiments are written in so I decided to make that part of the focal point of the card.  I created a galaxy background and then cut a heart shape out of it for the center of my card and then stamped the sentiment running up one side of the heart. I don't often make CAS cards but I really love how this card came out. For a little extra decoration I also added some interest with the Dotted Flower Stencil on the corners of the card and some exclusive Rabbit Hole sequins to match.

Did you notice that adorable little cow in the stamp set? You can create your very own cow jumping over the moon for your project! So many possibilities!


You can also find The Rabbit Hole products at Simon Says Stamp!

For more inspiration, updates, and news make sure to check out these places ...


Have a great day, I already am!

💙💜 Lisa  ðŸ’™ðŸ’œ

Smile

Hi everyone!  
Kelly here and I am sharing a card I made


I had a BLAST playing with this stencil.

For this card, I used the stencil three times with three different colored inks.
I rotated the stencil a bit after each color using that
 first row of dots outside the center dot as my guide.   
You can see that the colors overlap just a bit. 
I decided to off-set the stencil for a unique look.

I die cut the word "smile" several times in orange and once in black.
I off-set the black to give a shadow.  

I added a gem to the center of the stencil flower and mounted it on my base.

I hope that this stenciled background makes someone SMILE. 


For more information, news and updates check out these links:


I hope you enjoyed my take on the new "Dotted Flower" stencil.
It certainly is fun to play with and is very versatile.
Take Care,
Kelly 

Take Life One Sip at a Time


Hey yall!  Happy Friday, hope you are healthy and enjoying some family & crafting time.  Tangii here with a supah dupah bright and cheery card.  Recently, our wonderful Niccole sent us some beautiful Alcohol Ink/Yupo sheets.  I used mine for this card.  I loved what she sent me... so much so, I was actually afraid to use it (sure I'd just mess it up, lol).  Plus the sheet was so pretty as it was how do you decide what part(s) to use/cut up??  So I decided to use as much of the sheet as I could.  


I started off by cutting a rectangle panel  from the middle of my Yupo sheet.  Using some Dark Roast cs and a postage stamp die, I made the frame for that cut out panel.  Then I stamped my image from the Steeped in Happiness set with some Embossing ink and added some Dark Roast ep.  I love the rich dark brown, but with a little shimmer.

Next I used the Dotted Flower Stencil and some pink stickles for the steam from the pot.  Finally I stamped my sentiment from the Perfectly Blended set on to a die cut tag. I am so in love with the way this card turned out!!!  I am thinking of making my own Yupo sheet and re-creating this card to be framed for my loft!  Thank you so much Niccole for the base for this card!

All of the items I linked in my post are available at The Rabbit Hole Designs which is still open & shipping!

You can also read about this card on my blog, here with links to the products I used, etc.  Thanks for popping by, come back again soon!

Gold Dotted Flower Birthday Card


Hey Everyone! Justin here and today I am sharing a fun project using the new Dotted Flower stencil, part of the Rabbit Hole Designs April 2020 Release!

For this project, I wanted to create something a little different than I usually do. When I was first looking at this stencil, i thought that it could be absolutely beautiful if it was foiled, and I decided to use a color that I rarely do: gold.

Now, first things first. You do need a couple items to foil a project before you start, including a Deco Foil Transfer Sheets, Transfer Gel, a Laminator, and Parchment Paper. The Rabbit Hole Designs shop does have some Deco Foil options available to you for you to add on to your next order!

First, I took a piece of black cardstock and cut it into a 5.375" x 5.375" square. I also had a piece of black and gold metallic patterned paper that I cut into a 5.5" x 5.5" square piece to use later.

I adhered my Dotted Flower stencil with a light tack adhesive to my black cardstock square. Next, I took my Transfer Gel and spread a thin and even layer on-top of my stencil with a palette tool. I removed my stencil and set my black panel aside to dry. Rule of thumb: whenever I need something to dry, I always let it sit undisturbed for a minimum of 30 minutes. This way, I greatly prevent the likelihood of smudging and ruining my project.

While my black cardstock square was drying, I turned on my laminator to warm up and then I began to prepare my sentiment strip. I cut a strip of black cardstock and embossed the sentiment "Don't get all weird about getting older, it's merely the number of years the world has been enjoying you" from the Sassy Birthday set in gold embossing powder. I then framed the sentiment with the same black and gold patterned cardstock.

When my black cardstock square was dry, I placed a sheet of gold Deco Foil on top of it (gold shiny side facing up), and placed the cardstock and foil piece into a folder I made from parchment paper. I ran it through my laminator. Once out, I set it aside for a few minutes to cool down. I removed the Deco Foil Transfer Sheet, and had a beautiful metallic gold Dotted Flower!

I was now in the home stretch, and began putting my pieces together. I adhered my foiled cardstock square to my 5.5" x 5.5" patterned paper square, I adhered my sentiment strip with foam tape, and added a few gold sequins for extra embellishment!

And that's how I made my card!

I used the following products for this project:


Deco Foil Specialty Transfer Sheets
(note: while the specific color foil I used isn't in the Rabbit Hole Shop, there are a few other beautiful options that are the same quality product with so many possibilities!)

For more inspiration with your The Rabbit Hole Designs Creations, be sure to follow along at these other locations:


For more details about products used in this post, you may also follow along at my personal blog, Just a Note by Justin, as well!

I hope you're loving this new Dotted Flower stencil as much as I am! I cannot wait to see what you make with it!

Happy Birthday!

Hi everyone! It's Von Marie here and I am so happy to be on TRHD Blog today.  I have a Birthday card to share with you!


I don't know about you but I am always in need of a Birthday card, so I  made a Birthday card using Old School Tattoo Affirmation and the Dotted Flower Stencil from the April Release.  I first started out with the stencil which I ink blended with Tumbled Glass and Abandoned Coral Distress Oxide Inks.  I then stamped and heat embossed my image and colored it in with my Copic Markers to match my ink blending.  I also fussy cut it out. I then cut out my stencil piece from a wonky stitched rectangle and placed a strip of some chunky silver glitter across my panel.


I placed my panel in my Mini Misti to stamp and heat emboss the large sentiment from the Scripty Happy Birthday Stamp Set. I love the font on it, so pretty.  I then added my image with foam tape onto my glitter strip and added some blue gems to match.  My panel was then added to a A2 top folding blue card base.  Lastly, I added some sparkle to the diamond on my image.  I hope you like my card for today.  Thank you for stopping by the blog!

Supplies Used:


For more inspiration, updates, and news make sure to check out these awesome places! 

Thank you so much for stopping by today!


Oh, so excited bunny! card - using the Dotted Flower Stencil.


Hello my crafty friend!  Today I am on the blog with my Oh so happy bunny card featuring the Dotted Flower Stencil and the Caffeinated Rabbit stamp set.  It looks like you caught him.in the act of hiding his Easter egg. You can tell how excited he is by the look of joy on his face!
 I started out by using a piece of pale yellow cardstock cut to 4" my 5 and 1/4".   I use the dotted floral stencil  with a n oange distressed oxide ink to create the background.   I thought it looked either like the sunshine bouncing around or a Bunny bouncing around.  


I colored the caffeinated rabbit using my alcohol markers. I decided to use graze along with light blues and light pinks for highlights and shadows. I had an egg stamp which was zigzag/chevron and I stamped in light yellow creating a yellow and white chevrons egg.  I used alcohol markers to colored the parts of the egg that were left white using light pink, orange, and blue. To create the depth of the Easter egg, I used a pale purple the lightest grey for shadowing and a blender pen and weight gel pen for highlights and fussy cut it out. I also  fussy cut the rabbit, cutting the coffee cup out of image so I could place the egg in the rabbits grasp.


I grabbed my go to grass die in created the green grass for the base of the card front.  I had two sentiments in my stash that I thought would be perfect for the set, "You found me" and "so egg-cited".  I stamped them on the left side of the card.   I glued the rabbit on the right side of the card in the grass and glued the egg (at an angle) in his hands.  I stamped the #hare-lyawake" sentiment (from the Caffeinated Rabbit stamps set) in the grass, underneath the rabbit.  To finish the card I glued this card front on to a blue A2 card base.

Here are the products used:


I hope this inspires you to try a stenciled background  on your next creation.

Thank you so much for stopping by the blog!

Be Creative ~ Stay Inspired
Jenn Gross
@journeycoachjenn

For more inspiration, updates, and news make sure to check out these places


you are my lucky charm

Hi Everyone!
Donna here with todays post featuring goodies from the April release.

I'm going with a bright, vibrant theme here using the
Horseshoe Tattoo and Dice & Diamond Tattoo stamp sets along
with the Dotted Flower stencil.


I colored each image with Copic Markers after stamping 
in GinaK Black amalgam ink with my Misti tool.


I chose a sunburst background paper and added some stenciling using
blue ink and the Dotted Flower stencil...all THRD items are included in the
April release.

My goal here is to show you that you do NOT have to be an amazing colorist 
to get bright, colorful images, a few basic colors and an awesome background will do the trick.

Thank you for joining me today!


For more inspiration with your The Rabbit Hole Designs creations
be sure to follow along at the following locations:

April Release Inspiration Hop ~ Day 2


Hello and welcome to Day 2 of the Inspiration Hop. We are so excited for you to join us as we present to you our April release.  Our fabulous Design Team will be sharing their projects over the next couple days, so be sure to visit their blogs and leave them some crafty love.


 The 4 new stamps sets and 2 new stencils which are all available to purchase right now in the shop.


The stamp set that is being highlighted today is ...

Anchor Tattoo


And the stencil being highlighted today is ...


Dotted Flower Stencil
Make sure you come back tomorrow for Day 3 of our Inspiration Hop.


_______________________


**Giveaway**


To celebrate the April release, The Rabbit Hole Designs is giving away two gift certificates; one to a lucky Instagram Follower and one to a lucky Fan Page follower.  Winner will be chosen at random from the comments left on the INSTAGRAM post, and tagging friends, and also from commenting on the Fan Page post.  So make sure to head on over to INSTAGRAM and look for the giveaway post @therabbitholedesignsllc and look for the post at The Rabbit Hole Designs Fan Page by 11:59 p.m. PST 04-02-2020.  Winner will be announced on The Rabbit Hole Designs blog 04-03-2020.

This is the graphic you are looking for on our IG and FB


___________________


For more inspiration, updates, and news make sure to check out these awesome places! 


Thank you so much for stopping by today!