Pages

Showing posts with label Pumpkin Friends. Show all posts

Pumpkin Spice Latte a la Rabbit Hole


Good morning crafty friends! It's Lisa here today from Oh So Cute By Lisa
and it's time for the Coffee Loving Cardmakers 


The Rabbit Hole Designs is proud to announce that they are a 
Super Sponsor for the Blog Hop!
This is their second time sponsoring the hop and they have loads of
caffeinated critters to play with!

The Rabbit Hole Designs is offering 15% off everything in the Caffeinated 
section of the shop for the duration of the hop.
Just use the code: FallBrew
All the caffeinated stamps can be found here.


INTRODUCING my Pumpkin Spice Latte a la Rabbit Hole!
☕️🎃☕️🎃☕️🎃☕️🎃☕️


For day 4 of the hop I decided to use the stamp set Pumpkin Friends.
Now I know these pumpkins are not from a caffeinated critter set
but this is pumpkin season and they were the perfect addition to my
Pumpkin Spice Latte!

I used a large (to go) coffee cup die and decorated
it with fun orange polka dotted paper and this super cute Rabbit Hole pumpkin!
The #pumpkineverything sentiment is from the Pumpkin Friends stamp set
and the sentiment at the top of the cup is from the Perfectly Blended stamp set.
I just love all the coffee and tea related sentiments in that set!
For some extra added fun I added a green and white twine bow.

Thanks so much for stopping by today!
Don't forget to hop over to stop by The Rabbit Hole Designs Blog each day of the hop 
and comment for your chance to win a prize. 
Then hop over to the Coffee Loving Cardmakers Blog
and link up your coffee themed cards for more chances to win!

For more inspiration, updates, and news make sure to check out these links.

Have a great day, I already am!
☕️Lisa 🎃

I'd Pick you by Niccole

Hello everyone!


It's Niccole from Nic & Viv Designs back again to share another card I made using one of The Rabbit Hole Designs stamp sets. 

For today's card I used the Pumpkin Friends stamp set along with the Puzzle Box stencil.


How to create this card:


  • Standard A2 card base in dark gray
  • White panel that was stenciled with the Puzzle Box stencil in gray 
  • Glue to card base
  • Stamp your sentiment from Pumpkin Friends
  • On a piece of white card stock stamp you pumpkin image from Pumpkin Friends
  • Copic color and fussy cut your image
  • Attach to white panel
  • Finish with Nuvo Drops
Here is one more picture of the full card ...


TRHD Products used:

Pumpkin Friends

Puzzle Box

For more inspiration, updates, and news make sure to check out these places

The Rabbit Hole Designs YouTube


I have had so much fun playing with the Pumpkin Friends stamp set along with the Puzzle Box stencil.

Thank you so much for stopping by and spending some time with me.

Until next time ... Hugs & inky fingers!   -Nic-

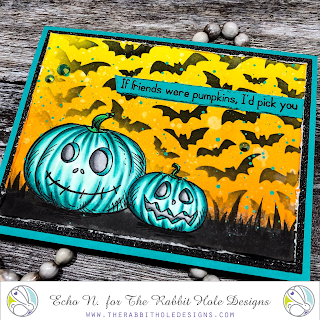
Will you be my pumpkin friend?


Welcome back down the rabbit hole!

Echo here from Stamp N Ground with a fun card I made using Pumpkin friends! Fall is in the air for sure. I love the colder nights and the crisp morning! 


Stamped Pumpkin friends and ink blended the background! 


Mist with water to activate distress ink!


Stenciled background!


Stamped Pumpkin Friends again and Copic colored! Then fussy cut pumpkins and added them to ink blended background! Spattered with some teal paint. Added sentiment and gems. 


I am loving how this caed turned out! Pumpkins, witches, cats, ohh my. Check out all the fun fall stamps that The Rabbit Hole Designs has to offer! 


                      For more inspiration, updates, and news make sure to check out these places.                                             
The Rabbit Hole Designs
The Rabbit Hole Designs Instagram
The Rabbit Hole Designs Facebook Page
The Rabbit Hole Designs Pinterest
The Rabbit Hole Designs YouTube

Thank you so much for stopping by!
Stamp on- Echo

Watercolor Pumpkin Friends

Hello everyone and welcome back! It's Amanda W. sharing some watercolor fun with Pumpkin Friends today.


Today I decided to get messy with watercolor. Let's be real, I'm rarely a clean crafter but when you add paint I'm an extra mess.
  • Today I used watercolor paper for the background panel and just did multiple layers of black watercolor, drying the paper in between to add texture and dimension to the paint. Then I splattered that with gold and purple watercolor and set it aside to dry.
  • I stamped, colored and cut my pumpkins and popped them up with foam squares.
  • I stamped and heat embossed the sentiment in gold and then stamped a spider hanging down from the bottom of it for an extra spooky look.
  • For finishing touches I added glossy accents to the pumpkin's eyes, noses and mouths and the spider's body.
  • This whole thing was glued onto a purple card base for a little pop of extra color around the edge.

Look at the light shine off the glossy accents. It really gives it a whole different look. I love it!

Here are the stamp sets I used.


For even more inspiration, updates, and news make sure to check out these links.


In the patch- with Katie

Happy Thursday crafters!  Katie here with a fun fall themed post for you today.  Just trying to get you geared up for you upcoming trip to the pumpkin patch!


I love this Pumpkin Friends set from the recent release, it is so cute and fun, and of course pairs perfectly with Gourdgeous.  So let me share how I made today's card.

How to:
  • I started this card by stamping my image using my Misti on Copic friendly paper.  I colored it them using my markers (see colors and other supplies on my blog).  I fussy cut them out with my snips and set them aside. 
  • Next, I worked on my backdrop. I started by die cutting a bit of paper with the scalloped edge and then used distress inks to create a sky and ground.  I splashed a little water on the scene to give texture to the sky.
  • After that, I stamped my image again so the shadow would be part of the scene.
  • I used some dies to cut leaves and stems, the closest I had to what might look like pumpkin greenery.  I added a little bit of Crushed Olive distress ink on a few edges to add to the colors.  I aslo cut a few thin strips of darker green paper and made the curly cues that you often see on pumpkins.
  • I used various glues and foam tape to mount the pumpkins and the leaves and put the scene together.
  • I chose to stamp the sentiment last, always a risky proposition, but it worked out. 
  • Lastly, I mounted the front later on black cardstock


So, pumpkin friends for the win?!  I think they are a sweet pair and they would be my first choice in the Pumpkin Patch. :)


Thank you for visiting me here today!  I hope you enjoyed this post and are loving this new release!  Please head to my blog for a full list of supplies. ~Katie


For even more inspiration, updates, and news make sure to check out these links.

Boo Banner


Hello my crafty friend, it's Amanda from Pear Blossom Press again. Now that summer is winding down, the kids are back in school, and Starbucks® has brought back the PSL, you know what that means...It's time to start planning for Halloween ;) Today, I've got a cute banner to help you get a jump on decorating. I chose to spell out BOO, but you could make your banner spell out any message you like. At the bottom of the post, I've got a few more suggestions.

To make the pennants, I first cut out a template for the triangles. To get the same angles, I stacked two pieces of scratch paper on top of each other and folded them in half. Then I lined them up in my trimmer with the fold facing away from my blade and cut a triangle shape. I separated the two pieces and, leaving one folded, I trimmed 1" from the same sides I had just cut. Then I trimmed 1" from the top. When I opened both pieces up, they stacked on top of each other with a nice wide border and they have matching angles. I used the templates to cut out the smaller pennant from black and white polka dot glitter paper, and the larger pennant from black cardstock.

To make the fringe, I stacked four pieces of orange tissue paper together and folded them into thirds (the same way they were folded in the package). I sliced the stack into 1" strips and used fringe scissors to cut along one edge. I glued the fringe to the back of the polka dot paper and feathered the fringe out with a semi-soft paintbrush. I only used two slices per pennant, but you can add more if you'd like a fluffier look.

Before adhering the fringed pennants to the black ones, I made simple tassels from embroidery floss and stapled them to the bottom of the black triangle points. After I glued the large and small pennants together, it was time to add the letters. I used my ScanNCut to cut out 4" letters from gold glitter cardstock and black cardstock. I glued the black and gold letters together, slightly offsetting them so they'd appear to have a drop shadow. (This makes it easier to read on a busy background like the glitter dots.) Then, I popped the letters up on the pennants with foam tape.

To decorate the letters and really jazz up the banner, I stamped, embossed, and watercolored three jack-o-lantern images. These are from the new release and I absolutely love them! They are from the Pumpkin Hair Don't Care, Pumpkin Friends, and Gourd-geous sets. Again, I used my handy ScanNCut to fussy cut the images. (Although, the Gourd-geous stamp has a coordinating die available.) Once the images were cut out, I used more foam tape to adhere them to the letters and added Aqua Shimmer to put a sparkle in their eyes. To finish the banner, I punched holes in the top corners and strung them together with orange baker's twine.


This banner is the perfect size to string across a door, but you can easily adjust it to fit any space you want. Here are a few more sentiment ideas:
  • HAPPY HALLOWEEN
  • WICKED
  • SPOOKY
  • TRICK-OR-TREAT
  • HELLO GOURD-GEOUS
What will you make your banner say? Have you got this year's costume picked out yet? I can't wait for Halloween!!! (Can you tell ;) ) Let me know in the comments how you celebrate Halloween. And if you're looking for more inspiration with these new stamp sets, check out this post. You will find the sister article to this one, with links to the products I used on my blog today. Hop on over for more fun ideas! I'll be back soon with another seasonal project.