Pages

Showing posts with label holiday. Show all posts

Little Reindeer Shaker Tag/Ornament


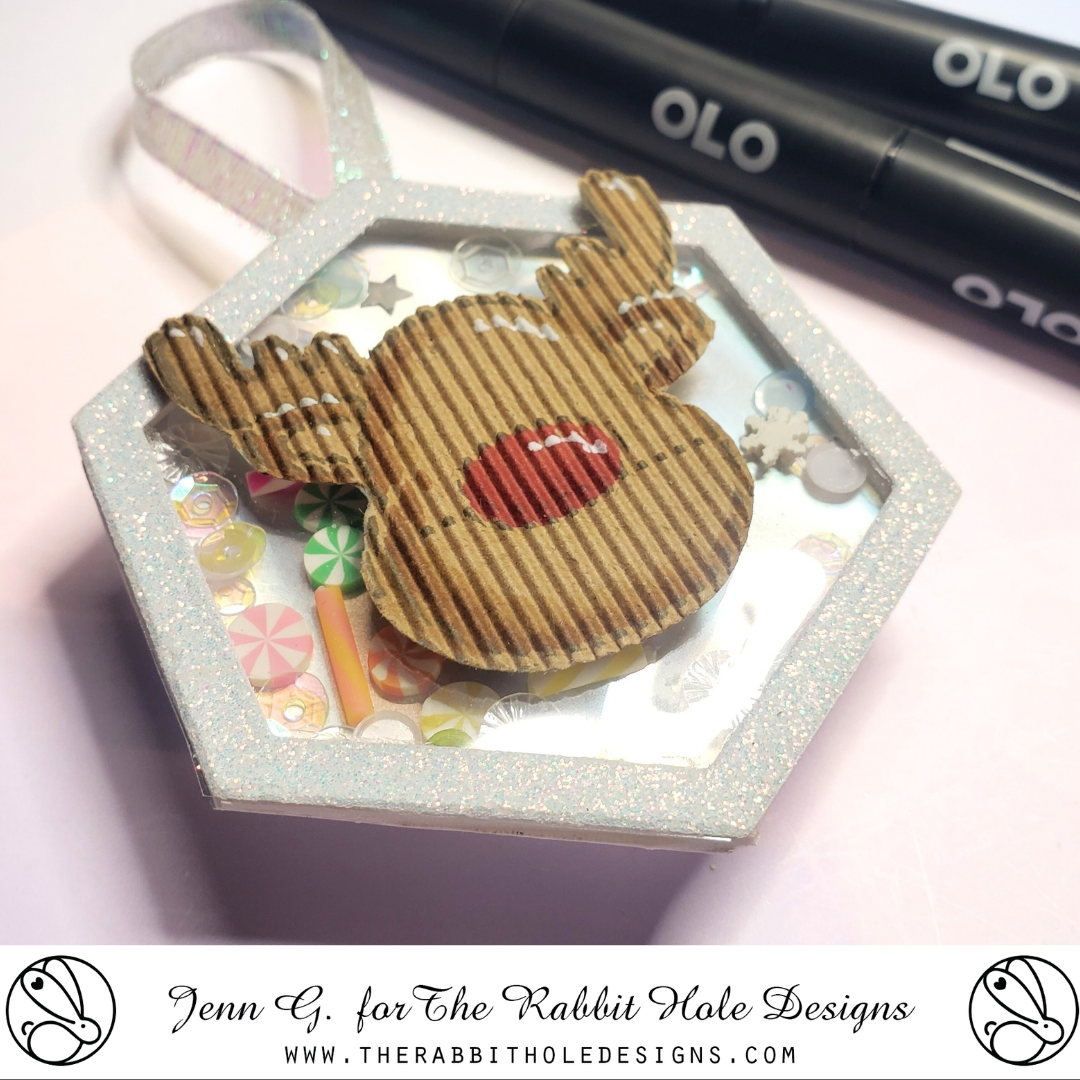
Hello crafty friends!  Jenn here with an easy shaker ornament featuring the One-Line Reindeer stamp set from The Rabbit Hole Designs

This is such a fun project.. You likely have a set of nesting die in your craft stash to use to create a shaker base for our Christmas ornament.

Let me share the quick step tutorial:
Stamp the image of the One-Line Reindeer using brown ink on to a piece of mini corrugated kraft cardstock.  Shaded the image with OLO markers and color the nose red. Added a few highlights with a white gel pen and use detail scissors to fussy cut the Reindeer.

To make the shaker base, you need two of your nesting dies.  I choose the size I want for the ornament and die cut an ornament back from a specialty paper like a matte silver lava cardstock and a second shape from a piece of clear acetate for the shaker window. 

Choose a second nesting die, one that will fit inside the first one, to make a window frame. Make sure the two dies leave at least a 1/4" to 3/8" frame thickness when nested together.  Use both dies to die cut togeter when die cutting a frame from white glitterstock.  You should have a window frame and the smaller inside shape. Set the smaller shape aside for later.

Assemble that shaker by gluing the clear acetate shape to the back of the glitterstock window frame. On the back side, create the shaker window well by adding double thick adhesive foam strips around the outer edge of backside of the window frame. The foam strips should be edge to edge around the ornament frame leaving no gaps. Add shaker bits to the window well.  Remove  the release paper from the foam tape and attach the silver matte lava stock ornament back (face down) back of the ornament frame locking the shaker bits inside.

Turn over the ornament and you have your shaker base. Add the One-Line Reindeer to the front (over the frame and window as shown above) with foam tape. Then the ornament over to the back side and glue the ends of a ribbon loop to the ornament.  Grab the smaller glitterstock shape (from inside of the die cut frame) and glue it to the back of the ornament to secure the ribbon loops in place. Stamp and fussy cut the Merry Christmas sentiment to add to the back of the shaker ornament.  This shaker could also be used as a gift tag.

Supply List

Supplies in your stash
Shaped nesting dies
Kraft cardstock 
Glitterstock
Clear acetate 
Matte silver cardstock 
Double sided adhesive foam tape 
Shaker bits
Ribbon 
Die cutting machine
Detail scissors 
Liquid Craft Glue 
OLO Markers 

Thank you for taking a moment  to check out today's blog featuring The Rabbit Hole Designs' One-Line Reindeer stamp set. I hope you enjoyed the shaker ornament tutorial and are inspired to create something lovely today!

Pretty Christmas Poinsettia Shaker Card


Hello. It's Lauren here today to share this pretty, full panel shaker card I created featuring the new Poinsettia & Pinecones. This set, illustrated by Kelly Taylor is super fun to create with. 

I wanted to use it to create a non-traditional poinsettia color. Something soft and subtle.  

I created a video showing how I created this shaker card that you can watch on my YouTube channel here: 

https://youtu.be/gLG20mrJ28w

You will find the products I used for this card linked below. Thanks for visiting! 

Poinsettia & Pinecones Stamp Set: Poinsettia & Pinecones 6x8 – The Rabbit Hole Designs

Cottontail Embossing Powder Tool: Cottontail Embossing Powder Tool – The Rabbit Hole Designs

A2 Shaker Acetate Sheets: A2 Shaker Acetate Sheets – The Rabbit Hole Designs


 You can follow me at these places:

Holly-day Copper Tag/Ornament Tutorial using the 1 Line Holly stamp set


Hello my crafty friends!  I think you are going to like this fun holiday stamping project.  I'm featuring The Rabbit Hole Designs' 1 Line Holly stamp set along with the Mid Century Modern #2 layering stencil, using the small dotted layer stencil.

I got a set of copper dimpled tags from the dollar store. I removed one from the package and cut off the jute loop at the top. I removed the protective layers of plastic from each side of the tag.  
A - Using the MISTI stamp positioner and the corner magnet, I secured the tag into place in the corner of the MISTI. I initially thought I would heat emboss the image on the tag, so I treated it with the Cottontail Embossing Powder Tool.
B & C - I positioned The Rabbit Hole Designs' 1 Line Holly stamp on the tag and grabbed it with the MISTI lid.   I changed my mind and decided to use Forest Green Stazon ink to stamp the image.
D -  I removed the stamped tag from the MISTI and heat set the ink, so it was dry for the next steps.  I positioned the small dot stencil layer from the Mid Century Modern #2 stencil over the tag and daubbed a fluffy white modeling paste from my stash stenciling the dots on the left side of the stamped image. This gives the impression of falling snow.  I removed the stencil and heat set the modeling paste.
E -  I grabbed a few colors of acrylic paints in red, white, dark green, light green, yellow,  and black.  I placed a small dots of each color onto a mixing palette.  I used the red and white paint to color the berries.  
F & G - I painted the holly leaves mixing combinations of the two greens, yellow, and white to create a blended look.
H - I painted the narrow strip of copper to the right side of the holly with the black acrylic paint.  After the paint dried, I added a red and black checked ribbon to the top of the tag to complete the project..  
The Rabbit Hole Designs products


Thank you for stopping by to learn how to recreate this Holly-Day Copper Tag.i hope you create something lovely today!

Be Creative ~ Stay Inspired

Jenn Gross


Follow me, Journey Coach Jenn, on 

Instagram - https://www.instagram.com/journeycoachjenn/

YouTube - http://www.youtube.com/c/JourneyCoachJenn

Blog - http://www.journeycoachjenn.com/


For more inspiration, updates, and news make sure to check out these places


The Rabbit Hole Designs

The Rabbit Hole Designs Instagram

The Rabbit Hole Designs Facebook Page

The Rabbit Hole Designs Pinterest

The Rabbit Hole Designs YouTube


Deck the halls!

Hey everyone, DT Member Jammie here wish a fun little card for you to see...
I used the new set from the November release "Love you more" but I modified it just a bit.  I used the image where the two little people are decorating the Christmas tree and changed it just a touch. Take a look:


I placed them at the front stoop of their little apartment decking the halls!  They really should invest in a ladder! I can totally Identify with this girl though, I want to decorate all the things! Lol! 

I hope that this project inspires you and I really hope that you can look at your stamps and make something different out of them, think outside of the box.  I love figuring out different ways to use my stamps, it just makes them so much more versatile.  I cannot wait to see all of the fun things you create with this adorable little stamp set! 

Hope you all have a wonderful holiday!  Tootles! -Jammie