Pages

Showing posts with label Charmaine Canham. Show all posts

Dashing through the NO!


Good morning my caffeinated critters!
Charmaine with CharCards "on the sleigh"!
 I like to make extravagant cards that take hours but decided that I need a quick card with a punch!
Well, here he is in all his Christmas glory!


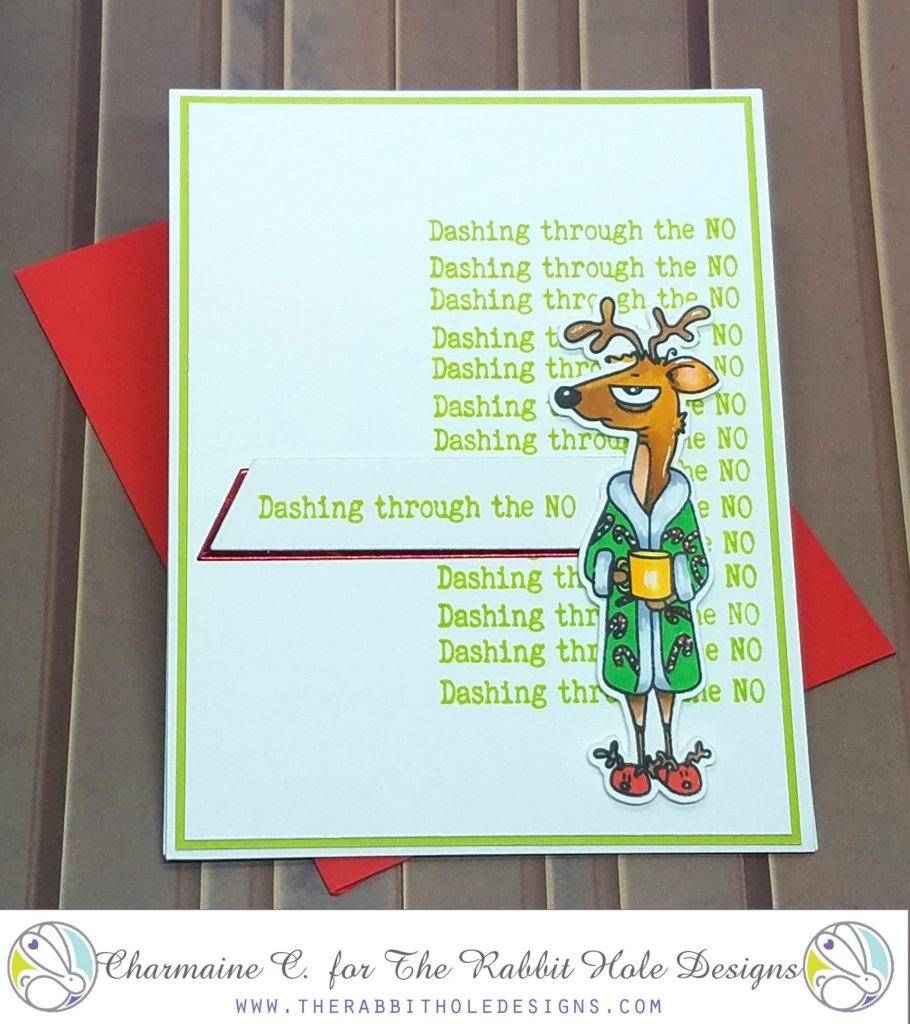
This caffeinated reindeer stamp and metal die are available at the Rabbit Hole Design and Simon Says Stamp stores.


                                             Here is what I did:

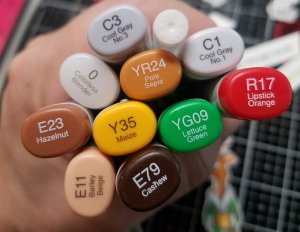
1. I stamped a few reindeer on Neenah 110 lbs card stock and fed it through my Brother Scan N Cut. You can also use the metal die cut. I used Gina K Amalgam ink (Copic friendly) to stamp.


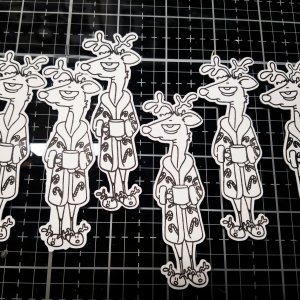
2. I used Copics to color this reindeer. Use a white Gelly pen for highlights and candy canes.


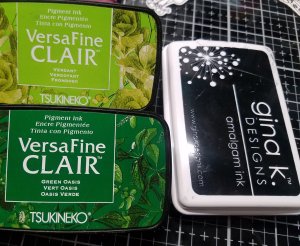
3. Using a 4 x 5 1/4 white card stock piece, I stamped the "dashing through the no" multiple times, 1/4 apart, with my Misti. I like using VersaFine Claire ink for sentiments! I made two different cards with a green variety.


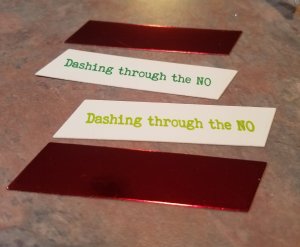
4. Stamp the sentiment and cut with a metal sentiment die. To add some shine to the card, also cut a red piece from red mirror card stock. Assemble with double sided tape.


5. Attach a matching green card stock to the stamped base's back. This should be about an 1/8th bigger than the stamped base.


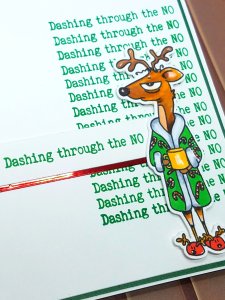
6. This is a  4 1/4 x 5 1/2 top folding card. Attach the sentiment with double sided tape and the reindeer with dimensional foam tape.
7. For the inside of the card, cut a piece of 60 or 80 lbs colored paper, 4 1/8 x 10 1/2. Fold at center, stamp sentiment and adhere with double sided tape.


8.  Match your envelope and you're done! I made 4 cards under two hours with distractions from my own village.


I hope you will give this a try! Clean and simple for the win! Leave me a comment or better yet, post your creation on our fan page!

Reindeer kisses,
Charmaine


Fly, Fly Away with me


Good Morning! Charmaine from CharCards here!

I am coming out of my glitter fort to bring you
this awesome shiny card. Grab your laminator, foil and this gorgeous stamp!


This image has an empty alt attribute; its file name is 20190724_1943247629936033019033289.jpg

This is a very doable card, it took about two hours to do everything. 

This is a top folding 4.25 x 5.5 card. 

I used the previously released Love you More stamp and one of the new stencils, Candy Twist, to make the background. 
Click on the images to go to the store. Also, these stamps and stencils are also now available at Simon Says Stamp 


Love You More Clear Stamp 4x6
Love You More, Click image for store


Candy Twist - 6x6 Stencil
Candy Twist Stencil, click image for store


Place the 6x6 stencil over a sheet of Neenah cardstock 110lb paper, or any other heavy duty cardstock. I use washi tape to keep everything in place but Pixie Spray is pretty handy here. Smear the transfer gel evenly across the stencil and paper using a craft knife or old credit card. Immediately wash the stencil in warm soapy water to avoid hardening of the gel. Set this aside and allow the gel to dry for about an hour. Switch on your laminator. Give it a good 20 minutes to heat up before use.


This image has an empty alt attribute; its file name is 20190724_1944124026818366040905272.jpg

Now, stamp, cut and color your pretty people and buildings. I used Copics and didn't focus too much on the detail. The main attraction of this card will be the foiled stencil result. For the background, I used a green and blue distress oxide palette. Nothing fancy, just enough to peak through.

Vellum "paper" is a fantastic way to soften any card. I used a cloud like metal die to cut clouds for the top and the bottom. Using black StazOn ink, stamp the sentiment on the vellum. This ink is amazing as it is PERMANENT! Give it a second to dry.

This image has an empty alt attribute; its file name is 20190724_1944011276829069687109925.jpg

Make sure the transfer gel is dry. Place a piece of red foil large enough to cover over the cardstock. Depending on your laminator (***please read your instructions***) place the foil and dried gel cardstock through the laminator.
Some machines require you to place your product in a piece of parchment paper to run through the machine.

Using the fluffy cloud die, cut two pieces from the red foiled product that match the vellum pieces.

Adhere the vellum to the red with a little overlap, and then to the card. Cut off excess paper to match the card size. Place the people on dimensional tape and use regular adhesive for the buildings.

I hope you have a fantastic day and appreciate you supporting a new and small business! We are all so excited that you are here growing with us!

Ta-ta!
Charmaine
charcards.blog

For more inspiration, updates, and news make sure to check out these links.


Miss Sassy Pants August 2019 Release

This image has an empty alt attribute; its file name is 20190717_0918567505515136284030525.jpg

Hi Sassy friends! 

My name is Charmaine from CharCards and I this will be my first time designing for The Rabbit Hole Designs blog. I am very honored to have been chosen for the team as these stamps speak to my sassy, sarcastic inner wild child. This was a definitely a match made in heaven!

Let me show you how I made Miss Sassy Pants sparkle using heat and foil!


This image has an empty alt attribute; its file name is sassy.jpg
Click on image for store


This magical stamp set can be used to make funny, sweet and silly cards. I chose to make a friendship card with the flying unicorn.


No photo description available.
Click on image for store


The front of the card is made by using one of the newly released stencils, Diamond Flower stencil, Deco Foil Transfer gel and foil similar to Deco Foil Silver Star foil available at The Rabbit Hole Designs store.


Before we start getting shiny, switch on the laminator. Give it a good 20 minutes before using.
Place the 6x6 stencil over a sheet of Neenah cardstock 110lb paper, or any other heavy duty cardstock. I use washi tape to keep everything in place but Pixie Spray is pretty handy here. Smear the transfer gel evenly across the stencil and paper using a craft knife or old credit card. Immediately wash the stencil in warm soapy water to avoid hardening of the gel. Set this aside and allow the gel to dry for about an hour. 

Stamp and fussy cut the unicorn. I use a Brother Scan n Cut to save some time. To avoid from distracting  from the beautiful foil, I kept the coloring of the unicorn to a minimum. I used two shades of pink for the hair and Copic markers C1 and C3 for the "white" of Sassy's body. Adhere a few pieces of dimensional tape to the back to give her some pizzaz!

This image has an empty alt attribute; its file name is pixlr4378736624258735886.jpg

This is a 4.25 x 5.5 top folding card. Adhere patterned paper on the inside of the card, same size as the card.  For the sentiment, I used a dialogue box die and the sweet friend sentiment.

Place Silver Star foil or similar foil over the dried gel on cardstock. Sandwich both pieces between parchment paper and feed it through the laminator. Set the dial to 5mm. Cut the beautiful, shiny result the same size as the card, 4.25 x 5.5.

Place a circle die big enough on the bottom corner of the result and position the unicorn in such a way that the unicorn doesn't get hung up as the card is opened. Use the shiny result card stock sans the circle and draw a pencil mark on the front of the white card to make an additional circle die cut. Two cuts are necessary because the gel result with two layers of cardstock might not make a smooth, clean cut. Adhere the shiny piece to the front, adhere Miss Sassy and there you are!

Pretty, shiny unicorn card!

Image may contain: text
For more inspiration, updates, and news make sure to check out these places.The Rabbit Hole Designs The Rabbit Hole Designs InstagramThe Rabbit Hole Designs Facebook PageThe Rabbit Hole Designs PinterestThe Rabbit Hole Designs YouTubeThanks for reading and I hope you can use this stamp set with us soon!
Charmaine Canham
Thank you so much for stopping by today!