Pages

Showing posts with label Embossing. Show all posts

Have a Brilliant Fall Y'all!


Hello my crafty friends!  Jenn here with another bright and fun fall card featuring The Rabbit Hole Designs Jack of All Faces stamp set paired with a sentiment from the Fall Foxes stamp set.

TRHD Supply List

Supplies from my Stash
VersaMark Watermark ink 
Black Embossing Powder 
White Embossing Powder 
Blue and Purple ink
Colored Pencils 
I stamped the pumpkin with the witch hat using VersaMark Watermark ink on a piece of dark blue cardstock treated with the Cottontail Embossing Powder Tool.  This treatment repels unwanted embossing power allowing the embossing powder to only stick to the stamped image. The images is heat embossed with black embossing powder and then colored with colored pencils.  The eye openings are cut with a craft knife and yellow cardstock is glued behind the image.  The image is fussy cut and a red flower is attached to the hat.
I added four crumpled autumn leaves to the bottom of the card front and added the pumpkin images to the front with adhesive foam tape. The sentiment is stamped on a piece of blue cardstock using VersaMark Watermark ink and heat embossed in white embossing powder.  It is cut to a strip and added to the cardftont with adhesive foam tape completing the card.

Thank you for stopping by to check out this Brilliant Autumn card created with The Rabbit Hole Designs' Jack of All Faces stamp set.  I hope you are inspired to create something lovely today!


Be Creative ~ Stay Inspired

Jenn Gross


Follow me, Journey Coach Jenn, on 

Instagram - https://www.instagram.com/journeycoachjenn/

YouTube - http://www.youtube.com/c/JourneyCoachJenn

Blog - http://www.journeycoachjenn.com/


For more inspiration, updates, and news make sure to check out these places


The Rabbit Hole Designs

The Rabbit Hole Designs Instagram

The Rabbit Hole Designs Facebook Page

The Rabbit Hole Designs Pinterest

The Rabbit Hole Designs YouTube


CAS Watercolored Holly Card - Christmas in July with The Rabbit Hole Designs


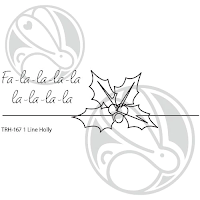
Hello my crafty friends!  I am sharing this simple watercolored card using The Rabbit Hole Designs' Line Holly stamps set from the Chrismas in July release and it is illustrated by Tatsiana Zayats. 
I die cut a piece of  white cardstock to an A2 card front size using a deckle edged die from my stash.
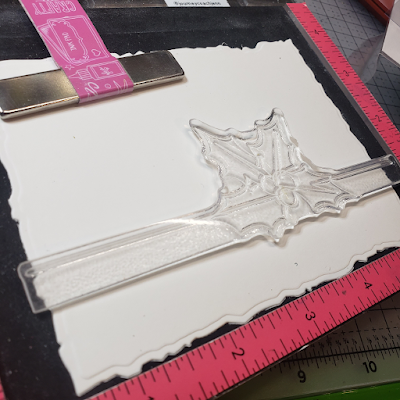
I prepped the card front using the Cottontail Embossing Powder Tool and placed it into my MISTI stamp positioning tool. I stamped the Line Holly with VersaMark Clear Watermark ink.
I heat embossed the image in clear embossing powder to create a resist of the image.
I used some of the handmade watercolor shift paints in my stash to color the image of the holly leaves and the berries.
I cut the Fa la la la la / la la la la sentiment in half to break it up over the length of the card. This can be achieved by masking off part of the stamp as well.  I glued a few holiday gems to the card front and mounted it to a green A2 card base to complete the card.  And there youi have it, another easy peasy clean and simple holiday card.

The Rabbit Hole Designs Products

Thank you, I appreciate you taking time from your day to stop by and check out  this clean and simple holiday card featuring The Rabbit Hole Designs new Line Holly stamp set.  I hope you are inspired to create something lovely today! 


Be Creative ~ Stay Inspired

Jenn Gross


Follow me, Journey Coach Jenn, on 

Instagram - https://www.instagram.com/journeycoachjenn/

YouTube - http://www.youtube.com/c/JourneyCoachJenn

Blog - http://www.journeycoachjenn.com/


For more inspiration, updates, and news make sure to check out these places


The Rabbit Hole Designs

The Rabbit Hole Designs Instagram

The Rabbit Hole Designs Facebook Page

The Rabbit Hole Designs Pinterest

The Rabbit Hole Designs YouTube

Happy Easter

 Hello Rabbit Hole Fans!  

It is Kelly here sharing my new card using "One Line Easter"
by The Rabbit Hole Designs.

To make this card, I stamped the bunny image on pink card stock with Versamark ink and used white embossing powder.  Then, I used a heart die and cut the image out.  I cut a bigger heart in white card stock twice and layered them with foam tape.  

To make the background, I used the "Happy Easter" from the set and stamped it repeatedly in a slightly darker pink ink than the background.  I adhered that pink panel to my white card base.  I felt like it needed something to anchor the heart so I put of strip of washi tape across the pink panel and then adhered the heart stack on top.  The repeated sentiment makes a lovely background.


For more inspiration, updates, and news make sure to check out these places.
 
 
Thank you for visiting us today!
-Kelly


Cupid -FND a slimline card


Hello my crafty friends!  Welcome to today's The Rabbit Hole Designs blog!  So a question for you...  Is it Galantine's or Valentine's Day?  Well, either way you look at it, that little cherub is so FND. That is Fat, Naked and Dangerous! So let's put him on a slimline card, right?

My Cupid -FND slimline card features The Rabbit Hole Designs' new Valentine stencil, the Sassy Anti Valentine stamp set and the soon to be retired Marquee Words stamps set

This is one of those cards where you see it in your mind, try it out, change your mind midway thought, and start over.  Sometimes this is the process when you create - trying by trying and learning as we makers make! 
  

I started off with a piece of 3 1/4" x 8 1/4" pink cardstock.  I stamped the word LOVE, from the Marquee Words stamp set in clear pigment ink 7 times  straight down the card front.  This gives the large letters a subtle shadow of the sentiment for the background.  I placed the three striped hearts on the Valentine stencil on the front of the card front about 1/2' below the top of the card front.  Using a Cotton Tail Blending Brush, I started to stencil it with Honeysuckle Ink.  Once I removed the stencil to reveal the image, I found it to be far too much pink.  I used my heat gun to make sure the ink was dry.  I replaced the stencil over the pink heart stripes and re-stenciled the three hearts in Black Soot Distress Oxide ink.   


Much better!  I needed one more black striped heart, so I positioned the striped heart stencil to add a 4th small striped heart at the bottom of the slimline card front. 


 Chubby cupid, from the Sassy Anti Valentine stamp set, is stamped on white cardstock with Versa Mark clear pigment ink and heat embossed with red glittery Oriental Fire embossing powder.  He is fussy cut and added to the card front. I layered the card front on a piece of red cardstock and tied it with some black twine.


I stamped and added the Fat, Naked and Dangerous  sentiment from the Sassy Anti Valentine stamps set and  attached it to the black twine. I mounted the card front on a dark grey slimline card base and added three black gemstone to finish the card.


Thanks you so much for stopping by today.  I hope you enjoyed this Cupid -FND slimline card featuring The Rabbit Hole Designs' new Valentine stencil, the Sassy Anti Valentine stamp set and the soon to be retired Marquee Words stamps set.  Feel free to ask any question or leave a comment below.


Be Creative ~ Stay Inspired

Jenn Gross


Follow me, Journey Coach Jenn, on 

Instagram - https://www.instagram.com/journeycoachjenn/

YouTube - http://www.youtube.com/c/JourneyCoachJenn

Blog - http://www.journeycoachjenn.com/


For more inspiration, updates, and news make sure to check out these places


The Rabbit Hole Designs

The Rabbit Hole Designs Instagram

The Rabbit Hole Designs Facebook Page

The Rabbit Hole Designs Pinterest

The Rabbit Hole Designs YouTube


Its All About Love AND stencils!

 Hello crafty people! Thanks for stopping by today to take a look. Todays card is all about love! 
I wanted to create a nice clean and simple card with the Open Heart stencil. I started out by applying a tiny bit of bright pink ink and then spread on some Faber Castell glass bead glitter gel. I let the panel dry over night to let it get completely dry. I didn't want to be tempted to touch it before it was totally dry.


After the panel was completely dry I added a frame around the panel. 
 Next I stamped the sentiment from the Je t'aime stamp set on a die cut heart and added a bit of silver thread behind it for a little touch of fancy.
I hope I was able to provide some inspiration today! Stop by The Rabbit Hole Designs to check out all the amazing products in the January new release.
Thanks so much!

For more inspiration, updates, and news make sure to check out these places.

I'd Give You the Moon

Hello! Alison here with a card using a couple of the newest release items from The Rabbit Hole Designs. I really love the June release's theme of outer space, as I have always enjoyed learning about it. So working with these stamps and stencils is a win for me!

I used the Space- Infinity and Beyond stamp set as my jumping off point. I really wanted to do something with just the moon, so I inked only that up (and used some tape to mask off the string) and stamped it repeatedly using Silvery Shimmer Delicata Ink on black cardstock. Also from that stamp set is my sentiment, which I heat embossed with silver powder on purple cardstock.
I really wanted an all-over star pattern in my background so I applied the new Aim for the Stars stencil a couple of times to cover my gray cardstock. I used VersaMark ink and then applied a glittery purple embossing powder to give it some sparkle and shine. I also added some purple ink to my white card base to tie the purples together.
If you would like more information on my card, please visit my personal blog HERE. I hope you can look at your sets a little differently, and see how masking off certain elements can completely change the look of your creations.


Have an inspiring day!
-Alison


Thanks for joining us today on the blog!
Come back for more inspiration using The Rabbit Hole Design products. 

For more information, news and updates check out these links:

Man in the Moon

 Hello there! Happy Monday!!! How's it going by you?
Michelle here, sharing my man in the moon card (hehehe).
I used the stamp set, Space- Infinity & Beyond and Ribbon Star Stencil...makes a 
perfect combo!!!! 
I inked up the background using tumbled glass and chipped sapphire distress
oxide inks. Than I embossed the stencil with metallic silver sparkle embossing powder.
I colored my astronaut with the no-line coloring technique.
I stamped him with antique linen ink and used Copic Markers to color.
For the moon: C00, C1, C2, C3, C5, C7, C9
For the astronaut: C00, C1, N2, C5, C7, B34, B37, B39, R29, R89
For a finishing touch I scattered a few Starletz gems.


Ribbon Star 6x6 Stencil


Space - Infinity & Beyond  4x6

Thanks for stopping by for a peek!!!
Hope you have a great week!!!

Michelle

Thanks for joining us today on the blog!
Come back for more inspiration using The Rabbit Hole Design products. 

For more information, news and updates check out these links:

Love Forever

Hello there! Michelle here. I love the newest stencil, Broken Glass! It's one of the most versatile 
stencils out there! I paired it up with Old School Tattoo- Anchor and love the way it turned out.


I inked up the stencil with victorian velvet and dried marigold distress oxide inks. I spritzed the stenciled background with water, than splattered some gold and black paint. Allow to dry.
I trimmed the panel to 4 x 5 1/4inches.  Next, I trimmed a piece of vellum to 2 1/4 inches and kept it long enough to fold over the stenciled panel. I embossed the sentiments with black embossing powder. The 'love' sentiment is from the stamp set Put a Bow on It.  
Adhere the vellum strip to the stenciled panel, than adhere to a piece of glitter paper that measures the same as the card base, 4 1/4 x 5 1/2.


I stamped the anchor with black ink than colored up with Copic Markers. I used shades:
W1, W3, W5, W7; RV32, RV34; YR00, YR61, YR02. I fussy cut the anchor. I laid down a piece of gold thread, than adhered the anchor on top. 
For a finishing touch I added some stickles glitter glue and sequins.

Thanks for stopping by for a peek!

Michelle


For more inspiration with your The Rabbit Hole Designs Creations, be sure to follow along at these other locations:


The Power of You


Hello there!
Michelle here. Stopping by to share a slimline card I created using one of the newest stamp sets 
from the Old School Tattoo line, Horseshoe.
Image may contain: possible text that says 'lucky charm You are my LUCK'
I stamped the image with antique linen distress ink than used Copic Markers to color.
I used colors: horseshoe: C2, C3, C5, W7
flower: RV55, RV66, RV69, RV99; Y26, Y28
banner: YR21, YR23, YR24
I fussy cut the shoehorse and set aside.

I trimmed the background white panel to 3 1/4 x 8 1/4. I used two stencils, Spell It Stencil and 
Tattoo Icons Stencil. First I used the Spell It Stencil to spell the word 'luck'. I used the horseshoe to replace the letter 'u'. I chose distress oxide inks in shades antique linen, fossilized amber, and vintage photo. Next, I used the Tattoo Icons Stencil and only inked up the mini horseshoe part of the stencil. I used spun sugar and picked raspberry inks, than added some shading with RV34 and N3 Copic Markers. I added some paint splatters with white and gold paint.
No photo description available.

No photo description available.

All embossing was done with black embossing powder.  I added two sentiments from the stamp set,
Old School Tattoo- Affirmation. I backed the panel onto gray cardstock than onto a card base that measures 3 1/2 x 8 1/2.
For a finishing touch I added shimmer with stickles glitter glue and scattered some sequins.
No photo description available.

Thanks for stopping by for a peek!

Michelle

For more information, news and updates check out these links:

Hey There Lucky Charm!


Hey yall!  Happy Sunday, and for those celebrating Happy Easter!  Tangii here with a fun little project using the Old School Horseshoe Tattoo and some embossing over Copics.  This was a very quick card coming together with such a great finished look! Hope you're getting some crafty/creative therapy time while we're spending some extra time at home.  If you need some new pretties to play with The Rabbit Hole Designs is still open/shipping!


I stamped my horseshoe with black ink and colored it in. Using my stamp positioner, I stamped it again with some embossing ink and added some green embossing glitter and heat set.  I really love the look of the embossed glitter over the coloring.  And look at the green glitter against the pink flower!!  After all of the embossing was done I added both sentiments in pink ink.  I cut out the whole thing with a postage stamp die and then popped it up with foam on the kraft cardstock.  White space and I aren't very good friends, so I just had to add a little ribbon and some green enamel dots at the bottom. Like I said, this was a quick and easy card.

You can also read about this card on my blog, here with links to the products I used, etc.  Thanks for popping by, come back again soon!

With Love

Hello there!
Michelle here!
Hello there TRHD fans!!!
I can't say how much I love the stamp set Put a Bow on It!!!
Any way you design it, it's just fabulous!!!!
Today I embossed it on black cardstock and added color with Polychrome 
Pencils. I first laid down white shading than colored over it with a teal shade.
The color just pops on black cradstock!!! I die cut the stamp with it's coordinating 
die and propped it up with foam adhesive onto kraft cardstock. 
I stamped the sentiment using part of the sentiment stamp from 
Pretty in Peony  I embellished with a few teal sequin.
Lastly, I added some blue stickles glitter glue.

Thanks for taking a peek!

For more inspiration, updates, and news make sure to check out these places


Michelle


Thinking of You


Hello there!!!
Michelle here, stopping by with a card I created for a friend going 
through a difficult time. She's a 'bow' girl so I know this card will
have her smiling. 

I embossed the stamp, Put a Bow on It, than colored it with a combination of 
Copic Markers and Prismacolor Pencils.  I die cut the bow cluster with the coordinating die.
I inked up the card base with cracked pistachio distress oxide ink. 
I splattered some white paint onto the background and 
bow cluster.  

The sentiment is from the stamp set Pretty in Peony  I also embossed it 
with gold embossing powder. 


I love the way it sparkles!

Here are the supplies I used:

Put a Bow on It 4x4
Put a Bow on it - Die

Pretty in Peony 4x6

Thanks for stopping by!

For more information, news and updates check out these links: