Pages

Showing posts with label Easter Bounty. Show all posts

Hop To It- with Katie

Hello peeps!   It's Katie, back today to share one more bunny card.  I really can't get enough of her, she is too sweet!


She just melts my heart!  I love that she is out there playing with her butterfly friends, enjoying nature. 


Here is how I did it: 

  • Used a stencil and distress inks to create the cloud and grass background.  Die cut to the smaller square shape.  
  • Stamped and colored the bunny from the Easter Bounty set with my Copics.  Die cut and set aside. 
  • Die cut the fence and grass dies and placed in the scene. Placed the bunny on top.  
  • Die cut rainbow of butterflies and added them to the scene with some pearl embellishments.

Pretty easy peasy right!?


That is all I have for you today.  I hope you have enjoyed this fun and fairly simple spring card.  


You are welcome to stop by my blog to see the full list of supplies I used. 

For more inspiration, updates, and news make sure to check out these places.


Have a most fabulous day! 


Heave Ho!- with Katie


Happy Monday! With Easter just around the corner I have been busy with bunnies!  This card was inspired by MaryAnn, her bunny flying the kite gave me the inspiration for the bunny to pull string to heave this huge carrot out of the ground.  I assume Ms. Rabbit is planning on having a feast. :)


Here is how I did it: 
  • I started by die cutting my background with the scallop frame die.  Next, I used my distress inks and stencil to create the cloud background. I set that aside.
  • I stamped and colored my images using my Copics.  I cut them out using a die cut machine. 
  • Next, I went about to create the rest of the scene, die cutting grass, branches and leaves and carefully placed them on the scene using foam tape. 
  • I added twine to my carrot and mounted my carrot on the background and then wrapped it around the tree branch and wrapped it around the bunny's hand.  I mounted the bunny with foam tape as well. 
  • Lastly, I mounted the entire scene on to my white cardstock base.


She looks pretty happy for someone working so hard to pull that carrot out of the ground.  I would be sweating up a storm!  ;)


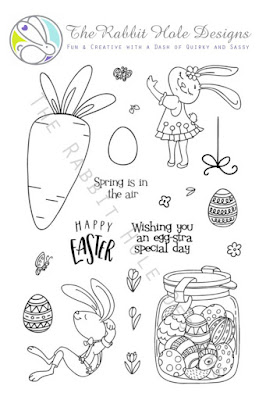
 This bunny is pretty much the cutest thing EVER!  She is from the Easter Bounty set. 
I hope you enjoyed this card and post, I enjoyed making it!  For further details on supplies feel I would be happy for you to visit my blog- KBStamps.

For more inspiration, updates, and news make sure to check out these places.


Alcohol Ink Easter Shaker Card


Hi, everyone! It's Lynnea Hollendonner and I have another fun Easter card to share with you!


How - To


  • Create background with alcohol inks. 
  • Die cut a circle from a piece of white cardstock and stamp eggs from the Easter Bounty stamp set randomly all over the panel with gray ink. 
  • Cut a piece of heat resistant acetate large enough to fit behind the die cut circle window and stamp the jar image from the Easter Bounty stamp set in the center and heat emboss with white powder. 
  • Adhere acetate to the back of the die cut panel and create a shaker well with foam tape. Fill with shaker confetti bits and back with the alcohol inked background piece. 
  • Stamp and white heat emboss sentiment from Easter Bounty onto black cardstock and adhere to card. 

Product List

Easter Bounty


For more inspiration, updates, and news make sure to check out these places


I hope you love this card as much as I do! See you next time! 

Faux Framed Wedding Scene


Hey, everyone! It's Lynnea Hollendonner with a quick way to create a faux frame! This technique is great for framing up little scenes and as soon as I saw this couple in the Happily Ever After stamp set I knew I wanted to frame them!


How - To

  • Mask off a semi circle at the bottom of a piece of A2 cardstock and blend on green ink for the grass. Use a cloud stencil and light blue ink to create clouds in the sky. 
  • Stamp 3 flowers from the Easter Bounty stamp set repeatedly across the hill and color with Copics. 
  • Stamp and clear emboss sentiment from Happily Ever After onto the hill. 
  • Stamp, color, and cut the image and glue onto the scene. 
  • Die cut a rectangle from a piece of A2 cardstock to create a frame. Using scissors snip from the outside corner to the inside corner at each corner. This will leave 4 strips - 2 short and 2 long. 
  • Using light gray Copic markers flick color onto the end of each strip and assemble them onto the card with foam tape. 


Products List


For more inspiration, updates, and news make sure to check out these places


Thank you for stopping by! I hope you'll try this super easy technique and create some framed scenes of your own!

Spring is in the air


Good Morning Rabbit Hole Designs Fans

Today is my day here on The Rabbit Hole Designs blog and I want to share an easy to make card with you that features the one of the images from
The Rabbit Hole Designs set Easter Bounty

Today's card was super fun to make and gave me a chance to get a little inky. And best of all was a 1 layer card that came together fairly quick once I had all the supplies gathered up.


Card Recipe
  • I stamped the girl rabbit and gave her a quick coloring with copics. 
  • I then stamped the kite from an upcoming set to be released next week on 03-27-2019 (yes you all are getting a sneak peek) and gave it a quick coloring with copics.  I also stamped the kite on a piece of post it tape to create a mask which I applied over just the diamond shape of the kite.
  • Ink up your background using a cloud stencil or you can use any die cut with wave like border and use that as a stencil.
  • I used Mowed Lawn Distress Oxide ink on a tiny blender brush to apply a patch of grass around the bottom of the bunny's feet.
  • I decided to use the sentiment from Easter Bounty stamped in a pretty purple that closely matched the purple on the bunny's dress.
  • instead of adding some sequins or enamel dots I went with the tiny butterfly also found in the Easter Bounty stamp set.
  • Neenah Classic Crest Solar white in 110lb  was used to create a side fold A2 sized card.
For more inspiration, updates, and news make sure to check out these places.

That is all for me today.  I hope I have inspired you to maybe give this technique a go and create some fast and easy cards.
~
Thank you for falling down The Rabbit Hole for a few minutes!
MaryAnn
~

Easter Embroidery Hoop with Katie

Happy Monday!

I am back again for another week with another fun project.  This time I am using the Easter Bounty set. 


Here is what I did: 
  • I stared by stamping my bunny on white Copic friendly CS.  Next I stamped it again on a post it and cut it out to create a mask.  I placed the mask over the bunny and then stamped the egg in the proper place. 
  • Next I came in with my Copics and colored them both.  Then I cut them out with my Scan n' Cut and set them aside. 
  • I used cut out this embroidery hoop die in three different colors (brown for the hoop, vanilla for the interior and gold for the metal pieces and put it together.
  • I stamped the little flower and leaves from the set at the top and colored them.  Then I created faux stitching around the inside.  Next I placed my bunny in the middle. 
  • I had this piece of CS pre-embossed and thought it was perfect so I placed my embroidery hoop on top of this with dimensionals and adhered it all to a base. 
  • Lastly, I die cut this hello sentiment in a nice yellow to compliment the pastels and adhered it. 
Here is one more view of the card from a different angle. 


For more inspiration, updates, and news make sure to check out these places.


Thank you for the visit today and I hope you enjoyed this project.  Fore more details on supplies you can visit my blog- KBStamps

Rainbow Ink Blended Die Cut Background


Hi, there! It's Lynnea Hollendonner! When I think of Easter I think of bright and happy days! And what's brighter and happier than RAINBOWS!!


How - To


  • Start by die cutting a background panel from white cardstock. 
  • Remove the "sun ray" pieces and blend on inks in rainbow order keeping the ink darkest at the inner edge and lighter towards the outer edge. 
  • Add double sided adhesive to the entire front of a card base and add the white die cut outline piece and center oval piece. 
  • Pop in each ray and press down firmly to adhere. 
  • Stamp sentiment from the Easter Bounty stamp set onto the center portion of the die cut background. 
  • Stamp bunny and carrot images from the Easter Bounty stamp set and watercolor images. Fussy cut and adhere with foam tape. 

Product List


For more inspiration, updates, and news make sure to check out these places


Thank you all for stopping by! I hope you're inspired to make a rainbow card this Easter! 

Egg Hunt with Easter Bounty


Hey crafty friends, it's Amanda and today I've got a really fun card for you. Have you seen the new Easter Bounty stamp set yet? It's got a pair of adorable bunnies and a bunch of Easter eggs to use for building a scene. I thought it would be fun to build my scene in 3D on top of an Easter basket box card.

I started by stamping and embossing my bunnies and eggs. I knew the back of my images would be visible, so I didn't want to use Copic markers to color them, as they bleed through. I also wanted soft colors for spring. So I grabbed my water-based markers and a blender pen to color them in. Instead of coloring directly on the paper, I scribbled color onto an acrylic block and picked it up with my blender pen. This allowed me to watercolor the images and get a nice variation in color for highlights and shading.  Once my images were colored and dry, I cut them out with my ScanNCut.
 
I knew that I wanted to add a lot of flowers to the scene as well, so I pulled out some tiny dimensional paper flowers from my stash. They started out white, but I sprayed them with some diluted liquid watercolors to turn them pink and coral. Next I die cut the pieces for my box, the grass struts, some greenery to glue the flowers to, and the pieces for the banner. To decorate the front of the basket, I cut thin strips of pastel cardstock and weaved them in.

Before I assembled the box, I stamped a sentiment from the Easter Bounty set on the back panel. Then I glued the box pieces together, adding the handle and grass struts. I assembled my banner and wrote "egg hunt" on the pennants, then I glued it to the handle. I tucked the bunnies and eggs in place and adhered them with glue or foam tape, for extra dimension. Then I glued the flowers and greenery in place to fill up the scene, but not hide my stamped images. As a finishing touch, I popped an egg up with foam tape on the back, near my sentiment.

I love how this card turned out! From every angle you can see something new. Plus, it folds flat and fits into an A6 envelope; perfect for mailing. I don't usually mail out many Easter cards, but there are a few special people on my list that I try to let know I'm thinking of them. Who will you be sending cards to this spring? Anyone egg-stra special? Let me know in the comments below and thanks for hopping by!

Happy Easter Card by Maria


Hello my crafty peeps!  I hope you are having a wonderful day so far.  Maria here on the the blog with you today, sharing this Easter card, showcasing the new Easter Bounty stamp set.  Here's what it looks like:


CARD RECIPE:
  • Stamp the images on smooth white card stock and color the images in with Copic markers (or any coloring medium of your choice).
  • Die-cut the image with an electronic die-cutting machine or fussy cut with scissors.  I used my Brother Scan N Cut 2.
  • Use the storybook die and die-cut a piece using 110 lb. card stock.  Keep the negative pieces to ink up with distress oxide (see photo below).

  • Use a grassy border die to die-cut the inked pieces.

  • Adhere the storybook die on the colored background with foam adhesive to give it some dimension.
  • Die-cut the tree using the tree die.
  • Start building your scene by adhering the colored images and die-cuts onto the card
  • Use stamping tool to stamp the sentiment.
Here's a little close-up of the card:


I used my white gel pen to add some details to the carrots, the bunny's cheeks and on the Easter eggs.  I absolutely adore this stamp set!   Here's another look:


For more inspiration, updates, and news make sure to check out these places.


If you are looking for further details about my project including supplies used, I would be so grateful if you can stop by my blog today at:


I hope you like my Easter card today.  Have a wonderful day and happy crafting!


Easter Bounty and Caffeinated Crab by Martha Lucia

Hi crafters, I have two cards to share with you featuring two of the recently released stamps. Take a look to my first card using the Easter Bounty stamp set:


To create my card I used the masking technique. Let me share with you how make this:
  1. Create the card base using Pool Party card stock. The size of this card is 4-1/4″x11″ with score in 5-1/2″.
  2. Cut a second layer using a stitched rectangle frame.
  3. Take a piece of scrap paper with the same size of the layer that you cut on the before step and die cut from that a heart.
  4. Arrange the die cut piece of scrap paper over the pool party card stock and secure it with masking tape.
  5. Sponge the colors of Distress Ink that you want to use to fill your heart. In my card I used Picked RaspberryWorn Lipstick and Twister Citron.
  6. Remove the scrap paper and keep to be used in another project.
  7. In a separate piece of whisper white card stock, stamp the bunny girl included on the stamp set Easter Bounty with Memento Tuxedo Black Ink.
  8. Color the image with alcohol markers or color pencils and fussy cut with the scissors.
  9. Paste the image over the decorated card base using double sided foam tape.
  10. Stamp the sentiment and little details included on the Easter Bounty stamp set over the card using Memento Tuxedo Black Ink.
  11. Paste the decorated layer over the card base using double sided foam tape.
  12. Finalize your decoration adding some Jewels or sequins.

For my second card is using the Caffeinated Crab stamp set. To create this card I used Poppy Parade card stock for the card base and Tangerine Tango for the second layer. I just dry embossed the second layer with an embossing folder and pasted it directly over the card base.

Over whisper white card stock stamp the Caffeinated Crab and one of the sentiments included on the stamp set with Memento Tuxedo Black Ink. Color the image with alcohol markers and fussy cut it with the scissors.


Paste the caffeinated crab with double sided foam tape and the sentiment directly over the decorated card base.  To finalize the card add a die cut leaves on top of the second panel.
You can find these stamps sets HERE in The Rabbit Hole Designs Store and let me tell you, you need to see the entire store because their images are really different and beautiful.
Thank you for stopping by and remember that you can follow us in all our social media venues and in our Facebook Group.

Easter Surprise with Katie

Hello friends and happy Monday!  

I have a fun Easter card for you today complete with a surprise inside....


Who doesn't love a nice Easter scene.  The setting, the colors, it just lends itself to a nice spring day. But what is that there, a little flap you can open?....


Ack!  What a nice bunny surprise complete with eggs too!  It is just like you snuck up on him taking a little break, busted! LOL.  

Here is a close up of the inside:


So here is what I did- 
  • I started with my bunny and jar of eggs from the newly released Easter Bounty set (I almost always start out with the part I want to color BTW).  I colored with my copics and fussy cut them out and set aside.  
  • Next, I set up my layers of paper- a light violet, pink on top and then a bright and bold yellow with this sunshine pattern.  I die cut the peek-a-boo flap in the yellow and them put the layers together. 
  • I added my interior scene and stamped the sentiment. 
  • I added some interest to the front with some more elements from the Easter Bounty set and die cut grass. 
  • Lastly, I added a bit of twine to pull it all together. 

All the pastel goodness just makes me happy!  Such a fun card to get in the mail. 

For a full list of supplies you may visit my blog.  For more inspiration, updates, and news make sure to check out these places:

The Rabbit Hole Designs The Rabbit Hole Designs InstagramThe Rabbit Hole Designs Facebook PageThe Rabbit Hole Designs PinterestThe Rabbit Hole Designs YouTube
Thank you for visiting today!!!


Release Hop for March


Hello and welcome to the release hop. We are so excited for you to join us as we present to you our March release.  Our fabulous Design Team and one guest Designer will be sharing their projects featuring the four new stamp sets that are available to purchase right now in the shop.
 So please, be sure to visit their blogs and leave them some crafty love. 

FREE SHIPPING 
on orders of $25 or more before taxes and shipping
(applies to US orders only)
No code necessary, exclusions apply


The stamps that are making their debut today are: 

Easter Bounty


Caffeinated Flamingo


Caffeinated Bee


Caffeinated Crab


Giveaway
Two winners will be chosen at random for a chance to win a *$10.00 (US funds) Gift Certificate* to The Rabbit Hole Designs. Leave a comment by 11:59 pm PST on 03-03-2019 on all participating blogs, for the entirety of the hop, so make sure to visit each stop and leave a comment. Winner will be announced on The Rabbit Hole Designs blog 03-04-2019

Here is the line up for the hop:


*Gift certificate can be used at any time and will not expire.  It is a One time use certificate and any funds not used will not be carried over for future use.

For more inspiration, updates, and news make sure to check out these awesome places! 
The Rabbit Hole Designs 

Thank you so much for stopping by today!