Pages

Showing posts with label Stenciling. Show all posts

Bright and Joyful Christmas Tree


Hello my crafty friends, Jenn here with a Bright and Joyful Christmas tree card featuring The Rabbit Hole Designs Warm and Cozy stamp set (illustrated by Agota Pop). I wanted to create and easy card, but som,ething that is a little bit elegant too. I hope you enjoy this twist on a traditional Christmas card.

Supply List

Other supplies (from your stash)
Paint brushes
Metalic watercolors
Bearly Arts Craft Glue
White ink
VersaMark Watermark ink
Gold Embossing Powder
Let's take a look at this simple step tutorial:
A - Use either a Bitty Blending Brush or Cottontail Blending Brush with white ink to stencil the Candy Twist stencil design in an oval shape in the center of a piece of 4' x 5 1/4" black cardstock

B - Use a paint bush and gold watercolor to add gold splatters the card front and set it aside to dry

C & D - Use the white ink and lightly stamp the Christmas tree image (from the Warm and Cozy stamp set) onto a piece of black coloring cardstock.  Watercolor the image with green, gold, red, and brown metalic and/or shift watercolors
E - Fussy cut or die cut the colored Christmas tree 

F -  Use the Cottontail Embossing Powder Tool to treat a piece of black cardstock. Stamp the Merry Christmas sentiment (from the Poinsettia and Pinecone stamp set) with VersaMark Watermark ink.  Dust it with gold embossing powder and heat set the sentiment. Use the coordinating dies to die cut the sentiment

G & H - Glue the stenciled card front on a green A2 cardbase.  Use adhesive foam squares to attach the painted Christmas tree to the center of the stenciled Candy Twist oval. Glue on the Merry Christmas sentiment above and below the tree as shown
Thank you for taking time  to visit today's blog and check out this Bright and Joyful Christmas Tree card created with The Rabbit Hole Designs' Warm and Cozy stamp set, Poinsettia and Pinecone stamp and die set, and Candy Twist stencil. I hope you are inspired to create something lovely today!

Be Creative ~ Stay Inspired

Jenn Gross


Follow me, Journey Coach Jenn, on 

Instagram - https://www.instagram.com/journeycoachjenn/

YouTube - http://www.youtube.com/c/JourneyCoachJenn

Blog - https://journeycoachjenn.blogspot.com


Such a Cool Friend! - A look back a Warm & Cozy stamp set


Today we are taking a look back to July 2023 and revisiting this cool card.

Hello crafty friend!  I hope you are keeping cozy during The Rabbit Hole Designs Christmas in July Release.

Today I am on The Rabbit Hole Designs blog with these two flakes friends.  They are keeping it cool and stylish with their colorful hats and scarves.  I am using the Warm and Cozy stamp set and coordinating die set. I used a retired candy twist stencil from my stash for the backgroundin the oval.

I stamped the snowmen in a light pink ink on coloring cardstock and colored them with soft blue, yellow green, and red OLO Markers. I stamped the sentiment at the bottom of the oval and popped up the snowman image with adhesive foam tape.  The background layer is a 4" x 5 1/4" Christmas red cardstock with flecks of white gold water color to make a snowy background. I rounded the four corners of both the red card front and the white A2 card base and glued them together.  I added the oval layer with images on top to complete the card.

The Rabbit Hole Designs Products

Thank you, I appreciate you taking time from your day to stop by and check out these two cool friends on The Rabbit Hole Designs Blog. I hope you are inspired to create something lovely today! 


Be Creative ~ Stay Inspired

Jenn Gross


Follow me, Journey Coach Jenn, on 

Instagram - https://www.instagram.com/journeycoachjenn/

YouTube - http://www.youtube.com/c/JourneyCoachJenn

Blog - http://www.journeycoachjenn.com/


For more inspiration, updates, and news make sure to check out these places


The Rabbit Hole Designs

The Rabbit Hole Designs Instagram

The Rabbit Hole Designs Facebook Page

The Rabbit Hole Designs Pinterest

The Rabbit Hole Designs YouTube

Birthday Twist Card - Sentimentally Speaking Stamp set


Hello crafty friends! Welcome to today's blog featuring The Rabbit Hole Designs New Paisley Bandana 2 Layer stencil paired with the Sentimentaly Speaking stamp set with coordinating dies. I had a funny little crafty mishap when I was creating this card and took a photo of it to share with you.  It was a good laugh out loud moment.

The new Sentimentally Speaking stamp set with coordinatind dies is a card makers "must have"! The set contains 14 everyday sentiments and the coordianting dies frame them beautifully.  This set has quickly become one of my favorites!  I am using the Happy Birthday stamp and matching die for today's Birthday twist card.

I used  Creamsicle, Watermelon and Wildberry inks to stencil the first layer, stencil #1, of the Paisley Bandana stencil. For second layer, stencil #2, I used Grasshopper, Eucalyptus and Rainforest inks.

A - I decided to stamp the main sentiment Happy Birthday in a dark purple ink in the middle of the card using the Stampwheel. Keeping the sentiment in place on the stamping platfoem, I cleaned it off the ink and  I rotated the stamp platform counter clockwise one notch. I masked off the word Birthday and injked only the word Happy in Wildberry ink to stamp it four times rotating the stamp platform one notch  to stamp the sentiment four times the around the top of the card.

B & C - You can see I accidentally inked the wrong side of the stamp platform.  Oooops no stamp there, it was on the other side.  That was a great laugh and easily fixed by whiping off the ink and flipping over the platform to try again. 

I cleaned off the stamp and rotated the stamping platform to place the sentiment one notch rotation below the main Happy Birthday sentiment.  I masked off the Happy portion of the word while inking only the word Birthday. This is stamped in Rainforest ink four times rotating the stamping platform clockwise one additional notch rotation each time.  

D -  I was not excited about the look of the main dark purple Happy Birthday sentiment so I pivoted.  I die cut the purple sentiment out of the card front.   I lined up the card front over an A2 card base and   re-stamped the sentiment with Rainforest ink on a light peach A2 card base.  The card front is attached using adhesive foam squares and the Happy Birthday sentiment show as a recessed sentiment.  A much better results in my opinion.
Supply List 

Thank you, I appreciate you taking time from your day to stop by and check out today’s The Rabbit Hole Design project.  I hope you are inspired to create something lovely today!


Be Creative ~ Stay Inspired

Jenn Gross


Follow me, Journey Coach Jenn, on 

Instagram - https://www.instagram.com/journeycoachjenn/

YouTube - http://www.youtube.com/c/JourneyCoachJenn

Blog - https://journeycoachjenn.blogspot.com/  


For more inspiration, updates, and news make sure to check out these places


The Rabbit Hole Designs

The Rabbit Hole Designs Instagram

The Rabbit Hole Designs Facebook Page

The Rabbit Hole Designs Pinterest

The Rabbit Hole Designs YouTube


Purrfect Erie Evening - Created with The Rabbit Hole Designs Meowgical Stamp Set


Hello crafty friends!  Today I am sharing this Too Cute to Spook Halloween card created with The Rabbit Hole Designs new Meowgical stamp set along with the Torn Paper stencil, and Clouds In My Coffee stencil.  Tools include Cottontail Embossing Powder Tool, and TRHD blending brushes.

Card Step Tutorial 
A & B - On a piece of 4" x 5 1/4" navy cardstock, use the Torn Paper stencil and Bitty Blending Brushes with two Distress Oxide green inks to create a blended dimensional ground

C & D - Use the Clouds In My Coffee stencil with Cottontail Blending Brush, Shark Tooth White ink and Carved Pumpkin Distress Oxide ink to blend the clouds. Use a stencil with small stars or circles and add it to the night sky
E & F - Treat the op left of the card front with the Cottontail Embossing Powder Tool and stamp the spider web stamp (from the Meowgical stamp set) with Versamark Clear ink. Heat set the stamped spiderweb with silver embossing powder.  Glue tree branches die cut  using a die from your stash on the card front in front of the spider web

G - The Vampire cat is stamped and color with Olo Markers in Blue Violet, Violet, Red Gray and Blue Green markers. Color one of two of the small Matte White Enamel Dots blue green and the other purple with Olo Markers. Add the colored dots to create the body of the spiders

H - Attach adhesive double-sided foam to the back of the colored and die cut Vampire cat and attach it to the card front. Mount the card front onto a white A2 card base


Products used
Meowgical stamp set                        Meowgical die set
            
              Torn Paper stencil                         Clouds In My Coffee stencil 
                   
                  Matte White Enamel Dots               Cottontail Embossing Powder Tool
            
                   Bitty Blending Brushes                Cottontail Blending Brushes         
                 

Thank you, I appreciate you taking time from your day to stop by and check out today's Card - Purrfect Erie Evening, created with The Rabbit Hole Designs new Meowgical stamp set. I hope you are inspired to create something lovely today!


Be Creative ~ Stay Inspired

Jenn Gross


Follow me, Journey Coach Jenn, on 

Instagram - https://www.instagram.com/journeycoachjenn/

YouTube - http://www.youtube.com/c/JourneyCoachJenn

Blog - http://www.journeycoachjenn.com/


For more inspiration, updates, and news make sure to check out these places


The Rabbit Hole Designs

The Rabbit Hole Designs Instagram

The Rabbit Hole Designs Facebook Page

The Rabbit Hole Designs Pinterest

The Rabbit Hole Designs YouTube


Disclosure - I love designing and creating cards and papercrafts.  I hope sharing my creations, some tips and techniques inspires you to create something lovely.  Please know, I have an affiliate relationship with some of the companies and the product links found on this blog. I love the products the I use and find joy in creating with them. I will occasionally try out a new product and will give you my honest opinion.  If you purchase products from these links, I will receive a small portion of your purchase at no additional cost to you. I use affiliate links of artist and crafters that inspire me.  It is a great way to support a fellow creator.  Find additional affiliate links at https://hype.co/@journeycoachjenn


Off-Road Besties - (Sassy best friends card tutorial)

Hello crafty friends!  Today I have a simple and fun beastie card to share.  I was inspired by one of the new sentiments  "You are the Thema to my Louise"  from The Rabbit Hole DesignsSassy Sentiment #2 stamp set.  I paired this sentiment uo with the Up In Flames stencil, and the SxS Life stamp set* 
(Profits from every sale of this stamp set* (SxS Life) will go to fund injured drivers/riders, families of drivers/riders who have lost their lives, and organizations that promote & educate driver and rider safety in the off-road environment."). 
I love using these three sets together to create this fun best friends card.
 I stamped one of the SxS off-road vehicles randomly on a piece of 4" x 5 1/4" white cardstock with purple ink to create the card background.  I stamp the same image on a piece of coloring cardstock and colored it with purple and grey Olo alcohol markers.  I die cut the colored image using the SxS Life coordinating die set

I stenciled the flames (from the Up In Flames stencil) onto a piece of 1" x 4" white cardstock with red, yellow, and orange inks.  I stamped the sentiment "You're the Thema to my Louise" to the left of the Flames.  I mounted the sentiment strip onto a piece of 4" x 1 1/4" red cardstock.  

I glued the background piece onto a red A2 card base.  I used foam squares to attach the colored SxS image to the bottom front of the card.  I glued the sentiment strip to the card front just above the colored SxS vehicle completing the card. 

Products used


 Thank you for stopping by for this quick Off-Road Besties card and tutorial. I hope you create something lovely today think lovely today!

Be Creative ~ Stay Inspired

Jenn Gross


Follow me, Journey Coach Jenn, on 

Instagram - https://www.instagram.com/journeycoachjenn/

YouTube - http://www.youtube.com/c/JourneyCoachJenn

Blog - http://www.journeycoachjenn.com/


For more inspiration, updates, and news make sure to check out these places


The Rabbit Hole Designs

The Rabbit Hole Designs Instagram

The Rabbit Hole Designs Facebook Page

The Rabbit Hole Designs Pinterest

The Rabbit Hole Designs YouTube

All Mad in Wonderland - The Rabbit Hole Designs August Release


Hello there crafty friends. I am so glad you were able to stop by for  today's The Rabbit Hole Designs blog!  This week has been just plain bonkers,  but thank goodness it's Friday!

This crazy cat with a big broad grin is the inspiration for this mixed media card.  I am using the Wonderland 2 and Wonderland 3 stamp and coordinating die sets along with the Heard in Wonderland sentiment stamp set and the Rhombus/Diamond Hot Foil Coverplate.
I colored the images with colored pencil and die cut them out. The background for this card includes two stencils from my stash. They create an optical illusion, almost like a multiverse opening up to a new dimension. I brought in some numbers to represent a clock and the passing of time.
I foiled book pages with the Rhombus/Diamond Hot Foil Coverplate and red foil.  The edges are curled up and the piece is glued to the card. I attached the cat, caterpillar, and numbers using double sided adhesive foam tape.  I added some clay playing card pieces to and embellishments without the blink.


Thank you again for stopping by to check out the blog.  I hope you enjoyed the super creative multimedia card and are inspired to create something lovely today!

Be Creative ~ Stay Inspired

Jenn Gross


Follow me, Journey Coach Jenn, on 

Instagram - https://www.instagram.com/journeycoachjenn/

YouTube - http://www.youtube.com/c/JourneyCoachJenn

Blog - http://www.journeycoachjenn.com/


For more inspiration, updates, and news make sure to check out these places


The Rabbit Hole Designs

The Rabbit Hole Designs Instagram

The Rabbit Hole Designs Facebook Page

The Rabbit Hole Designs Pinterest

The Rabbit Hole Designs YouTube

Modern Congrats card with Video Tutorial.

Hello my crafty friends and welcome to The Rabbit Hole Designs blog.  Have you seen all the fabulous projects the Brand Ambassadors posted over the last three days?  OMGeee, what an amazing release and what creativity!  

Today's card features the Mid Century Modern stencilBitty Bunny Blending Brushes and the Congrats die set!   This is one of those cards where the photos do not do it justice. I've included a couple different angles, so you can check out the glitter paper, holographic cardstock and the stenciling up close.  Light definitely plays differently with specialty papers.
I have a YouTube video showing how I created the background design using the Mid Century Modern stencil with the Bitty Bunny Blending Brushes to bring out thd detail. Click on the YouTube image to link to the stenciling tutorial.

I love how this photo brings out the glitter paper with much more detail.

The Rabbit Hole Designs Products

I hope you enjoyed this Modern Congrats card and video tutorial featuring Mid Century Modern stencil, Congrats die set and Bitty Bunny Blending Brushes.  Please let me know if you have any questions.


Be Creative ~ Stay Inspired

Jenn Gross


Follow me, Journey Coach Jenn, on 

Instagram - https://www.instagram.com/journeycoachjenn/

YouTube - http://www.youtube.com/c/JourneyCoachJenn

Blog - http://www.journeycoachjenn.com/


For more inspiration, updates, and news make sure to check out these places


The Rabbit Hole Designs

The Rabbit Hole Designs Instagram

The Rabbit Hole Designs Facebook Page

The Rabbit Hole Designs Pinterest

The Rabbit Hole Designs YouTube


Be-you-tiful Floral Shift

Welcome to The Rabbit Hole Designs blog!  I am using the One Line Flower stamp set to create today's card. 

I used a  stencil for a background I created a few months ago.  I thought these two would pair together nicely.  I stamped the One Line Flower image with VersaMark watermark stamp pad and heat embossed  the stamped image in black embossing powder.  I did the same with the Be-you-tiful sentiment.
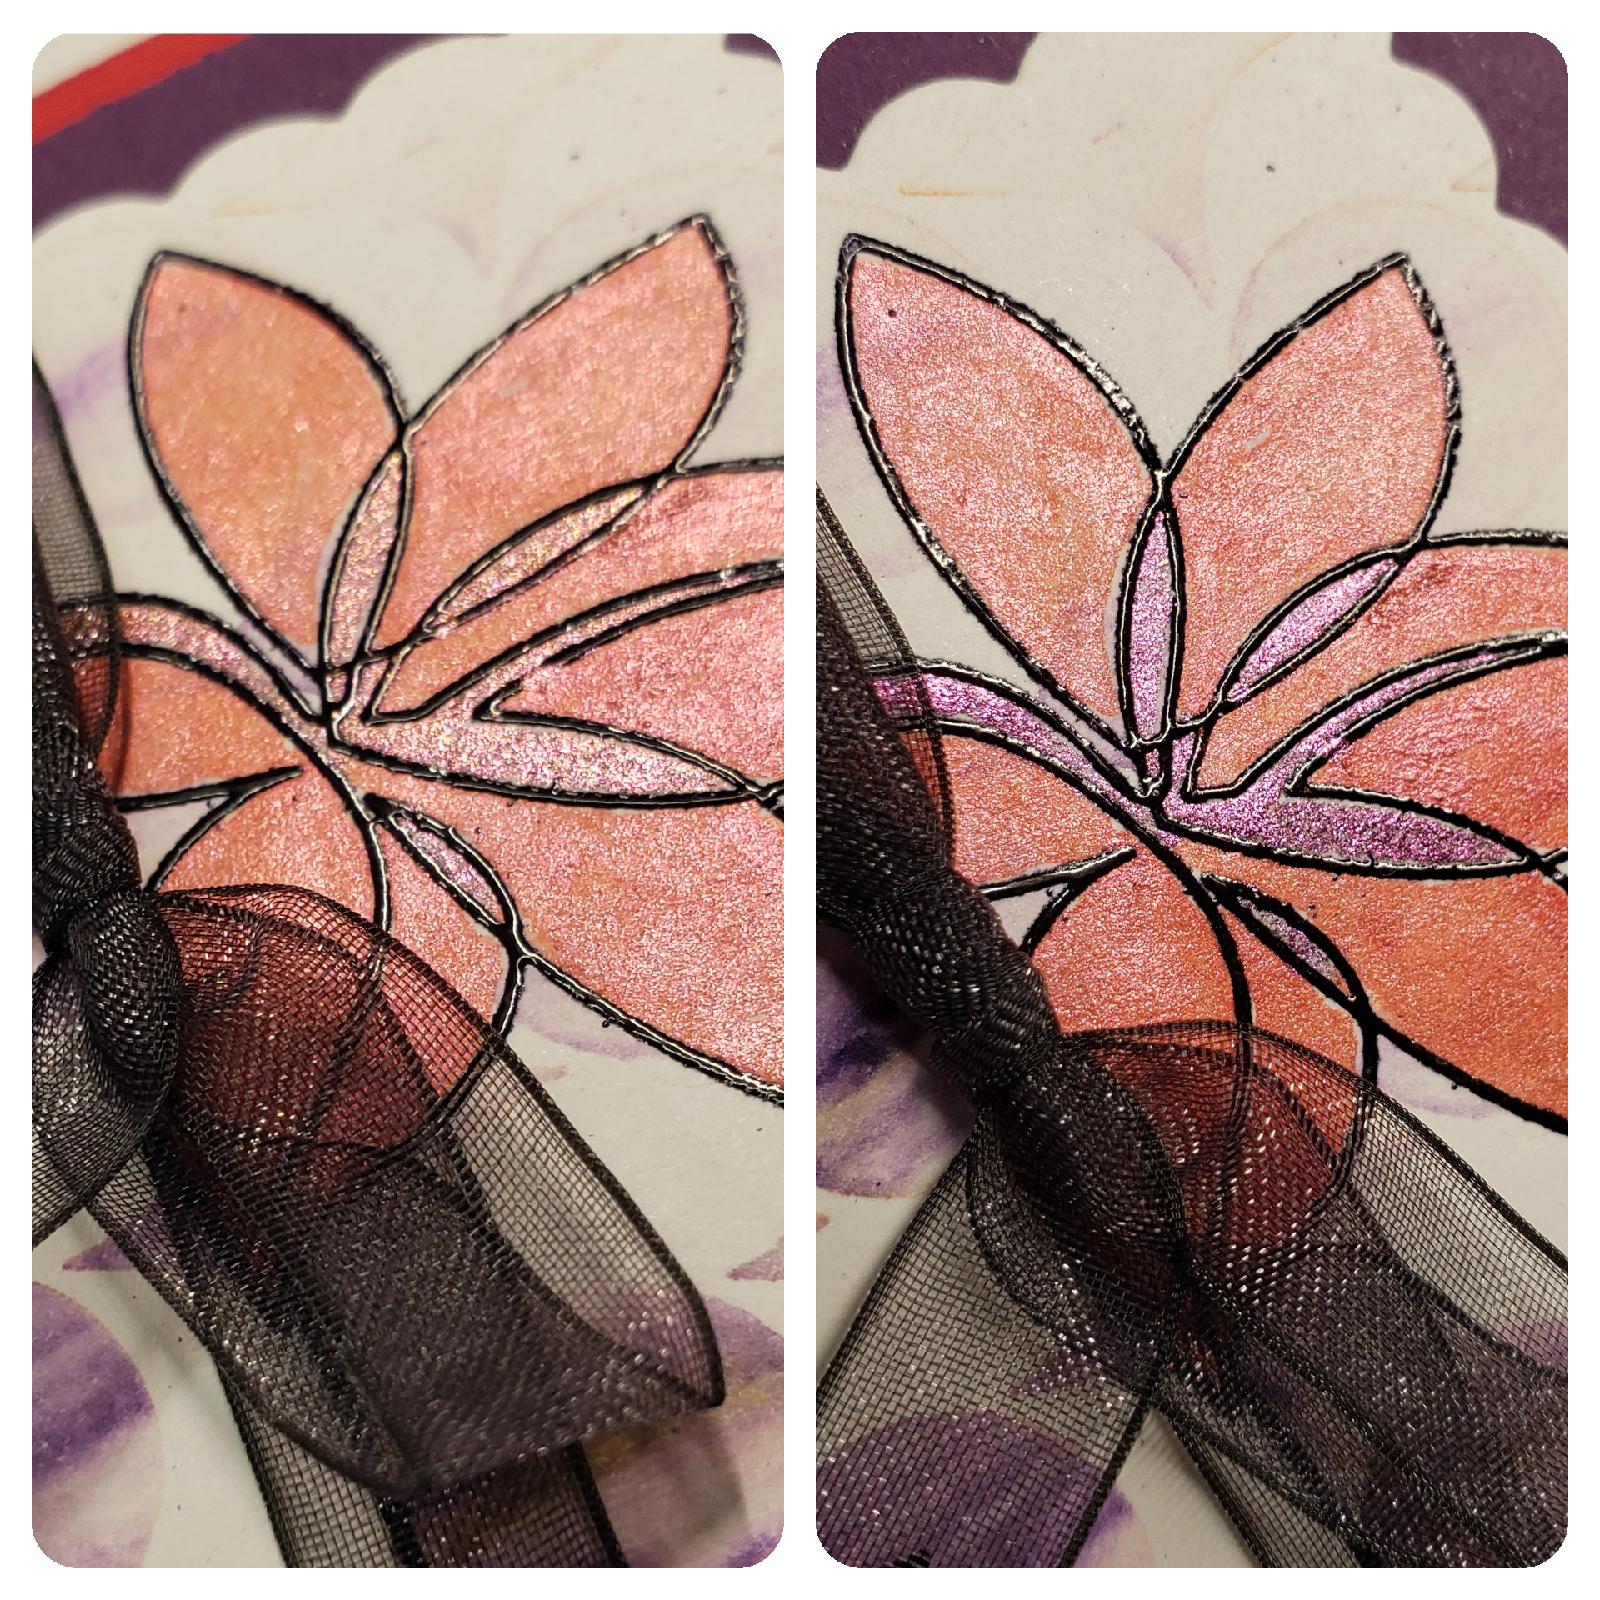
I have recently discovered shift watercolor paints. I am mesmerized by the way the color changes (shifts) as you move the cards so the light hits it at different angles. I painted the petals in Scarlet Red very fine glitter watercolor and in the areas that overlap, I used a color shift paint called Oil Slick.
You can see the how the color shifts from a rusty pink to a purple in this photo.  I think it adds just the right amount of interest to this card
I die cut the panel with a scallop edge border die and tied a thin black organza ribbon in a bow around this layer.  I attached this to a layer of dark purple cardstock and attached these two layers to a red A2 card base to complete the card.

Here are The Rabbit HoleDesigns products used in this card:

One Line Flower Stamp set


I hope you enjoyed this Be-you-tiful Floral Shift card featuring the One Line Flower stamp set.      


Be Creative ~ Stay Inspired

Jenn Gross


Follow me, Journey Coach Jenn, on 

Instagram - https://www.instagram.com/journeycoachjenn/

YouTube - http://www.youtube.com/c/JourneyCoachJenn

Blog - http://www.journeycoachjenn.com/


For more inspiration, updates, and news make sure to check out these places


The Rabbit Hole Designs

The Rabbit Hole Designs Instagram

The Rabbit Hole Designs Facebook Page

The Rabbit Hole Designs Pinterest

The Rabbit Hole Designs YouTube