Pages

Showing posts with label Caffeinated Boxer. Show all posts

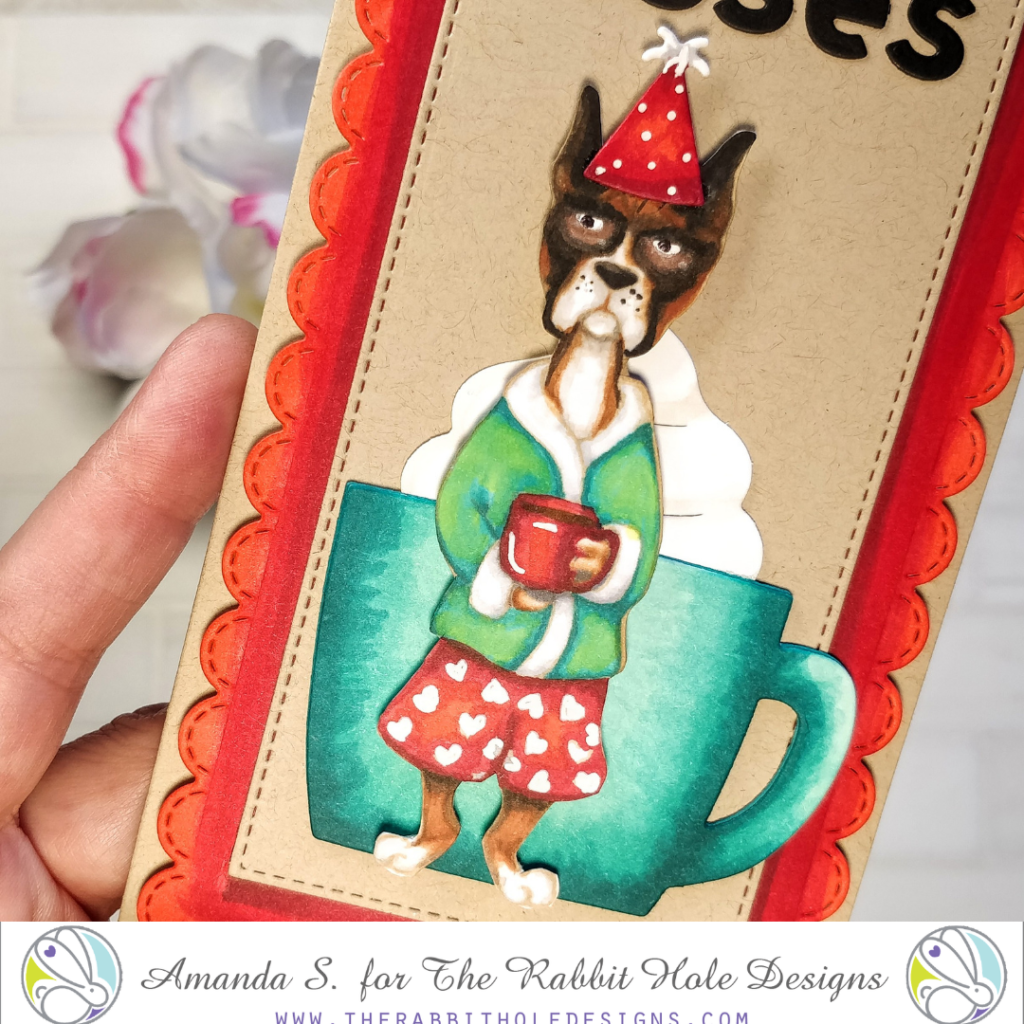
Birthday Wishes and Coffee Kisses


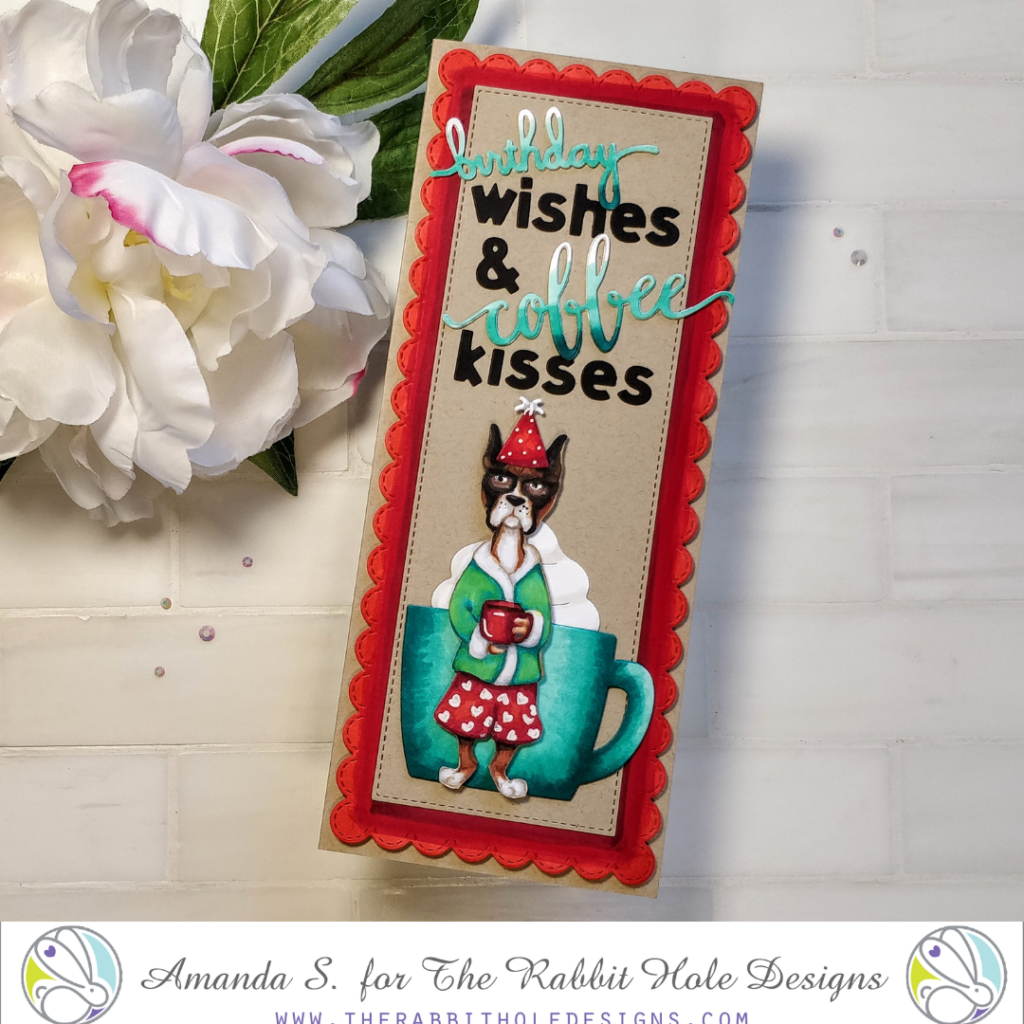
Hello my crafty friend! Amanda from Pear Blossom Press here again. As the year comes to a close, I'm wrapping things up with a fun birthday card. I made this slimline card for my coffee-loving nephew. It's hard to believe he's 23 now; seems like just yesterday he was a little boy. He still has the same cute smile though.

Originally, I was going to hide the Caffeinated Boxer behind the coffee mug, and reveal him with a pull-tab, but since I stacked the cursive words in the sentiment, I was afraid he'd get caught as he pulled up. I actually think I like it better this way though. You get to see all of the dog, instead of only the top half.

To begin, I stamped the Caffeinated Boxer with Warm Glow ink and Copic colored him for a no-line look. I used my ScanN'Cut to fussy cut him, leaving no border. I shopped my stash for the dies to create the sentiment and other layers of the card.

One of my favorite tricks is die cutting shapes from white cardstock and coloring them myself. You can start with light colored cardstock and use your markers to add shading too (this saves you a little time and ink), but I often cut from white. This way I can really control the highlight color, and I don't have to dig for the right colors of cardstock.

Once I Copic colored my die cut mug, whipped cream, party hat, cursive sentiments, and scalloped border pieces, I started assembling the card. In addition, I die cut the rest of my sentiment from black cardstock, and the card base and top layer from kraft stock.

For extra dimension, the mug is stacked four layers high, with the whipped cream sandwiched in between. The cursive words are stacked three layers high. I popped the boxer up with foam tape, and there is another layer of foam between the kraft and scalloped panels too. I didn't add any glitter or gems because I didn't want the card to feel too feminine. I was already pushing things with the scallops; remember, this card was for my nephew.

He loves the card, and I do too. I hope I've inspired you to give it a try. Of course, you can substitute any of the Caffeinated Critters for the focal point of your card, but I thought my nephew would really like the boxer. Which is your favorite?

Thanks for stopping by today. I'll be back soon with more fun cards to share. You can head over to my blog at pearblossompress.com for a complete list of supplies I used. Until then, happy holidays, and I wish you a safe and healthy new year. (Just think, this time next week, we can say hindsight is 2020!)
For more inspiration, updates, and news make sure to check out these places.


Coffee Lovers Blog Hop

Hello and a well caffeinated welcome...
DT member Jannie here and I am so excited for you to accompany us as we join up with the Coffee Loving Cardmakers  for their Fall/Winter Coffee Lovers Blog Hop. I am joining in as part of The Rabbit Hole Designs. This is our second time joining them and we are happy to announce we are Super Sponsors for this event. For the duration of the Coffee Lovers Blog Hop, The Rabbit Hole Designs will be offering specials ...
We are offering 15% off everything in the Caffeinated section of the shop!
Use Code: FALLBREW at checkout.
You can shop for all of the Caffeinated Critters HERE
So, now I'll show you the caffeinated critter I chose to use.... the BOXER!
His expression just cracks me up so much!  I mean, LOOK at him!  I decided to make him into a Christmas card by coloring heavy on the red and green and changing his sentiment a bit.  I used the script font from the "Love You More" set.  I'm still giggling at this silly pup. 

Make sure you come back tomorrow to see Michelle Bala sharing more Caffeinated Critters. Make sure you also head over to CLC Fall/Winter Blog Hop to link up to win some awesome prizes. The hop goes through November 8th.

See ya all soon! Toodles!

Joyful Boxer


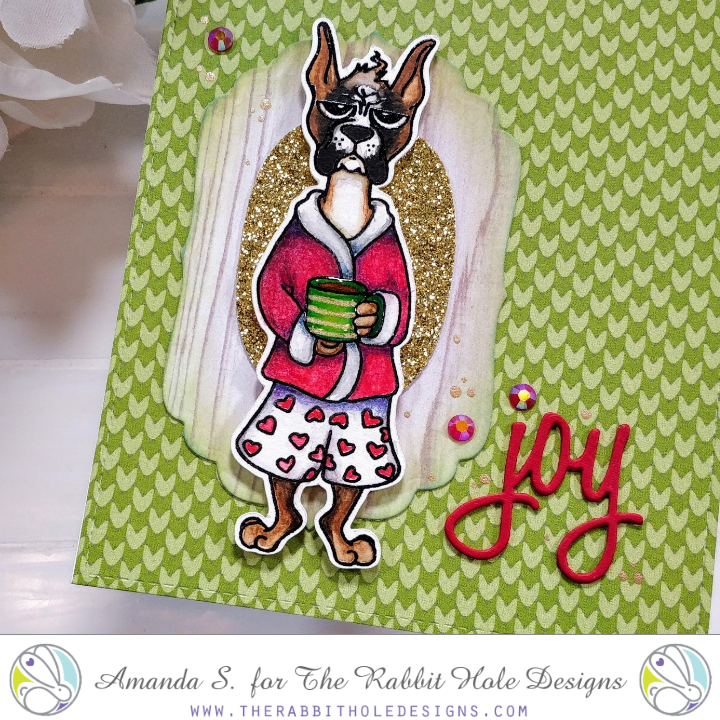
Hello again my crafty friend, it's Amanda from Pear Blossom Press again. I'm back with a fun new Christmas card featuring the Caffeinated Boxer. I took this image with me to Kathy Racoosin's coloring class, and I have to admit, I got help from the teacher on this guy ;) Because I simply love the way he turned out, I wanted to keep the focus of the card entirely on him.


Once I had him stamped, die cut and watercolored, Kathy showed me how to add in shading and sharpen up some of the details using color pencils. She encouraged us to be fearless and randomly color pluck. She also suggested that we use different colors for the shading, not just darker versions of the same color. So if you look close, you'll see that the shading on his red coat and the top of his boxers is purple. I never would have thought of that on my own. Now my pencil work isn't as smooth as Kathy's; it's going to take a lot more practice, but I'm working on it. And I'm getting ready for her next 30 Day Coloring Challenge that starts on November 1st. One of these days, I'll be good at it.

Have you had the chance to play with any of the new caffeinated critters from the last release? They are adorable! I love that the Caffeinated Boxer is wearing a pair of boxers! He cracks me up! And I love that he has a coordinating die; it makes life so much easier. For more inspiration, head on over to my blog, where you'll find the sister article to this post and a whole lot more! I'll be back soon with more fun cards to share.

Ruff Morning?


Good Morning crafty friends!

Welcome back for some coffee loving inspiration. Echo here down the rabbit hole. Do you have ruff mornings? There are days I certainly do. This boxer is my spirit animal for sure. I love this new addition to the coffee critter line up. You can find him here. I thought it would be fun to back a scene with him standing in front of a window with the sun shiny bright through the window and the boxer looking not very happy about it!

Here's how I made this card.


Stamp image on Copic friendly paper with Copic friendly ink. Color with Copic markers.


Fussy cut.


Die cut window. Then I colored the die cut window with a Copic marker. E59 walnut


Die cut a wood panel and a piece and piece of patterned paper. 


Cut a panel of white card stock to fit behind die cut window.


Mask of the bottom a bit to add grass later. Ink blend sun rays on white window card panel.


Move mask up and mask off the sun rays. Ink blend grass.


With a Copic marker- E59 walnut color die cut wood veneer paper. No need to do all just the little bit that will be showing.


I cut another strip of the wood veneer paper and colored it. Stamp sentiment in VersaMark and emboss with white embossing powder. 


Cut a piece of vellum for window. Assemble window panels and die cut card panels. Add to card base. Add caffeinated boxer with foam tape.


​For further detail head over to my blog 

  For more inspiration, updates, and news make sure to check out these places.


Thank you so much for stopping by!
Stamp on- Echo


Howl you doin, Therm-o-Web?

Morning Rabbit Hole fans!
We are collaborating with Therm-o-Web this week and sharing how we incorporate crafty items into our own designs using The Rabbit Hole Designs stamps. I hope you are able to fit these ideas into your own creations! There are also some prizes to win!!!
  Image may contain: text

Using our favorite boxer for this project available at Simon Says Stamp and at The Rabbit Hole Designs stores.
T
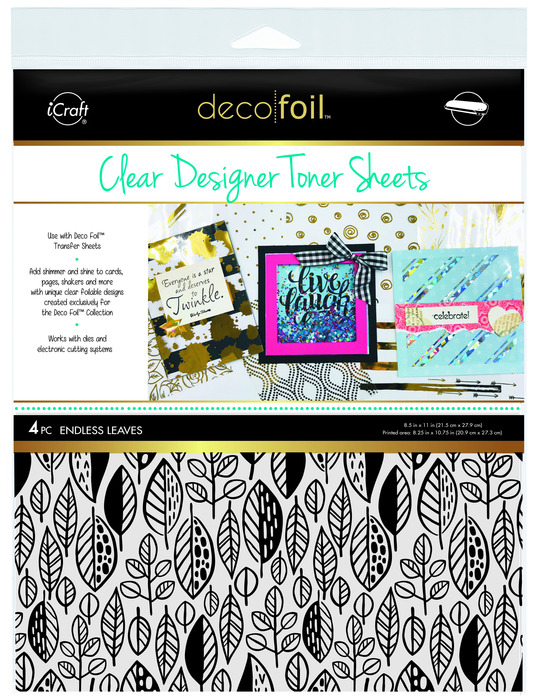
These are clear designer toner sheets. You get 4x A2 sheets in each pack and can be cut accordingly. This is similar to acetate, but already with an image printed on.

To color the toner sheet, choose a Deco foil transfer sheet color that will match your project. I used Emerald watercolor today. Links are on the images.


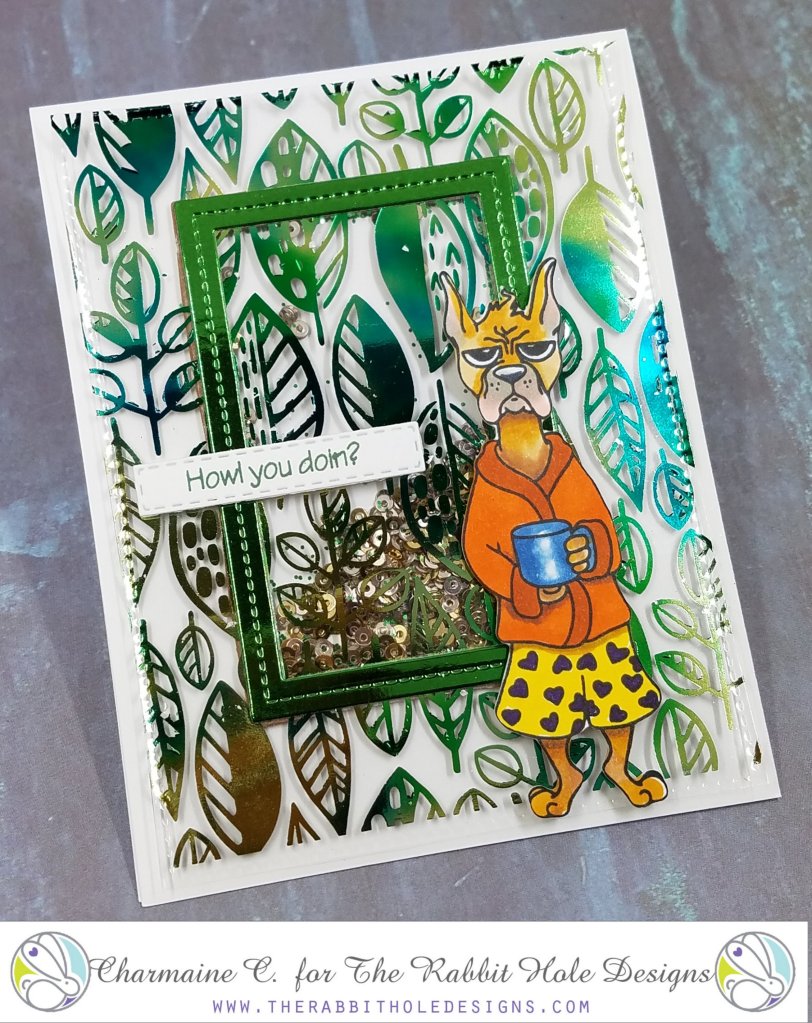
Here is how I made this Boxer shake:
*
**Switch on your laminator!***

1. Stamp, cut and color Boxer. I used Copics to color.
2.  Stamp and cut the sentiment.
3. Use a frame die to make the actual shaker part.


4. Cut the clear designer sheet to 4 x 5.25. You can also use a stitched die.
5. Cut a piece of transfer sheet big enough to cover the clear designer sheet.
6.  Following the instructions on the packaging, feed the sheet and toner sheet through a hot laminator. The "black" picks up the green and all the shine!
7. Adhere the frame to the designer sheet on top.
8. Apply foam tape underneath the sheet and frame. The frame hides the foam tape.
9. This is a top folding 4.25 x 5.5 card. Place sequins/shakers on top of the card and finish the shaker.
10. Apply the dog and sentiment, and you are done in 10 steps!
Hope you liked my card and all the elements I used from Therm-O-Web. These Clear Designer Toner Sheets are amazing and very easy to work with. I hope you will give it a try!
  For more inspiration, updates, and news make sure to check out these places.


Leafy kisses!
Charmaine
Follow me at www.facebook.com/charcards2017


Ruff Life

Hey, Hey!  What did you think of our inspiration hop and new goodies?  I sure had fun playing with them!  Well I have another card today using those now products.  


I think this card says it all!  Life is rough before coffee, no matter what day of week it is!  The boxer and the sentiment get Oscar for sure, but that paper get's best supporting actor. LOL

I made this card by:

  • Stamping my image on Copic friendly paper and coloring it with my Copics. I used my 0 blender to make the edges of the robe look fluffy like terry cloth. 
  • You'll notice that next, I used my gold gel pen to make his boxer shorts a bit sassy. 
  • After it was dry (not to smudge the gel pen), I fussy cut it out and put it aside. 
  • Next, I pulled out this DP from Echo Park and I die cut it using my Wonky Stitches die.  
  • I brushed the edges with a blue distress ink and then I adhered it to my base. 
  • Next, I cut the red CS and my white smaller.  I stamped the sentiment on my white and adhered that to the red, which I adhered to my DP. 
  • Lastly, I added my pooch into the scene with some foam tape. 
Here is one more look:


So, do you love the latest release and all the caffeinated critters?  What is your fave stamp/set?  I am not sure I can chose.

Don't forget you can now get these stamps in the shop and at Simon Says Stamps as well. 

Thanks for visiting and head on over to my blog for a list of supplies.  Have a fantastic day! ~Katie


For more inspiration, updates, and news make sure to check out these awesome places!