Pages

Showing posts with label clouds in my coffee. Show all posts

Head in the Clouds - Interactive Valentine Swing Card


Hello crafty friends!  Jenn Gross here, with and interactive card using stamps and stencils from The Rabbit Hole Designs, You can also find my projects on IG under @journeycoachjenn.  It seems that love is in the air and in the clouds!

Today I am sharing aninteractive Valentine card.  This swinging cupid card is created with The Rabbit Hole Designs' Cupid Clarence stamp set (a Dusting Pike illustration) I used Cottontail Blending Brushes,  Clouds in my Coffee stencil paired with the radiant die from the You've Been Framed die set for the background.

Let's take a look at how this card is created:
A - I stamp the Cupid Clarence image twice.  I colored the head of one of the images  and the body of the other image using blue violet (BV) Olo Markers.   I fussy cut the colored head and body, leaving about 1/2" of paper above the neck of the body piece to attach Clarence's head with a foam square.  I angle the head at a slight upward angle and secured it to the body.

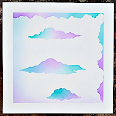
B - I randomly ink blended a cloud background with the Clouds In My Coffee stencil using Cotton Tail Blending Brushes. and Victorian Velvet, Spun Sugar, Kitsch Flamingo and Wilted Violet Distress Oxide ink on a 4" x 5 1/4' piece of white cardstock.

C & D - Using a standard hole punch, I added a hole 5/8" below the top center of the card front.  I positioned the radiant die from the You've been Framed die set about 1/2' below the hole and die cut the design. 
E - I used the standard hole punch to add a hole on each end of a 2' x 1/2" strip of clear acetate. This will be used for an interactive swing bar.

F - I added small jump rings to  the back of  Clarence's envelope and on the bottom of Clarence's shorts to add a small bit of weight for balance. The jump rings are attached with redline tape and a small piece of paper is glued over the top to secure the jumb rings into place.  I used Gem-Tack adhesive to attach a slider snap on side of the back of Clarence's arrow hand. 

G & H - I let the snap dry in place and attached one hole at the end of the acetate strip over the snap on Clarence's hand and snapped it in place. I snapped the other end of the acetate to the hole on the top of the card and tested the swing movement.  I removed the snap and acetate from the top card hole so I could stamp the sentiment at the bottom of the card.
I & J - I snapped the acetate swing bar to the top of the card front  I used a small cloud die cut from my stash to die cut a cloud to hide the snap attachment at the top of the card.  The cloud is placed over the snap with thick double-sided adhesive foam tape on each side of the cloud.  This space allows the acetate bar to swing freely.

K - I attached the card front to a lilac A2 card base using  double-sided adhesive foam tape completing this fun interactive card. 

Products Used

Thank you, I appreciate you taking time from your day to stop by and check out today’s interactive Valentine card featuring The Rabbit Hole Designs' new Cupid Clarence stamp set.  I hope you are inspired to create something lovely today!


Be Creative ~ Stay Inspired

Jenn Gross


Follow me, Journey Coach Jenn, on 

Instagram - https://www.instagram.com/journeycoachjenn/

YouTube - http://www.youtube.com/c/JourneyCoachJenn

Blog - http://www.journeycoachjenn.com/


For more inspiration, updates, and news make sure to check out these places


The Rabbit Hole Designs

The Rabbit Hole Designs Instagram

The Rabbit Hole Designs Facebook Page

The Rabbit Hole Designs Pinterest

The Rabbit Hole Designs YouTube


Coffee Buzzed


Hello my crafty friends!  Welcome to my 1st blog of 2021!  I am buzzing by to share this fun coffee card featuring The Rabbit Hole Designs; Clouds In My Coffee Stencil along with Caffeinated Bee and Sassy Sentiments stamp sets.


I stamped the  bee in yellow ink and colored it with a combination of TriBlend and Copic alcohol markers. I added Liquid Pixie Dust to the purple eye shadow and the blueish wings.


I used the Clouds in my Coffee Stencil and the Cotton Tail Blending Brushes to blend the clouds in pastel Distress Oxides inks on a piece of 4" x 5 1/4" white cardstock.  I used a honeycomb die in my stash to die cut a couple of openings in the card front.  I stamped the sentiment "Does this coffee make me look productive?" on the card front. I cut a layer of black cardstock measuring 4 1/8" x 5 3/4".  I  used and liquid glue to attach the card front to the black cardstock layer.


Here are The Rabbit Hole Design products used in this card:

 Clouds In My Coffee Stencil

Caffeinated Bee stamp set

Sassy Sentiments

Cotton Tail Blender Brushes


I hope you enjoyed this Coffee Buzzed Bee card featuring the Clouds In My Coffee Stencil along with Caffeinated Bee and Sassy Sentiments stamp sets. I love to hear from you. Let me know what are you looking forward to in the new year?  Me, I hope to be traveling and able to visit with friends


Be Creative ~ Stay Inspired

Jenn Gross


Follow me, Journey Coach Jenn, on 

Instagram - https://www.instagram.com/journeycoachjenn/

YouTube - http://www.youtube.com/c/JourneyCoachJenn

Blog - http://www.journeycoachjenn.com/


For more inspiration, updates, and news make sure to check out these places


The Rabbit Hole Designs

The Rabbit Hole Designs Instagram

The Rabbit Hole Designs Facebook Page

The Rabbit Hole Designs Pinterest

The Rabbit Hole Designs YouTube


Clouds in my coffee...

Hola Crafty Friends! Amy here and I'm so excited to share a card with you today featuring the Blended Sentiments 2 Stamp set and the Clouds In My Coffee Stencil from the November 2020 Release at The Rabbit Hole Designs


It's so hard to pick a sentiment when you have so many like this to choose from!


For this card I was really inspired by the name of the stencil Clouds in My Coffee, so I used that as the inspiration to create my card. For this card I did some actual drawing to create the coffee cup because I didn't have any stamps or dies that fit the look I was going for. 


I essentially drew the shape of the coffee cup and masked around all over the card to create the sky and the gradient on the coffee cup itself. For the Sky I used the negative pieces of the cloud stencil and ink blended around them to leave the center portions white. I then mirrored the same clouds as a reflection in the coffee and ink blended with brown inks to create the coffee itself. 

I then chose a very fitting sentiment from the Blended Sentiments 2 set and angled it so that it fit the contour of the coffee cup shape. I attached the panel to the card base and that's it, a sassy and snarky caffeinated card to share with a love one. 


Thank you for checking out my project today. I hope that you enjoyed it! Be sure to check out all the items from the new release as well as all the other fabulous products that The Rabbit Hole Designs carries. You can follow this link HERE to see their whole product line. 


Thanks for stopping by!
If you want to check out additional information on the products that I used to create this card you can visit my blog at amyswares.com 

-Amy


For more inspiration, updates, and news make sure to check out these places.