Pages

Showing posts with label Pear Blossom Press. Show all posts

Make a Wish - a new interactive birthday card surprise!

How crafty friends, Jenn here with an bright and cheery interactive birthday card featuring The Rabbit Hole Designs'  Pinwheel stencil and Sentimentaly Speaking stamp set with coordinating dies both from the June Release. I paired it with the Cupcake image from the Year 4 Birthday stamp set.

TRHD Supply List
Year 4 Birthday stamp set 

Other Supplies
Candle Light Pear Blossom Press 
World's Best Foam Tape 
Zero Centered Ruler 
OLO Markers
Distress Oxide inks 
White Embossing Powder
Using the Cottontail Blending Brushes I blended the Pinwheel  background on a piece of 4" x 5 1/4 Oceanside cardstock using Salvaged Patina, Salty Ocean, and Uncharted Mariner Distress Oxide inks.  I am using the new Candle Light interactive blow-out candle by Pear Blossom Press to create the interactive component.  The cupcake image is colored with OLO Markers. The sentiment is created by treating a piece of Sweet Pea cardstock with the Cottontail Embossing Powder Tool. The sentiment is the word Birthday and Wishes is heat embossed with white embossing powder and then die cut with the coordinating dies.
I positioned the cupcake image and Candle Light on the card front to locate the placement. I use a no-photo blue pencil to mark important areas, 1) where the candle flame will light up and 2) the hole needed for the action to blow out the candle flame. I glued the cupcake  onto the card front with liquid glue. I created a die placement template by die cutting the top 1/2 of the small flame (from the PB Press Stamp & Die set) onto a small piece of scrap cardstock This template helps to position the tiny flame die in place. I secure the die with low tack tape and die cut the flame.
 I punched a small hole in the right side of the candle for the small activator to turn off the light. Turning the card front over to the backside, I glue a small piece of yellow vellum over the flame. I lined up the candle light and created a double thick foam channel to slide the light into position. I removed the release paper and cover the channel with a piece of cardstock.  This channel allows the candle to slide into position and helps guide the air you blow at the candle light to extinguish the candle flame.
I framed out the card with The World's Best Foam Tape. I also creating a door opening in the pink card base allowing you to change the battery if needed.  I use a zero centered ruler and the blue pencil to mark the location for the hidden door. 
After die cutting the hidden door, I removed the release paper from the foam tape and centered the card front onto the card base.  I folded a small bit of washi tape over the bottom flap of the door for easy battery changing access.
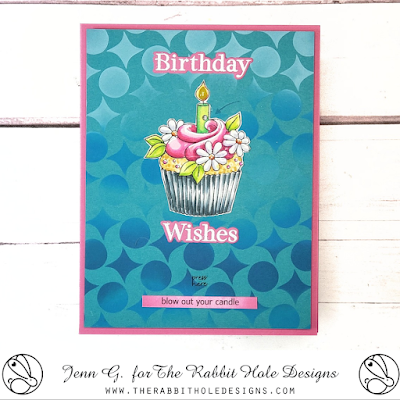
I stamped the words "press here" in black ink over the candle''s on button.  I typed and printed out the sentiment "blow out your candle". It is ink blended it in pink ink and glued to the card front.

Make sure to visit my Instagram - @journeycoachjenn to see this card in action!

Thank you for stopping by to check out this fun Rabbit Hole Designs interactive blow out candle Birthday card. I hope you are inspired to create something lovely today!

Be Creative ~ Stay Inspired

Jenn Gross


Follow me, Journey Coach Jenn, on 

Instagram - https://www.instagram.com/journeycoachjenn/

YouTube - http://www.youtube.com/c/JourneyCoachJenn

Blog - https://journeycoachjenn.blogspot.com/  


For more inspiration, updates, and news make sure to check out these places


The Rabbit Hole Designs

The Rabbit Hole Designs Instagram

The Rabbit Hole Designs Facebook Page

The Rabbit Hole Designs Pinterest

The Rabbit Hole Designs YouTube


Mountain View, Creating a Light up Card


Hello crafty friends! It's Lauren here today.
One of my favorite memories of when I lived near Seattle was watching the sun "wink out" as the sun set behind the mountains. It was so pretty. I was reminiscing about that memory as I created my card that features the new Let's Wander stamp set illustrated by Agota Pop.

You can watch me create my light up card in this quick video here:


Adding a light up element to your cards is so easy and really add something special!  I love the way this card came out and the memory that inspired it! I've linked the stamp set I used, below. Thanks for visiting! 

I use affiliate links when I can. This does not add any extra cost to you, but I do receive a small commission which helps keep me creating.
Thank you for visiting!

Let's Wander Stamp Set, The Rabbit Hole Designs: https://shrsl.com/4kaeg


Perfect Balance - Light Up Birthday Card


Hello crafty friends!  I am super excited to be back with this fun interactive light up card. I have been taking a break from crafting to allow my eye to heal.  I had eye surgery for a detached retina. It is healing well, but may still take a few more weeks to get the total focus back.

Today I am sharing a card I made for The Rabbit Hole Designs April release. I using the Namaste stamp set with coordinating dies paired with the Year 4 Birthday stamp set (by Agota Pop) 
I stamped the the Namaste yoga sheep and colored it with Red and Red Violet OLO markers. I am using it for the cupcake frosting.  I created a mask to cover the yoga sheep and stamped the cupcake from the Year 4 Birthday stamp set and colored it with Blue Green OLO markers. I fussy cut the cupcake image and I added a clay candle to the sheep's back.
I positioned the cupcake image on 4" x 5 1/4" to find the placement for the candle flame and the sentiment. I secured the small candle flame die and cutting out using the PB Press Stamp & Die set.  I added the sentiment to the card front.  I turned the card front over a d glued a small piece of yellow vellum behind the candle flame window.  I positioned the One Light behind the flame and marked where the button placement is on the card front. Using the PB Press Stamp and Die set, I stamped a starburst over the area marked for the button placement on the card front.  I added double thick double sided foam tape to frame out the one light and back of the card front.  I attached the card front to a pink A2 card base and attached the yoga cupcake to complete the card.

TRHD Supply List


Thank you, I appreciate you taking time from your day to stop by and check out today’s The Rabbit Hole Design light up card. I hope you are inspired to create something lovely today!


Be Creative ~ Stay Inspired

Jenn Gross


Follow me, Journey Coach Jenn, on 

Instagram - https://www.instagram.com/journeycoachjenn/

YouTube - http://www.youtube.com/c/JourneyCoachJenn

Blog - http://journeycoachjenn.blogspot.com/ 


For more inspiration, updates, and news make sure to check out these places


The Rabbit Hole Designs

The Rabbit Hole Designs Instagram

The Rabbit Hole Designs Facebook Page

The Rabbit Hole Designs Pinterest

The Rabbit Hole Designs YouTube

Bewitching Tag


Hey crafty friend, it's Amanda from Pear Blossom Press again, and today, I'm sharing a fun Halloween treat with the cutest little tag. Isn't she bewitching?

I stamped the witch and bottles from the new Spellcaster Witch set, then drew in my own background around her. For someone who doesn't draw, I think it came out pretty good. Want to see exactly how I drew it? (It was actually very easy.) Head on over to my blog for step-by-step instructions... pearblossompress.com 


Thanks for stopping by today. I'll be back soon with another fun project to share.

For more inspiration, updates, and news make sure to check out these places:

The Rabbit Hole Designs
The Rabbit Hole Designs Blog
The Rabbit Hole Designs Instagram
The Rabbit Hole Designs Facebook Page
The Rabbit Hole Designs Pinterest
The Rabbit Hole Designs YouTube

Light Up Halloween


Good morning! It's Lisa here with you today and I am up on the
 blog with a fun Halloween card for you!
You've got to love a holiday that says......"It's ok to combine orange and purple with each other!"
You wouldn't think that these colors would look good together but I just love them
blended next to each other! Maybe it's that they are so opposite, they do say opposites attract!
Anyway, I just love the color combination and I love the way this card turned out!


The best part about this card is the light up pumpkin!
I used the EZ Lights by Pear Blossom Press.
These lights are super easy to use and make easy work of making light up cards!
They consist of one battery pack attached to 3 mini lights.
I placed the 3 lights under the pumpkins eyes and nose.


Here is a quick recipe for my card:

1) I used a Wavy Wonky Rectangle die to cut a panel out of Bristol Smooth 
card stock. (I love this paper for blending Distress Oxide Inks)

2) Blend Distress Oxide inks: Carved Pumpkin into Spiced Marmalade on the bottom and
Wilted Violet into Shaded Lilac at the top. Next I spritzed the panel with water and 
dried it to give my background a distressed look.

3) Stamp Happy Halloween from the "Boo To You" stamp set in black
ink at the top of the panel and add the little spider around the words.

4) Add a grassy border at the bottom of the panel to ground your card.  
I also sponged the top of the grass with dark green ink to give it a little depth.

5) Stamp the pumpkin image from "Hey Gord-geous" in hybrid black ink
and color with Copic markers. I added Gina K Glitz Glitter Gel to
hat, eyes and mouth for a little sparkle. Die cut pumpkin with matching die.

6) Lastly tape the EZ Light battery pack to a piece of black cardstock measuring
5 1/2" x  4 1/4" and place foam tape all over panel avoiding battery pack.
I placed my battery pack on the bottom left of the card
and threaded the 3 lights up through the bottom right of the main panel. I adhered the
3 small lights to the back of the pumpkin behind the eyes and mouth. I placed my pumpkin on foam tape to leave room for the lights and then I adhered the main panel down to the black panel.
Press purple button on battery pack and prepare to be amazed!


** I added a small half circle over the battery pack and hand wrote
"push here" however there are stamp sets available that already have these sayings.


This card was so much fun to make and the EZ lights make quick work of light up cards!
In no time you can have a fun interactive card that will amaze your recipient!

Thanks so much for stopping by my blog today!
Don't forget that you can purchase The Rabbit Hole Designs products at

For a completed listing of supplies used with links please head to my blog


For more inspiration, updates, and news make sure to check out these links.


Have a great day, I already am!
🎃Lisa 🎃