Pages

Showing posts with label sassy sentiments. Show all posts

HB - Maybe Swearing Will Help

Hello my crafty friends!  Are you feeling sassy? I am and I have created this The Rabbit Hole Designs bright birthday slimline to show it. 
    
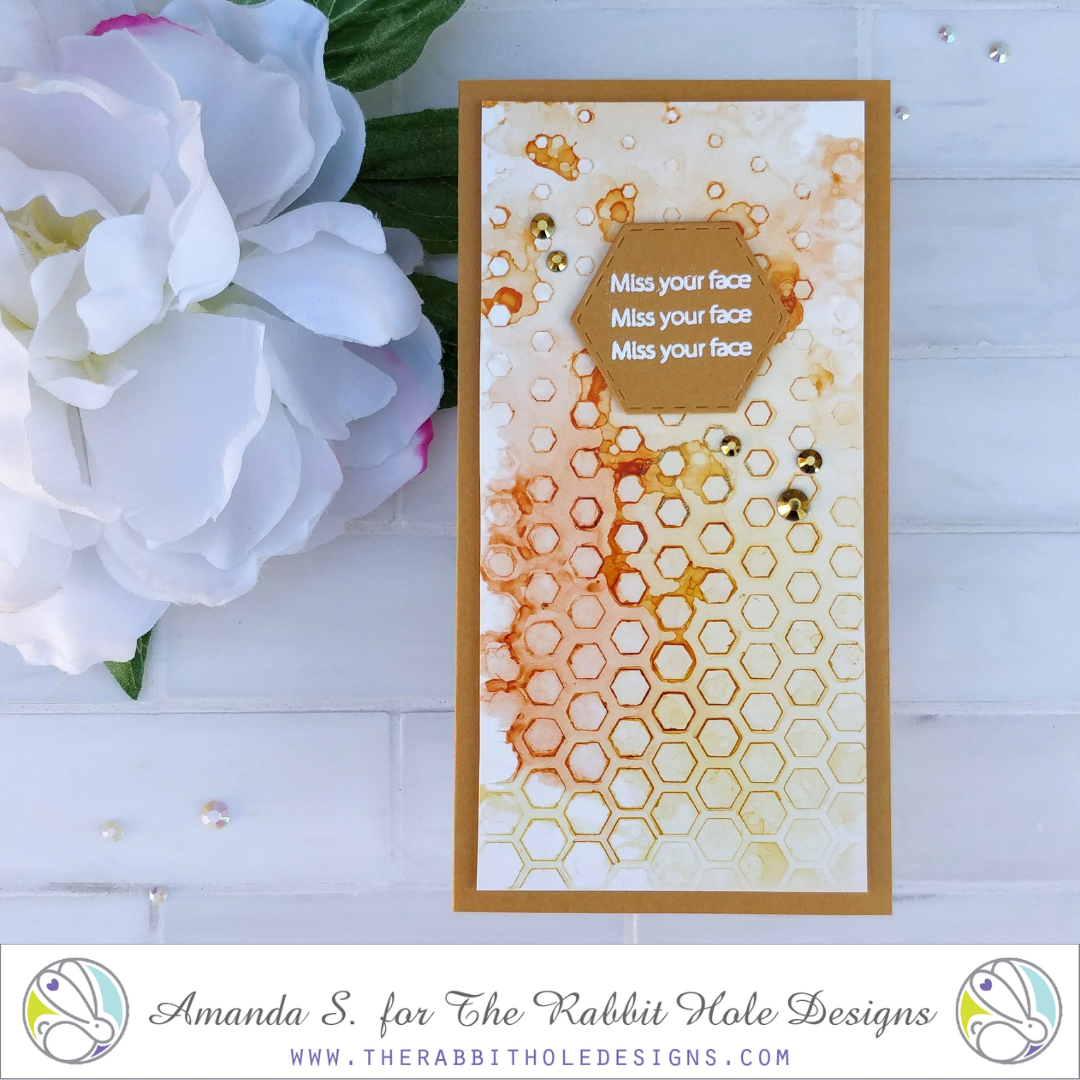
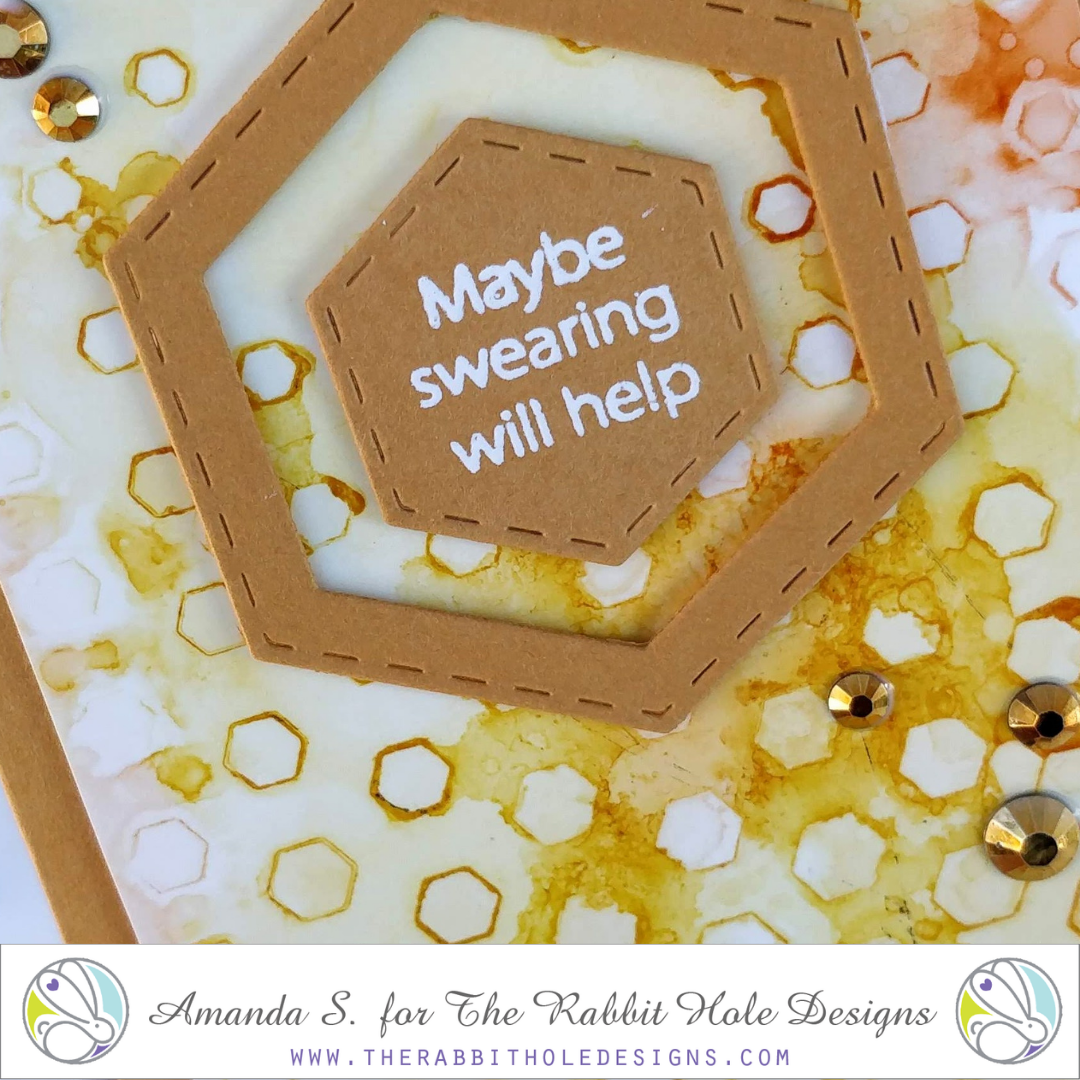
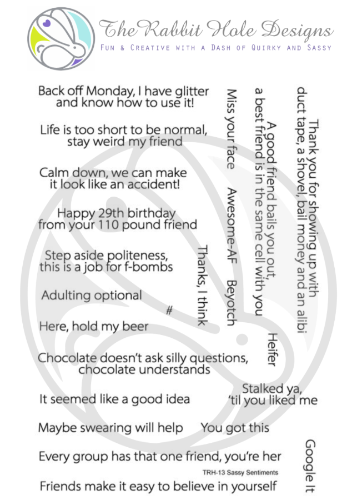
The Scripty Happy Word with Shadow die and the Scripty Birthday Word with Shadow die sets are used to create the eye-catching sentiment. The background is made from several rainbow colored Candy Twist die cuts and glued into a rainbow pattern. The small sentiment, "Maybe swearing will help", comes from the Sassy Sentiment stamp set.  I choose  to heat embossed it with white embossing powder on black cardstock. 
You can see how easy this card is to assemble this card once all the pieces  are die cut and heat embossed. the card front is layered on a piece of black cardstock and then attached to a white slimline card base.

The Rabbit Hole Design Products 

I hope you enjoyed this Maybe Swearing will help bright and sassy card featuring the products from The Rabbit Hole Designs.  Please feel free to leave me a comment or let me know if you have any questions.


Be Creative ~ Stay Inspired

Jenn Gross


Follow me, Journey Coach Jenn, on 

Instagram - https://www.instagram.com/journeycoachjenn/

YouTube - http://www.youtube.com/c/JourneyCoachJenn

Blog - http://www.journeycoachjenn.com/


For more inspiration, updates, and news make sure to check out these places


The Rabbit Hole Designs

The Rabbit Hole Designs Instagram

The Rabbit Hole Designs Facebook Page

The Rabbit Hole Designs Pinterest

The Rabbit Hole Designs YouTube


Color Pop Mini Slimline


Hello my crafty friend! It's Amanda, from Pear Blossom Press again, and today I'm sharing a quick and easy card idea that requires no coloring! The frame around the sentiment, plus a few coordinating gems, add a pop of color that really jumps out at you from the bold, stencilled background. 

This card features the Cat Eye Stencil, and Sassy Sentiments Stamp Set. Head on over to my blog for all of the details, and a few extra tips for this style of card... pearblossompress.com.

Thanks so much for stopping by today. I'll be back soon with more fun cards to share. And don't forget, the new release comes soon. You're not going to want to miss a thing. See you then!

For more inspiration, updates, and news make sure to check out these places.


Meerkat alibi!

Hello crafty friends! Kimberly here with a fun card using The Rabbit Hole Designs Caffeinated Meerkat stamp set and coordinating die. I had so much fun making this card. 


I started out blending Speckled Egg Distress Oxide over the Clouds in my Coffee Stencil on white cardstock. Then, I wanted some texture so I added some texture paste over the full clouds in the center of the stencil on the ink blended cloud background. I put that to the side to let the paste dry. 

Next, I decided I wanted to make a bush/tree background using the Clouds in my Coffee Stencil, so I blended Gathered Twigs distress oxide ink and alternated it with Rustic Wilderness distress oxide over another piece of white cardstock. I cut the center out with an oval die and added foam tape to the back to pop it up on the blue cloud background. 

Next, I colored in my Caffeinated Meerkat with Copic Markers, die cut it out and added foam tape to adhere it to the card. I did fussy cut the image after die cutting it to remove more of the white border. To finish the card, I stamped two sentiments from Sassy Sentiments on strips of brown cardstock with embossing ink and heat embossed them with white embossing powder. I attached them to the card and adhered the card front to a brown cardstock card base. 

I hope I was able to inspire you to make something crafty today! Thank you so much for stopping by!
Kimberly

For more inspiration, updates, and news make sure to check out these places


The Rabbit Hole Designs

The Rabbit Hole Designs Instagram

The Rabbit Hole Designs Facebook Page

The Rabbit Hole Designs Pinterest

The Rabbit Hole Designs YouTube

Hippo Botanical with a twist

 Hello! Kimberly here with a different way to use Hippo Botanical from the new release. I just love the flower from this set and thought it looked really lovely with the new Amanda stencil. I may have an unhealthy obsession with foam tape. I need to pop everything up, so why not make the flower pop?


I started out blending Twisted Citron and Mowed Lawn distress ink through the Amanda stencil on watercolor paper. 


Next, I covered the whole panel with texture paste.


Once that dried, I die cut it down to 4" x 5 1/4" and started with my flowers.


I stamped and fussy cut the hippo flower, the flower and the three lily pad leaves from the Hippo Botanical set. I colored the flowers in using R27, R37, R39, YR12, and YR07. I colored the leaves with YG00, YG05, and YG09. 


Next, I assembled my card. I adhered the leaf panel to my card base and added a brown frame I had in my stash. I added foam tape to the smaller flower. I lined it up to just cover the hippo and added it to the bigger flower. Then I added my leaves and my flower to the card. I stamped out a sentiment from Sassy Sentiments on a strip of white cardstock and layered it over a piece of patterned paper. To finish off with a little sparkle, I ran my clear Wink of Stella over the leaves. I hope you like it! 

Thank you for stopping by!
Kimberly

For more inspiration, updates, and news, make sure to check out these places...


Stenciled Backgrounds with Alcohol Ink


Hello crafty friend, Amanda from Pear Blossom Press here again, and today, I'm sharing a pair of fun mini-slimline cards that feature a cool stencil and alcohol ink technique! 

Head on over to my blog, pearblossompress.com, for instructions on how to combine alcohol inks with the new Tastes Like Honey Stencil for awesome backgrounds! A few Sassy Sentiments pull these cards together. 

Thanks so much for stopping by today! I'd love to know what your favorite way to make backgrounds are. Let me know in the comments below. I'll be back soon with more fun cards to share. Until then, I'll see you on Instagram

For more inspiration, updates, and news from The Rabbit Hole Designs, make sure to check out these places...

Miss Your Face


Hello there! Michelle here, sharing a card I made for my daughter. She's been home from college since Thanksgiving and we've had so much fun! She returns to school in a few weeks until May and I anticipate missing her like crazy! I'll drop it in the mail two days before she leaves😢

I inked up Beautiful Disaster with black ink and colored her with Copic Markers and 
Prismacolor Pencils. I used Copic shades E00, E11, E13, E15, R05 (skin/ lips); C2, C5, C9 (hair); 
RV91, RV93, RV95 (sweater); E81, E70, E71, E74 (coffee).
I added some shading with Prismacolor pencils in shades 1093, 934, 929, 935, 945, 921 and 938.
I created a mask using a circle die cut and scrap paper than secured the mask over the card base. I inked up the circle with tumbled glass distress oxide ink than removed the mask.  I used Pumpkin Face Stencil and inked up the stars with cracked pistachio distress ink. Than, I splattered the background with black paint.
I fussy cut my young lady than adhered her to the card base with foam tape.
I embossed the sentiment, from the stamp set Sassy Sentiments. For a finishing touch I scattered some gems.

Thanks for stopping by for a peek!

Michelle


Watch out Monday, I'm comin' for ya!

Hi crafty friends! Thanks for stopping by today. Today's card is all about the grumpy and sassy Caffeinated Unicorn! Isn't she the best? This feels so relatable to me most mornings, not just Mondays!! 


This card is pretty clean and simple but it packs a sassy punch. I started by ink blending directly onto an A2 size card base. I ink blended through the Aim for the Stars Stencil also from TRHD.

I set that aside and stamped and colored in the hilarious Caffeinated Unicorn with my alcohol markers. I did fussy cut her out but there are coordinating dies available. 


For the sentiment, I chose one from the amazing Sassy Sentiments stamp set from The Rabbit Hole Designs. This is one of my most beloved and most used stamp sets. There are just so many good sentiments on that one!  


All that was left was to assemble the pieces. I popped the sentiment and the unicorn up on the ink blended card base. I used a corner chomper on the card base (and the sentiment) for continuity and to add a little extra interest. 


I hope that you enjoyed the card today! Wishing you an amazingly caffeinated day! Be sure to check out all the fabulous products and other caffeinated critters that The Rabbit Hole Designs carries. You can follow this link HERE to see their whole product line. 


Thanks for stopping by!
If you want to check out additional information on the products that I used to create this card you can visit my blog at amyswares.com 

-Amy


For more inspiration, updates, and news make sure to check out these places.


Coffee Buzzed


Hello my crafty friends!  Welcome to my 1st blog of 2021!  I am buzzing by to share this fun coffee card featuring The Rabbit Hole Designs; Clouds In My Coffee Stencil along with Caffeinated Bee and Sassy Sentiments stamp sets.


I stamped the  bee in yellow ink and colored it with a combination of TriBlend and Copic alcohol markers. I added Liquid Pixie Dust to the purple eye shadow and the blueish wings.


I used the Clouds in my Coffee Stencil and the Cotton Tail Blending Brushes to blend the clouds in pastel Distress Oxides inks on a piece of 4" x 5 1/4" white cardstock.  I used a honeycomb die in my stash to die cut a couple of openings in the card front.  I stamped the sentiment "Does this coffee make me look productive?" on the card front. I cut a layer of black cardstock measuring 4 1/8" x 5 3/4".  I  used and liquid glue to attach the card front to the black cardstock layer.


Here are The Rabbit Hole Design products used in this card:

 Clouds In My Coffee Stencil

Caffeinated Bee stamp set

Sassy Sentiments

Cotton Tail Blender Brushes


I hope you enjoyed this Coffee Buzzed Bee card featuring the Clouds In My Coffee Stencil along with Caffeinated Bee and Sassy Sentiments stamp sets. I love to hear from you. Let me know what are you looking forward to in the new year?  Me, I hope to be traveling and able to visit with friends


Be Creative ~ Stay Inspired

Jenn Gross


Follow me, Journey Coach Jenn, on 

Instagram - https://www.instagram.com/journeycoachjenn/

YouTube - http://www.youtube.com/c/JourneyCoachJenn

Blog - http://www.journeycoachjenn.com/


For more inspiration, updates, and news make sure to check out these places


The Rabbit Hole Designs

The Rabbit Hole Designs Instagram

The Rabbit Hole Designs Facebook Page

The Rabbit Hole Designs Pinterest

The Rabbit Hole Designs YouTube


Hey! WTF Monday!


Hey yall!  Tangii here, Happy weekend!!  Hope you all had a great week.  I pulled out the snarky for my card this week!  I'm playing with Marquee Words and Sassy Sentiments for a super quick and fun card.  


I really made this card for my daughter's stash... when you're having a bad day or a bad week, who could help but giggle at this?!?!?  So I stamped my "WTF" from the Marquee Words set with embossing ink on a tag, and then added some Peridot glitter (it's not really a secret that pink and green are one of my fave color combos!).  The great thing about the Marquee set is that you can pair up those large letters with just about ANYthing! or even nothing at all, they are just as great all by themselves! The "back off Monday..." is from the Sassy Sentiments set, I think our sentiment sets pair perfect with these Marquee words!!  I finally added some ribbon and button to my tag and voila!  Easy peasy, pumpkin sqeezy!

All of the items I linked in my post are available at The Rabbit Hole Designs.

You can also read about this card on my blog, here with links to the products I used, etc.  Thanks for popping by, come back again soon!

Chocolate Truffles

Scented Embossing Chocolate Truffles

Hey crafty friend, it's Amanda from Pear Blossom Press, back with some more scented cards today. These were inspired by my friend, Katie Brooks. When the Sassy Sentiments stamp set came out last year, she had the brilliant idea to turn the jellyfish from Sofishticated into a truffle and pair it with the funny chocolate saying. As soon as my scented embossing powders arrived, I knew I wanted to recreate the idea!

To start, I stamped the top of the jellyfish onto white cardstock, then added a narrow border to it, and cut it out multiple times with my ScanNCut. (You could fussy cut the shape, or use a circle die and cut the bottom flat if you don't have a ScanNCut.) I coated the entire front of each cutout with Versamark ink, and melted several layers of chocolate embossing powder on top. Next, I lined the cutouts up in my Misti, and stamped the top of the jellyfish over the chocolate with more Versamark ink. I sprinkled on a second scented powder and heat embossed it. The new layer melted into the chocolate, creating a smooth, flat surface, but leaving crisp lines. (The different scents used were raspberry, rose, and apple.)

Scented Embossing Chocolate Truffles

To create the paper cups for the truffles, I cut strips of vellum and ran them through my paper crimper. I trimmed the strips to fit over each truffle and glued them in place.

To complete my cards, I created various backgrounds and either die cut them with a fancy scalloped rectangle, or dry embossed with the new Broken Glass stencil. A die cut sentiment pulled the cards together, and a few sequins finished them off.

Scented Embossing Chocolate Truffles Scented Embossing Chocolate Truffles Scented Embossing Chocolate Truffles

I have to tell you, these cards smell so good! The chocolate isn't very strong, so the other scents don't get lost. They all blend nicely, and smell like a fancy box of candy. But fair warning, everyone in the house will want to know what you're baking if you start melting the scented embossing powders.

Thanks for stopping by today! I hope Katie and I have inspired you to give this idea a try. Wouldn't it be great for Valentine's Day too? You can find the sister article to this over on my blog; head on over for links to the specific products I used. I'll be back soon with more fun cards to share.

For more inspiration, updates, and news make sure to check out these places.
The Rabbit Hole Designs

We're Owl Friends Here - Let's Practice Coloring

Owl Right The Rabbit Hole Designs That One Friend

Hey crafty friends, it's Amanda from Pear Blossom Press again. Have you been coloring along for the 30 Day Coloring Challenge this month? I have, and the new Owl Right stamp set has a fun image to color. While I was coloring this one, I wanted to practice adding big, bright highlights. 

I stamped my image and colored it with Copic markers, leaving large areas of white space at the top of each face. The eyes weren't standing out enough, so I chose to color over each owl with a very pale marker. Next, I added a pale cool grey to the bottom half of each eye to add dimension. I added shading by outlining the entire image with a warm marker, then blended it out to a pale yellow. I added extra shading with colored pencils. 

Owl Right The Rabbit Hole Designs That One Friend

To assemble the card, I cut the image out with a label die, then die cut the same label out of a panel of kraft cardstock to inlay the image. I taped the pieces together and then popped the panel up on a cream card base with foam tape. I popped up a fishtail banner, embossed with a Sassy Sentiment, with more foam tape, and added a few sequins. A coat of Diamond Glaze over the sequins adds extra shine. Last time I colored this image, I added Diamond Glaze to all of the eyes as well. Take a look here, and let me know which you like better. Flat or glazed?

Thanks for stopping by today. You can find the sister article to this post on my blog, along with links to the specific products I used. I'll be back with more fun cards to share. In the meantime, hop along with The Rabbit Hole Designs on social media for more inspiration:

Jen's Cupid

Hello everyone!

Her is a quick card made by our one and only Jen.  I wanted to share her card because it is so simple but oh so CUTE!!


Sometimes less is more ... GREAT job Jen

TRHD products used:


For more inspiration, updates, and news make sure to check out these places:


Thank you so much for stopping by and spending some time with us.


Stalked ya, 'til you liked me! -- Sassy Sentiments & Inky Stamp Sets


Hello TRHD fans!  It's Cassie here, back with another card to share with you!  I was so excited to ink up this fun set called Inky.  To make my background I placed my Candy Twist Stencil on top of my cardstock, and inked that up with some light blue ink.  I used a circle mask that I had made, and placed that over my stencil and then covered that with some Glimmer Paste.

My little octopus was colored with alcohol markers, and then fussy cut out and popped up onto my panel.  I couldn't resist stamping a couple of the other octopus on the inside of my card.  My main sentiment comes from the Sassy Sentiments stamp set. . .and it always makes me giggle.


If you'd like to see how I made this, you can check out the video here:


Here's a close up of the products I used:

Candy Twist Stencil

 Sassy Sentiments stamp set

 Inky stamp set

I hope you enjoyed what I made for you today and that you were inspired to go out and get a little crafty.  

For more inspiration, updates, and news make sure to check out these links.

Thank you so much for stopping by!
Cassie