Pages

Showing posts with label Spinner Cards. Show all posts

Cupid is Stupid


Hello my crafty friend, it's Amanda from Pear Blossom Press again. As we wrap up the Thanksgiving holiday here in the US, I'm busy making valentines. Or in this case, more sassy galentines! This card is easy to recreate and has no coloring at all, so it's also very quick. The spinner element and heart shape, make this card extra fun!


To make this card, I die cut a large heart three times, twice from white cardstock, and once from a gold foiled piece. I scored a line ¾" from the top of one white heart to make the back panel. I die cut a circle from the center of the other two hearts. Using Scor-Tape, I sandwiched in a line of clear thread, before sealing the two hearts together to form the front card panel. Then, I glued the back panel to the front, above the score line. This gave me a heart shaped card with a hole in the front.

I cut an arrow out of gold glitter cardstock using a preset image in my ScanNCut, then cut it in half and glued it to the card front, trimming the edges to mimic the hole in the center. I made sure to position the bottom of the arrow near the bottom of the card, so it would balance when the card is open.
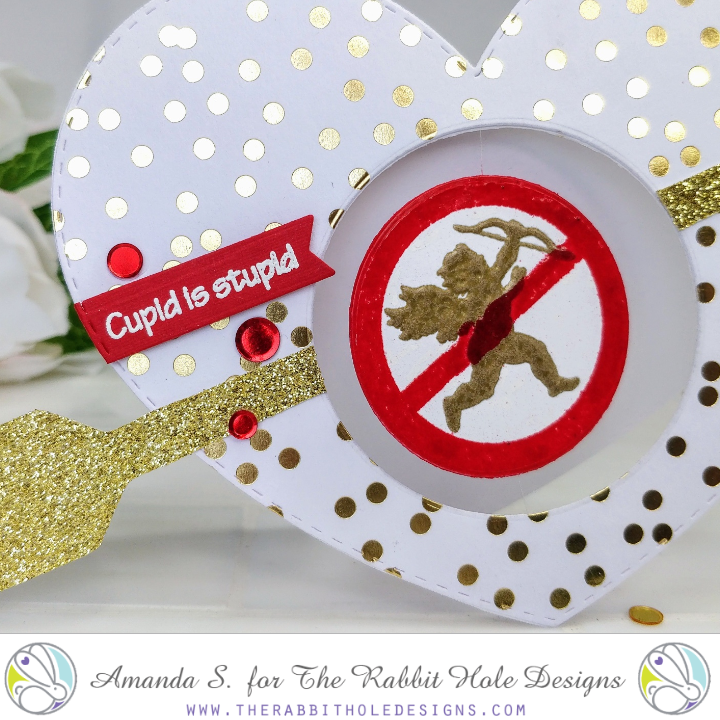


My sentiment and images are all from the new Sassy Sentiments Anti-Valentine set. I stamped and embossed the sentiment with white powder and die cut it with a fishtail banner. I used the large heart die again to cut the left edge of the banner. For the spinner element, I stamped and embossed two cupids with a double layer of gold powder. Then, I lined up the cross out image and embossed it over the top with a double layer of red powder. I used a powder tool in between coats and had to use a Versamarker pen and more red powder to fill in gaps where the second image overlapped the gold powder. I die cut the images with a circle die and glued them together around the thread. A few red sequins finished off the card nicely.

This card is fun to play with when you wind it up and let it go. Plus, the sentiment is hilarious! I keep pulling this stamp set out; I think it's going to get a permanent spot on my desk! If you'd like to see a few more cards using this set, you might like this article. For more inspiration and links to the specific products I used, check out the sister post on my blog today.

Thanks for stopping by; I'll be back soon with another fun card to share!


Humboldt Spinner with Katie

Hello there!  Happy Friday!

Today I have a fun card inspired by nature.  My daughter loves wildlife shows and cartoons that have to do with wildlife.  So we watched a show about Humboldt Squid and that is what inspired this card.  Humboldt are known for their bioluminescence and flashing red and white while hunting.  I used blue in my card instead of white, as I thought it was a better contrast. 


How I made this card:
  • I started by cutting my blue cardstock 8.5 X 5.5.  I scored it at 4.25 inches.
  • Next, I stamped this background ocean stamp on all sides with Stormy Sky Distress Ink.
  • After that, I scored the card at 2.125 to make it a Z-fold card.
  • Then, I used a circle die cut and cut half of a circle form the Z portion of the card.
  • I die cut the same sized circle from white cardstock and used the distress ink to color it. I adhered it to the card base so it lined up with half circle die cut.
  • On a bit of Navy CS, I embossed the sentiment with platinum embossing powder and used foam tape to mount it on the card. 
  • I stamped one squid from the Inky set and colored it using red and pink Copics. 
  • I mirror stamped another squid, made it a little darker with my Copic friendly liner pen and colored it with blue Copics.
  • I colored the edges of both images with my black liner and added some black to the back as well in case they didn't perfectly line up. 
  • I used mono adhesive on both squids.  I also added some extremely sticky double sided tape along the middle of the image and then added some fishing line down the middle.  
  • I ran the line down the edge in the z fold and taped it down so it was taught, then I used liquid glue (Glossy Accents) to ensure it held tight and trimmed the ends. 

Here is a close up of the blue side: 


So I do NOT do videos, BUT, I tried to capture what it would look like to see the spinner.  


Well I hope you enjoyed this creation today.  You are welcome to visit my blog for a full list of supplies. 


Caffeinated Bee Spinner Cards

Good morning Rabbit Hole fans and welcome back to the blog!
It's Lisa here with you today and this is my last post as a guest 
designer for the month of March. I've enjoyed sharing my cards with 
you all month and today I have 2 fun spinner cards for you.
I used the Caffeinated Bee stamp to make an interactive card and 
I decided to do it 2 different ways.

The first card has the spinner on the front of the card and when 
the card is opened it spins around on a string.
I mirror stamped the bee on both cards so I could have the identical 
symmetrical image on both sides of the spinner.


There are many YouTube videos showing the construction of a spinner card.
They are actually quite easy to make and they look very impressive when
opened by the recipient.  


The second card has the spinner on the inside of the card but essentially 
acts the same way with the bee spinning wildly when the card is opened.


Here are 2 short videos showing the mechanism of the 
spinner when the cards are opened.


Thanks so much for stopping by today!
I hope you enjoyed my cards and maybe you'll 
give the spinner card a try!

For more inspiration, updates, and news make sure to check out these links.

Have a great day, I already am!
🐝 Lisa 🐝