Pages

Showing posts with label Corner Mandala Stencil. Show all posts

For my Stud Puffin

 Hi everyone!  Amy here with you today sharing a card I created featuring the super cute Love Puffin Stamp Set illustrated by Agota Pop, and the awesome new You've Been Framed - Layering Dies.

Love Puffin Stamp and Die Set illustrated by Agota Pop, You've Been Framed Layering Dies, Corner Mandala Stencil by The Rabbit Hole Designs #therabbitholedesignsllc #therabbitholedesigns #trhd

I started this card by die cutting a piece of smooth white cardstock with the second largest die from the You've Been Framed - Layering Dies.  I then used the Corner Mandala Stencil (retired) with Distress Oxide Inks Salvaged Patina, Tumbled Glass, and Salty Ocean to create a gorgeous teal and blue background!

I stamped out this adorable puffin image from the Love Puffin Stamp Set, colored it with copic markers, and cut it out using the coordinating die set 

Love Puffin Stamp and Die Set illustrated by Agota Pop, You've Been Framed Layering Dies, Corner Mandala Stencil by The Rabbit Hole Designs #therabbitholedesignsllc #therabbitholedesigns #trhd

Next, I die cut a teal banner using the You've Been Framed Die Set.  I stamped the sentiment from the Love Puffin Stamp Set and white heat embossed.

I assembled my card using teal cardstock for the base.  I used foam tape to pop up the image and sentiment banner for some dimension!

Love Puffin Stamp and Die Set illustrated by Agota Pop, You've Been Framed Layering Dies, Corner Mandala Stencil by The Rabbit Hole Designs #therabbitholedesignsllc #therabbitholedesigns #trhd

For finishing touches on this card I added white gel pen accents, glitter, glossy accents, and a few sparkling sequins!  Thank you and I hope you enjoyed my card today!

For more inspiration, updates, and news make sure to check out these places:

Friend Like You

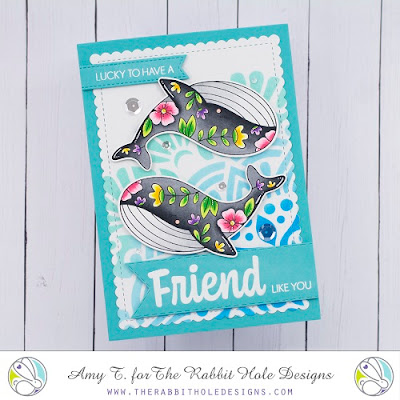
 Hi everyone!  Amy here with you today sharing a card I created featuring the gorgeous Flower Whale Stamp Set illustrated by Tatsiana Zayats.

Flower Whale Stamp and Die Set, Friend - Scripty Stamp Set, Corner Mandala Stencil by The Rabbit Hole Designs #therabbitholedesignsllc #therabbitholedesigns #trhd

For this card I used the Corner Mandala Stencil with Distress Oxide Inks Salvaged Patina, Tumbled Glass, and Salty Ocean to create a gorgeous teal and blue background!

I stamped out the beautiful Flower Whale Stamp twice, colored them with copic markers, and cut them out using the coordinating die set 

Flower Whale Stamp and Die Set, Friend - Scripty Stamp Set, Corner Mandala Stencil by The Rabbit Hole Designs #therabbitholedesignsllc #therabbitholedesigns #trhd

Next, I die cut two teal banners on which I stamped sentiments from the Friend - Scripty Stamp Set and white heat embossed.

I assembled my card using teal cardstock for the base.  I used foam tape to pop up the sentiment banners, and both Flower Whales for some dimension!

Flower Whale Stamp and Die Set, Friend - Scripty Stamp Set, Corner Mandala Stencil by The Rabbit Hole Designs #therabbitholedesignsllc #therabbitholedesigns #trhd

For finishing touches on this card I added white gel pen accents and a few sparkling sequins!  Thank you and I hope you enjoyed my card today!

For more inspiration, updates, and news make sure to check out these places:

Hold My Flowers


Hi Everyone, A new card to share. The image on the card is from Hold My Flowers , I have colored the image with Copics, . I have put it on a background I have made using the Corner Mandala  Stencil,which I used modelling paste through and then used some distress inks over it, 
I also used the sentiment from the set which I heat embossed in black  using the Contaiil Embossing Powder tool . For more information on my card check out my blog at http://creativestampinwithcindy.com 
Thanks for looking Cindy 

Sprinkles Please!

Hello my crafty friends!  This has such a summer warm vibe to it.   This fun shaker card is featuring The Rabbit Hole Designs' Taste Like Summer stamp set.  I paired it up with the Corner Mandala stencil because it created such a whimsy  likeness of the Sun.

 I started by stamping the bunny image from the Taste Like Summer stamp set onto a piece of yellow cardstock with brown ink. The bunny is colored with colored pencils an so is the cone.  I used a kraft knife to carefully cut the three ice cream scoop opening in the card.   I positioned the Corner Mandala stencil on the top left hand corner of the yellow cardstock and masked of some of the stencil leaving only what looks like the sun and rays to stencil.  I used Cracklin Campfire, Carved Pumpkin and Squeezed Lemonade  Distress Oxide ink with the Cotton Tail Blending Brushes to create the sun.

 I die cut some grass from green card stock and added it to the bottom portion of the card front. I die cut some grass from green card stock and added it to the bottom portion of the card front. I stamped the sentiment "life is short get the extra scoop" just above the grass on the left side of the card front. I turned the card over and attached a piece of clear acetate for the shaker window. I outlined the shaker window with The  Rabbit Hole Designs' new Double Thick Crystal Clear Foam Tape - 5mm wide. This tape is clear, so you can see through it.  You will not see any white foam at the edges of this card!  I added my shaker elements and then sealed the opening with a piece of cardstock.  I then added the Double Thick Crystal Clear Foam Tape - 5mm wide around the outer side back of the card front and attached it to in A2 grapefruit colored card base.  I embellished the Sun with some sequins to complete the card.


Here are The Rabbit HoleDesign products used in this card:

Taste Like Summer stamp set


Corner Mandala Stencil

I hope you enjoyed this Sprinkles Please! Shaker card featuring the Taste Like Summer stamp set, Corner Mandala stencil and NEW Double Thick Crystal Clear Foam Tape.   I love hearing from you. Please feel free to leave comment or a question.


Be Creative ~ Stay Inspired

Jenn Gross


Follow me, Journey Coach Jenn, on 

Instagram - https://www.instagram.com/journeycoachjenn/ 

YouTube - http://www.youtube.com/c/JourneyCoachJenn

Blog - http://www.journeycoachjenn.com/


For more inspiration, updates, and news make sure to check out these places


The Rabbit HoleDesigns

The Rabbit Hole Designs Instagram

The Rabbit Hole Designs Facebook Page

The Rabbit Hole Designs Pinterest

The Rabbit Hole Designs YouTube


A Happy Easter Card!

 Hi everyone! Von Marie here and I am so happy to be on the blog today! I have a card to share with you using the newest products from the latest release!


I used the Corner Mandala Stencil and 1 Line Happy Easter Stamp Set for my card today. I first started out with Neenah 80lb Desert Storm cardstock. I laid my stencil down and ink blended first using Cracked Pistachio, Ground Expresso, Hickory Smoke, and Squeezed Lemonade Distress Oxide inks with my Cotton Tail Blending Brushes. When it was dry I splattered green and gold metallic watercolors on my panel. I cut out my panel with a stitched A2 die. I turned my panel around, I liked this version better than the way I first intended to use this panel .


I then heat embossed my bunny with Versafine ink and clear embossing powder onto some Neenah 80lb cardstock. I colored the bunny in with some Prismacolor Colored Pencils and fussy cut it out. I cut out a circle with some of the cardstock I had left over from my ink blending. I glued my panel onto a A2 heavy weight card base with liquid glue and added my circle and bunny. I stamped and heat embossed the sentiment from the 1 Line Happy Easter stamp set onto a banner diecut. I then added it onto my card front. Lastly, I added sequins, white gel accents, and a twine bow. I hope you like my card. Thank you for stopping by!

TRHD Products Used:


For more inspiration, updates, and news make sure to check out these awesome places!


Thank you for stopping by and Happy Crafting!

Von Marie


Distress Glazed Mandala with Caffeinated Rhino

 Hello crafty friends! Kimberly here with The Rabbit Hole Designs! My card today pairs the recently released Corner Mandala and an older favorite of mine, Caffeinated Rhino. I just love how well they go together! 

I started making the background by lightly blending Speckled Egg and Pumice Stone Distress Oxides on watercolor paper using my Cotton Tail Blending Brushes. Then I put the stencil on the blended cardstock and blended Distress Glaze over some areas of the stencil (this is a resist glaze so ink will not stick to it). 


After I blended the distress glaze, I sprayed over the stencil with Pumice Stone Distress Spray. I dabbed off the excess ink before taking off the stencil to prevent too much leaking under the stencil. Then I stamped my Caffeinated Rhino on a smaller piece of watercolor paper with Ranger Archival ink. I used my distress inks to watercolor in my Rhino and the bird. Then I die cut them using the Caffeinated Rhino die. I also die cut a "shadow" for the rhino with grey cardstock just to add a little bit of color behind him. I used the sentiment from the stamp set by embossing it with white embossing powder on black cardstock. Once I had all of my pieces as you see here:


... I began to build my card. I cut down the Background to 5 1/4" x 4" and added that to a piece of grey cardstock. Then I glued my rhino slightly staggered off the grey rhino "shadow" and added foam tape behind him to pop him up. I glued the little bird to the tip of his horn and added a tiny piece of foam tape behind it as well. I attached the sentiment to the bottom of the card and used that as a ground for the Rhino to "stand" on so he didn't look like he was floating in air. Finally, I attached this to a white card base. I just love the soft colors!

Thank you for stopping by! 

Kimberly


Happy Valentines Day - Using those stenciled backgrounds

 MaryAnn, here to share some inspiration using backgrounds created with some of our stencils.

Many of you may recognize these backgrounds from the examples of the stencil on our website.  Why is that you may ask? Well because I am the one testing the stencils when they first arrive and then I use the test to take and post pictures to our website of what the final stenciled image will look like for you all.  I have amassed quite the stack of examples and decided to take over the blog today to show you how I used them.  There are no recipes, just pictures.  I hope you enjoy them.


Corner Mandala Stencil


Thank you for falling down The Rabbit Hole for a few minutes!
MaryAnn - Co-Founder The Rabbit Hole Designs

Breathe


Hello! Today I am sharing this blue mandala I created using the new Corner Mandala stencil. I love that when you line up the 6x6 stencil, it creates this beautiful mandala image. Did you know that the color of a mandala has meaning? I chose to make my mandala blue not only because it is my favorite color but a blue mandala symbolizes emotional healing, inner peace and meditation. 

This was super easy to create. I started out with a white 12x12 scrapbook page. I sprayed the back of the stencil with pixie spray to help hold it in place. I then taped around the edges of the stencil so that I wouldn't accidentally ink up the paper. 

Then using distress oxide inks in salty ocean, blueprint sketch and chipped sapphire, I blended from the center of the mandala to the outer edge. Carefully removing the stencil and aligning it up for each quarter.


Once the image was complete, I added the word "breathe" I cut using my Cricut I lined the letters up on the mandala using a t-ruler. Then I adhered them on.

When I took a look at my completed piece, knew I wanted to frame it. I placed it in a 12x12 shadow box frame. It now has a home in my craft room. 

I hope this inspires you to create your own beautiful mandala! Thanks for stopping by and have a wonderful day! 
Lauren


For more inspiration, updates, and news make sure to check out these places

A Bright and Happy Birthday! A fun stencil technique


Today I am on The Rabbit Hole Designs blog sharing this bold birthday card.  I am using the Corner Mandala stencil, the Scripty Happy Birthday stamp set and the Sassy Birthday 2 stamp set to create this colorful card.


I used the shaving cream technique with items purchased from the Dollar Tree.  Add a roll of paper towel and you spent $5 and change for the  dollar supplies. I added some  liquid colors from my stash to use in this technique.


Find  and watch my Facebook Live from Sunday, January 31, 2021 on The Rabbit Hole Designs Facebook Page to see how to create the stenciled image on my card.

The Rabbit Hole Design Product


Thanks you so much for stopping by today.  I hope you enjoyed this Bright and Happy Birthday card featuring The Rabbit Hole Designs' new  Corner Mandala stencil, the Sassy Birthday 2 stamp set and the Scripty  Happy Birthday stamps set.  Feel free to ask any question or leave a comment below.


Be Creative ~ Stay Inspired

Jenn Gross


Follow me, Journey Coach Jenn, on 

Instagram - https://www.instagram.com/journeycoachjenn/

YouTube - http://www.youtube.com/c/JourneyCoachJenn

Blog - http://www.journeycoachjenn.com/


For more inspiration, updates, and news make sure to check out these places


The Rabbit Hole Designs

The Rabbit Hole Designs Instagram

The Rabbit Hole Designs Facebook Page

The Rabbit Hole Designs Pinterest

The Rabbit Hole Designs YouTube


Enjoy Simple Pleasures!

Hello crafty friends! Kimberly here with The Rabbit Hole Designs to share a card I made featuring the Simple Things stamps set from the new release and the Corner Mandala Stencil. I just adore this Dapper Fella! 


I cut out my first panel 4"x 5 1/4 from white cardstock. I took the Corner Mandala stencil and centered it at the top of the panel (I love that you can use it for more than just the corner). 


I used my Cotton Tail blending brush to blend Bundled Sage Distress Oxide over the center of the stencil. I blended darker in the center to lighter toward the edges. From my stash, I added a black die cut word "Enjoy". 

Next I stamped This little guy from Simple Things and colored him in with Copics {adding a little plaid design to his vest}. 

Copics: 
Cat: E41, E42, E43, R30
Vest E84, E87
Shirt: E81
Pants: E87, E89
Hat: E81, E84, E87
Bow Tie & Umbrella: R35, R39
Shoes: N1, N2, N5, N8
Cup: E40, E41, N2, N5, N8

I fussy cut him out and popped him up on foam tape. I stamped "#Simple Pleasures" from the set, popped it up with foam tape. Then I scattered a few embellishments to finish it off. 

Thank you for stopping by! 

Kimberly