Pages

Showing posts with label Poinsettia & Pinecones Stamp Set. Show all posts

Merry and Bright Holly

Hello friends! Welcome back to the blog. Today's card features the 1 Line Holly 2x6 stamp set


Card details:
  • Stamp the holly image from the 1 Line Holly 2x6 stamp set with an alcohol-friendly black ink a white A2 vertical cardstock panel. Rotate the panel 180 degrees and stamp the image again. Color the image with alcohol markers.
  • Tape the 3 frames from the You've Been Framed die set together (nested within each other). Die cut with green cardstock to create frames and cut them into strips. Adhere the green strips onto a red cardstock panel. Adhere the red panel onto the bottom of the white A2 panel.
  • Stamp the "Merry and Bright" sentiment from the Poinsettia & Pinecones 6x8 stamp set directly onto the white panel.
  • Adhere entire panel to an A2 sized card base.


Thanks for visiting!

Amrita

You can find me on IG @amritapettus

For more inspiration, updates, and news check out these awesome places! 


The RHD Affiliate Disclaimer:

We want to ensure transparency and honesty in our interactions with you, our valued readers. Please be aware that the links provided on The Rabbit Hole Designs Blog may be affiliate links. This means that if you make a purchase through these links, the project designer may earn a small commission at no extra cost to you. Your support means the world to us!


We kindly request that you accept the tracking cookie for the affiliate websites. Rest assured, this will not expose your computer to viruses or compromise your information. It's a necessary step for the company to attribute the sale to the affiliate, ensuring that creators like our creatives receive their rightful commissions.


Your trust and support empower our creators to continue sharing creativity and inspiration through our blog. Thank you for being an integral part of The Rabbit Hole Designs community!


Blue & White Poinsettia Thank You Card


Hello! It's Lauren on the blog today sharing my pretty, white and blue poinsettia thank you card. I used my colored pencils with the Poinsettia and Pinecones stamp set and created a subtle brick background using the Back Alley stencil. 

You can watch me create my card in this quick video.


 Thanks for visiting! 

 *Disclosure: I use affiliate links where I can. This does not add any extra cost to you, but I do receive a small amount which helps keep me creating. Thank You*

Here are my links to the products I used to create this card:

Poinsettia & Pinecones Stamp Set: https://shrsl.com/47y0j

Poinsettia & Pinecones Die Set: https://shrsl.com/47y0l

Back Alley Stencil: https://shrsl.com/4p8mv

Sentimentally Speaking Stamp Set: https://shrsl.com/4lmc6

Sentimentally Speaking Die Set: https://shrsl.com/4mrcf

White Christmas


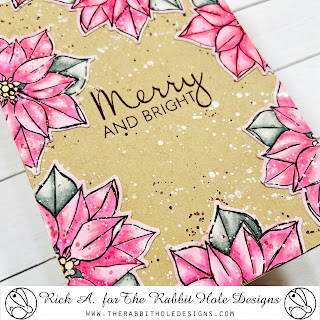
Hello! It's Lauren here on the blog with this pretty, white poinsettia Christmas card I created using the Poinsettia & Pinecones stamp set.

I started out by stamping the poinsettia image a few times in fade out ink onto kraft cardstock measuring 4 x 5.5". Then coloring them up using my colored pencils.

Next, I Added some white splatter using Titanium White Acrylic paint that I thinned a bit with water. 

While my splatters were drying, I stamped (in white ink) and die cut my sentiment from the same stamp set. I also die cut a sentiment blank from white cardstock and adhered it (offset) to the stamped sentiment.

I adhered my sentiment to my colored panel then adhered the panel to a white, Top Folding A2 sized (4.25x5.5) card base to finish my card. 


I hope I've given you some holiday crafting inspiration today. Thanks for visiting!

*Disclosure: I use affiliate links where I can. This does not add any extra cost to you, but I do receive a small amount which helps keep me creating. Thank You*

Here's my links to the set
I used to create this card:

Poinsettia & Pinecones Stamp Set: https://shrsl.com/47y0j

Poinsettia & Pinecones Die Set: https://shrsl.com/47y0l

Elegant Christmas Card- Revisited


 Hi there! It's Lauren here revisiting my easy yet elegant Christmas card using the beautiful Poinsettia & Pinecones stamp and die sets illustrated by Kelly Taylor.

I first prepared my white 4.23x5.48" cardstock panel for embossing by using the Cottontail Embossing Powder Tool. I then lined up and stamped my image onto the cardstock using my embossing ink pad. I covered the image with silver embossing powder, tapped off the excess and then heat set it. 

I then repeated the process, stamping the Merry Christmas words, embossing them in silver and then using the coordinating dies to cut them out. I also die cut 3 extra blank words and adhered them behind the corresponding embossed words. 


Finally, I adhered the embossed poinsettia panel onto a white, A2 sized (4.25x5.5) top folding card base. Then, I adhered the Merry Christmas words on to finish my card.

I hope this has inspired you to give this easy technique for creating a beautiful Christmas card a try. Thanks for visiting! 

 *Disclosure: I use affiliate links where I can. This does not add any extra cost to you, but I do receive a small amount which helps keep me creating. Thank You*

Here's my links to the sets I used to create this card:

Poinsettia & Pinecones Stamp Set: https://shrsl.com/47y0j

Poinsettia & Pinecones Die Set: https://shrsl.com/47y0l

Cottontail Embossing Powder Tool: https://shrsl.com/3f0uo

Merry Christmas

Hi, crafty friends! Carrianne here, sharing a lovely arrangement of festive poinsettias featuring the Poinsettia & Pinecones Stamp Set from The Rabbit Hole Designs. 

I am overjoyed that we are beginning to embrace the holiday season. I love this time of year, particularly the Christmas music at the mall and the decorations everywhere you turn. Everything is fun and festive. 


I began by stamping the image in green ink directly onto a panel of white cardstock. The image was stamped once more and colored with alcohol markers. I fussy cut the image out, but there are matching dies available. Next, I divided the image into two halves from the center and adhered them to opposite corners with foam tape for added dimension.


The sentiment is from the same set and is stamped in red ink. It was fussy cut and adhered with foam tape. I also added red sequins to complete the card. I am very happy with how it turned out.


Thank you for dropping in with me today! Have fantastic day!!

~ Carrianne ~


For more inspiration, news, and updates, make sure to check out these places.


DISCLOSURE: THIS POST CONTAINS AFFILIATE LINKS, MEANING I GET A SMALL COMMISSION WHEN A PURCHASE IS MADE THROUGH THAT LINK AT NO ADDITIONAL COST TO YOU. THANK YOU FOR SUPPORTING ME SO THAT I MAY CONTINUE TO SHARE MY CREATIONS WITH YOU!


Christmas Poinsettia and Pinecones

Hello friends! Welcome back to the blog. Today's card features the Poinsettia & Pinecones 6x8 stamp set along with its coordinating dies.


Card details:

  • Die-cut the middle frame from You've Been Framed dies on light pink cardstock. Blend the panel with the Candy Twist Stencil with light pink ink for a tone-on-tone effect.
  • Stamp the images from the Poinsettia & Pinecones 6x8 stamp set with an alcohol-friendly black ink on white cardstock and color with alcohol markers. Die-cut the images with the coordinating dies.
  • Stamp the sentiment "Merry Christmas" from the same stamp set and die-cut with coordinating dies. For added dimension, die-cut the sentiment on blank white cardstock and stack the die-cuts.
  • Attach the images and sentiment to the light pink panel and attach the panel to a white card base.
  • Add gems to finish card.


Thanks for visiting!

Amrita

You can find me on IG @amritapettus

For more inspiration, updates, and news check out these awesome places! 


The RHD Affiliate Disclaimer:

We want to ensure transparency and honesty in our interactions with you, our valued readers. Please be aware that the links provided on The Rabbit Hole Designs Blog may be affiliate links. This means that if you make a purchase through these links, the project designer may earn a small commission at no extra cost to you. Your support means the world to us!


We kindly request that you accept the tracking cookie for the affiliate websites. Rest assured, this will not expose your computer to viruses or compromise your information. It's a necessary step for the company to attribute the sale to the affiliate, ensuring that creators like our creatives receive their rightful commissions.


Your trust and support empower our creators to continue sharing creativity and inspiration through our blog. Thank you for being an integral part of The Rabbit Hole Designs community!


Merry & Bright New Year

 Hello and welcome back to the blog; it's Rick back with you again today sharing another card for a little festive inspiration.  Since the New Year is only a few days away I wanted to share an idea with you using a holiday stamp set that I am sure many of you have picked up from the Rabbit Hole this year.    Today my card features the Poinsettia & Pinecones Stamp Set designed by Kelly Taylor.  


Poinsettia & Pinecone New Year Card by Rick Adkins

I wanted to take the poinsettia from the stamp set and add a little glamor to it by using some Pearl White Stencil Butter that can be picked up right here on the website.  I ran it through the Cat Eye Stencil on a piece of black cardstock.   I then added it to a silver cardstock mat and to the card base.  This dresses up the card base and makes it more of a new year card than a holiday card.  I then stamped and heat embossed the large poinsettia also on black cardstock; and colored it in different shades of blue colored pencils.  

Poinsettia & Pinecones New Year Card by Rick Adkins

By doing these few simple things I took the Christmas card and make it into a new year card.  The sentiment Merry and bright can totally go for not only Christmas but also new year as well.  Just make sure you add a fabulous new year sentiment to the inside in your personal message and your golden.  By changing up your color scheme and adding a little more glitz to your cards you can totally take a holiday set and make it into a new year set or change up the sentiment and make it a birthday card as well.  Thanks for dropping by today I hope that you all have a safe and happy new year.  And I will see you again real soon. 

Stay Crafty 

Rick 

Create Colorful Christmas Cards in a Flash

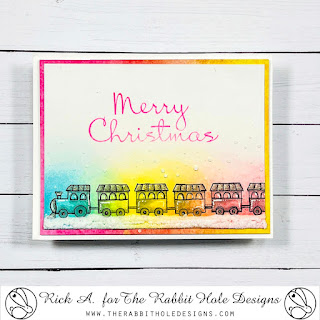
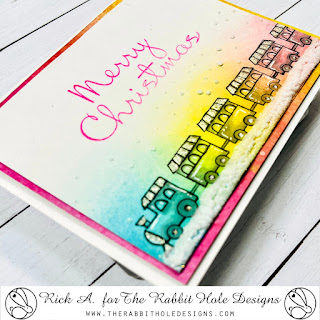
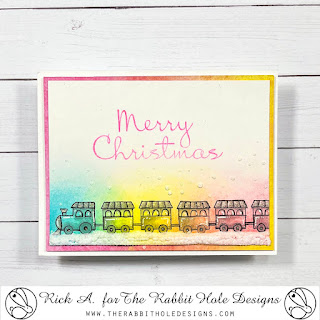
Hello and welcome back to the Rabbit Hole Designs Blog; it's Rick back with you today with a fun and festive Christmas Card Idea using the Baby's 1st Christmas Stamp Set.  I know that a lot of you may have your holiday cards all ready to go plus some may have started sending them out.  But if you're like me and in need of another idea that's quick and easy I have you covered.  

Baby's 1st Christmas Stamp Set, Rabbit Hole Designs, Rick Adkins, Train, Ink blended Card

Like I said this card is super easy and actually depending on how you choose to embellish it could be mass produced rather quickly. Okay, so this is the deal. You will need to pick a red blue and yellow ink color that's water reactive. Pull out your CottonTail Blending Brushes or even your Bitty Bunny Blending Brushes and slap down the three primary colors onto your Bristol smooth or watercolor cardstock where you are planning on stamping your focal image. Let the three primary colors overlap a little; but the blending doesn't have to be perfect. So, if you are not the best at ink blending no worries. Make sure you add enough ink to cover your chosen stamped image.

Baby's 1st Christmas Stamp Set, Rabbit Hole Designs, Rick Adkins, Train, Ink blended Card

Now the magic can happen! Spritz the ink with a little water and take a large flat brush and swipe through the ink. This will soften and blend the ink together. You want the ink to run a little that's okay. Next you are going to dry your cardstock panel completely. Once you have the panel dried stamp your focal image in the colored area. I picked the train from the Baby's 1st Christmas Stamp Set and added a few extra cars at the end of mine to extend the train a little. Make sure to stamp the image in a darker ink and something that want smear with your chosen color additive (markers or colored pencils). I stamped mine in Versafine Clair Nocturne Ink but stamped it off once to make it just a little lighter.

Baby's 1st Christmas Stamp Set, Rabbit Hole Designs, Rick Adkins, Train, Ink blended Card

Next I added some slight shading with a warm gray marker to the engine and box cars to give them a little more life. And then added a little glitter to sections of each with a glitter pen. I then added some snow below the train and sprinkled around the sky. All I had to do then was to stamp my sentiment in a coordinating ink color. I picked the Merry Christmas from the Poinsettia & Pinecones Stamp Set for my sentiment today but you can use any of the wonderful sentiments from your collection of Rabbit Hole Designs stamps.

Baby's 1st Christmas Stamp Set, Rabbit Hole Designs, Rick Adkins, Train, Ink blended Card

To finish off the card all I had to do was mat my inked panel with coordinating cardstock (or even pattern paper would work) and added it to my A2 (4 1/4" x 5 1/2" folded) Card Base.

I hope this post has given you another idea to add to your crafty arsenal. Whether you're making cards to brighten someone's day or as a creative outlet for yourself; having a fun technique to use for quick cards is a game changer.

Remember, it's all about experimentation and finding what resonates with you. And don't forget to share your creations on social media and tag The Rabbit Hole Designs to spread the card-making love.

Thanks for dropping by today I hope you have a wonderful day and that you found this post helpful. You can find all the supplies that I used on today's cards on my blog post by clicking here!

You can find me on the following Social Media Channels with more crafty inspiration: 
I hope that you have a crafty day.  For more inspiration, updates, and news make sure to check out these places.  


Have a crafty day!
Rick 

Pretty In Pink: Poinsettia & Pinecones

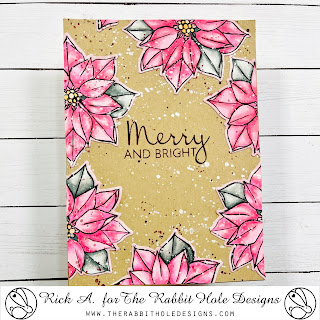
 Hello crafty friends and welcome back to the Rabbit Hole Designs Blog!  It's Rick and I am back up on the blog today with another fun Christmas card to share with you using the Poinsettia & Pinecones Stamp Set (designed by Kelly Taylor) for the Rabbit Hole Designs, along with the coordinating Poinsettia & Pinecones Dies.  If you haven't figured it out I am in love with this stamp and die set!  I used a nontraditional Christmas color scheme for today's card; I decided to use shades of Pink and Mint for the poinsettias.  

Poinsettia & Pinecones Stamp Set, Poinsettia & Pinecones Dies, Rick Adkins

So, let's talk a little bit about why you may want to pick a nontraditional colored scheme for your cards and especially with the Poinsettia & Pinecones Stamp Set.  Why go for pinks and mint, you ask? Well, my friend, it's all about adding a breath of fresh air to the traditional holiday color schemes. Christmas cards in shades of red and green are wonderful, but a little twist can go a long way.

Poinsettia & Pinecones Stamp Set, Poinsettia & Pinecones Dies, Rick Adkins, Pink & Mint

I remember one year, I received a card with soft pinks and mints, and it instantly stood out in the sea of red and green. It brought a smile to my face, and that's exactly what we want to achieve with our own creations. So, let's get daring and explore these vibrant hues.

Poinsettia & Pinecones Stamp Set, Poinsettia & Pinecones Dies, Rick Adkins, the Rabbit Hole Designs LLC

So, there you have it, my friends – the secrets to crafting a unique Christmas card with the Poinsettia & Pinecones Stamp Set in a delightful pink and mint color scheme. I hope you're feeling as inspired as I am!

Thanks for dropping by today I hope you have a wonderful day and that you found this post helpful. You can find all the supplies that I used on today's cards on my blog post by clicking here!

You can find me on the following Social Media Channels with more crafty inspiration: 
I hope that you have a crafty day.  For more inspiration, updates, and news make sure to check out these places.  

Have a crafty day!
Rick