Pages

Showing posts with label Die Cut. Show all posts

Honey - You Look Fabulous!


Hello! Lauren here on the blog today with this fun slimline card. My card features the new Tastes Like Honey stencil. This stencil is so awesome because it can be used to create all kinds of different looks for so many occasions. 

To create my card, I blended Gray Flannel ink onto white cardstock using the Tastes Like Honey stencil. The stencil is 6x6 so for it to fit a slimline card, I lines up the stencil and continued blending. I started out dark then lightened up as I continued. I trimmed the paper using a stitched rectangle slimline die from my stash. 

After cleaning the stencil, I repeated the same process onto yellow paper using Wild Honey Distressed Oxide ink and a bit of Fossilized Amber to darken it up a bit. I then die cut 5 stitched hexagons using a set from my stash.

Next, using the Spell It stencil, I blended the Gray Flannel ink to spell "Honey" on white cardstock. I trimmed the paper down and backed it with a matching gray cardstock border.


Then onto gray cardstock, I stamped the you look fabulous sentiment from the Miss You stamp set in Versamark ink. I covered that with white embossing powder and heat set it. After it cooled, I trimmed the sentiment using a rectangle die from my stash.


Having all the elements complete, I started to assemble the card. First I positioned the yellow hexagons onto the gray hexagon stenciled background and adhered them in place. Then trimmed off  any overhanging pieces. I adhered that onto a white 8.5 x 3.5 inch card base and adhered the word honey in the middle and the gray cardstock sentiment underneath.


Thanks so much for visiting. I hope you give this fun stencil a try! 
Lauren 

Products used:


Northern Lights Christmas Card


Hello Everyone! Justin here and today I am sharing a simple Christmas Card I made using the new Kringle set!

I wanted to create a project inspired by tree silhouettes and the Northern Lights, and I thought this was the perfect excuse to break out my Alcohol Inks!

To make my Northern Lights background, I took a 4.125" x 5.375" piece of plastic craft paper and totally slathered it with alcohol blending solution. I used gray, dark purple, dark blue, aqua, and lime green alcohol inks to drop onto the piece. I then used my air puff tool to push the ink around to get the design I wanted. I set the panel aside to dry entirely (I usually like to give this a good hour).

I took the small tree stamps from Kringle and heat embossed them with black powder onto black cardstock. I fussy cut them out and set them aside.

Next I took 4.25" wide piece of black cardstock and die cut a stitched hill piece. I heat embossed the sentiment "Merry Christmas" in white powder and set it aside.

I took my dry alcohol inked panel and adhered it to an A2-sized piece of black cardstock so it had a nice frame.

I then adhered my trees to my stitched hill, and adhered the entire piece using foam tape to the bottom of my card panel.

Using some purple sequins from a Rabbit Hole Designs Embellishment Pack (one of the amazing freebies you get with your order), I adhered a few to my card, and adhered the panel to an A2-sized card base!

And that's how I made my project!

This card uses the following Rabbit Hole Designs Product:


For more inspiration with your The Rabbit Hole Designs Creations, be sure to follow along at these other locations:


For more details about products used in this post, you may also follow along at my personal blog, Just a Note by Justin, as well!

I cannot wait to see what you craft up using these super cute new Christmas in July release products! Be sure to share them in The Rabbit Hole Designs Fan Page (and don't forget about the Anything Goes Challenge Album as well!

Happy Crafting!


Love is in the Stars Card


Hello Everyone! Justin here, and I today I am incredibly excited to be sharing this card I made using the new Aim for the Stars Stencil!

I figured this stencil paired so well with the balloon couple from the Love You More set, so I took the idea and just ran with it!

First, I colored up my couple with Copic Markers, fussy cut them out and set them aside.

Next, I die cut a stitched panel with stitching from white cardstock, a scalloped rectangle from navy cardstock, and cut an A2-sized piece of blue patterned paper. I also die cut another stitched panel from white cardstock, and then cut it with a cloud border die.

I took my white rectangle stitched panel and used a cloud stencil to blend clouds that went from pink, to purple, to navy with Oxide Inks. I also took my cloud border and distressed the bottom edge with pink oxide ink. I stamped the sentiments "love" and "is in the air" from Love You More in purple ink, along with some hearts from the set as well in various ink colors.

On my cloud panel, I took the Aim for the Stars stencil, put it into place, and applied a solid layer of purple Glitz Glitter Gel. I carefully removed my stencil and set my panel to dry entirely. I also cleaned off my stencil right away.

Once my stars had dried entirely, I adhered my cloud banner and couple with foam tape to this panel. I then adhered this layer to the scalloped navy panel, adhered the scalloped navy panel to the A2-sized blue patterned paper panel, and then adhered the whole unit to an A2-sized card base.

I finished my card off by adhering a few The Rabbit Hole Designs sequins, and was done!

This project uses the following products:


For more inspiration with your The Rabbit Hole Designs Creations, be sure to follow along at these other locations:


For more details about products used in this post, you may also follow along at my personal blog, Just a Note by Justin, as well!

I cannot wait to see what you craft up using these amazing new June release products, especially this fun stencil! Be sure to share them in The Rabbit Hole Designs Fan Page (and don't forget about the Anything Goes Challenge Album as well!

Happy Crafting!

Don't Bug the Beetle Card

Hey Everyone! Justin here and today I am sharing a project using the new Buggy for Caffeine set! This adorable beetle was the last bug in the set I wanted to make sure I used, and I wanted to take a different approach to this one. My last 2 bug cards were more earthier tones, so I decided that, for the beetle, I would go in a vibrant color direction!

For this card, I didn't do my coloring first. I took a scrap piece of white cardstock with the Candy Twist stencil and applied a thin layer of an electric purple glitter gel. I removed my stencil immediately to be cleaned, and then set my piece aside to dry.

I colored up my beetle with Copic markers and fussy cut them out. Next, I took an A2-sized piece of white cardstock and placed the Square Illusion stencil on top. I blended a red-to-pink-to-purple ombré using dye inks, since I knew they would give me more of that vibrant look I was going for! While the stencil was still on my panel, I spritzed it with some water to get that dappled effect, along with helping the colors blend together more.

Next, I took out some nesting square dies and cut a diamond directly from the upper middle part of the panel. Then, I cut out a diamond frame using the nesting dies from a purple glitter cardstock. I adhered this frame directly over my main panel diamond cut out.

I stamped the sentiment "Don't bug me I haven't had my coffee yet" from the Buggy for Caffeine set in red ink on white cardstock, cut it into a box, and framed it in that same purple glitter cardstock. I wanted to make this into a band, and I used the leftover scrap die cut from my diamond window. I cut it into 2 pieces, adhered them to my card, and adhered my actual sentiment over the top.

All I had left to do was some adhering, and my project was done. I took some clear acrylic bubble embellishments and adhered them to my project. I then took an A2-sized card base, and found where my diamond cut out window would be, and adhered my purple glittery Candy Twist piece directly behind it. I took some foam tape and adhered my main panel onto the card base to give the cut out window some depth. To finish my card, I used foam tape to adhered my beetle to the front of my card, and I was done!

I used the following products in this card:


For more inspiration with your The Rabbit Hole Designs Creations, be sure to follow along at these other locations:


For more details about products used in this post, you may also follow along at my personal blog, Just a Note by Justin, as well!

I hope you enjoyed my project and that it sparks some buggy inspiration for your next creation!

Happy Crafting!

Christmas Flower Card

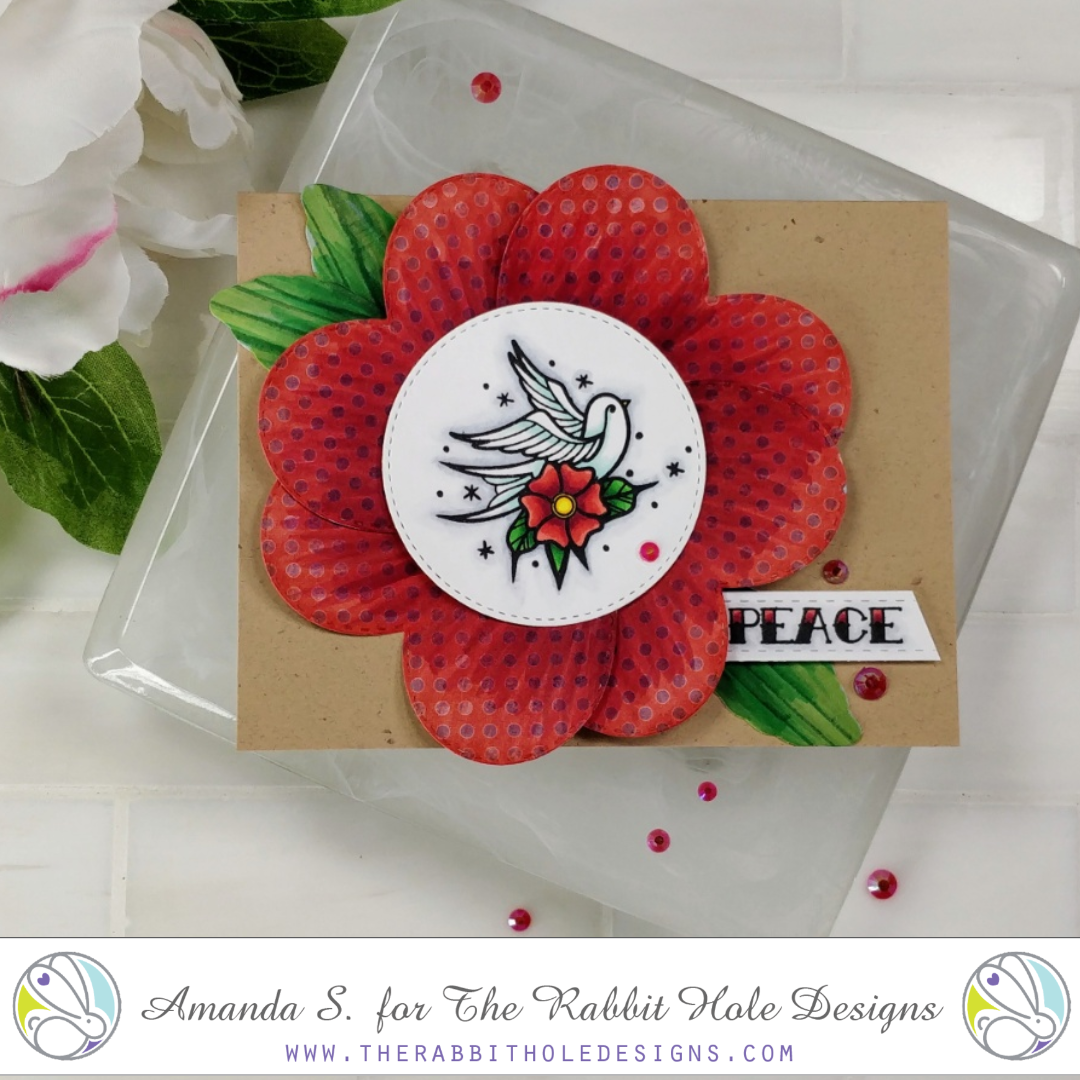
The Rabbit Hole Designs Tattoo Christmas Die Cut Card 

Hey crafty friend, it's Amanda from Pear Blossom Press again. I realize it's a little early to be making Christmas cards, but for some reason, the Old School Tattoo Affirmation set really inspires me. You may have seen the other Christmas card I made with it earlier this month (check it out here). I wanted to add the swallow to another card, but this time I wanted to add some layers and make it more 3D. 

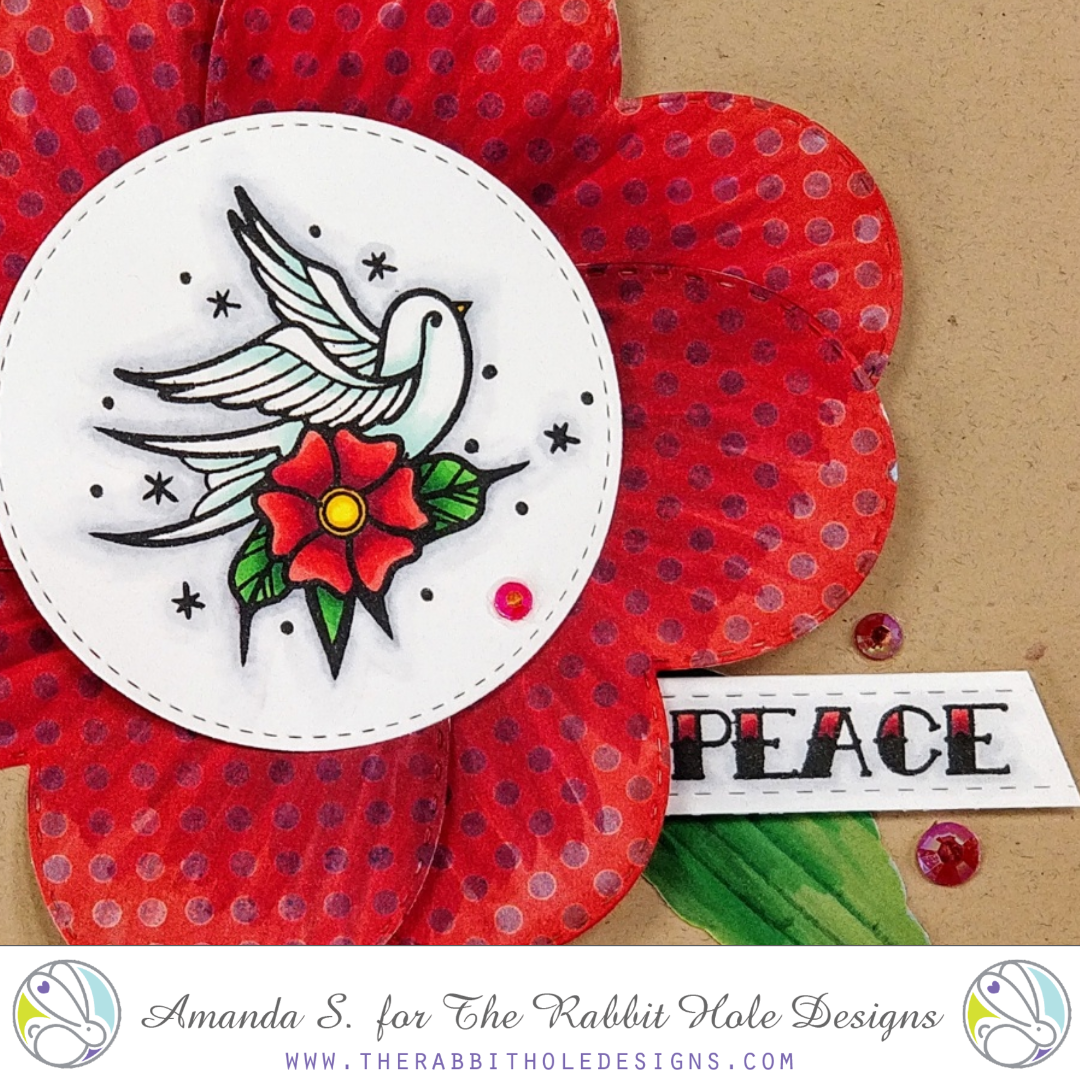
While this card might look like a lot more work, it was actually pretty easy. First, I stamped and Copic colored the swallow, then cut it out with a stitched circle die. Next, I die cut four stitched hearts from pattern paper. I used some of the same red Copic markers to add some shading to the hearts, and help the colors coordinate with my swallow. I used a large stylus to rub the hearts into the back foam pad of my Misti, to give them some curl and dimension. I fanned them out in a circle, and glued them together to form flower petals. Using foam tape, I adhered the swallow to the center, then I glued the flower to a kraft card base.

I die cut a few leaves from green pattern paper scraps, and a stitched strip that I stamped the word PEACE onto. Then, I added a smidge of color, again with my Copics. I nestled them under the flower petals and finished the card with a few red gems. By using pattern paper for the large die cut shapes, I was able to get a lot of color and texture, with minimal effort. It really helped me pull this card together quickly. And while it took a little more effort than a flat card, it would be pretty easy to make quite a few of these in an evening. Just remember to space your swallows out with enough room to cut the circles around them when you stamp them out. I've actually been stamping out sheets of images to color while I watch TV, or my favorite YouTubers, during the new 30 Day Coloring Challenge. It's very relaxing. 

The Rabbit Hole Designs Tattoo Christmas Die Cut Card


Thanks for stopping by today. You can find the sister article to this post on my blog, along with more links to the products I used. And get ready, the new release is coming out tomorrow; you'll definitely want to stick around for that! 

Somebunny is Awesome!


Hello my crafty friends and welcome to The Rabbit Hole Designs blog!  Has any-bunny told you, you’re awesome today?  Well I am!    This card features the fun and whimsy 4" x 4" stamp set All Ears! 


I stamped out the bunnies with black ink onto a piece of my favorite coloring cardstock. I colored them with a light grey alcohol marker to add shading and added a pale pink shade to the bunnys' ears and noses. After fussy cutting the group of bunnies out, I glued them to the piece of purple printed paper.


I wanted to frame the bunnies with some love in mind, so I used this fun circle and heart frame die and I die cut it to the upper part of a piece of 4"x 5 1/4" pink cardstock creating the opening for the bunnies to be seen through. I positioned the bunnies on printed paper behind the opening in the pink card front and attach it with foam squares.   I added double side adhesive foam tape to the back of the pink card front and attached it to an A2 white card base.


This sentiment, "Somebunny is"  just happens to be stamped from two different sentiments in the All Ears stamp set.  I masked off the words/letters I did not need and stamped out the sentiment with my stamp positioner onto white cardstock.. Once complete,  I cut out the sentiment. I created a frame layer from the same purple printed paper  I used behind the bunnies. I cut it slighty larger than the sentiment and used it as a layered frame. I glued this sentiment  to the card front above the bunnies as shown.


I love looking through my craft stash to see what I might have available to use with my projects. I found the "awesome" die cut word and knew it would be perfect for this card. I die cut the word from white cardstock and the back accent layer from the purple printed paper. I glued them together and then glued it just below the bunnies on the card front completing the card.


Here are the TRHD products used in this project:

All Ears 4” x 4” stamp set


I hope this fun “Somebunny is Awesome” card inspires you in your creations. Thank you so much for stopping by the blog!

Be Creative ~ Stay Inspired
Jenn Gross
@journeycoachjenn

For more inspiration, updates, and news make sure to check out these places


Kiss My Grass Card


Hey Rabbit Hole Crafters! Justin here with another project using a set from the latest The Rabbit Hole Designs Release! This Caffeinated- Goat set is so fun, and I'm not "kid"-ding!

For this card, I was inspired by farm life. Pretty simple, right? I felt like this goat is one of the first Caffeinated Critters that you would expect to find on a farm, so I wanted to make this fella right at home.

As always, I started my project with coloring up my goat with alcohol markers and cutting them out. I also wrote a fun little sentiment on their mug, reading "Kiss My Grass". Get It? Because goats eat... oh never mind!

Next I used oxide inks to blend up a daytime blue sky on a 4" x 5.25" white cardstock panel. Once finished, I set it aside.

Because I ink blended the entire sky, I wanted to do something different with the grass. One thing I love to do is use inks on colored cardstock. It's such a different effect from using solely white cardstock! So I grabbed a piece of grassy green cardstock, and trimmed it down to 4" x 5.25" as well, as I want the bottom length to be the same on both panels for when I layer. Next, I used a light tack adhesive to place my Diamond Flower Stencil on top, and ink blended over the stencil with a darker green ink. When I removed the Diamond Flower Stencil, I had a subtle floral pattern on what would soon become my grass! To finish this panel off, I used a grassy border die to give it that grassy top edge at the length I wanted. With my grass done, I set it aside until I needed it next.

I knew that, to give this card the barnyard effect I was going for, I wanted to include a rustic looking wooden fence. I have to be honest, I didn't even look for any sort of fence die. I just took paper bag colored cardstock and cut it into .5" wide strips for the vertical posts and .375" wide strips for the horizontal pieces. I cut all the vertical posts to be the same length, but I could have really skipped this part because a) I was going to tuck the posts under the grass layer to create depth of field and b) if you wanted this farm to look really rustic, different sized posts would totally add to that look!

Next, I needed to do a little bit of figuring out how my elements would be placed for my final result. I took my fence posts and laid them out so they were evenly spaced at the right height. Then, I placed the grass layer on top, as I had planned, to ensure my fence had the proper placement. Once I found out where my fence was going to be, I adhered my fence pieces together so they were 1 unit, and also masked my card to reveal the sections of the fence between the wood slats, as I was going to add some detail there. I took black ink and stamped the Caffeine Molecule included with the Caffeinated- Goat set to make it look like the fence had a chicken wire layer to it as well! I also took some black ink to my blending brush and distressed the edges of my fence to give it some shading. Once the Caffeine Molecule Chicken Wire was dry, I adhered my fence on top, and then applied my grass layer.

I then matted my grass and sky layered panel with an A2-sized cream patterned paper to continue the farmhouse effect. I placed where I wanted my goat, without adhering them yet. Once I knew where I wanted my goat, I was able to find the best spot for my sentiment strip. I took a strip of paper bag cardstock, trimmed it to 4.25" wide, and matted it with brown paper. I stamped the fun sentiment "Caffeine releases my inner kid" and adhered it towards the top of my card. 

I then adhered my goat and wanted to add a few more embellishments. I used a stitched cloud die to get a white cloud, and distressed the edges with a light gray ink and adhered my cloud in the sky. I also used some blue and green TRHD sequins and added those for additional embellishment!

Here are my products I used to make this card:

Caffeinated- Goat


For more inspiration with your The Rabbit Hole Designs Creations, be sure to follow along at these other locations:


For more details about products used in this post, you may also follow along at my personal blog, Just a Note by Justin, as well!

I hope you're loving these new Caffeinated Critters as much as I am, and I hope this card sparked some ideas and inspiration for your next caffeinated project!


Caffeinated Valentine Tags

Happy Valentine's Day!
Michelle here, I created some caffeinated gift tags for mini Valentine's Day gifts. The whole 
Caffeinated line is perfect for gift tags!
 Having the coordinating dies makes it a lot easier! I used Caffeinated Owl Stamp and Die, and
 I stamped the owl and flamingo, than die cut the images. I colored the caffeine cuties
with Copic Markers. I die cut each image twice per tag. One colored, one blank. 
After I colored the front of the tag I adhered the black die to the back.
 I stamped the back of the tags with sentiments from the set, Perfectly Blended.
I filled each treat bag with some Starbucks Via packets and Hershey Kisses...perfect combo!


Hope you give this a try!
Hope you enjoy today!

Michelle


For more inspiration, updates, and news make sure to check out these links.

You Feel Like Home To Me Card

Hey Rabbit Hole Crafters! Justin here, and I'm here with a fun traditional Valentine's Day project!

This card uses solely the Love You More set, but only uses the, what I call, scene building images!

I was looking at this card and knew that it was the set I wanted to use to create a Valentine's Day project, but didn't know which images I wanted to use. This set comes with 2 really cute pairings of a boy and girl couple, but what really inspired me was the sentiment "You Feel Like Home To Me". Since the set included images of houses, I knew that was the direction I was going to go.

First, I colored up a handful of houses and clouds with Copic Markers, alternating between a few different Red and Pink groupings I had come up with. I then cut all of the images out using my Scan and Cut.

Note: for images that are generally white, I color them up with a super light/diluted color. For these clouds, I took a super light pink marker and just went around one side's edges. You can also blend this out with a colorless marker if you deem fit.

I die cut a "Slightly Smaller Than A2"-sized stitched rectangle on white cardstock and again on black cardstock. I took my black cardstock panel, marked where I wanted my grounding for the house to be, and die cut a stitched curved edge on the panel. Then an A2-sized rectangle on red cardstock.

I took the white panel and ink blended a background. From the bottom up, I used a light pink, bright pink, and then a lighter red to create an ombré Valentine's Day appropriate sky.

I adhered my black stitched grounding section to the bottom of the ink blended panel. I then laid out how I wanted my houses to be layered, having some houses in front of others to create a little bit of depth, and adhered them. I also adhered my clouds, pairing some of them up, and adhered them with foam tape to raise them off the paper a bit.

I cut two very thin strips of black cardstock and heat embossed one sentiment on each, "You Feel Like Home To Me" and "Happy Valentine's Day". I then adhered those, one sentiment a bit removed and on top of the other, with foam tape in the top left section of my card.

I wanted a little bit of detail on the bottom of my card, so I had some red and white twine on my desk. I wrapped the twine along the bottom edge of my card and tied a bow. Fun tip, when using string to create a bow, sometimes it's hard to get a taught string (i.e. sometimes part of the string on the front is droopy). Remember, nobody is going to see the underneath of your panels, so they don't have to look perfect. I sometimes pull the strings from the back so they look taught on the front. I then take a piece of washi tape to the back to hold the string in place! And see, you'd never really know unless I told you!

I took some red and silver sequins that have been included in past The Rabbit Hole Designs orders and adhered them to my card. I finished by mounting my scene panel to my red A2 panel, and then mounting the entire piece to an A2 card base that is folded on the top edge! And that's how I made my Valentine's Day Card

I used the following products to create this project:


For more inspiration with your The Rabbit Hole Designs Creations, be sure to follow along at these other locations:


For more details about products used in this post, you may also follow along at my personal blog, Just a Note by Justin, as well!

No matter how you're celebrating Valentine's Day this year, I hope this card inspires you to go out and create a fun project with one of your favorite Rabbit Hole Designs sets, or even try out a new one!

Thanks for reading, and happy crafting!

Caffeine Saves Lives

Hello again Rabbit Hole fans!
It's Lisa back on the blog with you today and I have a short story to share with you.
I recently acquired the Caffeinated Shark stamp
and die and I'm so glad I did! Did you ever not order a stamp because you thought
you wouldn't use it and then see it used on a card and you're sorry you didn't order it?
Well a good purple haired friend of mine calls it FOMO...….
Now for those of you who don't know what that means (I certainly did not)
It means "fear of missing out".....
Well, I'm not missing out anymore, now little sharky is mine and I'm so glad he is!
I really have to start training myself to look at craft supplies in a different way
and see the potential in them.
Ok enough rambling for now, on to my card!
Card Recipe
1)  I usually start by stamping my image with some Copic friendly ink
and coloring with my Copic markers. I loved coloring sharky with my "W"
markers and giving him some fun spots along the way. I used the matching
die to cut him out after he was colored.
2) I covered my card base with some fun water themed patterned paper as a
background for my card.
3) My bubbly frame die cut was the perfect layer over the patterned paper
for little sharky and his fish friends.
4) I stamped the super funny sentiment from Perfectly Blended and
cut it in half.  I then inked the edges of the 2 sentiment strips in blue
to match the card.
5) I foam mounted the fish, sentiment and shark on the card and I'm
picturing the fish being scared of sharky and that the
caffeine is saving THEIR lives! 🤣🤣🤣

Here are the two Rabbit Hole stamp sets I used for today's card:

CAFFEINATED: Shark Clear Stamp 3x4
Caffeinated Shark
Perfectly Blended Clear Stamp 4x6
Perfectly Blended

Don't forget you can now purchase The Rabbit Hole stamps, dies and stencils
at Simon Says Stamp! Stay tuned to The Rabbit Hole FB Fan Page and Instagram
(see links below)
during the new September release so you don't miss out on some
great deals over at Simon Says Stamp!
Oh and by the way, the new Rabbit Hole release starts on August 26th and
just an FYI, y'all are in for some SCARY fun!


For more inspiration, updates, and news make sure to check out these links.

Have a great day, I already am!
🦈 Lisa ðŸ¦ˆ

Bowl of love


Hi TRHD fans!  Shanna here today with a fun shaped card showcasing my favorite goldfish!!  The stamps set is The Rabbit Hole Design's So-Fishticated set, and it is gorgeous!  I love how artsy all the different stamps are, it makes them so fun to color!  


I started off by die cutting 2 fish bowls and creating a "hinge" on one of them to attach and make a card.  I inked the edges of the top bow with Tumbled Glass Distress Ink to give some dimension to the bowl.  My water is another diet piece, that I die cut out of Bristol paper knowing I wanted to do some watercoloring on it.  I stamped the pretty goldfish from So-Fishticated on the water piece using Versa Clair Nocturne ink and heat set it to dry.  My coloring was done with Tombow markers, in shades of orange and teal.  Once I was don't coloring the fish, I masked it off with some masking fluid and then used a wet on wet technique with a couple of blue tones from my Tombow collection for the water.  


My sentiment came from the set, and I stamped it on white cardstock, cut it down to a strip, and popped it up with foam adhesive.  I did trim the line of the strip to match the shape of the bowl.  A white gel pen helped me add some final highlight lines to the bowl and I was done!

 **Well, ALMOST done**  

At the last minute I decided that gorgeous Goldy needed some sparkle!  Liquid Pixie Dust to the rescue! (cue Peter Pan music??!!)  I am in LOVE with this stuff, and guess what?!?  The Rabbit Hole Designs carries it in their shop!!  They actually have a bunch of new *Crafter's Essentials* that are totally worth checking out!  Take a peek at what they have to offer here.

Well, that's all today....Thank you so much for stopping by!  Be sure to swing by and say hi over at my blog, and follow along with my caffeinated adventures on Instagram!  See you all again soon
~Shanna


For more inspiration, updates, and news make sure to check out these places