Pages

Showing posts with label Thank You card. Show all posts

Cool Pineapple Mahalo


Mahalo, I am so glad you stopped by today's blog!  Mahalo is a Hawaiian word used to express gratitude, admiration or sincere thanks. It is often used as a greeting.   

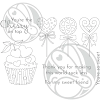
I created this cool pineapple card using The Rabbit Hole Designs new Aloha - Pineapple stamp set. It is beautifully illustrated by Agota Pop. The Mahalo sentiment is perfectly die cut using the coordinating dies.  I paired them with the You've Been Framed stand alone die set to add the background burst and frame.
You can see the die cut burst behind the pineapple and the dot and dashed frame.  I love the details in the You've been Framed die set.  It creates a suble way to draw attention to the pineapple image.  This cooler than cool pineapple is stamped with black ink and colored with OLO Markers using the Y (yellow), YG (yellow green), and B (blue) markers.

Products Used
   

Thank you, I appreciate you taking time from your day to stop by and check out my Cool Pineapple Mahalo card. I hope you are inspired to create something lovely today! Don't forget to check out the fun and fruity June release from The Rabbit Hole Designs.


Be Creative ~ Stay Inspired

Jenn Gross


Follow me, Journey Coach Jenn, on 

Instagram - https://www.instagram.com/journeycoachjenn/

YouTube - http://www.youtube.com/c/JourneyCoachJenn

Blog - http://www.journeycoachjenn.com/


For more inspiration, updates, and news make sure to check out these places


The Rabbit Hole Designs

The Rabbit Hole Designs Instagram

The Rabbit Hole Designs Facebook Page

The Rabbit Hole Designs Pinterest

The Rabbit Hole Designs YouTube


Your Such a Sweet Friend! - A Sassy Thank You Card

Hello there my crafty friends and welcome to today's blog!    I am so glad you stopped by today!  I am sharing this sassy Thank You card featuring The Rabbit Hole Designs' Sweet Wishes stamp set paired with the Optical-Mesh stencil.  

This is such a fun sweet stamp set!  I used Masking Magic to help create a row of fanned out suckers.  I stamped five of  the heart shape sucker on to the Masking Magic.  You may die cut or fussy cut the suckers depending if you have the coordinating dies.  I set these aside.

Using a light pink ink, and starting with the middle sucker on a 3 3/4" x 5 " piece of coloring cardstock.  I stamped out five suckers masking each stamped sucker before stamping the next. 

I carefully removed the masking suckers and setting them aside to use again later.

I colored the suckers using Olo Markers.  You will find the shading chart and color combos in the photos below so you can follow along.
Olo Markers used for the two outer violet suckers:
V1.1 / V2.4 / V2.3 / V2.6
For the ribbon
R0.3 / R0.4 / R 1.5 / R1.7
For the sucker stick
O7.1 / WG1 / RG3
I used a white gel pen for highlights
For the 2nd and 4th suckers:
R0.1 / R0.2 / R0.3 / R0.4
For the middle dark red sucker:
R5.3 / R5.5 / RV0.6 / R1.7

Once your images are colored,  place a Magic Mask sucker mask over each sucker image. Place the Optical-Mesh stencil over the card front using either a low tack adhesive or a magnetic board.  I colored the stencil with a pale blue ink and a Bitty Blendin Brush. I blended over the stenciled fading it out the color to frame the images.  I removed the stencil and the Masking Magic suckers for the reveal.
I stamped the sentiment in the middle of a 3/4" x 5" strip of red cardstock with clear embossing ink and heat set the sentiment with white embossing powder.   I added three of the new Matte White Enamel Dots to frame the sentiment. It is glued directly below the suckers on the card front.  I attached the card front to a 4" x 5 1/4" light blue cardstock and next attached this full card front to a white A2 card base to complete this sweet sucker card.

Products used


Yui are so sweet to take time from your day to stop by  to see this sassy The Rabbit Hole Designs card. I hope you enjoyed the tutorial,  Olo marker coloring steps and you are inspired to create something lovely today! 


Be Creative ~ Stay Inspired

Jenn Gross


Follow me, Journey Coach Jenn, on 

Instagram - https://www.instagram.com/journeycoachjenn/

YouTube - http://www.youtube.com/c/JourneyCoachJenn

Blog - http://www.journeycoachjenn.com/


For more inspiration, updates, and news make sure to check out these places


The Rabbit Hole Designs

The Rabbit Hole Designs Instagram

The Rabbit Hole Designs Facebook Page

The Rabbit Hole Designs Pinterest

The Rabbit Hole Designs YouTube

Thanks a Bunch!


Hi! Lauren here to share a fun slimline card using the balloon stamp from the newly released Balloon Party stamp set illustrated by Tatsiana Zayats. This is such a beautiful and fun stamp set to color. I love the balloons included in the set and was inspired to make a whole big bunch of balloons kind of like the bunches that they have at theme parks. 


I started out by using the balloon stamp to create a few masks and to stamp the bottom of a white slimline sized (3.5x8.5) cardstock panel. I made sure to mask off the balloons I had stamped on the panel when I added more next to them. 


When I felt I had stamped enough balloons at the bottom of the panel, I stamped a trio floating above my big bunch. Then I stamped the strings to them.


With the balloons all stamped, I colored them in the colors of the rainbow using my colored pencils. Then I trimmed the panel using a stitched slimline die from my stash. 


I then die cut the word "Thanks" using the Thanks-Scripty Word with Shadow Dies from white cardstock. Then I ink blended a matching orange ink onto the word (you could use a coordinating orange card stock. I didn't have the shade I needed). 


Next, I used the Cottontail embossing powder tool to prepare black cardstock for heat embossing. Then stamped my sentiment onto the prepped cardstock using embossing ink and heat set it white embossing powder on.


 I used a ruler to line up my sentiments so that they would be straight, then I adhered them onto my panel.


The last step was to adhere my panel onto a white slimline card base measuring 3.5"x8.5".

I am really pleased with how fun this card turned out. I love how colorful all the balloons are. I hope this card inspires you to create your own bunch of balloons with this great new set! Thanks for visiting!

For more inspiration, updates, and news make sure to check out these awesome places! 


Thanks For Everything


Hello! Lauren here today sharing my thank you card featuring the new Thanks, Scripty stamp and die sets. This was an easy card to make beautiful thanks to Niccole's gorgeous alcohol ink background panel! 

To turn the panel into a finished card, I first prepared a piece of vellum using the new Cottontail Embossing Powder Tool. Then I stamped the Thanks word using my watermark ink pad. I covered the word with gold embossing powder, tapped off the excess and heat set it. The Cottontail embossing tool works perfectly on vellum. No stray embossing powder clung to the vellum.


I used the shadow die from the Thanks die set to cut out the embossed word. I adhered it onto the alcohol inked background. 


Next, onto aqua cardstock I prepared, then stamped in watermark ink, the sentiment. Then embossed in gold. I used sentiment strip die from my stash to trim out the sentiment. Then adhered it to the panel. 


The last step, completing the card, was to back the panel with gold mirror cardstock and then adhere it onto a top folding A2 (4.25 x 5.5") white card base.
These Big Scripty words are perfect for creating quick and beautiful cards! Thanks so much for visiting!

Links to TRHD products used: 

Thank You

Hello there! Michelle here, sharing a quick one layer, CAS design using one of the newest stencils, 
Splish Splash and a previously released stamp set, Marquee Words. I trimmed and scored a piece of
Bristol Smooth cardstock to 4 1/4 x 5 1/2. 
Next, I created a mask with a piece of scrap paper. I trimmed the scarp paper to fit the same size as the card base. Using circle dies ( any manufacturer will do), die cut a few randomly placed circles. 
This is your mask!

Lay the may over the face of the card and secure with washi tape. Lay the stencil over 
and ink up die cut "windows". I used distress oxide inks in shades fossilized amber,
dried marigold, and picked raspberries. Remove the mask. I placed the card in my Misti Mini
and stamped the sentiments. I masked the letter S in the word THANKS before stamping.
I splattered some gold paint and added some silver stickles glitter glue.
For a finishing touch I added some sequins.

Thanks for stopping by for a peek!

Michelle


Thanks Card & a Farewell

Hello The Rabbit Hole Designs fans!  It's Maria back on the blog with you today with a Thank You card showcasing the Pretty in Peony stamp set.


Before I give you the details on how I made my card, this is to let you all know that this is going to be my last post as a DT member for The Rabbit Hole Designs.  My schedule has been really crazy lately and I am trying to cut back on commitments.  I have thoroughly enjoyed being on this journey with MaryAnn Samuelson and Heather Ferguson (co-owners of TRHD) with the rest of the design team members.  This "thank you card is for you guys!


Here's my card:


To begin, I stamped the images on some Neenah solar white card stock using Pale Fig and Spring Meadow Harmony Inks by Spectrum Noir.  I lightly colored the image with my Hydrangea and Citrus Green TriBlend markers.   To create softer colors, I used my alcohol blender so that some parts looked like they are colored with watercolors.

I also stamped the flowers and leaves using Spectrum Noir watermark ink and sprinkled this with white embossing powder.  I heat-set the images using my heating tool.  I fussy-cut the images with my precision scissors.

I die-cut another piece of white card stock using a die from my stash.  I foam-mounted this piece on my colored background.

I adhered the leaves and the small flower with some liquid adhesive.  I also layered the main flower with some liquid and foam adhesive to create more texture and dimension.

Lastly, I die-cut the word "thanks" using a die from my stash on some black card stock, and the shadow with some vellum.  I adhered this piece on my card.

Here's a little close-up:


I would like to thank MaryAnn and Heather for being the most wonderful lady bosses ever!  I had a great time designing for you guys from the very beginning, and I only wish you both greatest success in the future.   I also would like to thank the rest of the design team for being so supportive of me.  You guys rock!

I hope you like my card today and got inspired.  If you are looking for further details about my project including supplies used, I would be so grateful if you can stop by my blog today at:

For more inspiration, updates and news make sure to check out these places.  Happy stamping!

Peonies in Gold


Hello again Rabbit Hole fans and welcome back to the blog! It's Lisa here with you today and I have 2 cards to share with you using the new release Pretty in Peony stamp set.


Did you ever have an idea in your head for a card and when you actually sat down to make it,  you couldn't make it look like the picture in your head?   It always amazes me when that happens because I see it so clearly yet I just can't reproduce it.  It is very frustrating and sometimes I wind up creating something different but still very beautiful.  This was one of those times.  These 2 cards started off as an idea to have very bright flowers pop against a very stark black background.  Although I like how they came out, they started out very different in my head! 


Card Recipes

  • I began by stamping the peonies in clear versamark ink on watercolor paper and heat embossing them in gold.  
  • Next I took my Zig clean color markers and did some quick coloring with 2 colors for the flowers and 2 colors for the greenery.  
  • Once I had the color down, I took a small wet paintbrush to move the color around for a loose watercolored look.  What a therapeutic technique!
  • I took the flowers and leaves over to my scan n cut and cut them all out.
  • I prepped 2 card bases in black, both with a scalloped rectangle die. One rectangle I embossed with a diagonal striped embossing folder.
  • For the sentiments, on the first card I used a Thank You die from my stash and cut it out in gold glitter paper to match the outline of the flowers. On the second card I stamped a sentiment from the set in clear versamark ink and heat embossed it in gold on to a small scalloped rectangle.
  • I popped the some of the flowers up on foam tape to give them some dimension.

Thank you so much for joining me today on the blog.  I hope you have enjoyed my cards and make sure to check out all of the brand new items in the shop! The Rabbit Hole Designs has just added 5 fun new dies to their inventory and you're going to want to check them out!


For more inspiration, updates, and news make sure to check out these links.