Pages

Showing posts with label Mini Slimline. Show all posts

Quick and Easy Christmas Card

 Hi everyone!  Amy here with you today sharing a quick and easy card I created using the 1 Line Reindeer Stamp Set.  These types of cards are always great when you need a card, and you need it fast!

1 Line Reindeer Stamp Set, Retro Christmas Paper Pack, Clear Sparkle Enamel Dots by The Rabbit Hole Designs #therabbitholedesignsllc #therabbitholedesigns #trhd

I started this card by cutting a piece of white cardstock to mini slimline size.  I then stamped the 1 Line Reindeer image and sentiment, then gold heat embossed.  

1 Line Reindeer Stamp Set, Retro Christmas Paper Pack, Clear Sparkle Enamel Dots by The Rabbit Hole Designs #therabbitholedesignsllc #therabbitholedesigns #trhd

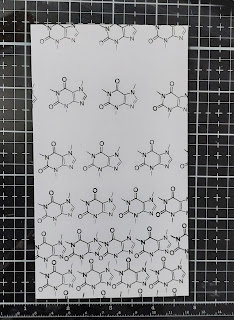
For the cardbase, I used a piece of patterned paper from the Retro Christmas Paper Pack.

1 Line Reindeer Stamp Set, Retro Christmas Paper Pack, Clear Sparkle Enamel Dots by The Rabbit Hole Designs #therabbitholedesignsllc #therabbitholedesigns #trhd

For finishing touches on this card I added some red glitter stickles to the reindeer's nose, and a few Clear Sparkle Enamel Dots!  Thank you and I hope you enjoyed my card today!

For more inspiration, updates, and news make sure to check out these places:

In Need of a Bigger Cup!


Hello! It's Lauren here today to share my greyscale mini slimline card featuring this new adorable Caffeinated Llama. I was inspired by a cute card a fellow brand ambassador recently made. This llama is a very serious coffee drinker so a bigger cup is definitely in order!!

To create this card, I first stamped the llama onto white cardstock in black ink. Then I colored him up using colored pencils. I used varying shades of warm greys for the llama and cool greys for the shorts, slippers and mug. I then die cut him out using the corresponding die.


Next, I adhered the llama onto a black cardstock dotted oval that I had die cut using a die from my stash. 

After that, I used the included coffee molecule stamp to create my background. I stamped them onto a white cardstock panel measuring 3.20x6.20. Starting with the molecules close together at the bottom then gradually spreading out as they go up the panel. 


I then adhered the llama oval onto the panel and stamped my sentiment above it.


I backed the panel with a slightly larger black cardstock panel then adhered it onto a white mini slimline (3.25x6.25) card base.

This card was quick and easy to make. I hope it inspires you to try your own greyscale Caffeinated Critter card!
 
For more inspiration, updates, and news make sure to check out these awesome places! 

Floral Birthday Mini-slimline Card


Hey crafty friend, it's Amanda from Pear Blossom Press again. And today, I'm sharing a lovely mini-slimline birthday card, featuring one of my favorite stamp sets, Pretty in Peony. Isn't it lovely paired up with the new hot foiled BIRTHDAY sentiment? That gold foil really adds an elegant touch. 

If you'd like all the specific Copic markers, and details on how I colored this card, head on over to my blog... pearblossompress.com.

Supply List
Pretty in Peony
Birthday - Scripty Word Hot Foil Plate
Birthday - Scripty Word with Shadow Dies
Birthday - Scripty Stamp Set

Thanks so much for stopping by today! I hope I've inspired you to give this card a try. If you do, tag me on Instagram @pearblossompress so I can cheer you on! I'll be back soon with more fun cards to share. In the meantime, check out these fun places for more inspiration, updates and the latest news...

9 Shades of Grey - Starring Clarence


 Hello my crafty friend! It's Amanda, from Pear Blossom Press, back with another fun card. And today, Clarence is the star of my monochromatic mini-slimline! Lol, I pulled out lots of grey markers to color him; not quite 50, only nine. Isn't he cute though? Head on over to my blog for all of the details... pearblossompress.com

If you'd like to recreate a card like this, be sure to head on over to the shop and pick up these supplies:

Thanks so much for stopping by today! I hope I've inspired you to give this card a try. If you do, tag me on Instagram @pearblossompress so I can cheer you on! I'll be back soon with more fun cards to share. In the meantime, check out these fun places for more inspiration, updates and the latest news...

Hello Mini Slimline {Quick and Easy}

Hello! Kimberly here and I am just LOVING these new releases from The Rabbit Hole Designs! I have a really easy mini slimline card to share using the Hello Die and matching Hello Stamp set


To start this card, I cut a yellow piece of cardstock that I had I my stash to 6 1/2" x 3 1/2". I stamped the sun image from the Hello stamp set all over the yellow cardstock in Versamark ink. The nice thing about embossing ink is that it leaves a slightly darker image than the cardstock you stamp it on as long as it is not a coated cardstock. Next, I stamped the word "Sunshine" all over a couple of extra pieces of the yellow cardstock using Apricot Pinkfresh Studio ink. 


I lined up the "Hello" die in the "Hello" shadow die and used washing tape to keep them lined up. I die cut the word hello out of both pieces of yellow cardstock that I stamped the word sunshine all over. Then, I separated the dies and die cut three "Hello" shadows out of white cardstock. I adhered the two Hello die cuts to the white Hello shadows. I adhered the yellow Hello outline that was die cut to the last white shadow die cut. I adhered them to the yellow card panel. I added foam tape tot the middle one for dimension. To finish the card, I added the yellow card panel to a white card base that measured 7 1/2" x 6  3/4"  and scored at 3 3/4". The finished card will measure 6 3/4" 3 3/4".

Thank you for stopping by!

Kimberly

For more inspiration, check out these places: