Pages

Showing posts with label Agota Pop. Show all posts

Bright and Joyful Christmas Tree


Hello my crafty friends, Jenn here with a Bright and Joyful Christmas tree card featuring The Rabbit Hole Designs Warm and Cozy stamp set (illustrated by Agota Pop). I wanted to create and easy card, but som,ething that is a little bit elegant too. I hope you enjoy this twist on a traditional Christmas card.

Supply List

Other supplies (from your stash)
Paint brushes
Metalic watercolors
Bearly Arts Craft Glue
White ink
VersaMark Watermark ink
Gold Embossing Powder
Let's take a look at this simple step tutorial:
A - Use either a Bitty Blending Brush or Cottontail Blending Brush with white ink to stencil the Candy Twist stencil design in an oval shape in the center of a piece of 4' x 5 1/4" black cardstock

B - Use a paint bush and gold watercolor to add gold splatters the card front and set it aside to dry

C & D - Use the white ink and lightly stamp the Christmas tree image (from the Warm and Cozy stamp set) onto a piece of black coloring cardstock.  Watercolor the image with green, gold, red, and brown metalic and/or shift watercolors
E - Fussy cut or die cut the colored Christmas tree 

F -  Use the Cottontail Embossing Powder Tool to treat a piece of black cardstock. Stamp the Merry Christmas sentiment (from the Poinsettia and Pinecone stamp set) with VersaMark Watermark ink.  Dust it with gold embossing powder and heat set the sentiment. Use the coordinating dies to die cut the sentiment

G & H - Glue the stenciled card front on a green A2 cardbase.  Use adhesive foam squares to attach the painted Christmas tree to the center of the stenciled Candy Twist oval. Glue on the Merry Christmas sentiment above and below the tree as shown
Thank you for taking time  to visit today's blog and check out this Bright and Joyful Christmas Tree card created with The Rabbit Hole Designs' Warm and Cozy stamp set, Poinsettia and Pinecone stamp and die set, and Candy Twist stencil. I hope you are inspired to create something lovely today!

Be Creative ~ Stay Inspired

Jenn Gross


Follow me, Journey Coach Jenn, on 

Instagram - https://www.instagram.com/journeycoachjenn/

YouTube - http://www.youtube.com/c/JourneyCoachJenn

Blog - https://journeycoachjenn.blogspot.com


Snow Much Fun Holiday Gift Tag


Hello crafty friends! I created and colored a holiday tag featuring The Rabbit Hole Designs Warm & Cozy stamp set.  The stamp set is an Agota Pop illustration and includes 4 snowman images, a Christmas Tree, 2 presents and 4 cozy sentiments

TRHD Supply List

Other Supplies 
Distress Oxide inks - Salvaged Patina, Victorian Velvet
Pawsitively Saturated ink - Melon
Masking Magic 
OLO Markers
I stamped the snowman with the bird onto a 3" x 7" piece of white cardstock along with the Snow Happy We're Friends sentiment. I created masks for both the snowman and sentiment. I used the Bitty Blending Brushes to ink blended the Melon around the snowman then added the Victorian Velvet to ink blend around the Melon color.  The last color added is Salvaged Patina.

I splattered the ink blended tag with white iridescence watercolor for a snowy effect. I removed the Masking Magic from the tag and colored the image with OLO markers - BV2.2, BV1.4, BV4.4 / R0.3, R0.4, R1.7 / B0.2, B0.3 / O7.3, O7.7

I cut the tag to 3 1/2" x 4 1/2" and attached a teal and pink ribbon to finish the tag.

Thank you, I appreciate you taking time from your day to stop by and check out this easy Holiday Gift Tag created with The Rabbit Hole Designs' Warm & Cozy stamp set. I hope you are inspired to create something lovely today!


Be Creative ~ Stay Inspired

Jenn Gross


Follow me, Journey Coach Jenn, on 

Instagram - https://www.instagram.com/journeycoachjenn/

YouTube - http://www.youtube.com/c/JourneyCoachJenn

Blog - http://www.journeycoachjenn.com/


For more inspiration, updates, and news make sure to check out these places


The Rabbit Hole Designs

The Rabbit Hole Designs Instagram

The Rabbit Hole Designs Facebook Page

The Rabbit Hole Designs Pinterest

The Rabbit Hole Designs YouTube


BOO-tiful Silly Pumpkins

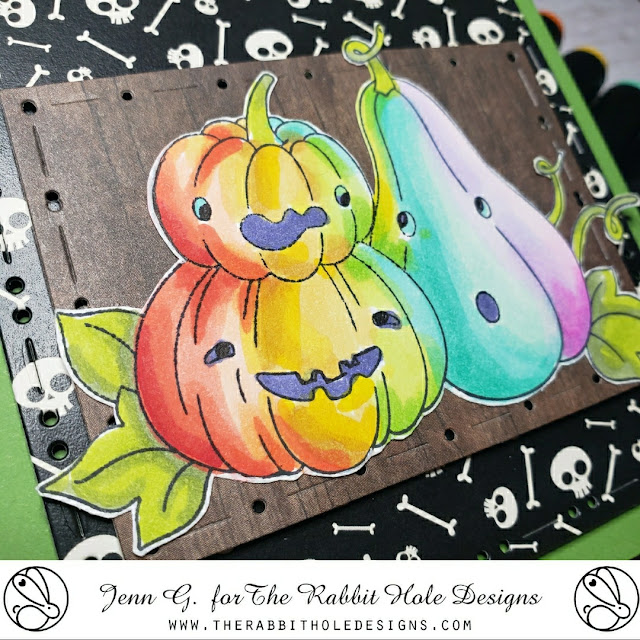
Hello my crafty friends!  Jenn here with a colorful Halloween card featuring The Rabbit Hole Designs  Silly Pumpkins stamp set paired with the You've Been Framed dies set. These pumpkins are so silly and whimsy. I decided to color them in rainbow colors. I’m using printed cardstock from my stash for the background layers.

Supply List: 

From my stash:
OLO Markers 
Boo word die
Printed cardstock 

I stamped he Silly Pumpkin image (an Agota Pop illustration) with black ink and colored them with OLO Markers in a rainbow blend.  I grabbed some printed Halloween cardstock  with skulls and die cut the medium You've Been Framed die.  The woodgrain  cardstock uses the smallest You've Been Framed die and it is cut smaller using the inside frame die to trim off about 2" from the long end.  

I layered the Halloween cardstock on a green A2 card base with adhesive foam squares and added the You've Been Framed  wood cardstock layer on top with adhesive foam squares.  The Silly Pumpkins are glued to the woodgrain cardstock The Boo sentiment from my stash and is added above the pumpkins with adhesive foam squares.

It is a super simple card.  Thank you for stopping by to check out this fun and whimsy Halloween card created with The Rabbit Hole Designs Silly Pumpkins stamp set.  I hope you are inspired to create something lovely and fun today!.

Be Creative ~ Stay Inspired

Jenn Gross


Follow me, Journey Coach Jenn, on 

Instagram - https://www.instagram.com/journeycoachjenn/

YouTube - http://www.youtube.com/c/JourneyCoachJenn

Blog - http://www.journeycoachjenn.com/


For more inspiration, updates, and news make sure to check out these places


The Rabbit Hole Designs

The Rabbit Hole Designs Instagram

The Rabbit Hole Designs Facebook Page

The Rabbit Hole Designs Pinterest

. - . The Rabbit Hole Designs YouTube

Simply Gourd-eous Halloween Card

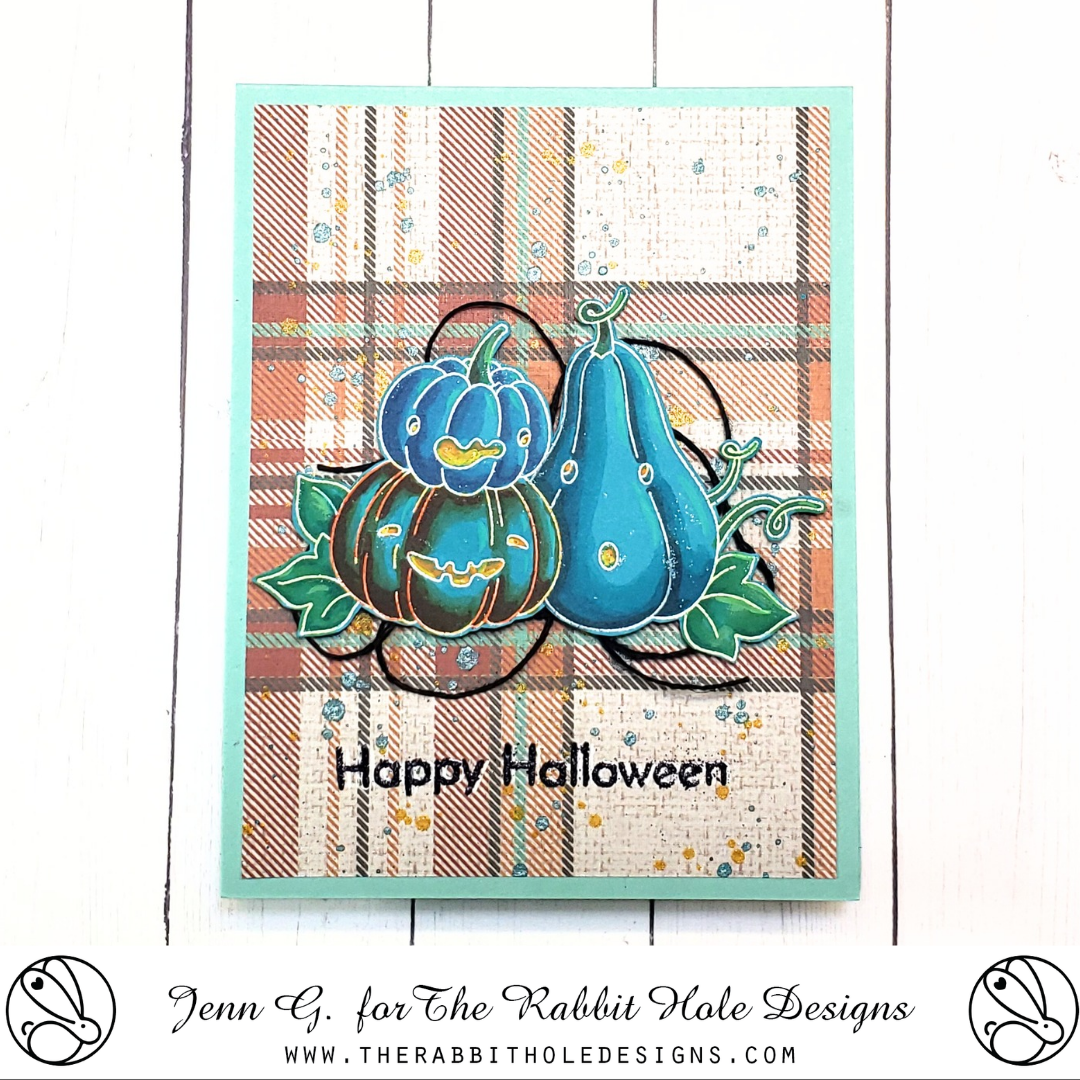
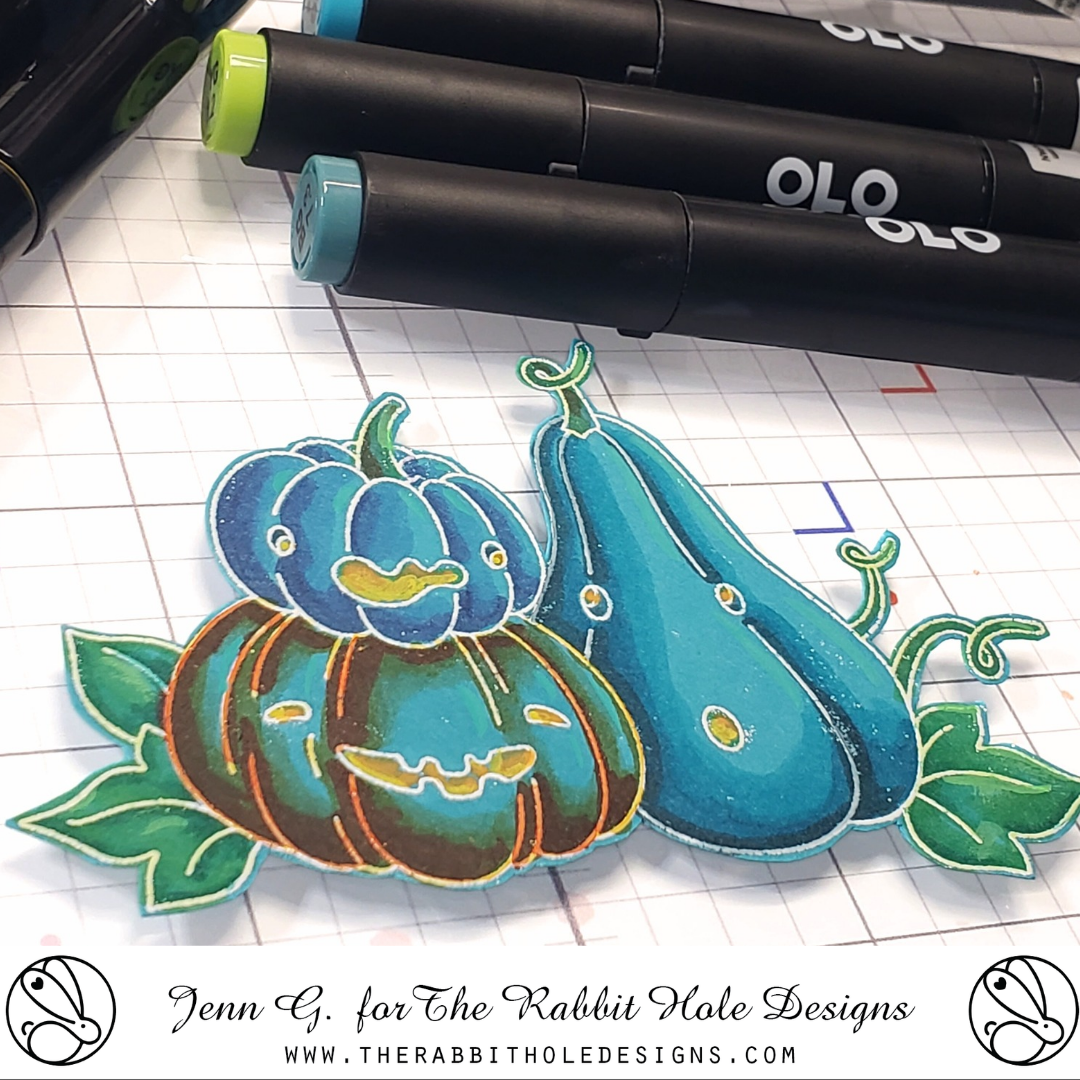
Hello creative friends!  Jenn here with this gourd-geous blue pumpkin card featuring The Rabbit Hole Designs' Silly Pumpkins stamp set, an Agota Pop illustration.

I love how vibrant these pumpkins are.  I treated a piece of bright blue cardstock with the Cottontail Embossing Powder Tool to help repel embossing powder from unwanted areas of cardstock. I stamped the image with VersaMark Watermark ink and heat set it in white embossing powder.
I shaded the Silly Pumpkins with OLO Markers using the blue (B) for the littlest pumpkin, blue green (BG) for the taller pumpkin, and orange (O) for the medium pumpkin.The leaves are shaded with green (G) and green  yellow (GY). I used a yellow Sharpie Creative Marker to brighten the pumpkins eyes and mouths. I fussy cut silly pumkind out and set the cluster to the side.
The A2 card base is cut from a light aqua cardstock.  The card front is a cut from coordinating printed cardstock in a brown, grey and aqua plaid. I splashed some gold and aqua metalic splatters on the card front. After the splatters dried, I treated the lower part of the card front with the Cottontail Embossing Powder Tool before stamping the Happy Halloween sentiment and heat setting it with black and white embossing powder.

I glues the plaid card front to the card base, added and attached twisted and looped black twine with double sided adhesive tape to the center of the card. I attached the pumpkins cluster with double sided adhesive foam tape over the twisted twine on the card front completing the card.

The Rabbit Hole Designs Supply List

Other supplies from my stash
OLO Markers
VersaMark Watermark ink
White Embossing Powder
Black Embossing Powder
Black Twine
Metalic paint (to splatter)
yellow Sharpie Creative Marker
 

Thank you, I appreciate you taking time from your day to stop by and check out this Simply Gourd-geous Halloween card created with The Rabbit Hole Designs' Silly Pumpkins stamp set. I hope you are inspired to create something lovely today! 


Be Creative ~ Stay Inspired

Jenn Gross


Follow me, Journey Coach Jenn, on 

Instagram - https://www.instagram.com/journeycoachjenn/

YouTube - http://www.youtube.com/c/JourneyCoachJenn

Blog - http://www.journeycoachjenn.com/


For more inspiration, updates, and news make sure to check out these places


The Rabbit Hole Designs

The Rabbit Hole Designs Instagram

The Rabbit Hole Designs Facebook Page

The Rabbit Hole Designs Pinterest

The Rabbit Hole Designs YouTube


Under Your Spell - Halloween Shaker Card

Hello crafty friends!  Jenn here, follow mw on social media @journeycoachjenn  Today I am sharing this fun interactive halloween card created using five products from The Rabbit Hole Designs. 

I started out with the newly released Pinwheel stencil, an A2 Shaker Acetate Sheet for the infinity shaker, the patented Cotton Tail  Embossing Powder Tool to treat the gray cardstock before heat embossing white cobweb images in the background and the sentiment on the black pumpkin, and images from the Meowgical stamp set. 

Supplies include:

Other  Supplies
OLO Markers
Chunky upper case alphabet letters to spell out "BOO" (from my stash)
Small Pumpkin die (from my stash) 
Purple and Orange sequins (from my stash)
Distress Oxide inks - Villianous Purple and Carved Pumpkin
VersaMark Clear Watermark Ink
White Embossing Powder
Bearly Arts Craft Glue
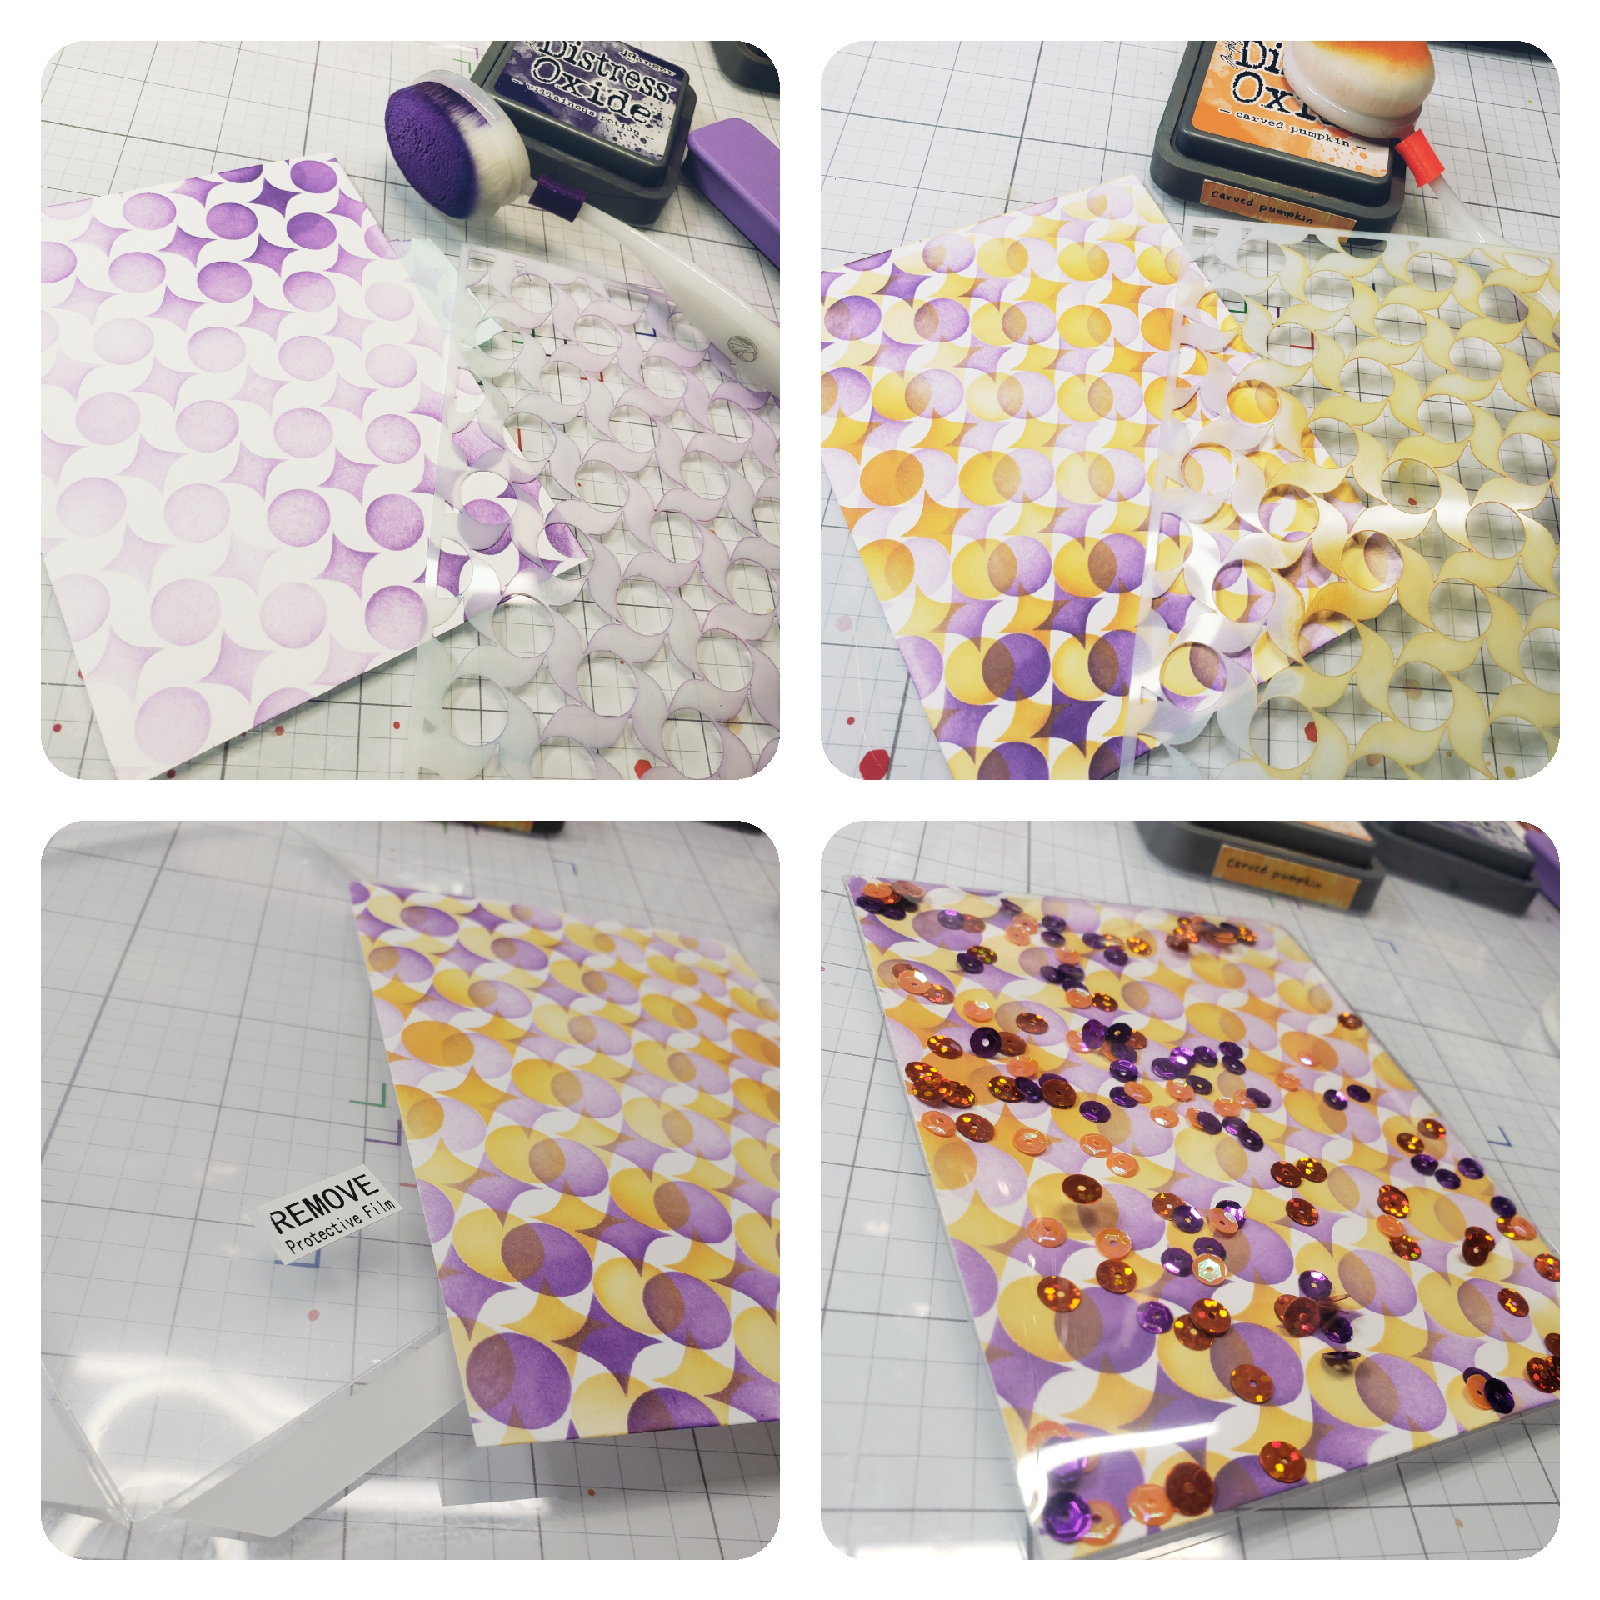
I stenciled a piece of 4 1/8" x 5 3/8" white cardstock using the Pinwheel stencil with Villanous Purple Distress Oxide ink. Clean the stencil and place it over the purple Pinwheels shifting it slightly catching the curve of the stencil circle in the curve of the purple stencil pin wheel.  Stencil it with Carved Pumpkin Distress Oxide ink.

Use one of the A2 Shaker Acetate Sheets and adhere it to three of the four sides of the Pinwheel stenciled background card. Add some purple and orange sequin shaker bits in the pocket and seal the remaining shaker window opening.
Using the Meowgical stamp set (illustrated by Agota Pop), stamp the spiderweb four times on gray cardstock. Heat emboss with white embossing powder. Use die cut alphabet letters from your stash to die cut the word "boo" from the embossd spiderweb cardstock and die cut a second set from black cardstock. Glue the spiderweb letters on top of the black letters off setting them slightly to create a black shadow. Set them aside.

Stamp the cat in the pumpkin.  I colored him with OLO markers using the Orange, Blue Green markers and cut out the image.
I stamped and heat embossed the sentiment  "I purred a spell on you" onto a piece of black cardstock treated with the Cottontail Embossing Powder Tool.   It is stamped with VersaMark Watermark ink and heat set with white embossing powder.  I used a pumpkin die from my stash to cut out the sentiment. Glue on the BOO at the top left side of the shaker card and glue the black  pumpkin sentiment with the kitty in the pumpkin image to the lower right side of the shaker card.  Attach the card to a whit A2 card base to complete the card.

Thank you, I appreciate you taking time from your day to stop by and check out today’s The Rabbit Hole Design project.  I enjoyed sharing the steps to recreate this fun halloween shaker card.  I hope it inspires you to create something lovely today!


Be Creative ~ Stay Inspired

Jenn Gross


Follow me, Journey Coach Jenn, on 

Instagram - https://www.instagram.com/journeycoachjenn/

YouTube - http://www.youtube.com/c/JourneyCoachJenn

Blog - https://journeycoachjenn.blogspot.com/  


For more inspiration, updates, and news make sure to check out these places


The Rabbit Hole Designs

The Rabbit Hole Designs Instagram

The Rabbit Hole Designs Facebook Page

The Rabbit Hole Designs Pinterest

The Rabbit Hole Designs YouTube 

Wishing You the Happiest Adventure!


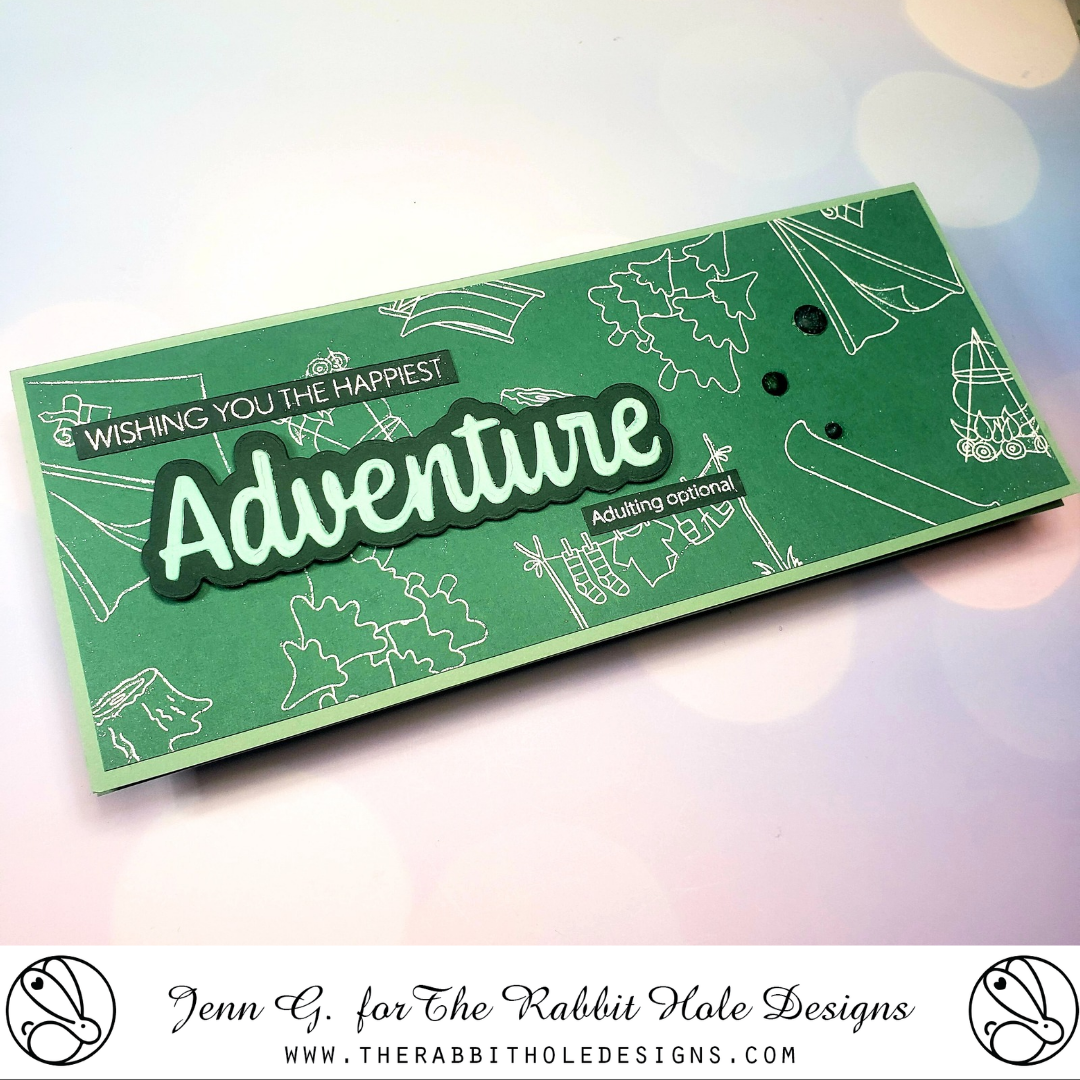
Hello crafty friends!  Jenn Gross here with an easy slimline card created with The Rabbit Hole Designs June Release. I am using these beautiful camping images illustrated by Agota Pop from both the Glamping with Tailette stamp set and Tenting with Tailette stamp set.  I love how stamping and heat embossing the line images create an simple background.

Supply List 


The only thing I colored on this card is (believe it or not) the Matte White Enamel Dots. They take colored pencil beautifully 
The background is a piece of medium green cardstock cut to 3 1/4" x 8 1/4". I treated the paper with the Cottontail Embossing Powder Tool. Once you treat the cardstock, the embossing powder only adheres only to the stamped images. The camping images are stamped in a random pattern using VersaMark Watermark ink then dusted with white embossing powder and heat set to create the background.

The word Adventure is die cut from light green cardstock  and the shadow layer is die cut from dark green cardstock.  The "Wishing You the Happiest" is from the Birthday Word stamp set and the "Adulting optional" is from Sassy Sentiment stamp set.  Both of these are stamped on the dark green cardstock with VersaMark Watermark ink and heat set with white embossing powder. I cut these sentiments into strips.  The sentiments and Adventure word are positioned and glued on to the left side of the card.


I chose a dark green colored pencil and colored a small, medium, and large Matte White Enamel Dots and attached them to the card front.  Attach the completed card front to a slimline card base and you have a finished card. 

Thank you, I appreciate you taking time from your day to stop by and check out today’s The Rabbit Hole Design project.  I hope you are inspired to create something lovely today!


Be Creative ~ Stay Inspired

Jenn Gross


Follow me, Journey Coach Jenn, on 

Instagram - https://www.instagram.com/journeycoachjenn/

YouTube - http://www.youtube.com/c/JourneyCoachJenn

Blog - https://journeycoachjenn.blogspot.com/  


For more inspiration, updates, and news make sure to check out these places 

The Rabbit Hole Designs

The Rabbit Hole Designs Instagram

The Rabbit Hole Designs Facebook Page
The Rabbit Hole Designs Pinterest

The Rabbit Hole Designs YouTube

Crafting Adventures: Glamping with Tailette Stamp Set & Dies

Hey there, Rabbit Hole Designs family! Rick here, thrilled to bring you another charming project today. We’re diving into the wonderful world of crafting with The Rabbit Hole Designs’ Glamping with Tailette Stamp Set & Dies. If you’re a fan of the great outdoors, you’re in for a treat. So grab your favorite beverage, settle in, and let’s get started!  

Glamping with Tailette Camping Card by Rick Adkins Over Head View

Creating a Whimsical Glamping Scene: 

I’ve always found solace in combining my love for crafting with the beauty of nature. The Glamping with Tailette Stamp Set & Dies offers the perfect opportunity to blend these two passions. Let’s embark on a crafting journey that captures the essence of the great outdoors.

Glamping with Tailette Camping Card by Rick Adkins Side View

Stamping and Coloring Techniques: 

Using The Rabbit Hole Designs’ Glamping with Tailette Stamp Set, I stamped out the adorable Tailette image and charming pine trees. Coloring these images was a breeze with alcohol markers from my stash. 

Pro tip: When coloring, start with light layers and build up for depth and dimension.

Die-Cutting for Precision: 

Thanks to The Rabbit Hole Designs’ Glamping with Tailette Dies, cutting out our stamped images was a breeze. These dies ensure clean, precise cuts every time, elevating the overall look of our project.

Glamping with Tailette Camping Card by Rick Adkins Front View

Background Blending: 

To create a dreamy backdrop for our glamping scene, I turned to my stash of inks. Blending soft clouds and lush grass with my chosen ink colors; which will added depth and dimension to our card.

Layering Patterns and Textures: 

Choosing the right pattern papers is key to creating a cohesive look. I reached for a camping themed paper pad from my stash to add texture and interest to our card front. The layering of patterns brings our glamping scene to life.

Glamping with Tailette Camping Card by Rick Adkins Close Up View

Assembling the Card: 

With all the elements in place, it’s time to assemble our card. Adhering Tailette and the pine trees with foam adhesive adds dimension and visual interest. A final touch of stamped images on the inside completes the look.

Finishing Touches and Final Thoughts: 

And there you have it—a charming glamping-themed card that’s perfect for any outdoor enthusiast. I hope this project inspires you to get creative and capture your own outdoor adventures in card form. Until next time, happy crafting!

Glamping with Tailette Camping Card by Rick Adkins

Thank you for joining me on this crafting adventure! Don’t forget to share your creations and tag us on social media. And if you haven’t already, be sure to check out The Rabbit Hole Designs for more amazing crafting supplies. You can find a full list of supplies on my blog Happy crafting!

Rick

The RHD Affiliate Disclaimer:

We want to ensure transparency and honesty in our interactions with you, our valued readers. Please be aware that the links provided on The Rabbit Hole Designs Blog may be affiliate links. This means that if you make a purchase through these links, the project designer may earn a small commission at no extra cost to you. Your support means the world to us!


We kindly request that you accept the tracking cookie for the affiliate websites. Rest assured, this will not expose your computer to viruses or compromise your information. It's a necessary step for the company to attribute the sale to the affiliate, ensuring that creators like our creatives receive their rightful commissions.


Your trust and support empower our creators to continue sharing creativity and inspiration through our blog. Thank you for being an integral part of The Rabbit Hole Designs community!

I am here to kelp! - a Fin-tastic interactive wobbler card.


Hello crafty friends!  Jenn here! You can also find me on social media @journeycoachjenn.  Today I am on The Rabbit Hole Designs Blog sharing an adorable  interactive wobbler card.  It is created with The Rabbit Hole Designs new Fin-tastic stamp set (an Agota Pop illustration) paired with the Deco Flowers layered stencil, You've Been Framed dies, Splish Splash Stencil and the Making Waves stencil.
I colored the Mermaid with OLO markers using YG 8.3, 8.5 and 8.7 for the hair. The skintone is BG 7.0, 7.2, and 7.3.  The mermaid tail is colored with BG 2.1, 2.3 and 2.4.  The sea shells and coral are colored with R 2.2 , 2.4 and OR 1.3 and 1.6. She has been cut out and a wobbler has been attached to her back and then to the card panel. 

I created the card background by lightly stenciling the Splish Splash stencil in a light blue. I added the kelp using 3 of the stencil layers from the Deco Flower stencil. The ocean floor is stenciled in brown gray ink using the Making Waves stencil.

The sentiment is stamped on a blue cardstock  and fussy cut. I use the You've Been Framed dies to cut out the card front and the blue layer, before attaching them to an A2 kraft cardstock card base.

Supplies List
Action Wobblers 
Liquid glue

Thank you, I appreciate you taking time from your day to stop by and check out today’s The Rabbit Hole Design project.  I hope you are inspired to create something lovely today!


Be Creative ~ Stay Inspired

Jenn Gross


Follow me, Journey Coach Jenn, on 

Instagram - https://www.instagram.com/journeycoachjenn/

YouTube - http://www.youtube.com/c/JourneyCoachJenn

Blog - https://journeycoachjenn.blogspot.com/  


For more inspiration, updates, and news make sure to check out these places


The Rabbit Hole Designs

The Rabbit Hole Designs Instagram

The Rabbit Hole Designs Facebook Page

The Rabbit Hole Designs Pinterest

The Rabbit Hole Designs YouTube


You Mermaid It! - Graduation Gift Card Tag


Hello crafty friends.  I hope you are having a mermazing day!  Jenn here! You can also follow me on social media @journeycoachjenn.  With graduations just around the corner, I thought I would be fun to create a super cute graduation gift card holder with the new Fin-tastic stamp set  (illustrated by Agota Pop).  I used the sentiment from the Salty Air stamps set.  The background is created with the Splish Splash stencil. 
A -  The Splish Splash stencil is used to create the water background on a piece of 4" x 5 1/4" Aqua Sky cardstock. For the ink blending, I use TRHD Bitty Blending Brushes with a light green and a light aqua ink

B - Using a tag die from my stash, I cut out two  2 1/2" x 4 1/2" This size tags to allow for a gift card to be added.  Die cut one tag from gray cardstock for the tag back. Die cut a second tag from the Splish Splash stenciled panel for the tag front. The mermaid and coral cluster is colored with OLO Markers 

C - I stamped the "Congrats! You mermaid it!" sentiment to the upper left of the tag front and glued the mermaid in place. The coral cluster is attached with double sided foam tape.  Attach the to tags together using 1/4" double sided ashesive foam tape, making sure to leave a pocket opening at the top of the tag. I added six Clear Sparkle Enamel Dots to the tag

D - Insert a gift card and tie the tag opening closed with green twine.  This will be such a lovely graduation gift.  You can replace the gift card with cash if you prefer


Thank you, I appreciate you taking time from your day to stop by and check out today’s The Rabbit Hole Design project.  I hope you are inspired to create something lovely today!


Be Creative ~ Stay Inspired

Jenn Gross


Follow me, Journey Coach Jenn, on 

Instagram - https://www.instagram.com/journeycoachjenn/

YouTube - http://www.youtube.com/c/JourneyCoachJenn

Blog - https://journeycoachjenn.blogspot.com/  


For more inspiration, updates, and news make sure to check out these places


The Rabbit Hole Designs

The Rabbit Hole Designs Instagram

The Rabbit Hole Designs Facebook Page
The Rabbit Hole Designs Pinterest

The Rabbit Hole Designs YouTube


Perfect Balance - Light Up Birthday Card


Hello crafty friends!  I am super excited to be back with this fun interactive light up card. I have been taking a break from crafting to allow my eye to heal.  I had eye surgery for a detached retina. It is healing well, but may still take a few more weeks to get the total focus back.

Today I am sharing a card I made for The Rabbit Hole Designs April release. I using the Namaste stamp set with coordinating dies paired with the Year 4 Birthday stamp set (by Agota Pop) 
I stamped the the Namaste yoga sheep and colored it with Red and Red Violet OLO markers. I am using it for the cupcake frosting.  I created a mask to cover the yoga sheep and stamped the cupcake from the Year 4 Birthday stamp set and colored it with Blue Green OLO markers. I fussy cut the cupcake image and I added a clay candle to the sheep's back.
I positioned the cupcake image on 4" x 5 1/4" to find the placement for the candle flame and the sentiment. I secured the small candle flame die and cutting out using the PB Press Stamp & Die set.  I added the sentiment to the card front.  I turned the card front over a d glued a small piece of yellow vellum behind the candle flame window.  I positioned the One Light behind the flame and marked where the button placement is on the card front. Using the PB Press Stamp and Die set, I stamped a starburst over the area marked for the button placement on the card front.  I added double thick double sided foam tape to frame out the one light and back of the card front.  I attached the card front to a pink A2 card base and attached the yoga cupcake to complete the card.

TRHD Supply List


Thank you, I appreciate you taking time from your day to stop by and check out today’s The Rabbit Hole Design light up card. I hope you are inspired to create something lovely today!


Be Creative ~ Stay Inspired

Jenn Gross


Follow me, Journey Coach Jenn, on 

Instagram - https://www.instagram.com/journeycoachjenn/

YouTube - http://www.youtube.com/c/JourneyCoachJenn

Blog - http://journeycoachjenn.blogspot.com/ 


For more inspiration, updates, and news make sure to check out these places


The Rabbit Hole Designs

The Rabbit Hole Designs Instagram

The Rabbit Hole Designs Facebook Page

The Rabbit Hole Designs Pinterest

The Rabbit Hole Designs YouTube