Pages

You Are never Too Old...

 Hello crafty friends it's Rick back with a little project for you today!  I used the Play, Learn, Grow Stamp Set for my main focal image today.  If you remember the card I shared a few weeks ago with a fun Fall themed background well I have another one for you today using another one of the backgrounds I created during that session.  If you missed that post you can catch up on it here!

Play, Learn, Grow Card by Rick Adkins Close up


But back to todays card; for this card I added some strips of coordinating paper from my stash to the card base and stamped the sentiment from the Play, Learn, Grow Stamp Set right on the strips.  I then added the super cute little owl doing math that to the front of the card.  I made sure to pop him up with a few of our 3D Foam Squares for that little extra touch of dimension.  I then finished off the card by adding a few Clear Sparkle Enamel Dots.  Because we all need a little sparkle in our lives when we learn.  

Play, Learn, Grow Card by Rick Adkins


Thanks for dropping by today and I hope that you found a little bit of inspiration with my card today.  
You can find me on the following Social Media Channels with more crafty inspiration: 
I hope that you have a crafty day.  For more inspiration, updates, and news make sure to check out these places.  

Have a crafty day!
Rick 

Hey Boo! Halloween Card


Hello crafty friends and welcome to today's blog.  I am keeping the design simple and sharing The Rabbit Hole Designs' kittens from the Meowgical stamp set. These cute kittens are an Agota Pop Illustration,   This is an easy to re-create A2 Halloween card.
The images are colored with OLO Markers and the sentiment is die cut from the retired Niccole Lowercase Alphabet dies 

The pumpkin kitten is stamped for no line coloring and colored with Blue Violet OLO markers. I took my artist liberty and slightly changed  the pumpkin eyes and smile.  The yellow potion kitten is colored with Yellow Orange and Orange OLO markers.


Products Used

Thank you, I appreciate you taking time from your day to stop by and check out this cute Hey Boo Halloween card featuring The Rabbit Hole Designs New Meowgical stamp set and Coordinating dies. I hope you are inspired to create something lovely today! 


Be Creative ~ Stay Inspired

Jenn Gross


Follow me, Journey Coach Jenn, on 

Instagram - https://www.instagram.com/journeycoachjenn/

YouTube - http://www.youtube.com/c/JourneyCoachJenn

Blog - http://www.journeycoachjenn.com/


For more inspiration, updates, and news make sure to check out these places


The Rabbit Hole Designs

The Rabbit Hole Designs Instagram

The Rabbit Hole Designs Facebook Page

The Rabbit Hole Designs Pinterest

The Rabbit Hole Designs YouTube


Whoooooo's ready to create?


Hi crafty friends!
I'm so glad you are here today!
Today I have made a card featuring the stamp set called Play, Learn, Grow. 
These two owls are just the cutest, getting ready to learn.  I couldn't love them more!
I love coloring and creating with them and I know you will too.


 I challenge you to recreate this. Make sure to tag me @craftwithme101 and The Rabbit Hole Designs on Instagram if you do. 

For more inspiration, updates, and news make sure to check out these awesome places! 

Pretty Mini Slimline Halloween Card


Hello! It's Lauren here again today with a cute and pretty mini slimline card. I used the new Spooky Sightings stamp set, illustrated by Agota Pop Illustration. 

I've created a short video that shows my process up on my YouTube channel. You can watch it here: 

https://youtube.com/shorts/by3_VG5wKX4?feature=share

I hope this inspires you to create a fun Halloween card. I've linked the products I used down below. Thanks for visiting!


  You can follow me at these places:

Purrfect Erie Evening - Created with The Rabbit Hole Designs Meowgical Stamp Set


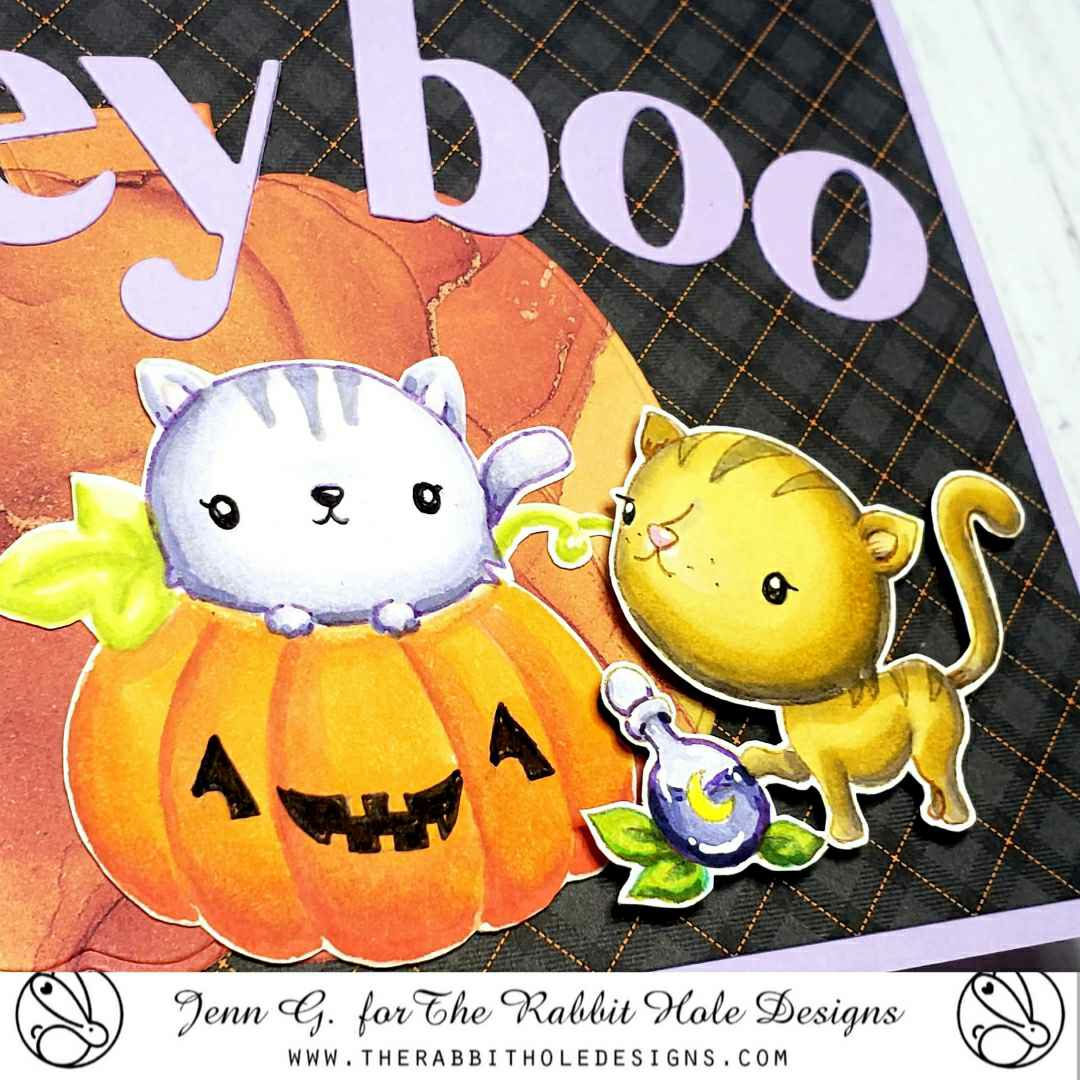
Hello crafty friends!  Today I am sharing this Too Cute to Spook Halloween card created with The Rabbit Hole Designs new Meowgical stamp set along with the Torn Paper stencil, and Clouds In My Coffee stencil.  Tools include Cottontail Embossing Powder Tool, and TRHD blending brushes.

Card Step Tutorial 
A & B - On a piece of 4" x 5 1/4" navy cardstock, use the Torn Paper stencil and Bitty Blending Brushes with two Distress Oxide green inks to create a blended dimensional ground

C & D - Use the Clouds In My Coffee stencil with Cottontail Blending Brush, Shark Tooth White ink and Carved Pumpkin Distress Oxide ink to blend the clouds. Use a stencil with small stars or circles and add it to the night sky
E & F - Treat the op left of the card front with the Cottontail Embossing Powder Tool and stamp the spider web stamp (from the Meowgical stamp set) with Versamark Clear ink. Heat set the stamped spiderweb with silver embossing powder.  Glue tree branches die cut  using a die from your stash on the card front in front of the spider web

G - The Vampire cat is stamped and color with Olo Markers in Blue Violet, Violet, Red Gray and Blue Green markers. Color one of two of the small Matte White Enamel Dots blue green and the other purple with Olo Markers. Add the colored dots to create the body of the spiders

H - Attach adhesive double-sided foam to the back of the colored and die cut Vampire cat and attach it to the card front. Mount the card front onto a white A2 card base


Products used
Meowgical stamp set                        Meowgical die set
            
              Torn Paper stencil                         Clouds In My Coffee stencil 
                   
                  Matte White Enamel Dots               Cottontail Embossing Powder Tool
            
                   Bitty Blending Brushes                Cottontail Blending Brushes         
                 

Thank you, I appreciate you taking time from your day to stop by and check out today's Card - Purrfect Erie Evening, created with The Rabbit Hole Designs new Meowgical stamp set. I hope you are inspired to create something lovely today!


Be Creative ~ Stay Inspired

Jenn Gross


Follow me, Journey Coach Jenn, on 

Instagram - https://www.instagram.com/journeycoachjenn/

YouTube - http://www.youtube.com/c/JourneyCoachJenn

Blog - http://www.journeycoachjenn.com/


For more inspiration, updates, and news make sure to check out these places


The Rabbit Hole Designs

The Rabbit Hole Designs Instagram

The Rabbit Hole Designs Facebook Page

The Rabbit Hole Designs Pinterest

The Rabbit Hole Designs YouTube


Disclosure - I love designing and creating cards and papercrafts.  I hope sharing my creations, some tips and techniques inspires you to create something lovely.  Please know, I have an affiliate relationship with some of the companies and the product links found on this blog. I love the products the I use and find joy in creating with them. I will occasionally try out a new product and will give you my honest opinion.  If you purchase products from these links, I will receive a small portion of your purchase at no additional cost to you. I use affiliate links of artist and crafters that inspire me.  It is a great way to support a fellow creator.  Find additional affiliate links at https://hype.co/@journeycoachjenn


Snowing with Poinsettias and Pinecones

Hello Friends,

This is Wendy and I'm so excited to share today's card. The gorgeous Poinsettia & Pinecones stamp set pairs so well with this cute little fox. 


I created a snowing background for this little fox. To create a little hill of snow, I masked off a little portion at the bottom of the card base for the little fox to stand on.


For extra interest I glued the Poinsettia and Pinecones spray to the edge of the cared base and cut away the excess over hang.

The Fall Foxes stamp set was illustrated by Agota Pop and the Poinsettia & Pinecones stamp set was illustrated by Kelly Taylor.

Halloween is Meowgical

 Hi everyone!  Amy here with you today sharing a card I created featuring the Meowgical and Silly Pumpkins Stamp Sets illustrated by Agota Pop.

Meowgical Stamp and Die Set illustrated by Agota Pop, Silly Pumpkins Stamp Set illustrated by Agota Pop for The Rabbit Hole Designs #therabbitholedesignsllc #therabbitholedesigns #trhd

I started this card by die cutting a piece smooth white cardstock, and blended on Distress Oxide Inks Peacock Feathers and Prize Ribbon.  I then used watercolor paint from Iuile Watercolors to create a sparkling background!  I splattered the background with white paint and set it aside to dry.

Next, I stamped out these adorable images from the Meowgical and Silly Pumpkins Stamp Sets, and colored them with copic markers.  I fussy cut the pumpkin image, and used the Meowgical Die Set to cut out the kitties and the stars. 

Meowgical Stamp and Die Set illustrated by Agota Pop, Silly Pumpkins Stamp Set illustrated by Agota Pop for The Rabbit Hole Designs #therabbitholedesignsllc #therabbitholedesigns #trhd

I stamped the sentiment, which is from the Meowgical Stamp Set, on black cardstock and white heat embossed.  I then fussy cut around the sentiment.  

I assembled my card using black cardstock cut to 5" x 7" for the base.  I popped up the images with foam tape for some dimension!  

Meowgical Stamp and Die Set illustrated by Agota Pop, Silly Pumpkins Stamp Set illustrated by Agota Pop for The Rabbit Hole Designs #therabbitholedesignsllc #therabbitholedesigns #trhd

For finishing touches on this card I added accents with a white gel pen, glitter, and glossy accents.  Thank you and I hope you enjoyed my card today!

School Bus

 Hello!  Today I am sharing a card I made using the new School Sightings stamp set from The Rabbit Hole Designs.  This is such a fun stamp set for anything related to back to school.  It would be perfect for teachers, school staff or students.  And don't forget the bus drivers!  I like to give a small end of the year gift to our bus driver and I think this card is perfect for that.  I'll probably add a coffee shop gift card or a box of Girl Scout cookies.  I've got three kids that ride the bus, my two boys and our exchange student, so our bus driver definitely deserves a little appreciation!


I decided to do something totally out of my comfort zone for this card.  I left it with no sentiment. Crazy, I know! 😂 I'm really trying to branch out in my card making and this is a step in the right direction.  When I give this card out, I'll probably add a thank you stamp inside with my handwritten message.  But for now it is sentiment-less and I'm convincing myself that I'm okay with that! 

For the background I used the Back Alley stencil. Our school colors are blue and gold so I used a blue ink for the brick background to match the yellow bus. Other than the stenciling, I kept the card pretty simple with just a few layers of dark blue card stock and a strip of ribbon.  The bus image is colored with colored pencils.

For more inspiration, updates, and news make sure to check out these places:


Elegant and Easy Christmas Card


Hi there! It's Lauren here to share an easy yet elegant Christmas card using the beautiful new Poinsettia & Pinecones stamp and die sets illustrated by Kelly Taylor.

I first prepared my white 4.23x5.48" cardstock panel for embossing by using the Cottontail Embossing Powder Tool. I then lined up and stamped my image onto the cardstock using my embossing ink pad. I covered the image with silver embossing powder, tapped off the excess and then heat set it. 

I then repeated the process, stamping the Merry Christmas words, embossing them in silver and then using the coordinating dies to cut them out. I also die cut 3 extra blank words and adhered them behind the corresponding embossed words. 

Finally, I adhered the embossed poinsettia panel onto a white, A2 sized (4.25x5.5) top folding card base. Then, I adhered the Merry Christmas words on to finish my card.


I hope this has inspired you to give this easy technique for creating a beautiful Christmas card a try. Thanks for visiting! 

Here's a link to the sets I used to create this card:

Poinsettia & Pinecones 6x8 – The Rabbit Hole Designs

Poinsettia & Pinecones Dies – The Rabbit Hole Designs


Quick & Easy Background Idea


Hi there,
This is Wendy. I'm excited to be here to share this super cute and simple card today. 

Sometimes it's hard to come up with creative ways to use sentiments. This card showcases a really cute background using a repeating sentiment from the Play Learn Grow stamp set.

After I repeat stamped I used a blending brush to add a little color to the background.


I colored the cute little owl with Copic Markers and layered the pieces of cardstock on the card base and popped the little owl up. This card is simple and cute and so easy to recreate.

Thanks so much for stopping by.

To see more ideas and inspiration from me you can visit me on my blog HERE or my YouTube channel.

Hugs
Wendy

Silly Pumpkins and Playful Foxes: A Whimsical Fall Card

 Hello and welcome back to the Rabbit Hole Designs Blog.  It's Rick here with you today to bring you a fun whimsical Fall themed card.  To create the card I used not one, not two, but three different stamp sets from the Rabbit Hole Designs.  I used the brand new Silly Pumpkins Stamp Set from the latest release as the focal image and the other two sets are my supporting actors for this feature.  Here's a look at the card I created to share with you today.  

Silly Pumpkins Stamp Set, Falling Leaves 6x6 Stamp Set, Fall Foxes Stamp Set, Falling Leaves Dies, Card by Rick Adkins

After creating the backgrounds for the card, I stamped the Silly Pumpkins Stamp Set in a light colored ink because I knew I wanted to color it in a no line coloring style.  I used my alcohol markers for the coloring.  

Silly Pumpkins Stamp Set, Falling Leaves 6x6 Stamp Set, Fall Foxes Stamp Set, Falling Leaves Dies, Card by Rick Adkins

Which was super easy since the design that Agota Pop came up with for this stamp set was super easy to color.  I then decided that my original background needed a little something, something to jazz it up a little bit more.  So I used my Cottontail Embossing Powder Tool and adding some anti-static powder to the card panel.  I then stamped the Falling Leaves 6x6 Stamp Set in embossing ink and covered it with gold embossing powder.  I then heat set the embossing powder to add a little more glitz to the card front.  

Silly Pumpkins Stamp Set, Falling Leaves 6x6 Stamp Set, Fall Foxes Stamp Set, Falling Leaves Dies, Card by Rick Adkins


Once I had the background finished I then could add my add the Silly Pumpkins Image to the card front and the sentiment that I had stamped from the Fall Foxes Stamp Set.  To finish off the card I added a few die cut leaves that I created using the Falling Leaves Dies.  I used these die cuts in the creation of my background panels in the first stage of adding ink to get the fun fall ink colors onto them.  I simply tucked them behind the Silly Pumpkins to finish off the card.  

I hope that you have a wonderful day and thanks for joining us today.  

Happy Stampin' 

Rick

Meow-magical!


Hi crafty friends!  Today I am so happy to show you this card I made using the newest release from TRHD. 


This set is called Meowgical and it is simply adorable!
It features four cute Halloween kitties as well as some awesome sentiments to go along with them.  
When creating this card, I used iuile watercolors to splatter some paint at the top, creating this speckled affect. I also embossed the lower half and then ink blended it to create more texture.  
This was such a fun card to make.  I hope you recreate and tag me on Instagram, if you do.

I challenge you to recreate this. Make sure to tag me @craftwithme101 and The Rabbit Hole Designs on Instagram if you do. 

For more inspiration, updates, and news make sure to check out these awesome places! 


Happy Meowloween

 Hi everyone!  Amy here with you today sharing a card I created featuring the new Meowgical Stamp Set illustrated by Agota Pop.

Meowgical Stamp and Die Set illustrated by Agota Pop, Fiddlehead Stencil, You've Been Framed - Layering Dies by The Rabbit Hole Designs #therabbitholedesignsllc #therabbitholedesigns #trhd

I started this card by die cutting a piece of smooth white cardstock with the second largest die from the You've Been Framed - Layering Dies.  I used the Fiddlehead Stencil with Distress Oxide Inks Wilted Violet and Black Soot to create the background.

Next, I stamped this super cute kitty image, and the stars, from the Meowgical Stamp Set.  I colored them with with copic markers, and cut them out using the coordinating die set

Meowgical Stamp and Die Set illustrated by Agota Pop, Fiddlehead Stencil, You've Been Framed - Layering Dies by The Rabbit Hole Designs #therabbitholedesignsllc #therabbitholedesigns #trhd

I die cut a sentiment banner out of purple cardstock using a banner die from the You've Been Framed - Layering Dies.  I stamped the sentiment, which is from the Meowgical Stamp Set, and white heat embossed.

I assembled my card using purple cardstock for the base, and popped up the kitty and sentiment banner with foam tape for some dimension!  

Meowgical Stamp and Die Set illustrated by Agota Pop, Fiddlehead Stencil, You've Been Framed - Layering Dies by The Rabbit Hole Designs #therabbitholedesignsllc #therabbitholedesigns #trhd

For finishing touches on this card I added accents with a white gel pen and glossy accents on the kitty's nose!  Thank you and I hope you enjoyed my card today!