Pages

Puffin Awesome


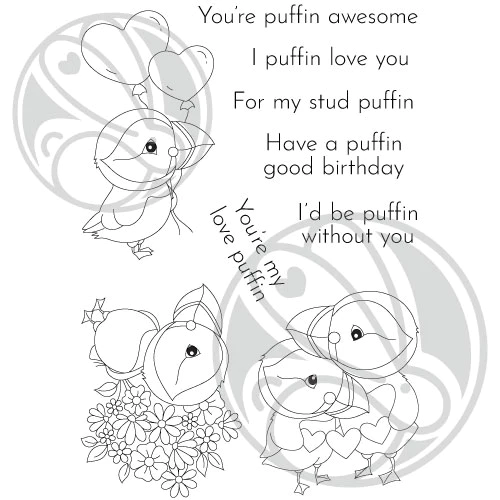
Hello. Lauren here today with a sweet card featuring the newly released Love Puffin stamp set illustrated by Agota Pop. This set has super cute images that are so fun to color!

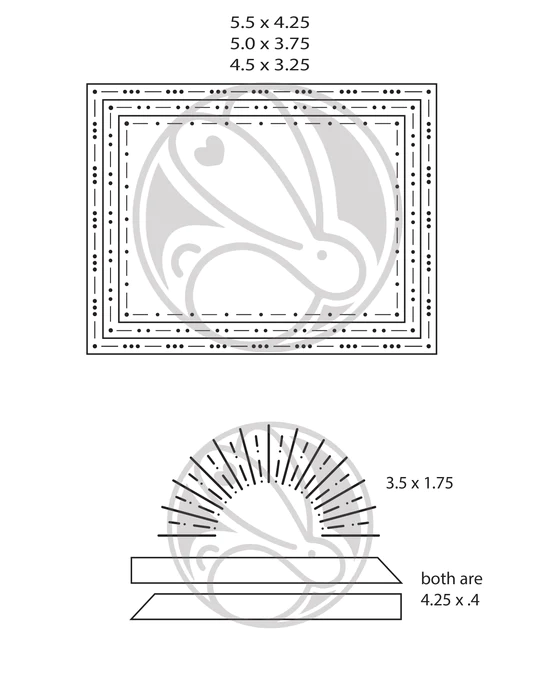
I started by using the new You've Been Framed layering dies to die cut rectangles from green, red and pink cardstock. Then I used a heart stencil to dry emboss hearts onto the pink rectangle.

I adhered them all together, offset. Then I adhered them to floral printed cardstock and then onto a top folding A2 (4.25x5.5) sized card base.


I then stamped my puffin image, colored it using Copic markers then die cut it out using the coordinating die. 


Next, I stamped my sentiment in black and die cut it out using the sentiment die included in the You've Been Framed Die set. I also die cut a sentiment strip from black cardstock. I adhered the black behind and offset. Then I adhered the sentiment to the card.


I hope you are loving all the fun inspiration for the awesome release this month and that I've inspired you to create something cute too! Thanks for visiting. 

Here are the products I used to create this card:


My "Sweet Wishes" for you!


Hello Friends!  I am excited to share this card with you today and show you all of the wonderful supplies used.  I will have everything linked but if you have any questions, please feel free to ask in the comments.

To start, I stenciled using the Cat Eye stencil and a TRHD stencil brush, on an A2 size panel.  Using a mixture of red and pink Distress Oxide inks. I set that aside and let it dry.  I stamped and colored (with alcohol markers) images from the set "sweet wishes".  I then fussy cut them out but coordinating dies are available for purchase.  

To continue, I colored a few of the white enamel dots from TRHD, with Copic Markers, in varying shades of red.  I love being able to customize these enamel dots to create any color you'd like.  

Once the stenciled background is finished drying, I used the largest of the You've Been Framed layering dies to cut my panel.  Then I used the smallest size of the framed dies to cut another panel with holographic paper.  

I then start assembling the card, first by placing the largest panel on the card base, then the holographic on the card as well. I placed the images and a sentiment on the card and it is complete, once the enamel dots are on as well.

I hope you enjoyed this tutorial and if you have any questions please feel free to comment or message on Instagram @craftwithme101

 I challenge you to recreate this. Make sure to tag me @craftwithme101 and The Rabbit Hole Designs on Instagram if you do. 


Celebrating Love! Happy Year of the Rabbit


Hello crafty friends and Happy Chinese New Year!  Today begins the Year of the Rabbit and I am super excited to share this Love-N-Heart die from The Rabbit Hole Designs.  Do you know there are two ways you can get this die and one of them is for free!

The Love-n-Heart Die is free with a $75.00 product purchase (prior to shipping and taxes).  It can also be purchased seperately for $9.99.  Add the Love-N-Heart die to your cart and the discount (if applicable) will be applied upon checkout. No code is needed. This is a while supplies last type of discount.

Let's take a look at this easy to make card.
I die cut the Love-N-Heart die twice.  Once from a glossy black cardstock and a second from a matte white cardstock.  
I used the white die cut outline and positioned the black glossy die cut inside pieces to fill in.  The background printed paper is from my stash.  It is a red paper with gold foiled firework bursts.  It is perfect to celebrate the Chinese New Year. I cut a piece to 4" x 5 1/4" to use as a card front.
I glued the white Love-N-Heart outline down on the middle of the printed card front.  I then glued the remaining black pieces in place.  I glued this card front to a white A2 cardbase completing this festive card.

Products used

Thank you for stopping by and checking out this festive card featuring the Love-N-Heart die.  Remember there are two ways you can get this die while supplies last.  I hope you are inspired to create something lovely today!  May you have a happy and abundant Year of the Rabbit! 

Valentine Cupcake

  Hi everybody!  Amy here today sharing a card I created featuring the new Sweet Wishes Stamp Set illustrated by Agota Pop, and the new You've Been Framed - Layering Dies.

Sweet Wishes Stamp and Die Set illustrated by Agota Pop, You've Been Framed Die Set, Valentine Stencil by The Rabbit Hole Designs #therabbitholedesignsllc #therabbitholedesigns #trhd 

I started this card by die cutting a piece of smooth white cardstock with the second largest die from the You've Been Framed - Layering Dies.  I used the Valentine Stencil with Distress Oxide Inks Saltwater Taffy and Candied Apple to create a pink and red background!  I then splattered the background with gold watercolor paint and set it aside to dry.

Sweet Wishes Stamp and Die Set illustrated by Agota Pop, You've Been Framed Die Set, Valentine Stencil by The Rabbit Hole Designs #therabbitholedesignsllc #therabbitholedesigns #trhd

I stamped out this gorgeous cupcake image from the Sweet Wishes Stamp Set, colored it with copic markers, and cut it out using the coordinating die set 

I assembled my card using red cardstock for the base, and foam tape to pop up the image for some dimension!

Sweet Wishes Stamp and Die Set illustrated by Agota Pop, You've Been Framed Die Set, Valentine Stencil by The Rabbit Hole Designs #therabbitholedesignsllc #therabbitholedesigns #trhd

For finishing touches on this card I added white gel pen accents, glitter, and a few sparkling sequins!  Thank you and I hope you enjoyed my card today!

For more inspiration, updates, and news make sure to check out these places:

Your Such a Sweet Friend! - A Sassy Thank You Card

Hello there my crafty friends and welcome to today's blog!    I am so glad you stopped by today!  I am sharing this sassy Thank You card featuring The Rabbit Hole Designs' Sweet Wishes stamp set paired with the Optical-Mesh stencil.  

This is such a fun sweet stamp set!  I used Masking Magic to help create a row of fanned out suckers.  I stamped five of  the heart shape sucker on to the Masking Magic.  You may die cut or fussy cut the suckers depending if you have the coordinating dies.  I set these aside.

Using a light pink ink, and starting with the middle sucker on a 3 3/4" x 5 " piece of coloring cardstock.  I stamped out five suckers masking each stamped sucker before stamping the next. 

I carefully removed the masking suckers and setting them aside to use again later.

I colored the suckers using Olo Markers.  You will find the shading chart and color combos in the photos below so you can follow along.
Olo Markers used for the two outer violet suckers:
V1.1 / V2.4 / V2.3 / V2.6
For the ribbon
R0.3 / R0.4 / R 1.5 / R1.7
For the sucker stick
O7.1 / WG1 / RG3
I used a white gel pen for highlights
For the 2nd and 4th suckers:
R0.1 / R0.2 / R0.3 / R0.4
For the middle dark red sucker:
R5.3 / R5.5 / RV0.6 / R1.7

Once your images are colored,  place a Magic Mask sucker mask over each sucker image. Place the Optical-Mesh stencil over the card front using either a low tack adhesive or a magnetic board.  I colored the stencil with a pale blue ink and a Bitty Blendin Brush. I blended over the stenciled fading it out the color to frame the images.  I removed the stencil and the Masking Magic suckers for the reveal.
I stamped the sentiment in the middle of a 3/4" x 5" strip of red cardstock with clear embossing ink and heat set the sentiment with white embossing powder.   I added three of the new Matte White Enamel Dots to frame the sentiment. It is glued directly below the suckers on the card front.  I attached the card front to a 4" x 5 1/4" light blue cardstock and next attached this full card front to a white A2 card base to complete this sweet sucker card.

Products used


Yui are so sweet to take time from your day to stop by  to see this sassy The Rabbit Hole Designs card. I hope you enjoyed the tutorial,  Olo marker coloring steps and you are inspired to create something lovely today! 


Be Creative ~ Stay Inspired

Jenn Gross


Follow me, Journey Coach Jenn, on 

Instagram - https://www.instagram.com/journeycoachjenn/

YouTube - http://www.youtube.com/c/JourneyCoachJenn

Blog - http://www.journeycoachjenn.com/


For more inspiration, updates, and news make sure to check out these places


The Rabbit Hole Designs

The Rabbit Hole Designs Instagram

The Rabbit Hole Designs Facebook Page

The Rabbit Hole Designs Pinterest

The Rabbit Hole Designs YouTube

Golden Love Card


Hello there! It's Lauren on the blog today to share this pretty card that features the new Love-N-Heart Die paired with the Garden Trellis hot foil coverplate. They look so beautiful together.

I started by using gold foil to hot foil the Garden Trellis onto an A2 sized Bristol Smooth cardstock. 

I then spritzed water onto the panel and added dry pigments in shades of violet, pink and green.

Once my panel was dry, I adhered it to a gold mirror cardstock mat. Then I adhered it onto a white A2 sized card base.

I then used the Love-N-Heart die with gold mirror cardstock to die cut the love outline. I adhered it onto the card and saved the inside, love word for a later card. 


Once my panel was dry, I adhered it to a gold mirror cardstock mat. Then I adhered it onto a white A2 sized card base.

I then used the Love-N-Heart die with gold mirror cardstock to die cut the love outline. I adhered it onto the card and saved the inside, love word for a later card. 


I hope you love this month's release and that I have inspired you to give this love die a try! Thanks for visiting!

Here's the list of products I used for this card:


Thanks again for visiting. You can follow me here:

For my Stud Puffin

 Hi everyone!  Amy here with you today sharing a card I created featuring the super cute Love Puffin Stamp Set illustrated by Agota Pop, and the awesome new You've Been Framed - Layering Dies.

Love Puffin Stamp and Die Set illustrated by Agota Pop, You've Been Framed Layering Dies, Corner Mandala Stencil by The Rabbit Hole Designs #therabbitholedesignsllc #therabbitholedesigns #trhd

I started this card by die cutting a piece of smooth white cardstock with the second largest die from the You've Been Framed - Layering Dies.  I then used the Corner Mandala Stencil (retired) with Distress Oxide Inks Salvaged Patina, Tumbled Glass, and Salty Ocean to create a gorgeous teal and blue background!

I stamped out this adorable puffin image from the Love Puffin Stamp Set, colored it with copic markers, and cut it out using the coordinating die set 

Love Puffin Stamp and Die Set illustrated by Agota Pop, You've Been Framed Layering Dies, Corner Mandala Stencil by The Rabbit Hole Designs #therabbitholedesignsllc #therabbitholedesigns #trhd

Next, I die cut a teal banner using the You've Been Framed Die Set.  I stamped the sentiment from the Love Puffin Stamp Set and white heat embossed.

I assembled my card using teal cardstock for the base.  I used foam tape to pop up the image and sentiment banner for some dimension!

Love Puffin Stamp and Die Set illustrated by Agota Pop, You've Been Framed Layering Dies, Corner Mandala Stencil by The Rabbit Hole Designs #therabbitholedesignsllc #therabbitholedesigns #trhd

For finishing touches on this card I added white gel pen accents, glitter, glossy accents, and a few sparkling sequins!  Thank you and I hope you enjoyed my card today!

For more inspiration, updates, and news make sure to check out these places:

You're My Love Puffin


This is an amazing set from The Rabbit Hole Designs new release, called Love Puffin! I absolutely love these cuddly puffins. If you know me, you know this is right up my alley.

I started by stamping and coloring the image, then fussy cutting it out. To create the background, I masked diagonal sections with masking tape. I then went in with distress oxide ink in "Fired Brick" and ink blended the color onto the spaces seen. I sprayed water on it to activate the oxidation, with the masking still on. After allowing to drive completely, I mixed white paint and water into a spray bottle and sprayed it onto the card. Make sure to do this while the masking is still on.

After allowing that all to completely dry (2-3 hrs), I remove the masking. I make a quick sentiment with the ones provided on the set. Stamping it on white cardstock, then placing it on black cardstock. I finished everything by placing everything on the background panel and then adding it onto an A-2 size card base.

I hope this tutorial and if you have any questions please feel free to comment or message on Instagram @craftwithme101

 I challenge you to recreate this. Make sure to tag me @craftwithme101 and The Rabbit Hole Designs on Instagram if you do.