Pages

Showing posts with label therabbitholedesigns. Show all posts

A Berry Sweet Shaker Card


Hello. My name is Wendy and I am brand new to the design team. I'm so happy to be here and hope I inspire you to make some beautiful projects. 

Today's card features the Berry Best stamp set illustrated by Agota Pop.


To create this card I stamped the macaron stacks 5 times in alcohol safe ink and then colored each with Copic Markers.

I used The Rabbit Hole Designs A2 Shaker Acetate Sheets for my shaker card. These acetate sheets are incredibly easy to use. They come with adhesive ready to go. The background of the shaker is ink blended over the Overlapping Circles stencil, which sadly is sold out now, in colors to match the macarons

For the sentiment I stamped in VersaMark Ink and white heat embossed.

Thank you for stopping by and checking out my card. I hope you enjoyed and if you'd like to see more about this card and a video on how I made it you can visit my blog.

Hugs
Wendy


From Your Flaky Friend


Center stage for this adorable snowman! The line that creates this 1 Line Snowperson can be positioned so it looks like he is on a hill of snow. This little guy was colored with a no-line watercoloring technique. The background was created by blending 2 different Distress Oxide inks and stenciling the Mid-century Modern #2 stencil. Stenciled only 2 of the 4 layers of the stencil set and offset them. 


For more inspiration, updates, and news make sure to check out these places:

Snowflake Snowperson Ornament


I wanted to create an ornament for our Christmas Tree. I used the 1 Line Snowperson set. The snowman was watercolored and glitter glue was added to add sparkle. To create a look of falling down a hill I moved the line from the 1 Line Snowperson down. The snowflake is one of those cuts you learn to do when you are little. I added bits and pieces of ribbon, glitter glue, chunky glitter, jute, and Retro Christmas paper scraps.


For more inspiration, updates, and news make sure to check out these places:


Booktroverted

Hello Crafty friends and fellow Book Lovers!  This post would have been done last night.  Except that truly I am one of the original Booktroverts and so, instead of writing my first ever blog post for our beloved TRHD I was in my bed...reading.   Until nearly 4 a.m.  (Seriously, though, it was just that book I needed to read.  Please tell me you know what I mean!) 

I'm hoping that if you love this stamp and sometimes can't put that book down, you are, perhaps, a little sympathetic and willing to read on?


This card is very simple to create: 

1.  Using the Book Lover stamp set, stamp the image in black ink.  

2. Mask the image 

3. Using a small acrylic stamp block and some gray archival ink, stamp Booktrovert in rows across, above, and below the image.  (Make sure you stagger the start of each line!)  

4.  Remove the mask and color -- I used my copics and a stardust glitter pen on the books' spines.  Don't forget a shadow at the bottom of your image to lightly ground it (I'm not a fan of "floating" images, so for me a shadow is a must).  

5. Cut down the top & bottom of your image and mount it on an A2 card base in a color you like (I'm into this pear-ish color at the moment, but since I have a rainbow of books, most colors work.) 

6. Pick your fave sentiment from the set, stamp it black on white card and pop it onto a simple shape in the color of your base card and--for a little extra oomph--pop up that sentiment shape with a bit of foam tape.  You're done!  (Now you can go back to your book!)

    I hope you've enjoyed this post and appreciate the time you've spent here with me today.  You can also find me on IG, FB, on my blog (occasionally!), and  even on YouTube every once in a while.   


For more inspiration, updates, and news make sure to check out these places


The Rabbit Hole Designs

The Rabbit Hole Designs Instagram

The Rabbit Hole Designs Facebook Page

The Rabbit Hole Designs Pinterest

The Rabbit Hole Designs YouTube

See you soon!

Essie 

https://www.instagram.com/escards/

https://www.facebook.com/essie.cards.5/

https://www.youtube.com/channel/UCOn2Ek96271Vo3Z_fcEz1bg

https://essiemakescards.blogspot.com/

Any Road Can Get You There! card


Clean and simple cards are sometimes a great way to bring a lot of emphasis to a card. For this card, I used a shaped die to create a cardstock stencil. Since I knew I would be doing white cups/saucers with red and black shapes. Picking the color for the background was easy.  Blue is such a nice color to ground your images, think of the sky and how everything looks nice against that blue sky. The image on this card is from the set TRH-176 Wonderland 2, designed by Dustin Pike, the sentiment is from the set TRH-178 Heard In Wonderland.


___________________________

FREE WITH MINIMUM PURCHASE
Free with minimum $35 purchase
After discounts, before tax and shipping
While supplies last
___________________________

For more inspiration, updates, and news make sure to check out these places:


Merci Amanda!


The Amanda Foil Cover Plate is part of the new line of products TRHD presents to its customers!  They are heavy-duty, easy-to-use foil plates. The Amanda design of one of their best-seller templates is the one template I fell in love with!

For this card, I foiled the card using the Amanda Hot Foil Cover Plate, then used water-soluble pastels to add some color to the leaves and background. I used my fingers and some water to blend the colors!


___________________________

FREE WITH MINIMUM PURCHASE
Free with minimum $35 purchase
After discounts, before tax and shipping
While supplies last
___________________________

For more inspiration, updates, and news make sure to check out these places:

"Joy to the Squirrel"


Clarence is back and he is having a blast during our Christmas in July celebration! Of course, Clarence couldn't stop himself from playing with some snow and creating a snow-squirrel!  The Clarence Christmas set TRH-170 is a 4x6 set that includes three adorable and fun images of Clarence and two sentiments. 


Clarence was colored using watercolors. He is such a fun character to color. I added some highlights and lowlights to the tail to make it look furry. I kept the colors to match the retro palette of reds and teals. The background is one of the layers of the Mid-Century Modern #2 Stencil used with TCW's Stencil Butter (Pearl White)


For more inspiration, updates, and news make sure to check out these places:

Classic Merry Christmas


We are celebrating Christmas in July all month long! My first card using the 1 Line Reindeer set was this one. I wanted to create a look of an ornament with the classic red/green combination. 
This is how I created this card: Prepare the card base using the Cottontail Embossing Powder tool, and white heat embossed the 1 Line Reindeer stamp. Stamp the reindeer one more time on masking paper and cut the mask. Apply mask over the embossed image. Cut two more masks, one that goes above the horizontal stamped image and one that goes below it. Remove the top horizontal mask and using a circular motion blend the green ink to create the top of the ornament. Place the mask back on and remove the bottom mask and repeat now with the red ink. Wait for the ink to dry and then remove the reindeer mask. Color nose and add highlights after dried. To finish the card stamp the sentiment and apply golden bling. As a last minute decision, I decided to use a notching tool to create notches on all 4 corners of the card and wrap a red embroidery cord around it.

Versatility on Your Stamps


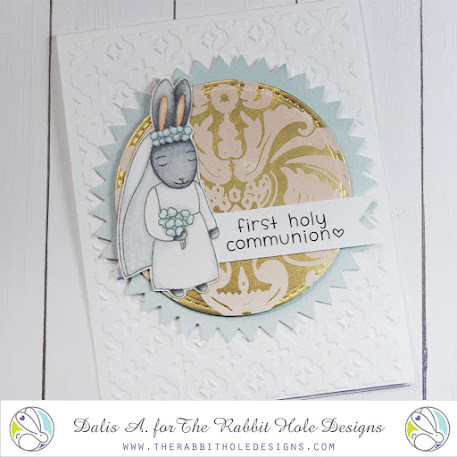
Looking at your stamps in a different way is always the best part of getting a new stamp set. The "Happily Ever After" is a sweet wedding stamp set, but what else can it be? If you mask the groom bunny out of the picture you get this adorable girl bunny that is perfect for a First Holy Communion card. What else do you see when you look at the Happily Ever After couple? Maybe a PROM card, if you mask the veil of the bride? 
After coloring the bunny with alcohol markers, I decided to create the golden backdrop with some stickers to convey the idea of the osties. The embossed folder used even though does not have a cross image, it does bring an idea of a cross, helping bring the theme and the card all together.


For more inspiration, updates, and news make sure to check out these places:

Embroidered Anemones


A new trend in card making is adding stitched elements to your cards. I gave it a go with some very loose French knots (You can catch a video tutorial at my youTube channel) where the anther or pollen of the flowers would be in the Blooming Anemone stamp (TRH-160). HINT: Use a thicker thread to create the knots. A thicker thread will stay in place and not go through the hole you create in the card to accommodate these.


This card features "Blooming Anemone" (TRH-160), which was stamped on Bristol smooth white cardstock and watercolored.  For the sentiment, we have a combination of "You Scripty" 3x4 stamp and it's coordinating die with shadow. This bridge card was stenciled with the Mesh - Optical Illusion Stencil and then splattered with gold watercolors.

Hold My Flowers


Hi Everyone, A new card to share. The image on the card is from Hold My Flowers , I have colored the image with Copics, . I have put it on a background I have made using the Corner Mandala  Stencil,which I used modelling paste through and then used some distress inks over it, 
I also used the sentiment from the set which I heat embossed in black  using the Contaiil Embossing Powder tool . For more information on my card check out my blog at http://creativestampinwithcindy.com 
Thanks for looking Cindy 

When you just want to say Hello!

 Hello, my crafty friends! Is there ever a time where you just want to send a simple Hello to someone?


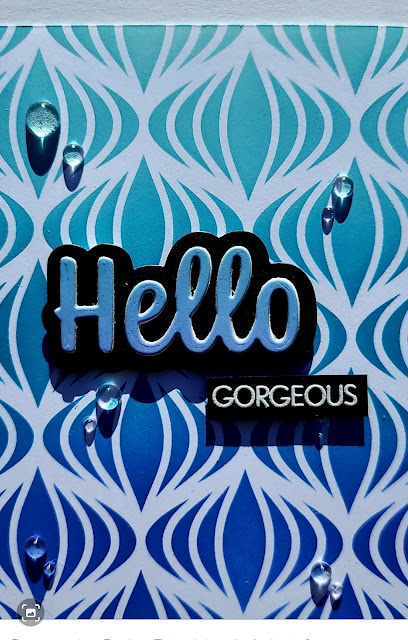
Today I have for you a 4 1/4 by 5 1/2 card using the New Hello - Scripty Word with Shadow Layer Dies and the New Hello - Scripty 3x4 stamp set. These sets pair so well with each other but also with the other new stamps and dies from this release.

I loved using a blue combo with the Cat Eye 6x6 stencil, it just gave the little bit extra almost an ocean feel. For the Hello I stacked 4 of them on top of each other and adhered it to the shadow die. I really wanted to keep this nice and sleek. I stamped and white heat embossed Gorgeous on black cardstock. I added just a few clear embellishments and I really loved how it came out.


For more inspiration, updates, and news make sure to check out these places.

The Rabbit Hole Designs

The Rabbit Hole Designs Instagram

The Rabbit Hole Designs Facebook Page

The Rabbit Hole Designs Pinterest

The Rabbit Hole Designs YouTube