Pages

Showing posts with label Year 5 Birthday. Show all posts

Hello Gorgeous!


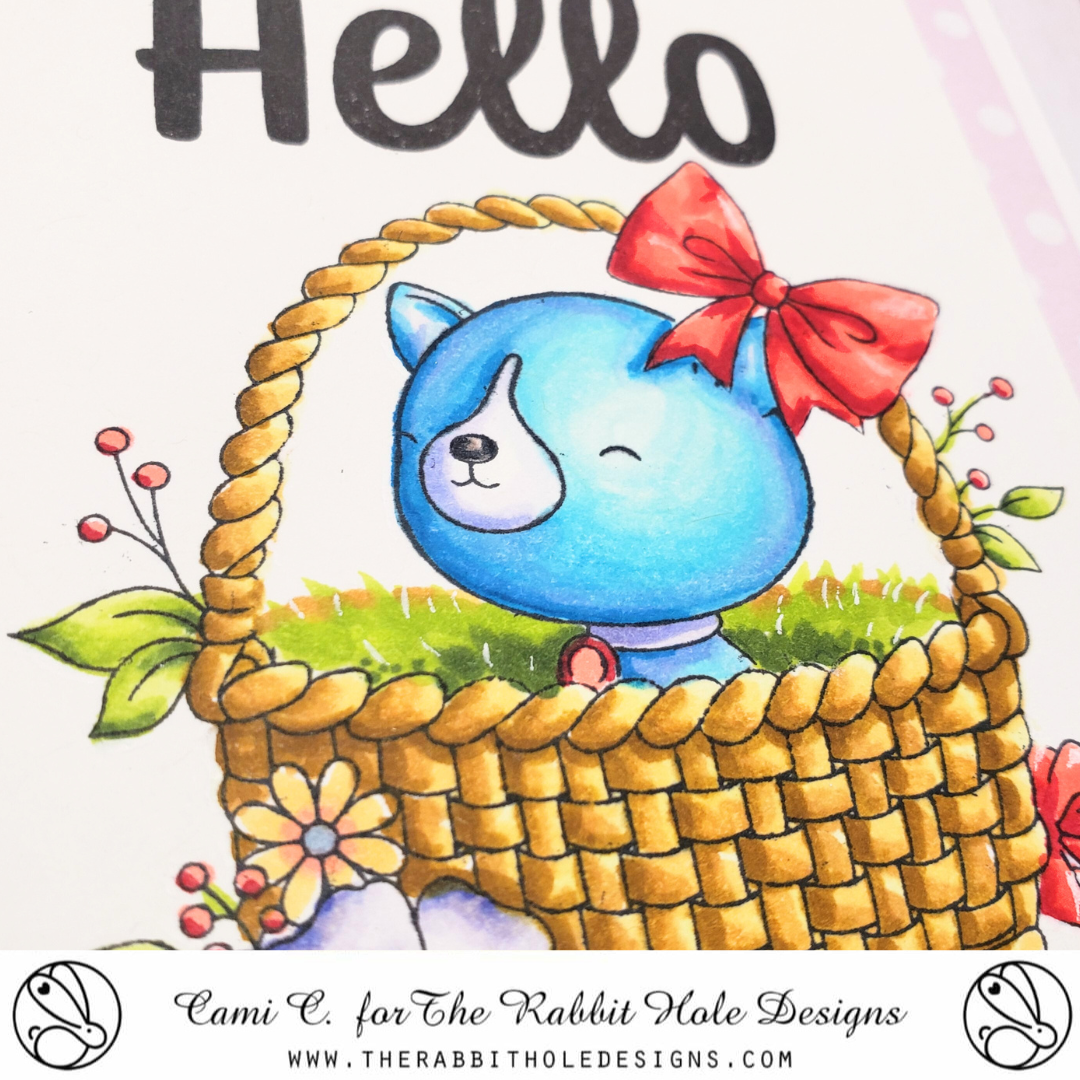
Hey there crafty friends! Now here is a basket full of adorable!  This little blue dog is content sitting outside in the sun just soaking in the beautiful day!

Today I am sharing this lovely card featuring The Rabbit Hole Designs' new Easter Basket stamp set paired with the Year 5 Birthday stamp set (both are illuastrated by Agota Pop) and the Hello word stamp set. 

I started by stamping the Easter Basket stamp on a piece of Masking Magic. I cut the basket out and used a craft knife and cutting mat to carefully cut out the inside area with the eggs. I use this part to mask off the inside of the basket, when I stamped it on coloring cardstock. This way the basket appears empty.  I remove the inner mask and placed the basket mask over the stamped basket image and stamped the dog to sit inside the basket and his bone to the right side of the basket. After removing  the basket mask,  my image is ready to color. 

I colored the dog with blue (B) OLO markers and the basket with orange (O) and orange red (OR) OLO markers. I added grass to the basket using green (G) and yellow green (YG) OLO markers.

The sentiment is from the Hello Word stamp set.  I stamped Hello and gorgeous on the card front using Versafine Black Onyx ink. The finished card panel is trimmed and glued to a 4" x 5 1/4" pale purple polka dot cardstock and attached to an A2 card base completing the card.

Supplies used 

Thank you, I appreciate you taking time from your day to stop by and check out my Hello Gorgeous card on The Rabbit Hole Designs Blog. I hope you are inspired to create something lovely today!


Be Creative ~ Stay Inspired

Jenn Gross


Follow me:

Instagram - https://www.instagram.com/journeycoachjenn/

YouTube - http://www.youtube.com/c/JourneyCoachJenn

Blog - http://www.journeycoachjenn.com/


For more inspiration, updates, and news make sure to check out these places


The Rabbit Hole Designs

The Rabbit Hole Designs Instagram

The Rabbit Hole Designs Facebook Page

The Rabbit Hole Designs Pinterest

The Rabbit Hole Designs YouTube


Galentine's Day Candy Box Card - Step tutoral and pattern


Hello crafty friends!  Jenn here with a fun and sassy Galentine's Day Box Card. I designed and created this book fold box card and have provided the details below.  Each side holds 3 smarties candy rolls. I share the dimensions,  score lines, and details below.

The Rabbit Hole Designs Supplies 
 

Let's get started on the box card
I am using white cardstock to show the details, but I use a pink cardstock to create the actual box. It is cut from a piece of sturdy cardstock to measure 11" long x 4 3/4" wide.

 I scored the short side all the way down the length of the panel at 1/4", 3/4", 4" and 4 1/2"

Turn the cardstock to the long side and score down the width at 1/2", 1", 2 3/4", 3 1/4", 5", 6 1/8", 7 7/8", 8 3/8", 10 1/8" and 10 5/8"
A - The scored piece of 11" x 4 3/4" cardstock will look like this.

B & C - We are creating two boxes, one on each side, so you need  to leave (on the 11" length of the cardstock) two box lids (both on top and bottom) and four side flaps on each side as well. I shaded the areas of the box that need to be removed and cut them out (see photos above). Once the panel is trimmed fold the box and flaps on the score lines.
D & E - To create the box panels inserts,  cut a long strip of printed cardstock 3" wide and 10" long. Cut the following pieces from the strip.
  • Two 1"x 3" panels
  • Four 3/8" x 3" panels 
  • Four 1 1/2" x 3" panels
Lay the panel inserts out on the box. Do NOT add glue yet.  Be sure to leave each far side flap empty as these will be glued to create each box.
Note the placement of the two magnets. They are located on the third panel from each box edge with the magnets in the middle closest to the middle of the box pattern.

F & G - Add a strong piece of double-sided tape 1/2" in from the edge of the third panel and adhere the mini magnet.  Repeat this step on the opposite sides third panel. Use Bearly Arts Craft Glue to glue down the panel insert on this side of the box.  The 1" x 3 " panel inserts are for the middle of the box card and one is for the reverse side.

H & I - Fold one side of the box in on itself and glue the side tab to the inside is the box as show (I).

J - Repeat these steps with the opposite side of the box card.  

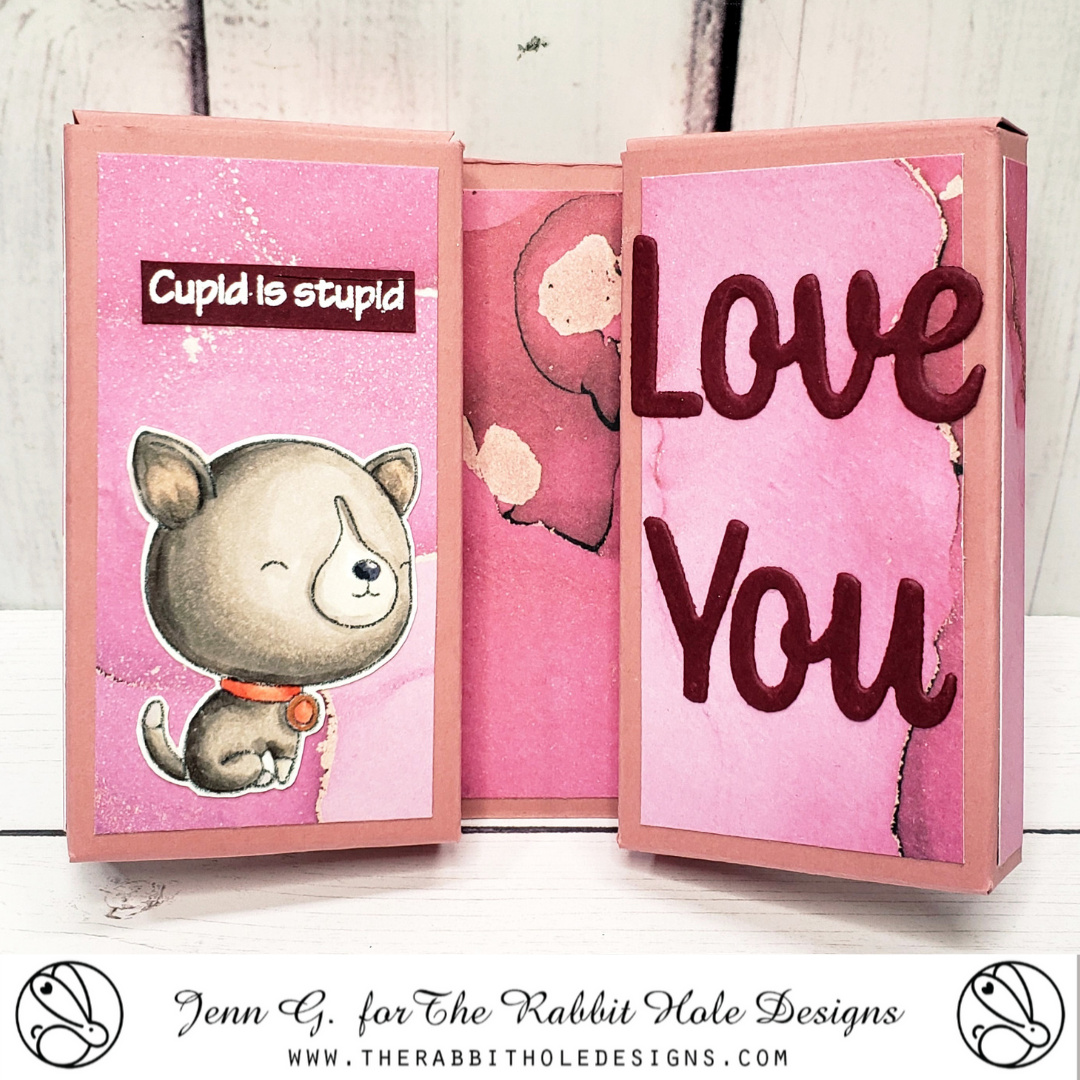
K & L - Fold each box lid and box bottom to close the box.  You will have two box side that fold in like a book and are secured with the craft magnets.  Now you can add the card details.
I stamped out two dog images from the Year 5 Birthday stamp set. One is created using mirror stamping technique on a blank red rubber stamp and restamped on coloring cardstock.  Both images are colored with OLO markers creating a brown dog and a gray dog.  I used the Cottontail Embossing Powder Tool to treat red cardstock before stamping the Happy Galentine's Day and Cupid is Stupid sentiments with VersaMark Watermark ink and heat set them with white embossing powder. I cut them into strips. I glued one dog and Happy Galentine's Day to the outside of the closed box card.
I added the second dog and Cupid Is Stupid sentiment on the left inside panel of the box card.  I die cut the words Love and You and glued them to the inside right card panel.  You can fill each box side with Smartie Candy Rolls, money, or any thing that will fit in a box opening measuring 1 5/8" x 31/8" x 3/8".

Thank you, I appreciate you taking time from your day to stop by and check out this Galentine's Day Candy Box Card.  I hope you are inspired to create something lovely today!


Be Creative ~ Stay Inspired

Jenn Gross


Follow me, Journey Coach Jenn, on 

Instagram - https://www.instagram.com/journeycoachjenn/

YouTube - http://www.youtube.com/c/JourneyCoachJenn

Blog - http://www.journeycoachjenn.com/


For more inspiration, updates, and news make sure to check out these places


The Rabbit Hole Designs

The Rabbit Hole Designs Instagram

The Rabbit Hole Designs Facebook Page

The Rabbit Hole Designs Pinterest

The Rabbit Hole Designs YouTube

Yappy Birthday! - The Rabbit Hole Designs 5 Year Celebration!


Hello my crafty friend!  Hope your new year is off wonderful start. The Rabbit Hole Designs is celebrating 5 years, Happy Birthday!


Let's get this pawty started and take a closer look at how I created this card!
I started with a piece of 4" x 5 1/4" premium coloring cardtock.  I stamped the image of the dog with balloons in the center using a stamp positioner.  I stamped a second image on a piece of Masking Magic. This is a reusable delicate tack adhesive backed paper used to block of areas on a project. You can either fussy cut the mask image or die cut it using the coordinating dies. I placed over the stamped image on the cardfront.  

I used a low tack sticky mat under the card front to hold it while I ink blended the background with pink and purple Distress Oxide inks.  I placed the Mid-Century Modern #2 layering stencil, the starburst layer, over the top of the ink blended card front.  It is a 6x6 stencil and grips to the sticky mat over the A2 card front.  For this technique you can use a damp baby wipe or damp paper towel to daub over the starburst openings.  Daubing the slightly damp cloth will lift off some of the ink color on the blended background.  When you remove the stencil, you will see the starburst shapes show up lighter on the background.
I moved the card front from the sticky mat to a splatter box and a proceeded to add splatters of white ink using a paint brush and slightly diluted white liquid ink.
I pealed off the Masking Magic and colored the birthday balloon dog image with OLO Alcohol Markers.
I die cut the Happy, Birthday, and You Scripty Word and Shadow Layer dies from pale pink cardstock. I used the "Y" from You to replace the "H" in Happy making it read "Yappy Birthday" for the sentiment. I glued the sentiment into place and added Clear Sparkle Enamel Dots to the front of the card.  The finished card front is attached to an light pink A2 card base.

The Rabbit Hole Designs Products

Thank you, I appreciate you taking time from your day to stop by to celebrate 5 year with The Rabbit Hole Designs.  I hope you are inspired to create something lovely today!


Be Creative ~ Stay Inspired

Jenn Gross


Follow me, Journey Coach Jenn, on 

Instagram - https://www.instagram.com/journeycoachjenn/

YouTube - http://www.youtube.com/c/JourneyCoachJenn

Blog - http://www.journeycoachjenn.com/


For more inspiration, updates, and news make sure to check out these places


The Rabbit Hole Designs

The Rabbit Hole Designs Instagram

The Rabbit Hole Designs Facebook Page

The Rabbit Hole Designs Pinterest

The Rabbit Hole Designs YouTube

January 2024 Release

Hello and welcome to the inspiration hop. We are excited for you to join us as we present to you our January 2024 release. Our Brand Ambassadors will be sharing their projects, so be sure to visit their blogs and leave them some crafty love.

The 4 stamp sets with coordinating dies are all available to purchase right now in the shop.

The products being highlighted today are:

Thank you so much for being here for our inspiration hop.

Here is the lineup for today:

The Rabbit Hole Designs

Lauren

Jenn                                

Rick

Tracy

Jessica

Lydia

Deana


GIVEAWAYS:
To celebrate the January 2024 release, The Rabbit Hole Designs is giving away two savings vouchers; one to a lucky Instagram follower from all comments left on The Rabbit Hole Designs Instagram account release post and one to a commenter on the HOP Blog Posts from all of the Brand Ambassadors Blogs. So make sure to head on over to Instagram to look for the giveaway post. Must comment by 11:59 pm PST 01-04-2024

@therabbitholedesignsllc

Winners will be contacted via DM for the Instagram winner and announced on The Rabbit Hole Designs Blog Day 1 Release post  on 01-05-24

The randomly drawn winner from Rick Adkins blog is:

Rick I absolute love your card. It's beautiful. Love your design and the color combination! Thanks for sharing! Happy New Year!!


Carrianne Banul


Please email us to claim your voucher info@therabbitholedesigns.com Subject January Blog Hop (Blog Comment) Winner.

All winners have 1 week to claim or they forfeit all rights to savings voucher(s)

This is the graphic you are looking for on our IG and FB fan page

For more inspiration, updates, and news check out these awesome places! 

Thank you so much for stopping by today!