Pages

Showing posts with label Congratulations. Show all posts

Pretty, Paisley Congratulations Card


Hi there! It's Lauren today with this clean and simple congratulations card that features both the new Paisley Bandana stencil set and the Sentimentally Speaking stamp set from this month's release. 

I've created a video showing how I created my card. You can watch it here:


I've linked the products I used, below. 

I use affiliate links when I can. This does not add any extra cost to you, but I do receive a small commission which helps keep me creating.
Thank you for visiting!

 Paisley Bandana, 2 Layer Stencil, The Rabbit Hole Designshttps://shrsl.com/4lmc4

Sentimentally Speaking Stamp Set, The Rabbit Hole Designs: https://shrsl.com/4lmc6

Cottontail Blending Brush: https://shrsl.com/3htkd

You can follow me here:

Bright Birthday Wishes!


Hello crafty friends and welcome to The Rabbit Hole Design's blog.  I am sharing this bright and cheery birthday card.  These colors pop! This cake is inviting you to cut into it and grab a slice!

The new Congratulations stamp set simply changes into a birthday cake by cutting off the hearts on top.  You could modify it to create a graduation cake, anniversary cake, really ant type you might need.

The background is created using the Mesh- Optical Illusion stencil and ink blending with Distress Oxide inks on a pink cardstock.

The sentiment uses both the Happy and the Birthday Scripty Word and Shadow Layer dies. Both words are die cut from a white cardstock and glued to the front of the card.

You can see how simple it is to assemble this card. after you have stenciled the background, colored and cut out the cake, and die cut the scripty words.  The two white lines on the left side of the card are thin strips of white cardstock that are glued to the card front.  The card front is attached to a white cardstock A2 base.

The Rabbit Hole Designs Products Used

Thank you for stopping by!  I hope you enjoyed this simple cheery birthday card.  Please feel free to ask any questions or leave a comment.  I hope you spend time to create something lovely today! 

Be Creative ~ Stay Inspired

Jenn Gross


Follow me, Journey Coach Jenn, on 

Instagram - https://www.instagram.com/journeycoachjenn/

YouTube - http://www.youtube.com/c/JourneyCoachJenn

Blog - http://www.journeycoachjenn.com/


For more inspiration, updates, and news make sure to check out these places


The Rabbit Hole Designs

The Rabbit Hole Designs Instagram

The Rabbit Hole Designs Facebook Page

The Rabbit Hole Designs Pinterest

The Rabbit Hole Designs YouTube


Congratulations!


Happy weekend!!!!  Hope you are having a wonderful Saturday!  Tangii here with another fun card using Congratulations from the May release.  A little embossing here, a little ink blending there and voila!  While this image is fantastic to color, I just can't help but embossing it!  And not just embossing, but embossing in metal (Gold, Silver, etc.)

I also used the Mesh Optical Illusion stencil and some Oxide Ink to add a little something to the upper corner... my card went from "simple" to "woohoo" just by adding that stenciled piece!  I LOVE the final look!

You can also read about this card on my blog, here with links to the products I used, etc.  Thanks for popping by, come back again soon!

May 2022 Release Hop - Day 1


Hello and welcome to day 1 of the inspiration hop. We are excited for you to join us as we present to you our May 2022 release. Our Brand Ambassadors will be sharing their projects over the next few days, so be sure to visit their blogs and leave them some crafty love.

The 5 new stamps sets, 3 coordinating dies, and 2 stencils are all available to purchase right now in the shop.

The products being highlighted today are:

Make sure you stop back tomorrow for Day 2 of our inspiration hop.

Here is the line up for today:

__________________
**Giveaway**

To celebrate the May 2022 release, The Rabbit Hole Designs is giving away two savings vouchers; one to a lucky Instagram follower and one to a lucky Fan Page follower.  Winner will be chosen at random from the comments left on the INSTAGRAM post, and tagging friends, and also from commenting on the Fan Page post.  So make sure to head on over to INSTAGRAM and look for the giveaway post
and look for the post at
by 11:59 p.m. PST 04-28-2022 
Winners will be contacted via DM for the IG winner 
and announced in the 
Facebook Fanpage group on 04-29-2022

This is the graphic you are looking for on our IG and FB
___________________
For more inspiration, updates, and news make sure to check out these awesome places! 

Thank you so much for stopping by today!

Congratulations Peonies


Hello crafty peeps!
It's Lisa here and it's my day on The Rabbit Hole Designs Blog. 
I have a Congratulations card to share with you today. 
I used the masking technique to make my card and the 
Pretty in Peony stamp set with some quick watercoloring.
Here's how this card came together:

  1. The first step was to cut a scalloped rectangle frame from watercolor paper.
  2. Next I stamped "Congratulations" from the Happily Ever After stamp set across the middle of the paper.
  3. I wanted to do some masking over the sentiment so I used purple tape to cover it up.
  4. Now it was time to stamp the peonies over the tape.  I stamped the flowers repeatedly over to cover the width of the card.
  5. Next I used my Zig watercolor markers and some water to paint the flowers.
  6. The next step was to remove the purple tape and reveal the stamping.
  7. I used a ruler to draw a black line above and below the flowers to really make the sentiment stand out between the flowers.
  8. The last step was to do some ink splattering and apply the watercolored panel to a golden yellow card base and apply some sequins.


Thanks for stopping by today and make sure to stop by The Rabbit Hole Design's blog
 each day to see more projects from the fabulous design team!

For even more inspiration, updates, and news make sure to check out these links.

Have a great day, I already am!
🌼Lisa 🌼

SoFishticated Zentangle


Hey crafty friends, it's Amanda with Pear Blossom Press again! Today, I've got a fun zentangle card for you. If you're not familiar with the term, let me explain. It's the art of doodling, or drawing tiny repetitive patterns within the lines of a bigger image or scene. For those of us who love to doodle, but wouldn't consider ourselves great artists, the Sofishticated stamp set is the perfect way to get started! It is full of gorgeous underwater creatures drawn in zentangle fashion. (And some great sentiments too.) You can use these images as focal points for your own zentangle scenes, like I did.

For this card, I started by stamping my images with black ink, then I used my stitched hillside dies as guides to draw in the wave lines around the images with a Copic liner. You can freehand that part, but I wanted to make sure my lines curved in the same places. Next, I filled in the waves with little doodles and patterns. (Don't be intimidated by this; think dots, scallops, Vs, swirls, and crosshatched lines. This is the fun part!)

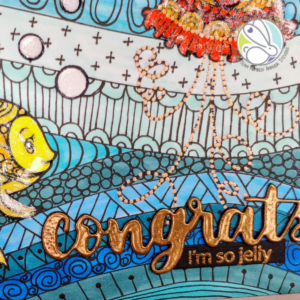
Once the patterns were all filled in, I used Copic markers to color the waves and images. Then I glued the scene onto a blue A2 card base. For the sentiment, I stacked the die cut word, Congrats, several times and added a layer of copper embossing powder on top. I stamped the smaller sentiment onto a strip and embossed it with the same powder, then glued them in place. Details on the fish were added with white, gold, and copper gel pens. I try to save anything with a long dry time as the last thing I add to a card, so I'm less likely to smear it. So for my final touch, the fish and bubbles got some extra pizzazz with an Aqua Shimmer pen and a coat of Diamond Glaze (the most challenging of all things to photograph).

Are you a doodler? Have you tried any zentangle art yet? This card was a ton of fun to create, but I never would have given it a try without the Sofishticated stamp set to get me started. I have several more ideas for different scenes that I can't wait to try! I hope you'll give it a try too and let me know what you think.

If you'd like links to other specific products I used for this card, you can find them on the sister post here. I'll be back soon with another fun card. Until then my friend, thanks for swimming by and I'll SEA you soon!

Release Hop for April ~ Day 1 ~ Happily Ever After


Hello and welcome to Day 1 of the release hop. We are so excited for you to join us as we present to you our April release.  Our fabulous Design Team will be sharing their projects today featuring the stamp set Happily Ever After.  So please, be sure to visit their blogs and leave them some crafty love. 

All of the new stamp sets are available to purchase right now in the shop.

FREE SHIPPING 
on orders of $25 or more before taxes and shipping
(applies to US orders only)
No code necessary, exclusions apply


The stamp set that is being spotlighted today is: 

Happily Ever After


**Giveaway**
To celebrate day 1 of the release, The Rabbit Hole Designs is giving away the stamp set Happily Ever After to one lucky winner.  Winner will be chosen at random from the comments left on participating blogs, so make sure to visit each stop and leave a comment.  Leave comments by 11:59 pm PST 03-28-2019 on all participating blogs. Winner will be announced on The Rabbit Hole Designs blog 03-29-2019

Here is the line up for the hop:

Lisa Golzbein
Katie Brooks
Maria Russell
Lynnea Hollendonner
Amanda Stevens
Martha Lucia Gomez
MaryAnn Samuelson

Make sure you come back tomorrow for Day 2 of our release HOP.


For more inspiration, updates, and news make sure to check out these inspiring places! 

The Rabbit Hole Designs 

Thank you so much for stopping by today!