Pages

Showing posts with label Circle Illusion Stencil. Show all posts

A Sassy Good Bye 2020


 Hello my crafty friends and welcome to today's blog. I'm featuring The Rabbit Hole Designs' Caffeinated Bear and Circle Illusion stencil to create this sassy good-bye 2020 card.  This card is snarky and caffeinated.  


I used Spectrum Noir TriBlend alcohol markers to transform the bear into a panda bear.  I colored the ears and around the eyes with black and grey markers. To perk up the Panda, I colored the robe in bright pink and added yellow polka-dots. The fun bunny slippers and mug are colored an aqua blue.


I used a piece of 4" x 5 1/4" teal cardstock for the card front.  I used Pixie Spray to lightly tack the Circle Illusion stencil to the teal card front.  I added an oval stencil over the left side of the card front and stenciled Squeezed Lemonade Distress Oxide ink over the stencil using a Cotton Tail Blending Brush.


I die cut the words using letter dies in my stash and a glossy black cardstock and glued them on the card front.  I created the mask by scoring light blue cardstock every 1/8th inch and added lines.  I cut the scored cardstock into a small rectangle, angled the corners, and punched holes in each corner. I threaded twine through the holes to create a small face mask.


I added a die cut black glossy frame to the card front and glued it to a white A2 card base to complete the card.

Here are The Rabbit Hole Design products used in this card:

Caffeinated Bear stamp set


Optical Illusion stencil


Cotton Tail Blending Brushes


Thank you so much for joining me today.  I hope you enjoyed this Sassy Good Bye to 2020 card featuring the Caffeinated Bear stamp set and the Circle Illusion stencil.   May 2021 bring you joy and blessings.  See you in the New Year!


Be Creative ~ Stay Inspired

Jenn Gross


Follow me, Journey Coach Jenn, on 

Instagram - https://www.instagram.com/journeycoachjenn/

YouTube - http://www.youtube.com/c/JourneyCoachJenn

Blog - http://www.journeycoachjenn.com/


For more inspiration, updates, and news make sure to check out these places


The Rabbit Hole Designs

The Rabbit Hole Designs Instagram

The Rabbit Hole Designs Facebook Page

The Rabbit Hole Designs Pinterest

The Rabbit Hole Designs YouTube

Floral Flamingo Friend - A2 Stenciled Card


Hello my crafty friends!  Welcome to todays The Rabbit Hole Design blog. I love all the sentiments that come with the Flamingo Botanical stamp set. you really need to check it out!  This sentiment I chose for this card reads: "If I had a flower for every time you made me smile and laugh I could walk in my garden forever".  Don't you just love it? I am featuring the Flamingo Botanical stamp set, the Circle Illusion stencil, and the Cotton Tail Blender Brushes.


The stenciling is super simple.  I used a low tack tape to secure an open circle mask/stencil on a piece of 4"x 5 1/4" white cardstock on the lower right . I stamped the Circle Illusion stencil over the top of the  open circle.  I chose Speckled Egg and Shaded Lilac Distress Oxide inks for the stencil blending with my Cotton Tail Blender Brushes.  

I stamped the gorgeous sentiment to the top left of the card front, attached it to a slightly larger piece of pink cardstock.  I tied a thin black organza ribbon around the car just under the sentiment and tied a bow.  

I colored the Flamingo image from the Flamingo Botanical stamp in pink and coral alcohol markers, fussy cut it out and attached it to the card from with double sided foam tape. I added a few of the sequins to the lower front left of the card front and attached it to a navy A2 card base completing the card.


Here are The Rabbit Hole Design products used in this card:


Flamingo Botanical stamp set 4x6


Circle Illusion stencil 6x6


Cotton Tail BlenderBrushes 


I hope you enjoyed this fun flamingo card featuring the Flamingo Botanical stamp set, the Circle Illusion stencil, and Cotton Tail Blender Brushes   I love hearing from you. With The Rabbit Hole Design Release next week, what do you hope to see?    


Be Creative ~ Stay Inspired

Jenn Gross


Follow me, Journey Coach Jenn, on 

Instagram - https://www.instagram.com/journeycoachjenn/

YouTube - http://www.youtube.com/c/JourneyCoachJenn

Blog - http://www.journeycoachjenn.com/


For more inspiration, updates, and news make sure to check out these places


The Rabbit Hole Designs

The Rabbit Hole Designs Instagram

The Rabbit Hole Designs Facebook Page

The Rabbit Hole Designs Pinterest

The Rabbit Hole Designs YouTube


Jingle Wishes Shaker Card


Hello Everyone! Justin here, and today I am sharing this fun shaker card that I made using the new Kringle set, and a couple elements from the Slice of Christmas stencil!

First, I colored up my Santa from Kringle with Copic Markers, fussy cut him out and set him to the side.

Using my Slice of Christmas Stencil, I blended one of the trees onto white cardstock using a Cotton Tail Blending Brush, using a green blend of Oxide Inks for the body of the tree, and a brown ink for the stem. I fussy cut my tree out and set it aside with my Santa.

I took a square piece of white cardstock and ink blended a light blue green to navy ombre blend using Oxide Inks and a  Cotton Tail Blending Brush. I spritzed this piece with water and set it aside for later.

Taking an A2-sized piece of white cardstock, I used the "snowbank" from the Slice of Christmas stencil and blended up a horizontal wonky stripe pattern using a red Oxide Ink with a  Cotton Tail Blending Brush. I took a square die cut, and cut a window in the upper center of my image.

Next, I took an A2-sized piece of kraft cardstock. I used 2 square dies to cut out a frame that would fit perfectly over my square cut out from my red striped panel. I distressed the edges with a brown Oxide Ink, and adhered my frame directly over my window. Then, I cut a .75" strip from the bottom of my kraft cardstock, and blended a darker brown ink over the Circle Illusion stencil, creating a wood effect that I like to use with a  Cotton Tail Blending Brush. I adhered this strip to the bottom of my stripe panel to act as the flooring.

Taking the banner stamp from Kringle, I stamped the banner, and then stamped the buildable sentiment "Jingle Wishes" inside the banner in an alcohol marker safe ink. I heat set the ink, and then colored over the banner in red Copic Markers.

I took my fussy cut Christmas Tree and adhered some sequins to it from a shaker pack. I alsåo cut out a small tree skirt from my scrap patterned paper stash, adhered it to the bottom of my tree, and adhered my tree to the lower right portion of my panel. I also took my sentiment banner, tucked it behind the tree, and adhered it down.

I flipped my panel over, and adhered acetate to cover my window. I then took my Kringle Santa and adhered him so that he looked like he was peeping into the window to say hello. I also adhered a very small piece of his hat directly to the visible acetate, just to help keep him flush against the shaker window.

Using doubled up foam tape, I made a border around the outside of my shaker window on the backside. I removed the backing, and then went over the edges of the tape (not the tape backing portion) with an anti-static powder tool. I took my blue-green-to-navy ombré piece and poured a shaker pack on top of it (very carefully, so that none of the sequins went astray). I took my mail card panel, carefully placed my card over the ombré piece, and pressed down to fully adhere it. I gave my card a shake to make sure none of my shaker bits flew out, and I got the all clear to finish this card up!

I used doubled up foam tape to cover some remaining back portions of the panel, removed the backing, and adhered it to an A2-sized card base. I also wanted to add a little extra glitz, so I took a couple more sequins from the pack and adhered them onto my card as well.

And that's how I made my project!

Here are the products I used:


Circle Illusion stencil


For more inspiration with your The Rabbit Hole Designs Creations, be sure to follow along at these other locations:


For more details about products used in this post, you may also follow along at my personal blog, Just a Note by Justin, as well!

I cannot wait to see what you craft up using these super cute new Christmas in July release products! Be sure to share them in The Rabbit Hole Designs Fan Page (and don't forget about the Anything Goes Challenge Album as well!

Happy Crafting!


Anti Valentine's Day Cards


 Good morning crafty card making peeps!
I hope you all enjoyed your Thanksgiving and ate lots of turkey
and spent some quality time with family and friends!
I spent the holiday with family in Georgia and had 
tons of fun shopping and laughing!

It's Lisa here today on the blog with 2 fun cards
using products from the recent December release!
In the crafty world we are ahead of schedule with the holidays
so we are currently in Valentine's Day mode.
I used the new Anti Valentine Sassy Sentiments combined with the 
Circle Illusion Stencil and came up with 2 fun and easy cards.

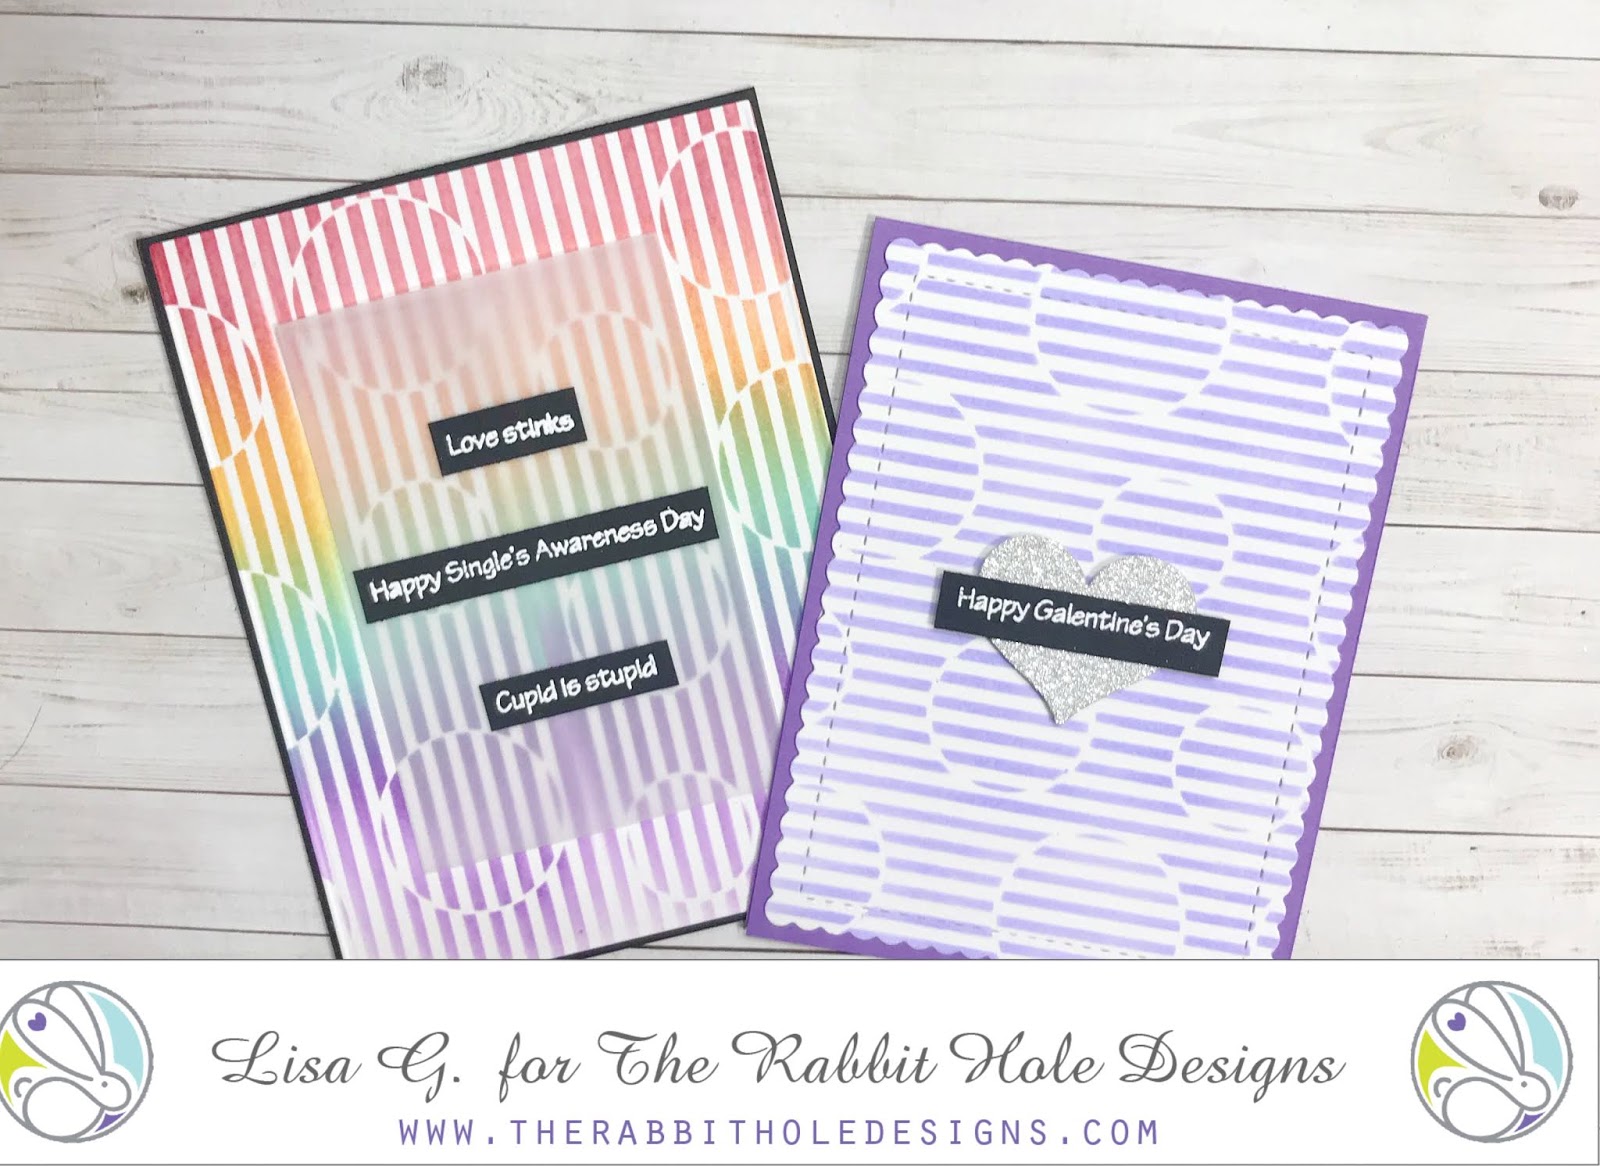
For my first card I blended rainbow colors over the Circle Illusion Stencil
for a fun and colorful background. 
I used a smaller rectangle of vellum paper to mute out the center
of the stenciled background and then I added 3 sentiments from
the Anti Valentine Sassy Sentiments. I white heat embossed the sentiments
on to black paper and stacked them on the vellum.
I even decorated the inside of the card with another sentiment
and included the heart image from the same set with the
word "blah" inside of it.


For my second card I used purple ink only over the 
Circle Illusion Stencil for a more monotone look.
I added a heart shape that I cut from silver glitter paper on to the 
center of the stenciled background.

Once again I white heat embossed a sentiment on black paper from the 
and mounted the sentiment it across the silver heart.
Lastly I  decorated the inside of the card similar to the first card.


I love the new stencils, they really make quick work 
of a fun and interesting background with minimal effort.
The Anti Valentine Sassy Sentiments stamp set really 
cracks me up and at the same time can be used for a legit 
Valentine's day card if you use the cupid and heart images 
and any number of other "true love" sentiments.

Thanks so much for stopping by today and don't forget you can 
purchase The Rabbit Hole Designs products at Simon Says Stamp.

For more inspiration, updates, and news make sure to check out these links.


Have a great day, I already am!
💘Lisa 💘

Not a Valentine Card by Niccole

Hello everyone!

It's Niccole from Nic & Viv Designs back again to share another card I made using one of The Rabbit Hole Designs new stamp sets. 

For today's card I used the Sassy Sentiments - Anti Valentine stamp set and the Circle Illusion stencil.


How to create this card:


  • White A2 card base
  • Stamp repeatedly with your Misti the heart from the Sassy Sentiments - Anti Valentine  stamp set on the right side vertically  Copic color and set aside
  • Add Glitz Gel in three colors to a piece of gray card stock with the Circle Illusion stencil
  • Let dry
  • Trim panel and apply to left side of card base
  • Add a thin strip of black card stock to incorporate the two pieces together
  • Add black Nuvo drops randomly to hearts
  • Stamp sentiment from Sassy Sentiments - Anti Valentine stamp set to thin strip of white card stock
  • Cut a banner end to one side of sentiment strip
  • Add sentiment strip to card with foam tape
Here is one more picture of the full card ...
What do you think of the change from red to black with the Glitz Gel?  I really love how it turned out.

TRHD Products used:

For more inspiration, updates, and news make sure to check out these places

The Rabbit Hole Designs YouTube

I have had so much fun playing with the Sassy Sentiments - Anti Valentine stamp set and the Circle Illusion stencil today.

Thank you so much for stopping by and spending some time with me.

Until next time ... Hugs & inky fingers!   -Nic-

December Release Inspiration Hop ~ Day 2


Hello and welcome to Day 2 of the Inspiration Hop. We are so excited for you to join us as we present to you our December release.  Our fabulous Design Team will be sharing their projects over the next couple of days, so be sure to visit their blogs and leave them some crafty love.


 The 4 new stamp sets, 3 dies, & 2 Stencils are available to purchase right now in the shop.
~
As a thank you every order placed will be eligible for a 20% discount. Discount Code TRHDTHANKFUL20 This code will only be accepted until 12-01-2019. There are no exclusions on this code it is applicable to your whole order. Not applicable to previous orders. May be used more than once. Does not apply to shipping and tax.
Please see graphic at the bottom of the post.
**Please Note: Free Shipping WILL NOT be available during the time this discount code is in effect. **
~

The stamp set that is being highlighted today is:

Love You More - Heart Dance


you may also see this stamp set floating around the design team ...


**Giveaway**
To celebrate day 2 of inspiration The Rabbit Hole Designs is giving away the stamp set Love You More - Heart Dance and the stencil Circle Illusion to one lucky winner. Winner will be chosen at random from the comments left on participating blogs, so make sure to visit each stop and leave a comment. Leave comments by 11:59 pm PST 11-28-19 on all participating blogs. Winner will be announced on The Rabbit Hole Designs blog 11-29-2019 


Here is the line up for the hop:
Amanda Stevens
Amanda Wilcox
Lisa Golzbein
Cassie Trask

Make sure you come back tomorrow for Day 3 of our Inspiration Hop.


Thank you so much for stopping by today!