Pages

Showing posts with label Clean and Simple. Show all posts

Balloon Animals #2 Snarky Clean & Simple Card

Hello crafty friends, today I am sharing another card using the Balloon Animals #2 Stamp Set that just released the first of this month.  It has sentiments that are not as snarky as this one, but if you know me you know I am a sarcastic person, so I was all about this sentiment when I saw this stamp set.   

Snarky Clean & Simple Balloon Animals #2 Card by Rick Adkins

For my card I used two of the images from the Balloon Animals #2 Stamp Set.  I picked the Octopus and the Crab.  I thought that they were super funny paired with the sentiment I picked for today's Snarky Clean & Simple Card design.  I colored the two images with my alcohol markers and used the matching Balloon Animals #2 Dies to cut each one of them out.  

Balloon Animals #2 Snarky Clean & Simple Card by Rick Adkins

For the inside panel of my card I used the Making Waves Stencil to add a little fun underwater plants.  I just keep the color scheme super simple.  I only used two different colors of ink for the background.  For the stencil I just used my Bitty Bunny Blending Brushes and went a little heavier with the ink application.  

Thanks for dropping by today I hope that you you enjoy my little snarky clean and simple card today! 

Rick 

For more inspiration, updates, and news check out these awesome places! 


Affiliate Disclaimer: This post contains affiliate links. If you make a purchase through these links, I may receive a small commission at no additional cost to you. Thank you for supporting The Rabbit Hole Designs LLC and helping us continue to bring you creative content!

Discover the Adventure: Creating a Clean and Simple Card with the Let's Wander Stamp Set

Hello, wonderful crafters! Rick here from The Rabbit Hole Designs, bringing you another exciting and heartwarming project. Today, we're celebrating "Let's Wander Where the Wi-Fi Is Week" with a delightful card design featuring our very own Let's Wander Stamp Set. This stamp set is perfect for those who love adventure and the great outdoors. Let's dive into the details of this clean and simple card design that’s sure to bring a smile to anyone's face.


The Inspiration Behind the Card

When I first got my hands on the Let's Wander Stamp Set, it immediately reminded me of my childhood camping trips with my family. We’d pack up the car, leave the bustling city behind, and head into the woods for a weekend of hiking, storytelling around the campfire, and sleeping under the stars. This stamp set perfectly captures that sense of adventure and nostalgia, making it an absolute joy to work with.


Crafting the Card

The Perfect Stamping

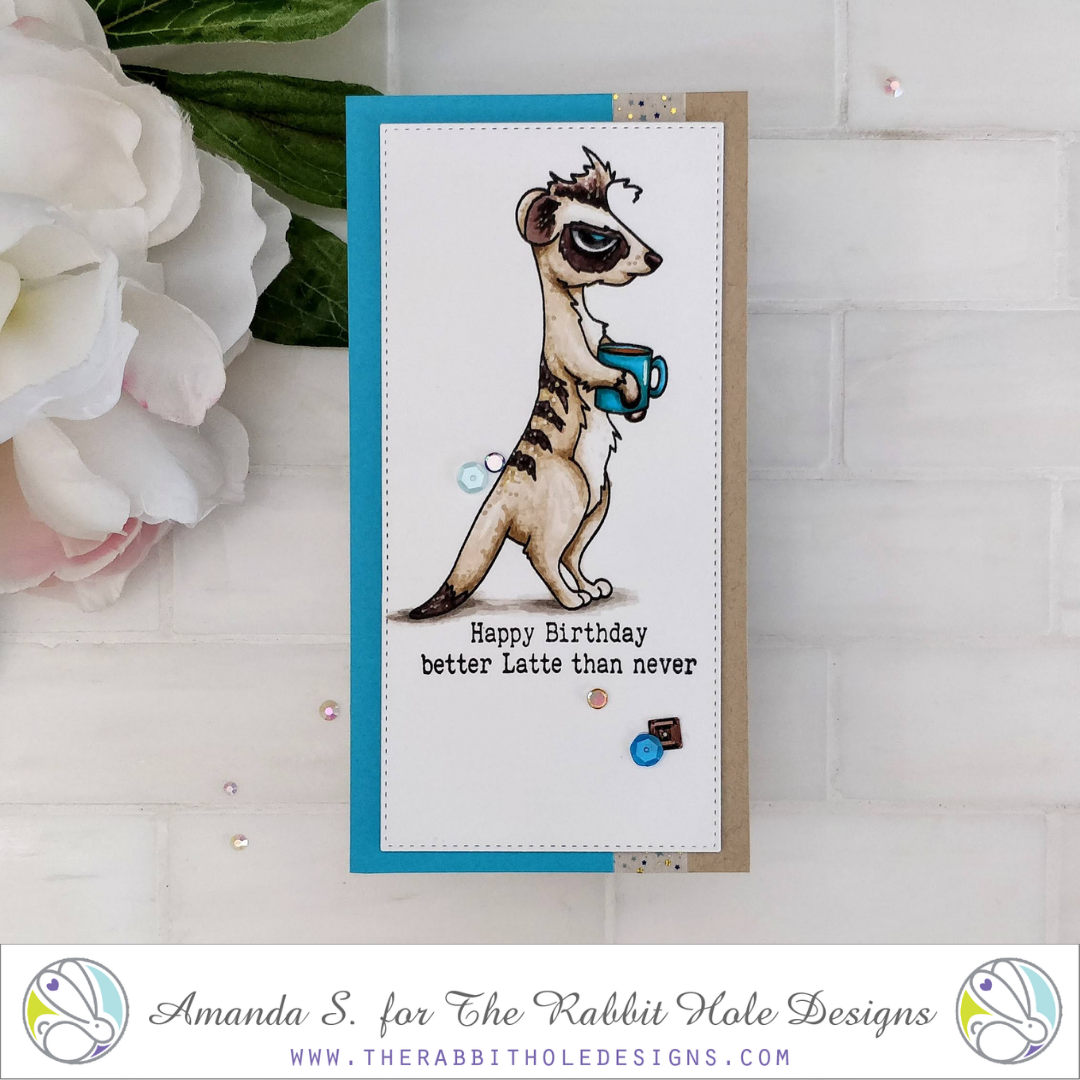
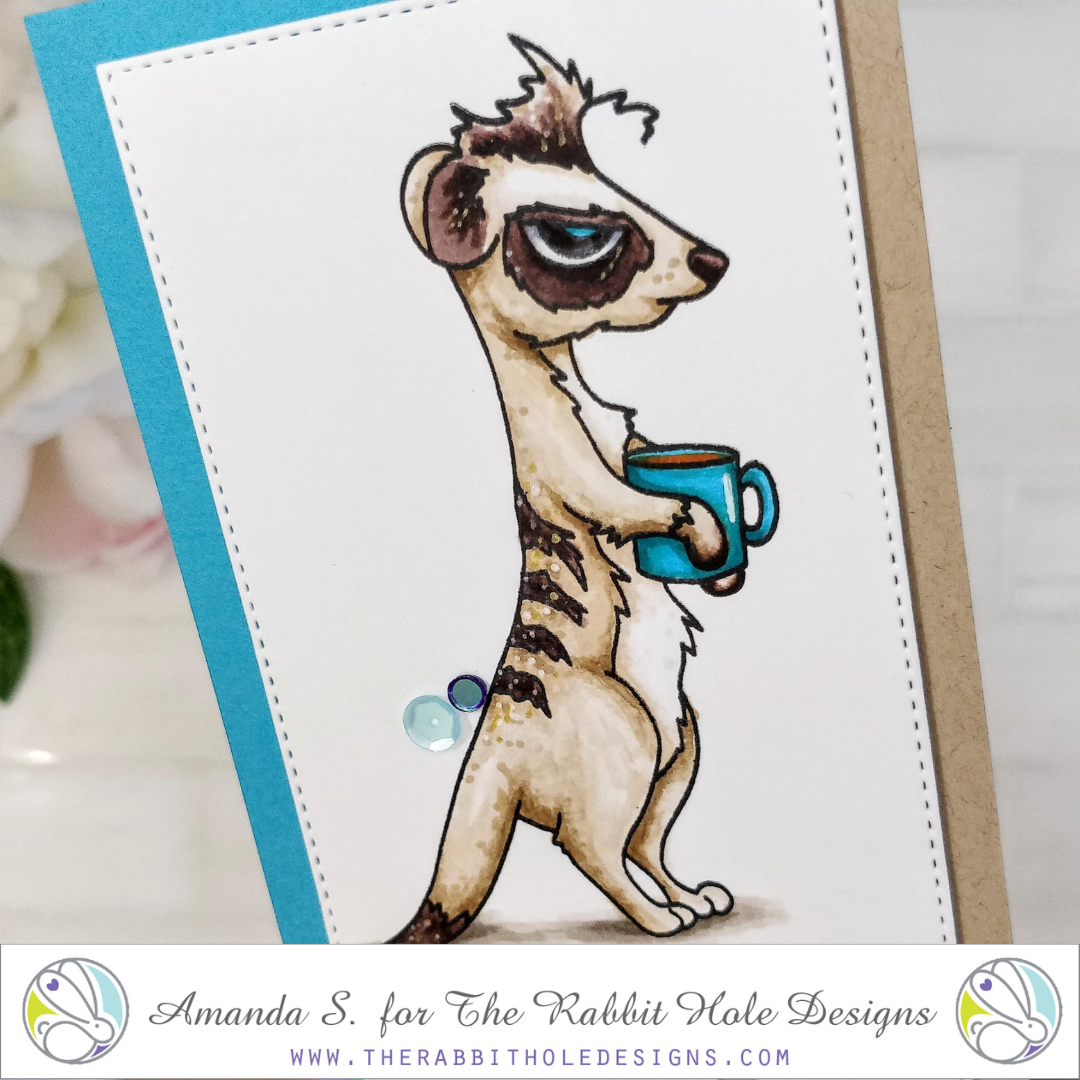
To start, I stamped the charming image from the Let's Wander Stamp Set onto high-quality white cardstock using a reliable black ink. This combination ensures crisp, clean lines that are ideal for coloring.

Adding Vibrant Colors

Next, I brought the stamped image to life using my favorite brush markers. Coloring is such a therapeutic process, allowing me to infuse the scene with vibrant hues and personal touches. It's like painting a picture with markers, and I love seeing the image come to life with each stroke.


Creating a Beautiful Frame

After coloring, I trimmed the cardstock to 4" x 5 1/4". To add a subtle but effective detail, I brushed the edges with a rich blue ink. This technique adds a hint of color that frames the image beautifully, drawing the eye inward.

Stamping the Sentiment

For the sentiment, I chose Versafine Clair Nocturne Ink that provides deep, crisp impressions. Stamping the sentiment directly onto the card front adds a finishing touch that ties the entire design together.

Preparing the Card Base

I crafted the card base from sturdy kraft cardstock, cut to 4 1/4" x 11" and scored at 5 1/2" for a top-folding design. Before folding, I stamped the same image from the Let's Wander Stamp Set on the inside using a soft brown ink. This adds a delightful surprise when the card is opened, showing that extra bit of thought and care.


Assembling the Card

I attached the card front to the base using 3D Foam Squares, which add wonderful dimension to the design. This is a great tip for adding depth and interest to your cards – the raised effect can really make your design pop.

Finishing Touches

To complete the card, I added a few Clear Sparkle Enamel Dots around the sentiment. These little embellishments catch the light beautifully and add just the right amount of sparkle without overpowering the design.

Final Thoughts

This project is a fantastic example of how a few thoughtful details can transform a simple design into something truly special. The Let's Wander Stamp Set from The Rabbit Hole Designs is a joy to work with, capturing the essence of outdoor adventure and childhood memories.


Creating cards is more than just a hobby – it’s a way to share a piece of your heart with someone else. I hope this project inspires you to embrace your creativity and perhaps take a moment to wander where the Wi-Fi is weak. Happy crafting, friends! I can't wait to see what you create. Feel free to share your projects and stories in the comments below.

Stay inspired and keep crafting!

Rick

For more inspiration, updates, and news check out these awesome places! 


The RHD Affiliate Disclaimer:

We want to ensure transparency and honesty in our interactions with you, our valued readers. Please be aware that the links provided on The Rabbit Hole Designs Blog may be affiliate links. This means that if you make a purchase through these links, the project designer may earn a small commission at no extra cost to you. Your support means the world to us!


We kindly request that you accept the tracking cookie for the affiliate websites. Rest assured, this will not expose your computer to viruses or compromise your information. It's a necessary step for the company to attribute the sale to the affiliate, ensuring that creators like our creatives receive their rightful commissions.


Your trust and support empower our creators to continue sharing creativity and inspiration through our blog. Thank you for being an integral part of The Rabbit Hole Designs community!

Sending Some Love Your Way

 Hello crafty friends it's Rick back with you again today sharing another love themed card idea with you using the Cupid Clarence Stamp Set.  Today's card features the left over foil from the last card that I shared with you.  I ran the foil with the stamped outline of Clarence through my laminator with a toner sheet and attached it to a mat layer.  

Cupid Clarence Foiled Card by Rick Adkins

To finish off the card I simply picked one of the beautiful sentiments from the Cupid Clarence Stamp Set and heat embossed it from a heart die cut I had in my stash.  I then finished it off by adding a few of the Matte White Enamel Dots.  

Cupid Clarence Foiled Card by Rick Adkins

There's nothing like a super easy shiny clean and simple card design.  You could totally do this same design by changing out the foiled background and using just a piece of the Spring Floral #1 or Getting Inky Pattern Papers both from the Rabbit Hole Designs.  I encourage you to think outside the box and recreate a version of this card.  

Thanks for dropping by today I hope you have a wonderful day.  

Happy Crafting 

Rick

Easy Clean & Simple Fall Card

Hello and welcome back to the blog; it's Rick back with you today on this fabulous Black Friday!  I hope that you save some time to do a little crafting today after all your shopping adventures.  And if you have been out all day shopping and want to do a little crafting than my card today featuring the Falling Leaves Dies is the perfect one to recreate.  

Clean & Simple Fall Card by Rick Adkins using the Falling Leaves Dies


If you remember I mentioned on Monday that I would be sharing another card with you this week using more of the leaves that I die cutting and Gelli printed.  Well, this is that card!  To increase the fall vibes on the card I took the leaves die cuts and ran them through and embossing folder to add just a little more texture to the die cuts.  I simply attached the die cuts to my A2 card front cut from Cream Cardstock from the top left corner down to the bottom left corner but with a slight curve in the middle for added interest.  

Close up view of Rick's Fall Clean & Simple Card Design

 Once I had all the leaves attached and the extra trimmed off the edges.  I took a black pen and drew on a few dots around a few of the leaves on the card.  I also added a little gold splatter to the card front as well.  Even through I have a lot of white space on the card, all the colorful leaves make it quite colorful.  The little extra details add to the texture and help provide a little more interest to the card, but they are so shuttle they do not over power the clean and simple design. 

Falling Leaves Dies, Happy Scripty Dies, Happy Scripty Stamp Set, Rick Adkins

 For the sentiment to the card I cut out the word happy from the, Happy Scripty Word with the Shadow Layering Die, just without the shadow layer and cut it from some gold metallic cardstock.  I attached the die cut sentiment to the card front with a little liquid glue.  I then took and stamped one of the sentiments from the Happy Scripty Stamp Set. I made sure to prep the cardstock with my Cottontail Embossing Powder Tool before adding gold embossing powder and heat setting it.  The sentiment strip was stamped on a scrap of navy cardstock (also left over from a pervious project).  For the sub-sentiment I popped it up with a little foam tape for a little dimension on the card.  Just a little side note if you don't have on of the Cottontail Embossing Powder Tools, do yourself a favor and pick one up as a little early Christmas present to yourself.  You will thank me for that little piece of advice.  

Falling Leaves Clean & Simple Card Design By Rick Adkins

To finish off the card and to add a little more bling to my clean & simple card; I added a few of the Clear Enamel Dots sprinkled around the card and on the leaves.  Since this was a clean and simple design I wanted something that would add a little bling but not over power the card design.  And the Clear Enamel Dots was the ticket.  They provide just the right amount of sparkle and shine but do not over power the card design.  I really love how on the leaves they look like dew drops from an early fall morning.   

I hope this post has shown you that creating a clean and simple design isn't as hard as you may think. Sometimes stepping outside of your comfort zone while crafting can truly elevate your designs.


Remember, it's all about experimentation and finding what resonates with you. And don't forget to share your creations on social media and tag The Rabbit Hole Designs to spread the card-making love.


Thanks for dropping by today I hope you have a wonderful day and that you found this post helpful. You can find all the supplies that I used on today's cards on my personal blog! 


You can find me on the following Social Media Channels with more crafty inspiration: 

Blog:  https://www.rckinsmonstudio.net/rickadkinscards

Facebook Page:  https://www.facebook.com/rickcraftycorner

YouTube:  https://www.youtube.com/@RickAdkins

TikTok:  https://www.tiktok.com/@rickadkinscardmaker

Instagram:  https://www.instagram.com/rickadkinsdesigns/


I hope that you have a crafty day.  For more inspiration, updates, and news make sure to check out these places.  


The Rabbit Hole Designs

The Rabbit Hole Designs Instagram

The Rabbit Hole Designs Facebook Page

The Rabbit Hole Designs YouTube


Have a crafty day!

Rick 

Floral Friendship Card - featuring the Lovely Lilies stamp set

Hello crafty friends!  Today I am sharing this simple one layer card created using the new Lovely Lilies stamp set.  These images are beautiful illustrated by Kelly Taylor exclusively for The Rabbit Hole Designs. 
I started off by stamping the two bloom lily image on a piece of 4 1/4" x 5 1/2"  Premium Coloring Cardstock using Pink Sand Fresh Ink for no-line coloring. I Googled lilies and chose the Royal Sunset Lily as my color inspiration.  The lilies are colored with OLO Markers using Violet, Orange,  Orange-Red, Green and Yellow-Green families.
I stamped and cut the same image from Masking Magic to cover the lilies while I ink blended the background.  After the background was dry,  I treated it with the Cottontail Embossing Powder Tool before stamping and heat embossing the sentiment in a copper embossing powder.

I cut the card front  down to measure  4" x 5 1/4" and mounted it on a purple A2 card base competing the card.

The Rabbit Hole Designs Products 


I hope you enjoyed this CAS card featuring  the new Lovely Lilies  stamp set.  May you be inspired to create something lovely today!

Be Creative ~ Stay Inspired

Jenn Gross


Follow me, @journeycoachjenn on: 

Instagram - https://www.instagram.com/journeycoachjenn/

YouTube - http://www.youtube.com/c/JourneyCoachJenn

Blog - http://www.journeycoachjenn.com/


For more inspiration, updates, and news make sure to check out these places


The Rabbit Hole Designs

The Rabbit Hole Designs Instagram

The Rabbit Hole Designs Facebook Page

The Rabbit Hole Designs Pinterest

The Rabbit Hole Designs YouTube


Classic Merry Christmas


We are celebrating Christmas in July all month long! My first card using the 1 Line Reindeer set was this one. I wanted to create a look of an ornament with the classic red/green combination. 
This is how I created this card: Prepare the card base using the Cottontail Embossing Powder tool, and white heat embossed the 1 Line Reindeer stamp. Stamp the reindeer one more time on masking paper and cut the mask. Apply mask over the embossed image. Cut two more masks, one that goes above the horizontal stamped image and one that goes below it. Remove the top horizontal mask and using a circular motion blend the green ink to create the top of the ornament. Place the mask back on and remove the bottom mask and repeat now with the red ink. Wait for the ink to dry and then remove the reindeer mask. Color nose and add highlights after dried. To finish the card stamp the sentiment and apply golden bling. As a last minute decision, I decided to use a notching tool to create notches on all 4 corners of the card and wrap a red embroidery cord around it.

With age comes the cage Rainbow Card


It is June, PRIDE month and I wanted to do a rainbow color combo card for my post at TRHD. This is such a bright look for any card and not hard to achieve at all with a few pointers. First of all, you don't need all the colors of the rainbow in inks to end up with this look. You only need pink (or red), yellow, blue, and purple inks. The colors in between these colors will be created when you blend the colors. It is such a fun look to make when you see your new color blends in between. My favorite on this card is the coral that got created when my pink and yellow blended. I used the new May release stamp set: SxS Life

Profits from every sale of the  SxS Life stamp set will go to fund injured drivers/riders, families of drivers/riders who have lost their lives, and organizations that promote & educate driver and rider safety in the off-road environment. This will be for the lifetime of the stamp set in our shop.

Hello Sunshine - Clean and Simple Card


Hello sunshine! It's Amanda from Pear Blossom Press again today with a clean and simple card, that's also really quick and easy to recreate! Head on over to my blog for all of the details, and a few tips for similar cards... pearblossompress.com.

Be sure to head on over to the shop and pick up the new Hello Scripty Word with Shadow Dies and the coordinating Hello Scripy Stamp Set, if you'd like to make a card like this. And check out the other coordinating word and stamp sets to create similar cards for any occasion!

Thanks so much for stopping by today. I'll be back soon with more fun cards to share. In the meantime, check out these fun places for more inspiration, updates and the latest news...


Clean and Simple Copic Meerkat


Hello my crafty friend, it's Amanda from Pear Blossom Press, again! Today, I'm sharing a clean and simple card, featuring the new Caffeinated Meerkat. I love this little guy. He's so much fun to color, and he's not too cutsie, so he's perfect for masculine cards too! Especially, when you pair him up with some of the fun sentiments in the Blended Sentiments stamp set

For the Copic chart I used, and coloring tips and tricks, head on over to my blog... pearblossompress.com. I've listed measurements for the card pieces too. 

Thanks so much for stopping by today! I'll be back soon with another fun card to share. Until then, let me know in the comments what your favorite caffeinated critter is. Is there another animal you'd like to see in the series?

For more inspiration, updates, and news, make sure to check out these places...

Butterfly Kiss Mini-slimline

Hello again my crafty friend, it's Amanda from Pear Blossom Press again. Today, I've got a clean and simple mini-slimline card for you, and I think you'll agree, it's very sweet.

Using the new Butterfly Kiss stamp set, and minimal coloring, it came together very quickly too. Head on over to my blog for all of the details, and for a list of the markers I used... pearblossompress.com

Thanks so much for stopping by today. I'll be back again soon with another fun card to share. Until then, I'll see you in the Facebook Fan Page.

For more inspiration, updates, and news make sure to check out these awesome places! 

The Rabbit Hole Designs 

The Rabbit Hole Designs Instagram

The Rabbit Hole Designs Facebook Fan Page

The Rabbit Hole Designs Pinterest

The Rabbit Hole Designs YouTube

Hello Flower - Stenciled Slimline Card


Hello crafty friends! Lauren here today with this easy stenciled slimline card. I wanted to create a cheery card that is sure to put a smile on my recipients face. The new Build Your Garden stencil is perfect for that with its happy flowers!

This was a super easy card to create. First, using washi tape. I covered the parts of the stencil that I wouldn't be using at all.

Next, I secured my stencil to a piece of white cardstock. Then I masked off, with washi tape, everything except the flowers and leaves I wanted to color.  

Now this might sound crazy, but I took the Cotton Tail blending brush that I've designated for my green Distress Oxide inks and adding no additional ink, blended the green ink that was already on the brush over the stems and leaves of the stencil. 

Then, I covered the stems and leaves and uncovered the flower petals. I did the same thing as I did with the stems and leaves. I used the ink that was already on my Cotton Tail brush that I designated for my pinks and blended the ink over all the petals. 

The last color I used was orange for the small round flowers. I made sure to mask off the others areas before blending them. 


I then trimmed down the panel using a stitched rectangle slimline die and adhered it to a slimline card base.

To create my "Hello" word, I used the same stencil on a second piece of white cardstock. Then I used an alphabet die set from my stash to create the word from the stenciled cardstock. I used a t-ruler to make sure the letters were straight and adhered them onto the front of the card.


I am super happy with how this card turned out! I love how you can create a  pretty card using just this stencil! 

For more inspiration, updates, and news make sure to check out these awesome places! Thanks for visiting!


Here's the link to the Build your Garden Stencil: 


Ink Bleached Easter Card


Hello my crafty friend, it's Amanda from Pear Blossom Press again! I'm back with another fun card showing off a neat ink bleaching technique. It's easy, and lends itself to clean and simple images like the new 1 Line Happy Easter stamp set. (It's also a great alternative to traditional coloring.) 

Head on over to my blog, where I'll walk you through the steps, and give you a bunch of helpful tips. (Click here.) Notice the hint of pink in my bunny's cheeks and ears? I've got tricks for that too!

Thanks so much for stopping by today. I'll be back soon with another fun card to share. In the meantime, you can find me posting regularly to my blog, and on social media.

For more inspiration, updates, and news from The Rabbit Hole Designs, make sure to check out these places...

Clean, Simple, Masculine...


Why are masculine cards so hard? Is it just me, or are clean and simple cards hard too? It's never that they take a lot of work; it's just that the ideas are hard to come up with. And it's hard to know the difference between clean and simple, versus plain and boring, right? Amanda from Pear Blossom Press here again, and today, I'm sharing a two versions of a clean and simple, masculine card. Since I already took care of the hard part (coming up with the idea), you're going to love how fast you can whip up a whole batch of these to have on hand!

STEP ONE:

Stamp HAPPY BIRTHDAY from the Marquee Words set onto a white panel. Turn the exclamation point upside down and stamp the bottom portion of it (mask off the top of the dot) above the words. Move it over and stamp it two more times. Next, use a Copic Multiliner and draw the top of the dot to look like a candle flame.  

STEP TWO:

Color the dots and flames with Copic markers. I used shades of green for one card, and blue greens for the second. Next, I trimmed the panels down to 5" x 3¾" and added a raised border, by scoring 1/8" on all four sides of the panels in my Scor-Pal. At this point, you can pop the panels up with fun foam on black mats and white card bases. (That's what I did for the green card.) But if you want to spend a few more minutes on the cards, you can add lights to the flames with EZ-Lights. They'll add a real pop of light! To do that, you'll want to punch a small hole at the base of each candle flame. And if you look closely, you'll see that I embossed PUSH HERE next to the Y in happy. I used white powder to allow it to blend into the background. In person, you can see the raised, shiny text, but it doesn't detract from the clean layout. 

STEP THREE:

Add lights! Flip your panel over and use double-stick tape to adhere the battery of your EZ-Light to the panel, making sure to line up the button right under PUSH HERE on the other side. Line up the three LEDs with the holes in the candles and secure them with tape. Add a layer of double-thick foam tape around the edges of the panel. I promise, it's really simple. Then you can attach it to the black mat and card base.

STEP FOUR:

Add clear raindrop gems on top of the flames. I did this on both cards; they're a great detail whether or not they light up. In the pictures below, you can see how the entire gem will light up when you put it on top of a light. You can also see what it would look like if you don't cover up the light... 

That's it. Pretty easy, right? Obviously, you can change up the colors, or even stamp on colored cardstock and fill in the dots with a white gel pen if you want a different look. Adding the lights only takes a few more minutes, but the card is great without them too. Here is a look at the finished cards. (The green doesn't have lights, the teal does.)

And here is a closeup of the lights, after the glue is dry. (Make sure to use a glue that will dry clear.) See how the whole gem lights up, instead of just the bottom of the flame? Pretty cool, right? You can use this same trick for other gems too, as long as they are clear or translucent (no silver paint on the back). 

What do you think of my clean and simple, masculine cards? I hope I've inspired you to give them a try. Want to see another card made using the Marquee Words stamp set? Check this out. How about another card with gems that are lit up? This Christmas card has lights under the star and Rudolph's red nose.

Thanks for stopping by today! Head on over to my blog, to read the sister article and find links to the specific products I used for today's cards. If you give this a try, tag me on social media so I can see and cheer you on! I'll be back soon with more fun cards to share.