Pages

July 2021 Inspiration Hop - Day 3


Hello and welcome to Day 3 of the Inspiration Hop. We are so excited for you to join us as we present to you our July release. Our fabulous Design Team have been sharing their projects over the last couple of days, so be sure to visit their blogs and leave them some crafty love.

 The 4 new stamps sets, 3 die sets. They are all available to purchase right now in the shop.

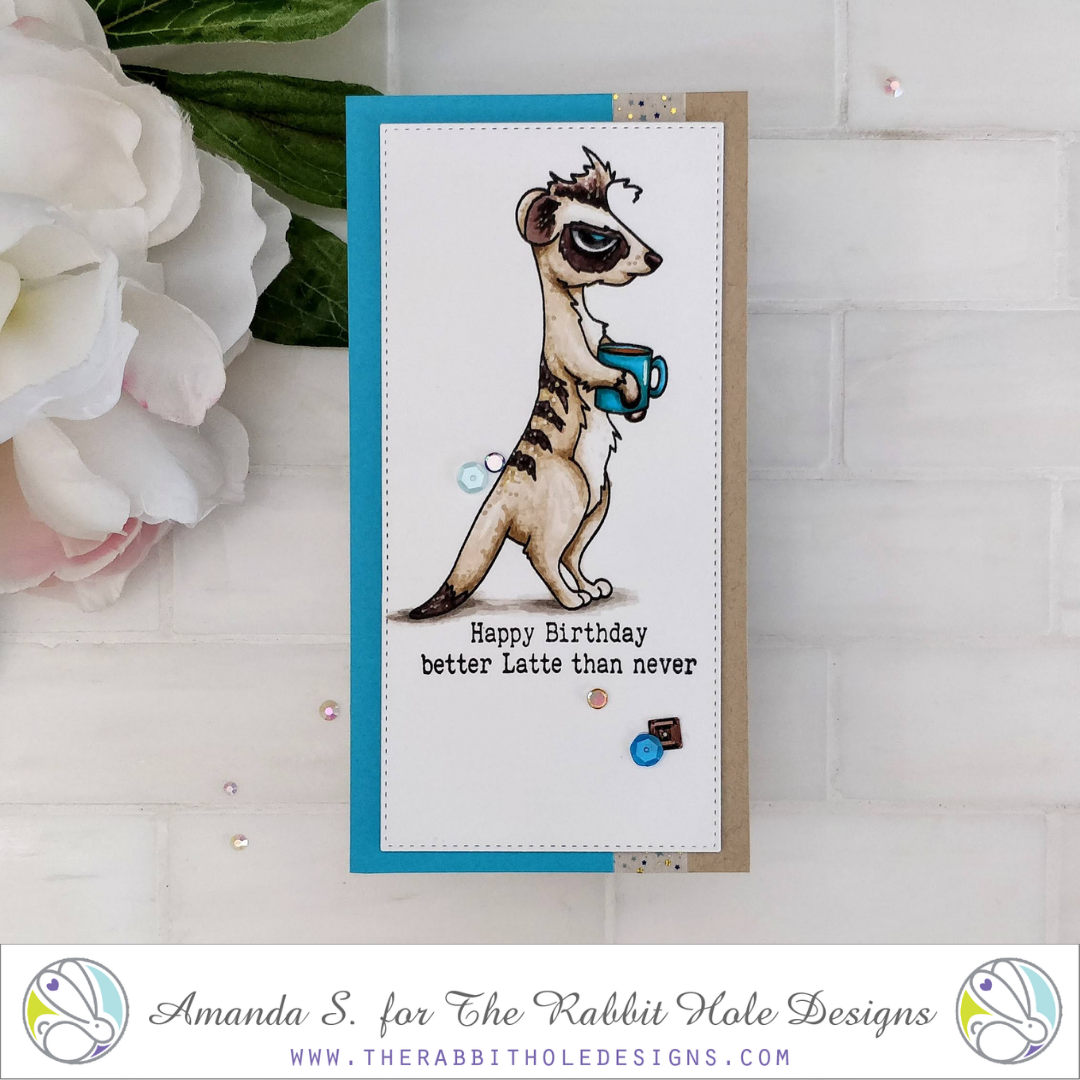
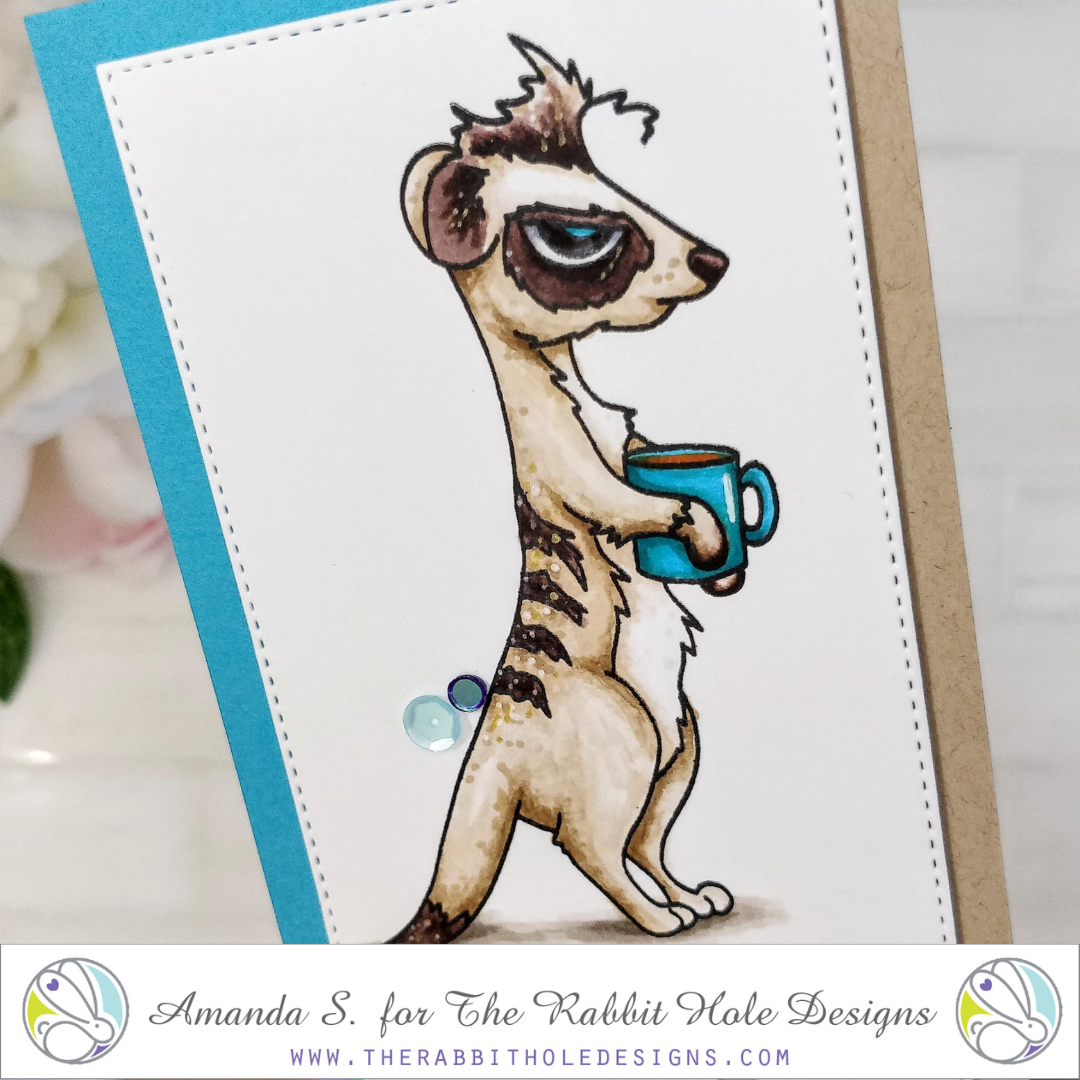
The one new stamp set being highlighted today are ...

Christmas Sweets

Thank you for being part of our July Inspiration Hop.

Here is the line up for the hop:

___________________

**Giveaway**

To celebrate the July release, The Rabbit Hole Designs is giving away two savings vouchers; one to a lucky Instagram follower and one to a lucky Fan Page follower.  Winner will be chosen at random from the comments left on the INSTAGRAM post, and tagging friends, and also from commenting on the Fan Page post.  So make sure to head on over to INSTAGRAM and look for the giveaway post @therabbitholedesignsllc and look for the post at
by 11:59 p.m. PST 07-01-2021. 
Winner will be announced on The Rabbit Hole Designs blog 07-02-2021.

This is the graphic you are looking for on our IG and FB

__________________

For more inspiration, updates, and news make sure to check out these awesome places! 


Thank you so much for stopping by today!

July 2021 Inspiration Hop - Day 2

Hello and welcome to Day 2 of the Inspiration Hop. We are so excited for you to join us as we present to you our July release. Our fabulous Design Team will be sharing their projects over the next couple days, so be sure to visit their blogs and leave them some crafty love.

 The 4 new stamps sets, and 3 die sets are all available to purchase right now in the shop.

The new stamp set being highlighted today is ...

Hoppy Holidays 4x6 Stamp Set

Make Sure you stop back tomorrow for our last day of our inspiration hop.

Here is the line up for the hop:

_________________

**Giveaway**

To celebrate the July release, The Rabbit Hole Designs is giving away two savings vouchers; one to a lucky Instagram follower and one to a lucky Fan Page follower.  Winner will be chosen at random from the comments left on the INSTAGRAM post, and tagging friends, and also from commenting on the Fan Page post.  So make sure to head on over to INSTAGRAM and look for the giveaway post @therabbitholedesignsllc and look for the post at
by 11:59 p.m. PST 07-01-2021. 
Winner will be announced on The Rabbit Hole Designs blog 07-02-2021.

This is the graphic you are looking for on our IG and FB

__________________

For more inspiration, updates, and news make sure to check out these awesome places! 


Thank you so much for stopping by today!

July 2021 Inspiration Hop - Day 1

Hello and welcome to Day 1 of the Inspiration Hop. We are so excited for you to join us as we present to you our July release. Our fabulous Design Team will be sharing their projects over the next few days, so be sure to visit their blogs and leave them some crafty love.


 The 4 new stamps sets and 3 new dies are all available to purchase right now in the shop.


The two new stamp sets being highlighted today are ...


 Christmoose- Moosemas 4x6 Stamp Set


Make Sure you stop back tomorrow for Day 2 of our inspiration hop.


Here is the line up for the hop:

__________________


**Giveaway**


To celebrate the July release, The Rabbit Hole Designs is giving away two savings vouchers; one to a lucky Instagram follower and one to a lucky Fan Page follower.  Winner will be chosen at random from the comments left on the INSTAGRAM post, and tagging friends, and also from commenting on the Fan Page post.  So make sure to head on over to INSTAGRAM and look for the giveaway post @therabbitholedesignsllc and look for the post at The Rabbit Hole Designs Fan Page
by 11:59 p.m. PST 07-01-2021. 
Winner will be announced on The Rabbit Hole Designs blog 07-02-2021.

This is the graphic you are looking for on our IG and FB

___________________


For more inspiration, updates, and news make sure to check out these awesome places! 


Thank you so much for stopping by today!

Glitzy Butterfly

 Hello, my crafty friends! Today I have paired 2 of my most loved stencils to create this glitzy card.


This card was inspired by 2 of my most used stencils. I paired the Butterfly 3x4 Stencil with the Clouds in my Coffee 6x6 Stencil. For the Butterfly stencil, I first did an ink blend of picked raspberry, shaded lilac, and wilted violet. I knew I wanted to add texture so I grabbed some of my favorite fine glitter and transparent paste. I waited for everything to dry before I fussy cut out the butterfly, which I popped up with the Double Thick Crystal Clear Foam Tape - 5mm wide.


For the background, I used the Clouds in my Coffee stencil using distress ink to create a different color palette, but I knew I wanted it to be just as glitzy as my butterfly so I had glitter ink in an extra spray bottle and did a couple of sprays with it. 


For more inspiration, updates, and news make sure to check out these places.

The Rabbit Hole Designs

The Rabbit Hole Designs Instagram

The Rabbit Hole Designs Facebook Page

The Rabbit Hole Designs Pinterest

The Rabbit Hole Designs YouTube


Meerkat alibi!

Hello crafty friends! Kimberly here with a fun card using The Rabbit Hole Designs Caffeinated Meerkat stamp set and coordinating die. I had so much fun making this card. 


I started out blending Speckled Egg Distress Oxide over the Clouds in my Coffee Stencil on white cardstock. Then, I wanted some texture so I added some texture paste over the full clouds in the center of the stencil on the ink blended cloud background. I put that to the side to let the paste dry. 

Next, I decided I wanted to make a bush/tree background using the Clouds in my Coffee Stencil, so I blended Gathered Twigs distress oxide ink and alternated it with Rustic Wilderness distress oxide over another piece of white cardstock. I cut the center out with an oval die and added foam tape to the back to pop it up on the blue cloud background. 

Next, I colored in my Caffeinated Meerkat with Copic Markers, die cut it out and added foam tape to adhere it to the card. I did fussy cut the image after die cutting it to remove more of the white border. To finish the card, I stamped two sentiments from Sassy Sentiments on strips of brown cardstock with embossing ink and heat embossed them with white embossing powder. I attached them to the card and adhered the card front to a brown cardstock card base. 

I hope I was able to inspire you to make something crafty today! Thank you so much for stopping by!
Kimberly

For more inspiration, updates, and news make sure to check out these places


The Rabbit Hole Designs

The Rabbit Hole Designs Instagram

The Rabbit Hole Designs Facebook Page

The Rabbit Hole Designs Pinterest

The Rabbit Hole Designs YouTube

Rainbow Chameleon

Hello my crafty friends and welcome to The Rabbit Hole Designs blog. Today I am sharing a colorful and caffeinated card. The Caffeinated Chameleon has been camouflaged many ways this month.  I thought I would celebrate Pride Month by camouflage him in Rainbow stripes.
Cut strips of 10 different pieces of colored cardstock and started sticking them in rainbow order on a piece of white cardstock using a double-sided Adhesive Sheet.  Cut a piece of the newly created rainbow cardstock to 4" x 5 1/4" to use as a card front. Stamp the Caffeinated Chameleon on the piece of the remaining rainbow cardstock lining up the top of the head in the red stripe. Fussy cut the rainbow chameleon. Add shading to the rainbow chameleon matching each rainbow colors as closely as you can using alcohol markers. Stamp the chameleon on a piece of white cardstock.  Colored the eyes and the coffee cup.  Cut the colored eyes and coffee cup out and glue them to the rainbow chameleon. 
Here you can see his eyes and coffee cup were colored, cut out and glued onto the front of Caffeinated Chameleon.  Add foam squares to he back of the chameleon and attach it to the card front, placing it slightly lower off center of the card front rainbow.  Stamp the sentiment above the chameleon and add die cut coffee cups to the card front. Attach the card front to an A2 white card base. 


I hope you enjoyed the Rainbow Chameleon card featuring the Caffeinated Chameleon stamp set


Be Creative ~ Stay Inspired

Jenn Gross


Follow me, Journey Coach Jenn, on 

Instagram - https://www.instagram.com/journeycoachjenn/

YouTube - http://www.youtube.com/c/JourneyCoachJenn

Blog - http://www.journeycoachjenn.com/


For more inspiration, updates, and news make sure to check out these places


The Rabbit Hole Designs

The Rabbit Hole Designs Instagram

The Rabbit Hole Designs Facebook Page

The Rabbit Hole Designs Pinterest

The Rabbit Hole Designs YouTube


Coffee First, Schemes Later


Hey yall!  Happy, happy Tuesday!  Hope your week is off to a great start. Tangii here, with another share from the June Release.  For today's card I used all 3 of the newest Caffeinated Critters, Meerkat, Hippo & Chameleon and the coordinating dies for all 3.

These guys made for a great trio for a slimline, check out their profiles!  I stamped and then die cute each of these guys out.  Once I got them all colored up, I placed them on my background piece and then sliced off the rest of their bodies (lol).  The frame is popped up for a little dimension.

The caffeine formula was stamped in a chat bubble in French Roast ink, and the sentiment from the Perfectly Blended set, was also stamped in French Roast on a separate tag and then popped up.
 
You can also read about this card on my blog, 
here with links to the products I used, etc.  Thanks for popping by, come back again soon!

Meerkat Shaker Tag

 Hello, my crafty friends! If you love coffee this shaker tag is for you! 


This was such a fun shaker tag to put together, I mixed a few mediums including an alcohol ink coffee splatter background. For the tag, I ended up die cutting 5 tags since I knew the sides were flimsier than the top and bottom. Once I had all my tags cut I took one of my squares dies to cut the centers out of 4 of them. 

Once I had everything cut I adhered to the inked background, I wanted this to have some depth so I used the new Double Thick Crystal Clear Foam Tape - 5mm wide to give me the perfect thickness. I used vintage photo distress ink to add some color to the tag itself. I used my zig brush markers to color my Caffeinated Meerkat and fussy cut him out.


Any Occasion Note Cards

Hello and welcome to The Rabbit Hole Designs.
I'm sharing a simple set of cards I made using the new "Butterfly" Stencil.The stencil is 3" x 4" which is perfect for the focal of an A2 card or used repetitively on a larger card panel.

I started by selecting a variety of card stock colors. Then, I adhered the stencil with adhesive spray and low tack tape.

Next, I applied glitter gel using the stencil onto the card stock
pieces and let them dry.

After they dried, I adhered them onto card bases. 
I decided to leave them plain on the front, letting the butterfly shine and use them as note cards for a variety of themes. This was a fun crafty session.


Thank you for stopping by the blog today,
Kelly 
 

Rainbows Are My Camo

 Hi and welcome back crafters!  Joy here, today with a caffeinated rainbow!  Who can resist a little rainbow with their coffee?  This little critter couldn't!  If you haven't guessed it by now, my project today features the Caffeinated Chameleon decked out in his rainbow suit!  


I stamped the chameleon onto smooth cardstock and colored him with Copic markers in a reverse rainbow order.  When attempting to blend your rainbow colors it is still important to maintain your light sources and shadows.  I have found that using a toner gray helps maintain those shadows without having to work really hard at blending the darkest of shadows.  

In addition to the Caffeinated Chameleon, I used the Amanda Stencil on my card.  The bottom layer is black cardstock with white ink blending and the top layer is white cardstock with black ink blending and both matted to define the edges.  To finish off my card, I heat embossed one of the sentiments from Caffeinated Chamelon.  I hope you will give it a try! 

For more inspiration, updates, and news make sure to check out these places:

Clean and Simple Copic Meerkat


Hello my crafty friend, it's Amanda from Pear Blossom Press, again! Today, I'm sharing a clean and simple card, featuring the new Caffeinated Meerkat. I love this little guy. He's so much fun to color, and he's not too cutsie, so he's perfect for masculine cards too! Especially, when you pair him up with some of the fun sentiments in the Blended Sentiments stamp set

For the Copic chart I used, and coloring tips and tricks, head on over to my blog... pearblossompress.com. I've listed measurements for the card pieces too. 

Thanks so much for stopping by today! I'll be back soon with another fun card to share. Until then, let me know in the comments what your favorite caffeinated critter is. Is there another animal you'd like to see in the series?

For more inspiration, updates, and news, make sure to check out these places...