Pages

Showing posts with label Cards in Motion. Show all posts

Swinging on the Moon - Double Dial Card

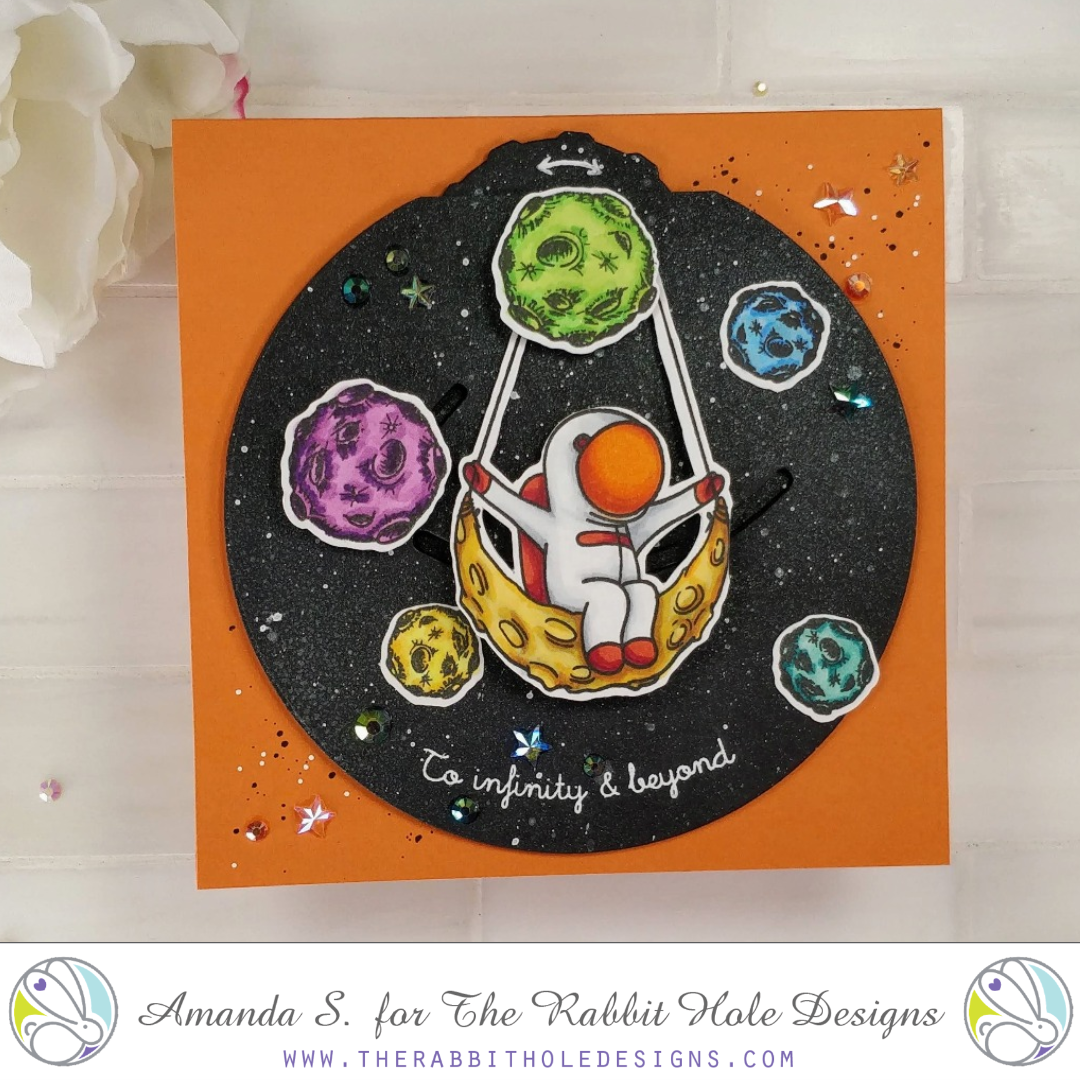
Swinging on the Moon Double Dial Card

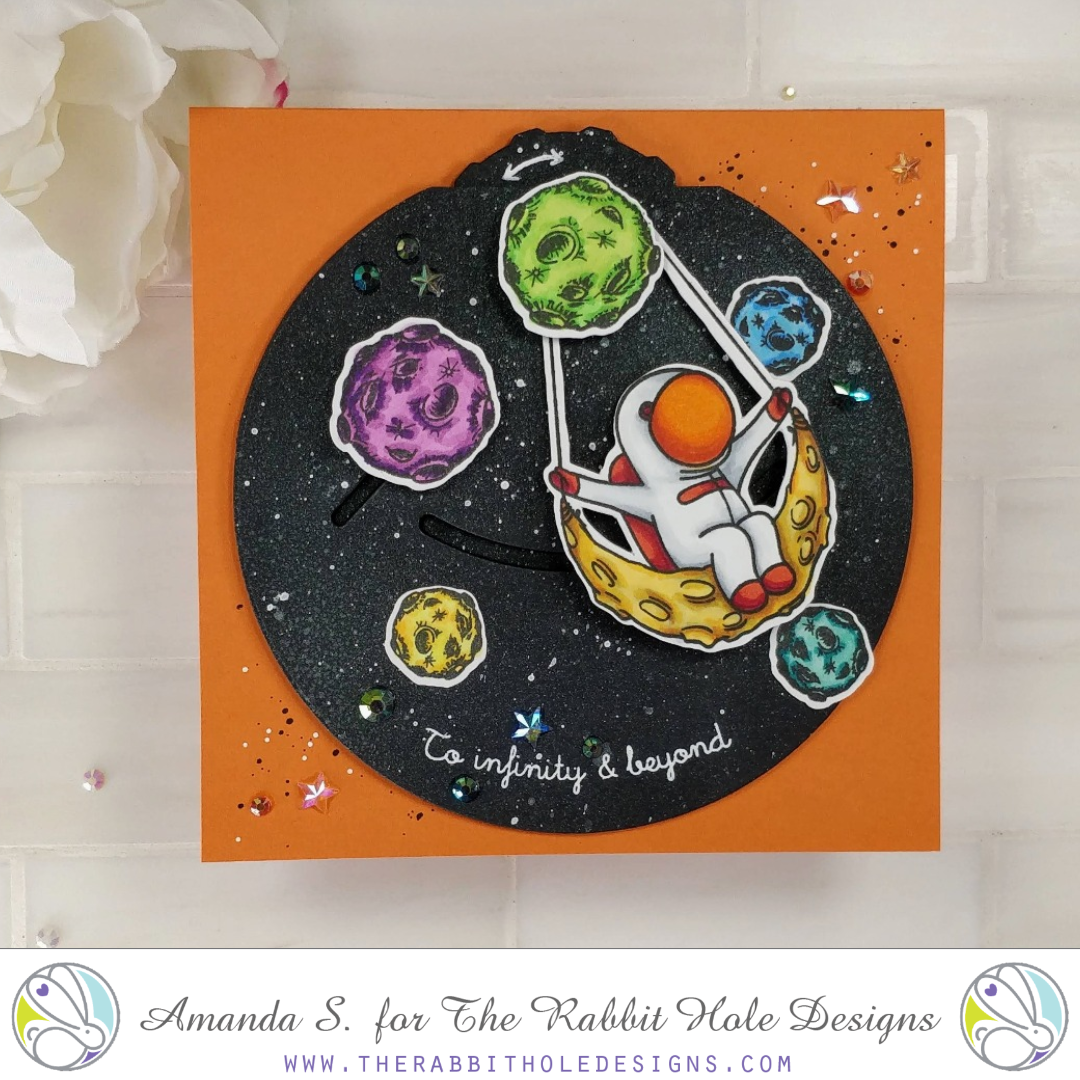
Hey crafty friend, Amanda from Pear Blossom Press here again. I've got an awesome new interactive card for you today! I paired up images from Space - Infinity & Beyond, and Space - Miss You, along with a neat double dial die set, to create a fun swing card. Check it out in action...


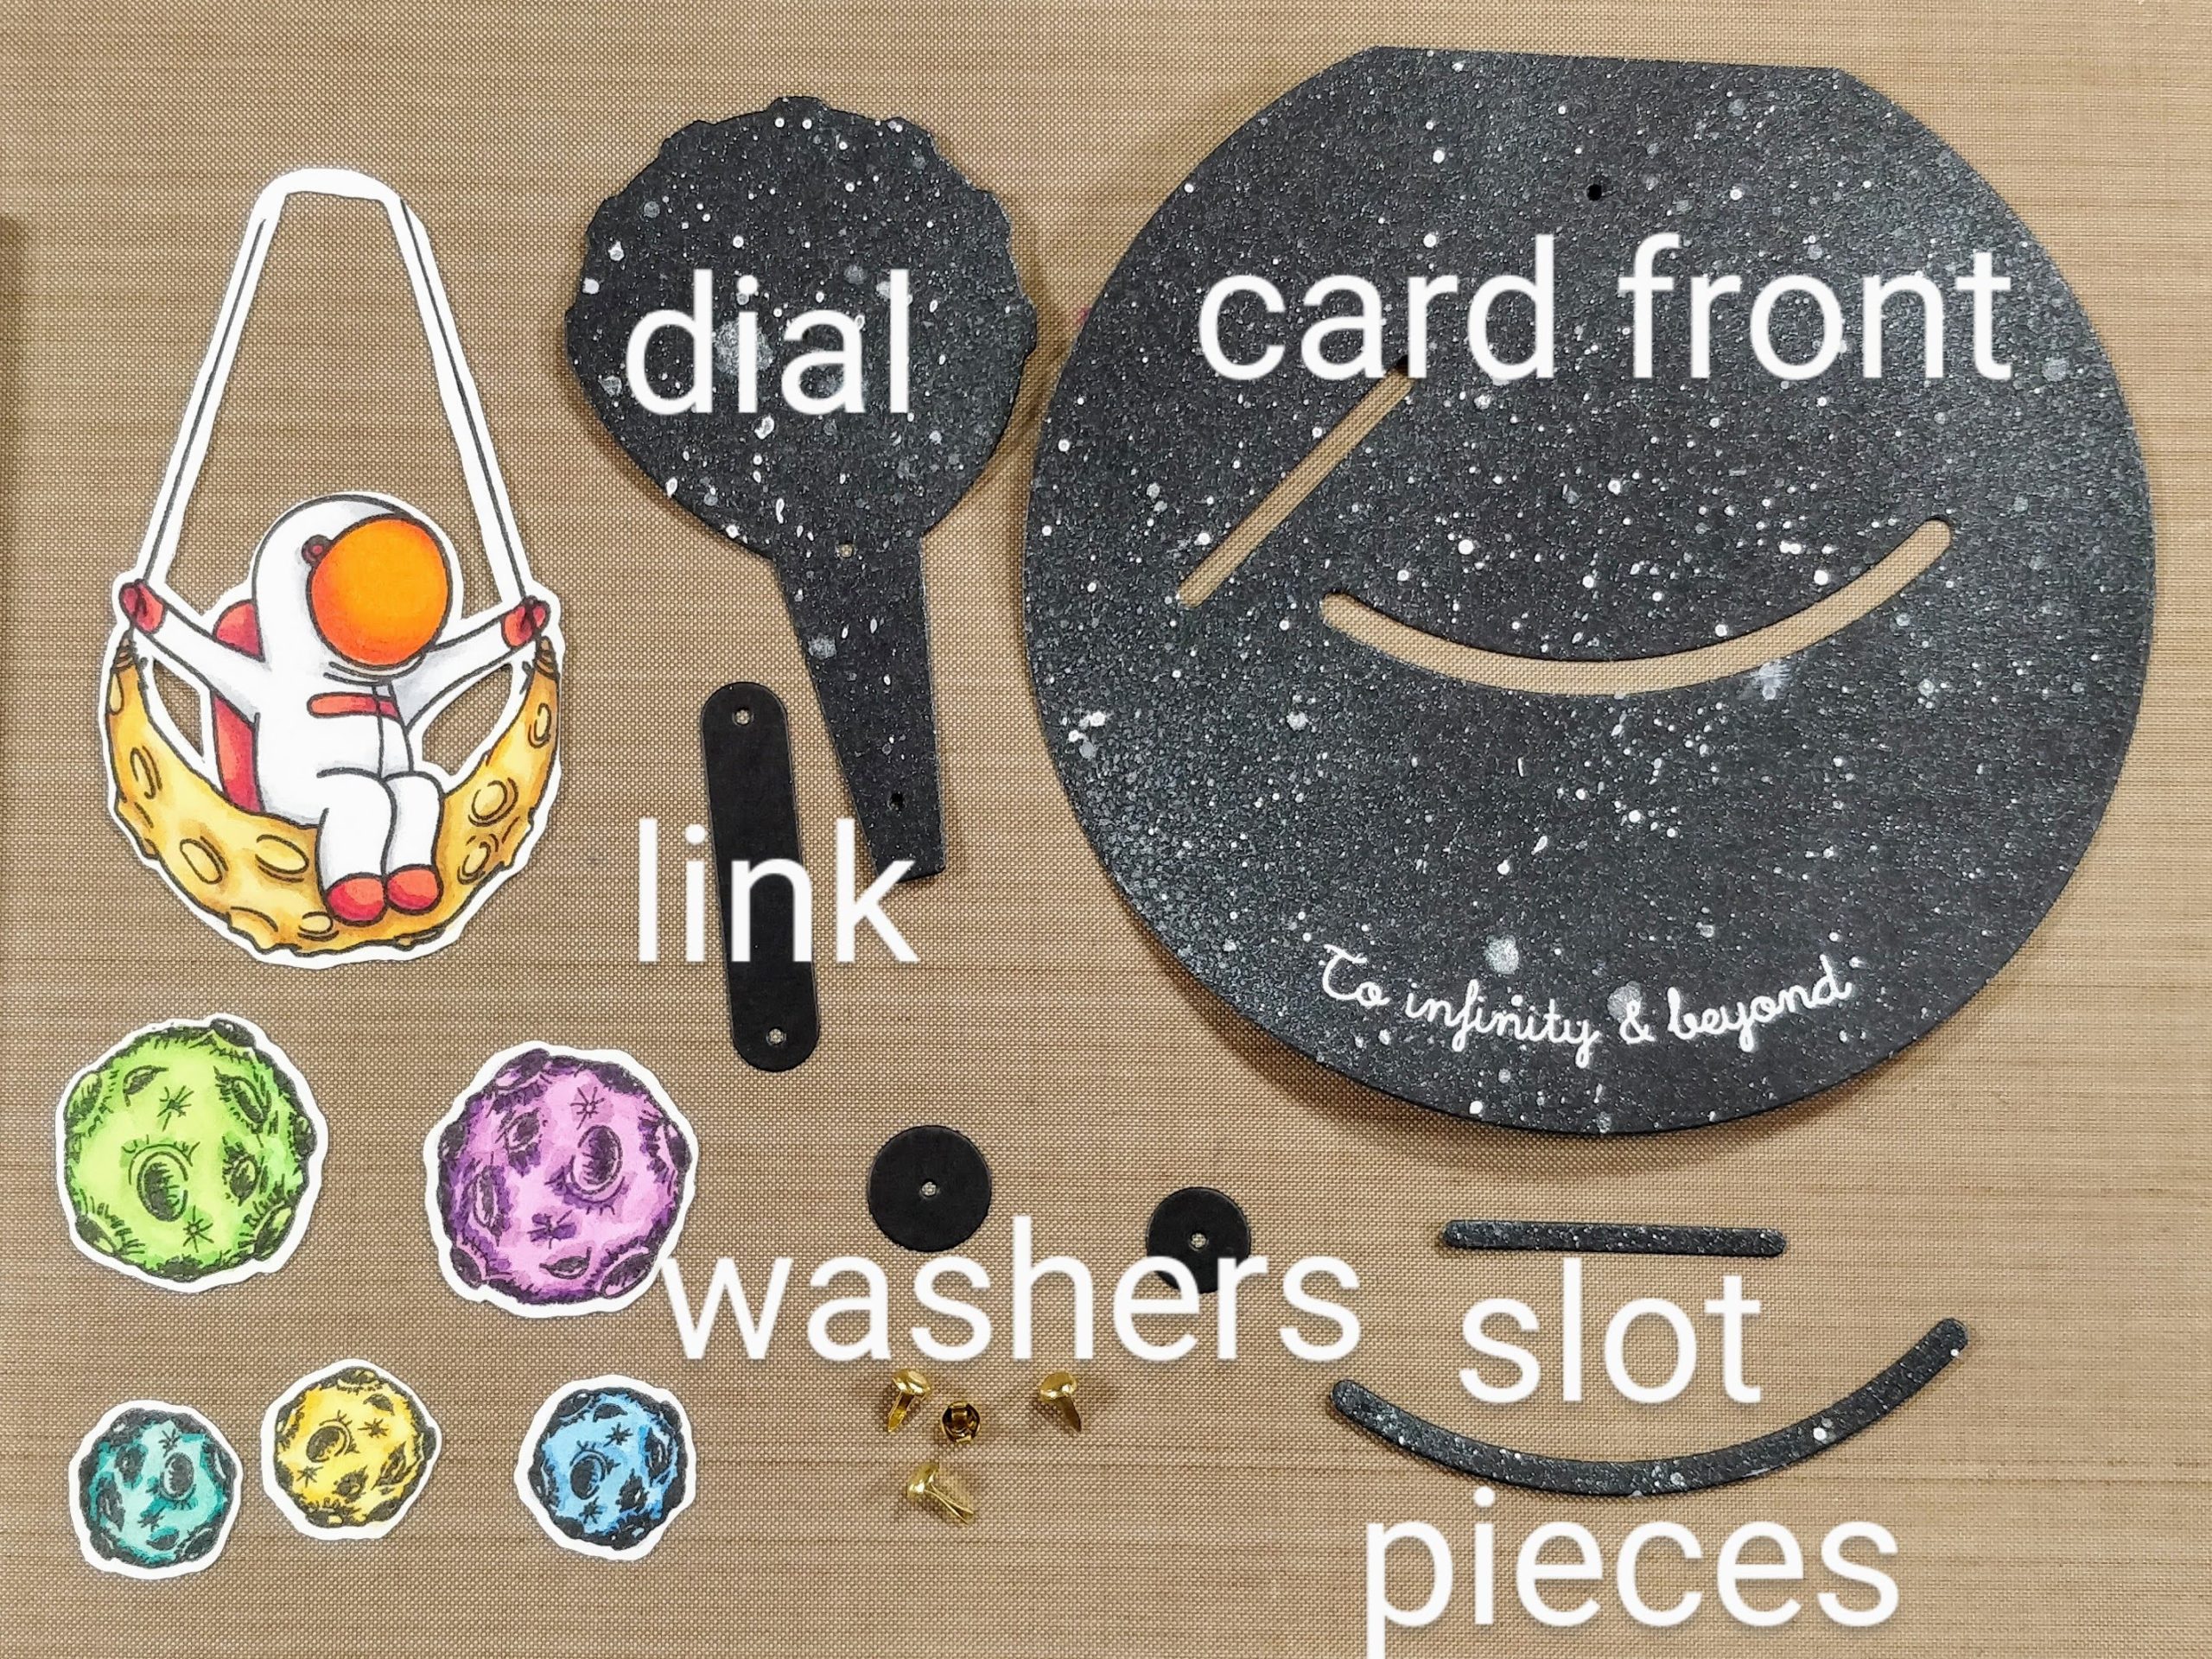
To prep, I stamped my images and Copic colored them. I extended the arms of the astronaut's swing and connected them at the top with a black pen. Then, I cut out all of the images with my ScanNCut. To create the galaxy background, I borrowed a trick from my friend Cassie, and just splattered white paint and shimmer mist onto black cardstock. It's fast and easy. I cut out a 5" circle and trimmed the top off to create the card front. I used the die set to cut the slots from the circle, as well as the dial, link and washers. It may seem complicated, but I promise, this was really easy to put together. Here are step-by-step photo directions to assemble the pieces...
Swinging on the Moon Double Dial Card 
Parts for Swinging on the Moon Double Dial Card.

Swinging on the Moon Double Dial Card 
1. Attach link to dial with brad.

Swinging on the Moon Double Dial Card 
2. Attach dial to card front (narrow tweezers help create extra space when opening brad).
Swinging on the Moon Double Dial Card 
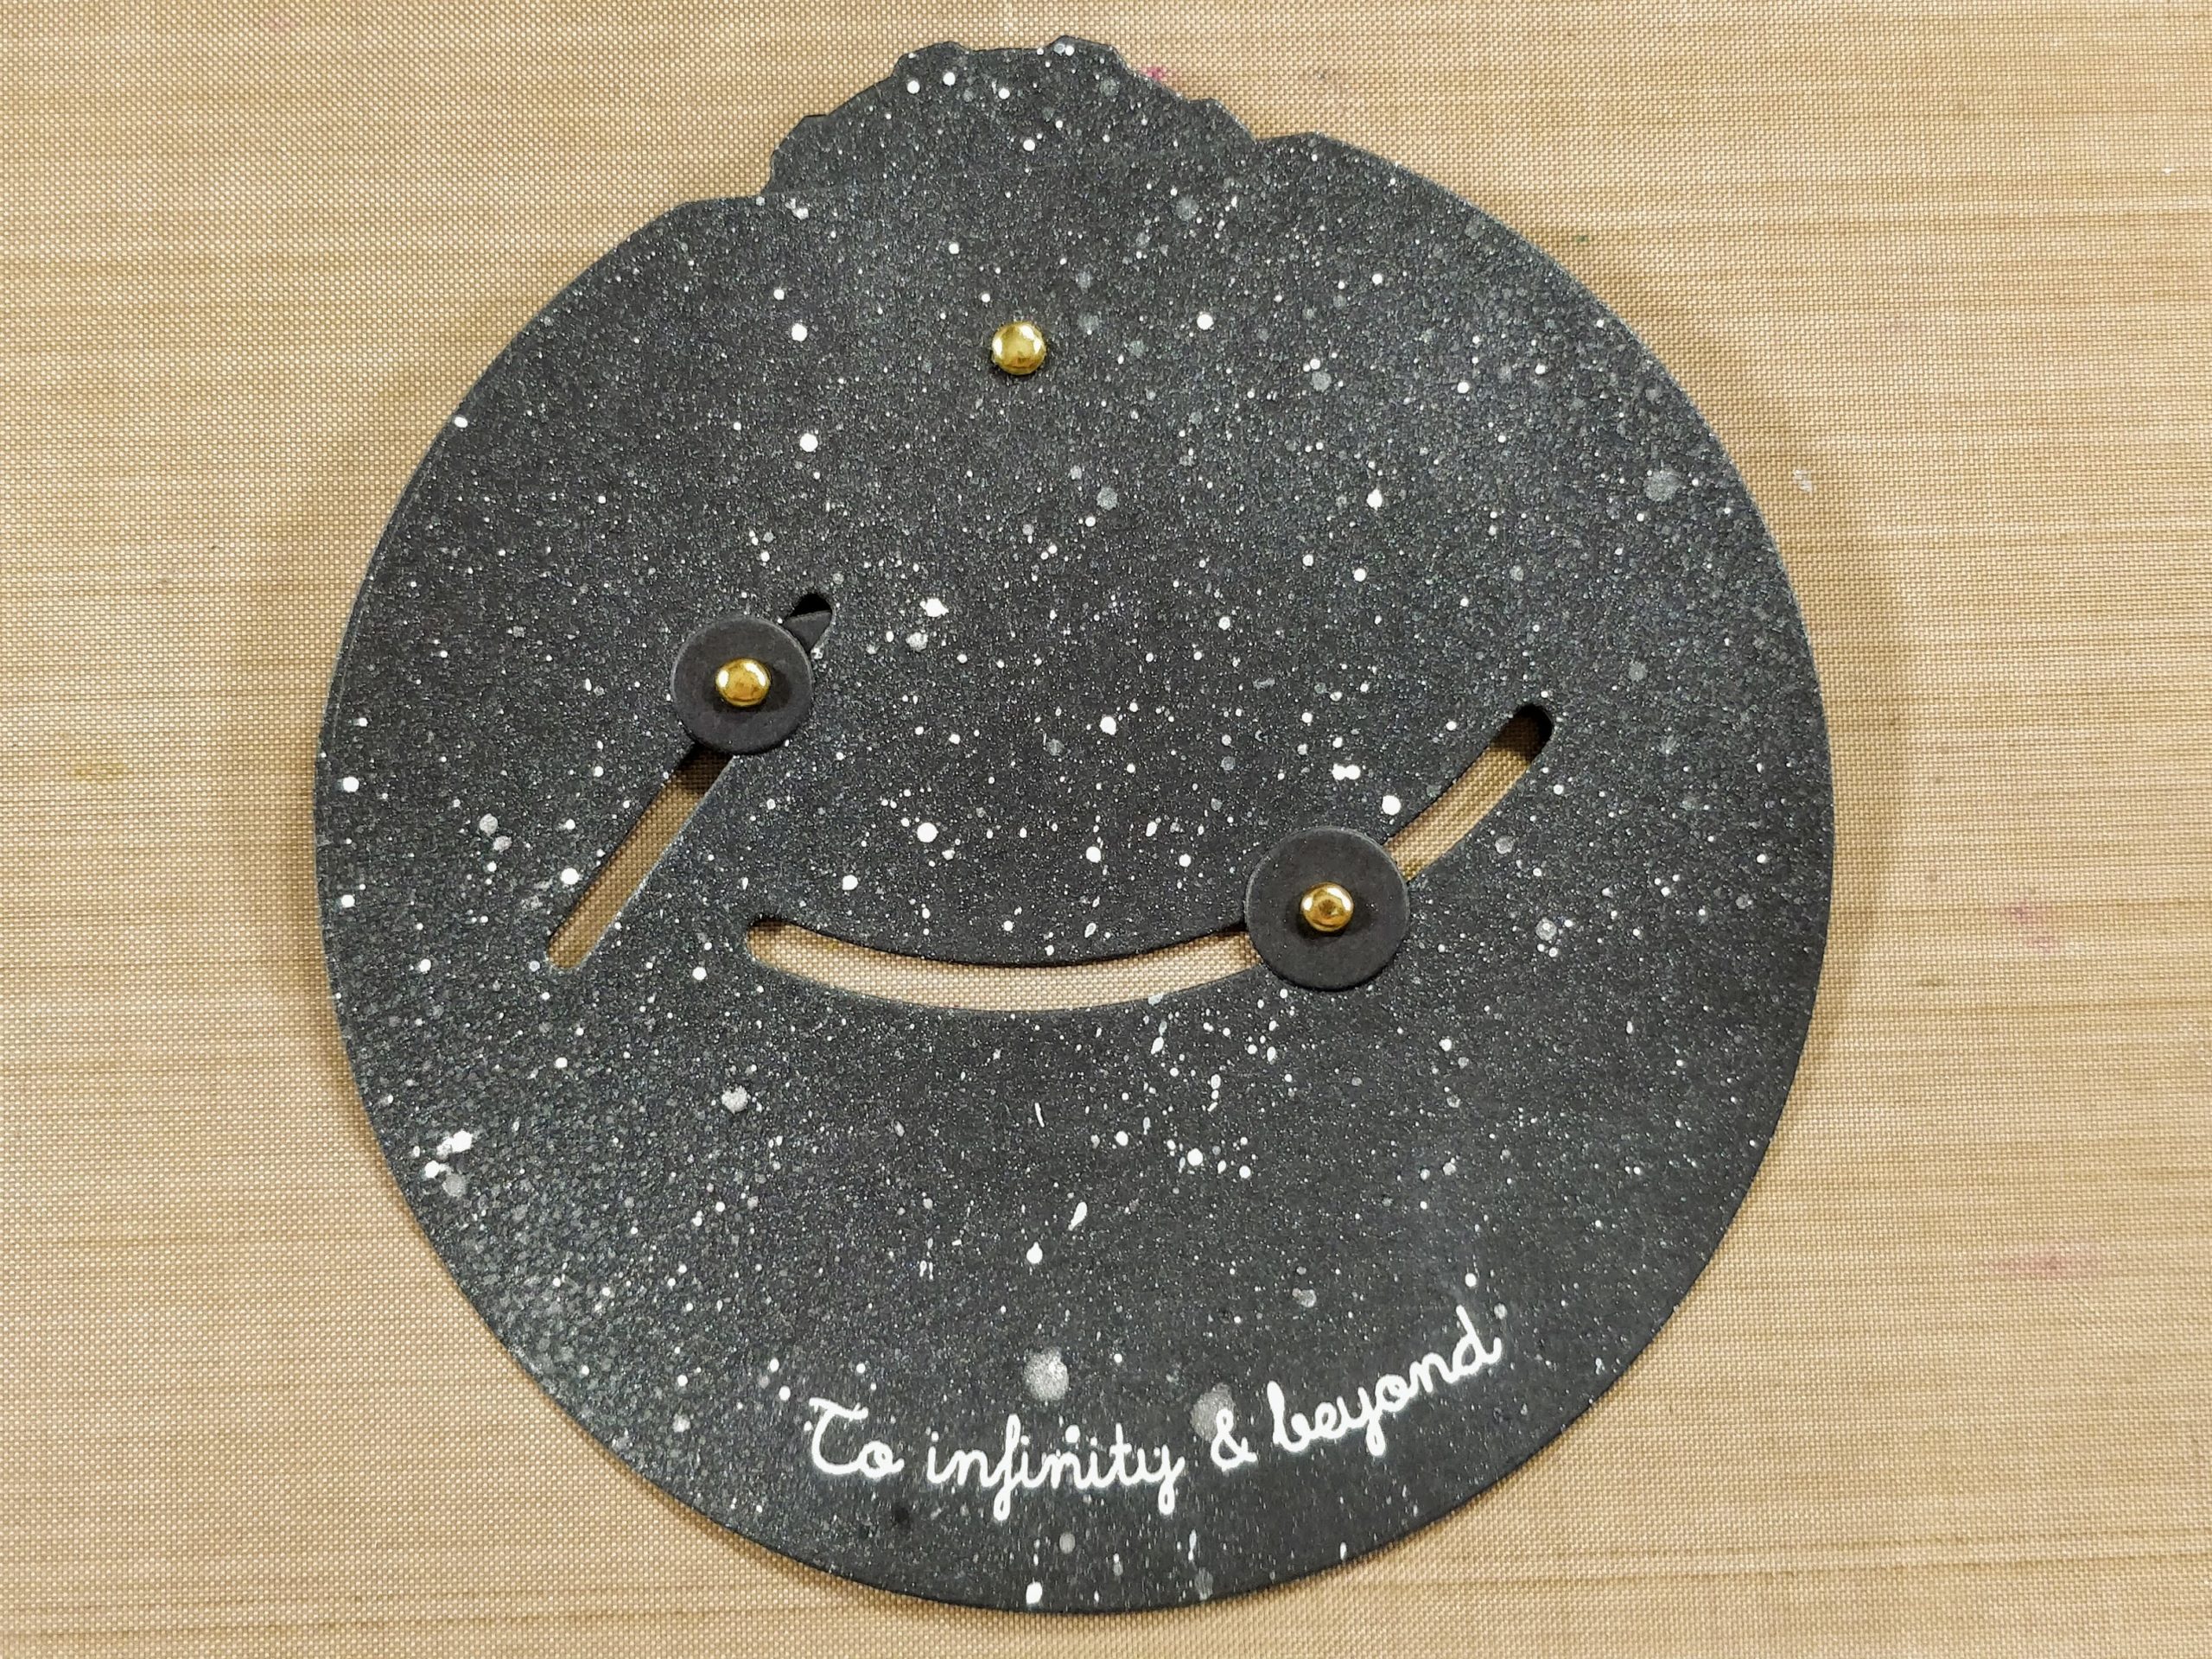
3. Use brads and washers to attach link and dial arm to card front (view from front).
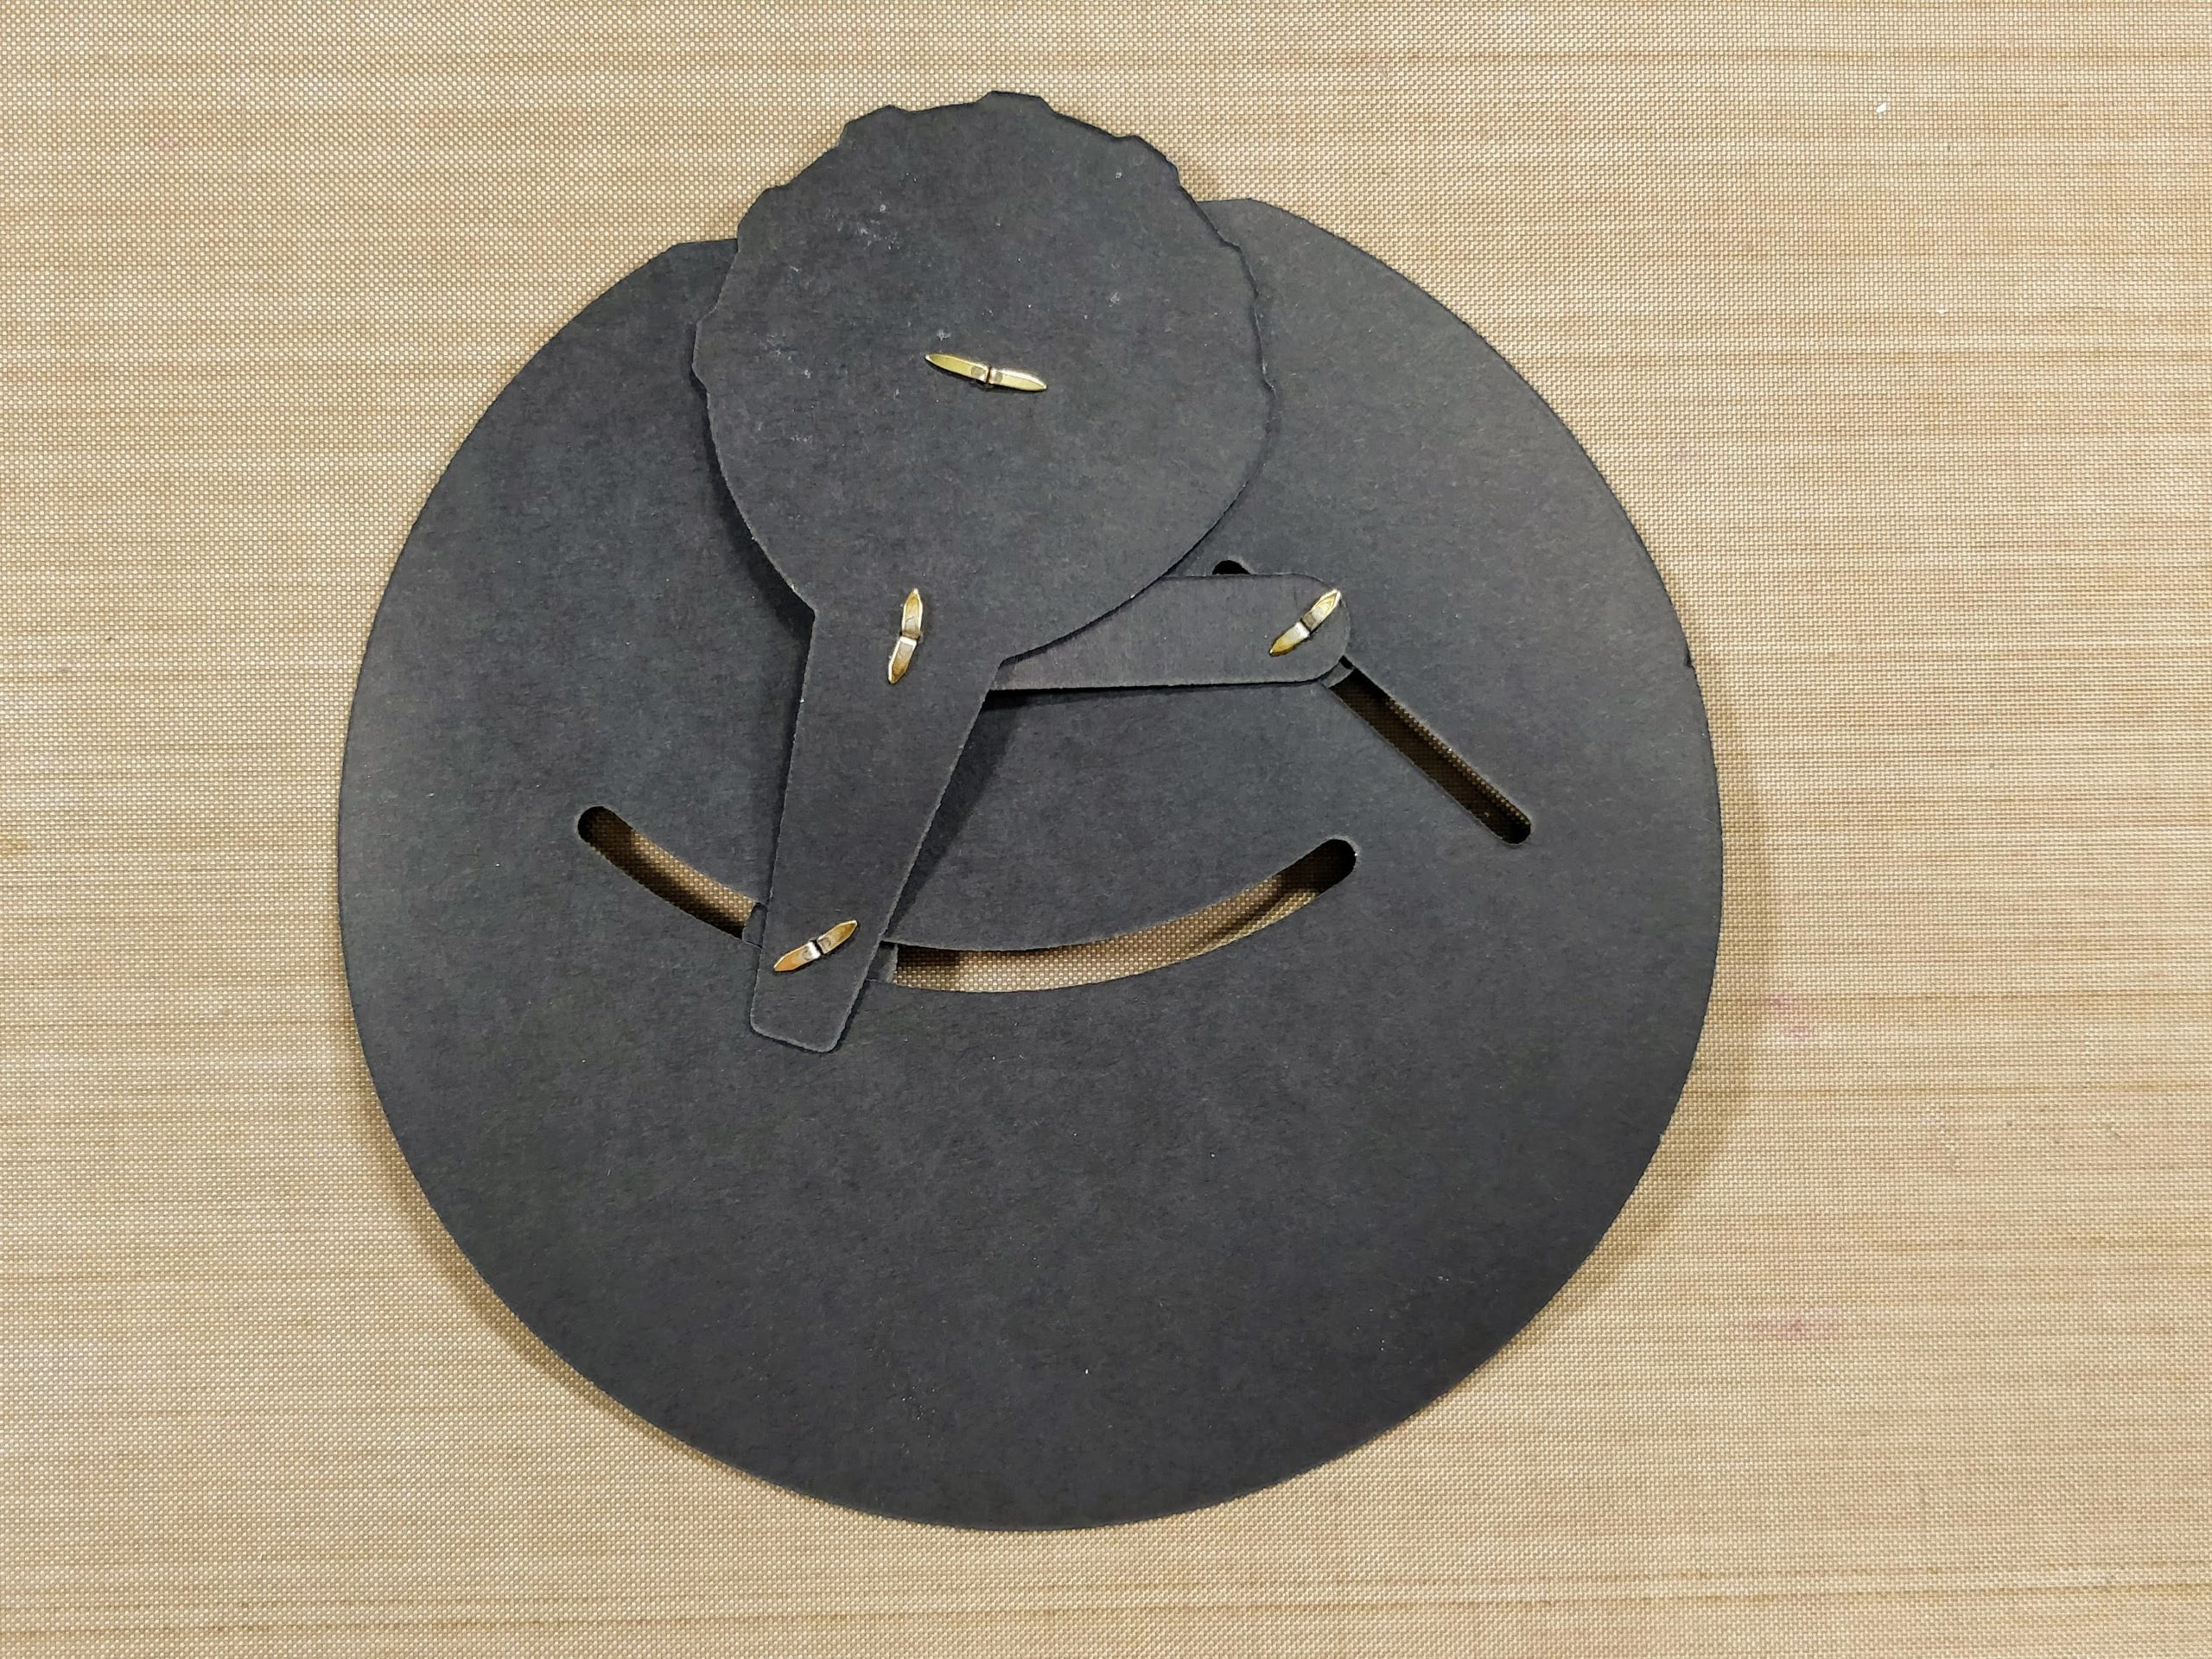
Swinging on the Moon Double Dial Card 
(View from back.)

Swinging on the Moon Double Dial Card 
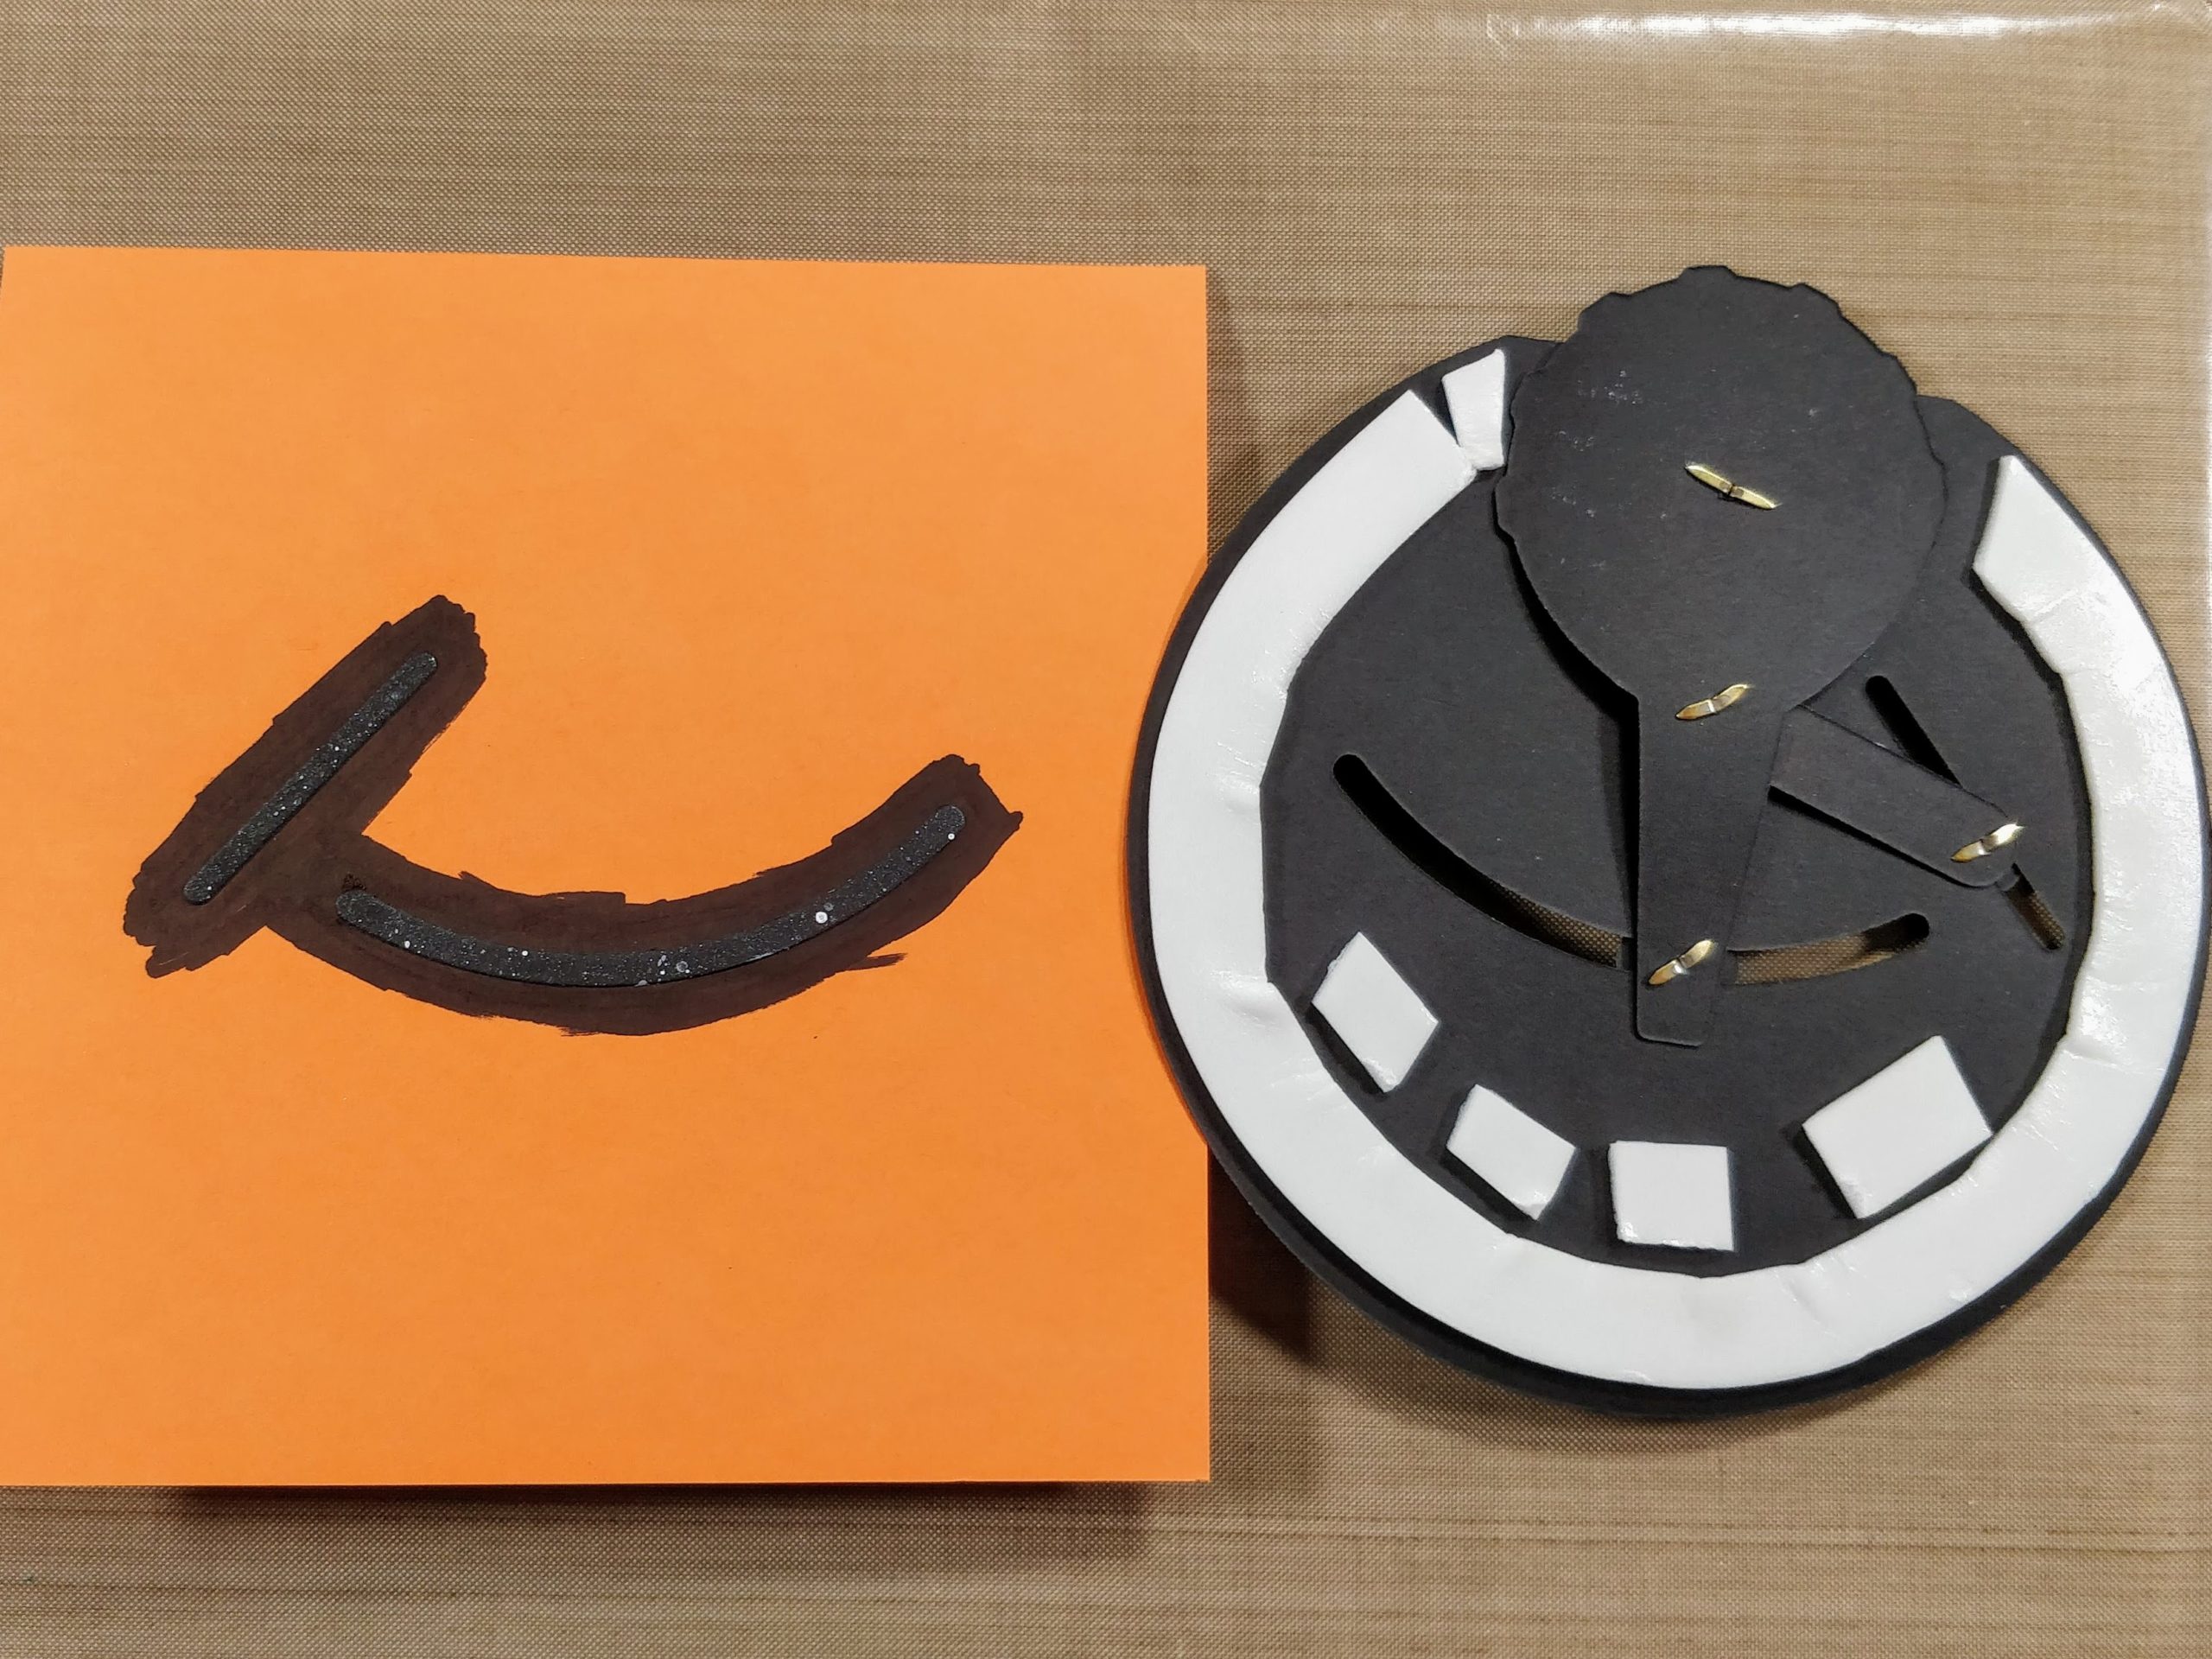
4. Attach black slot pieces to card base and use marker to darken area around them. Apply foam tape to back of card front, away from moving parts.
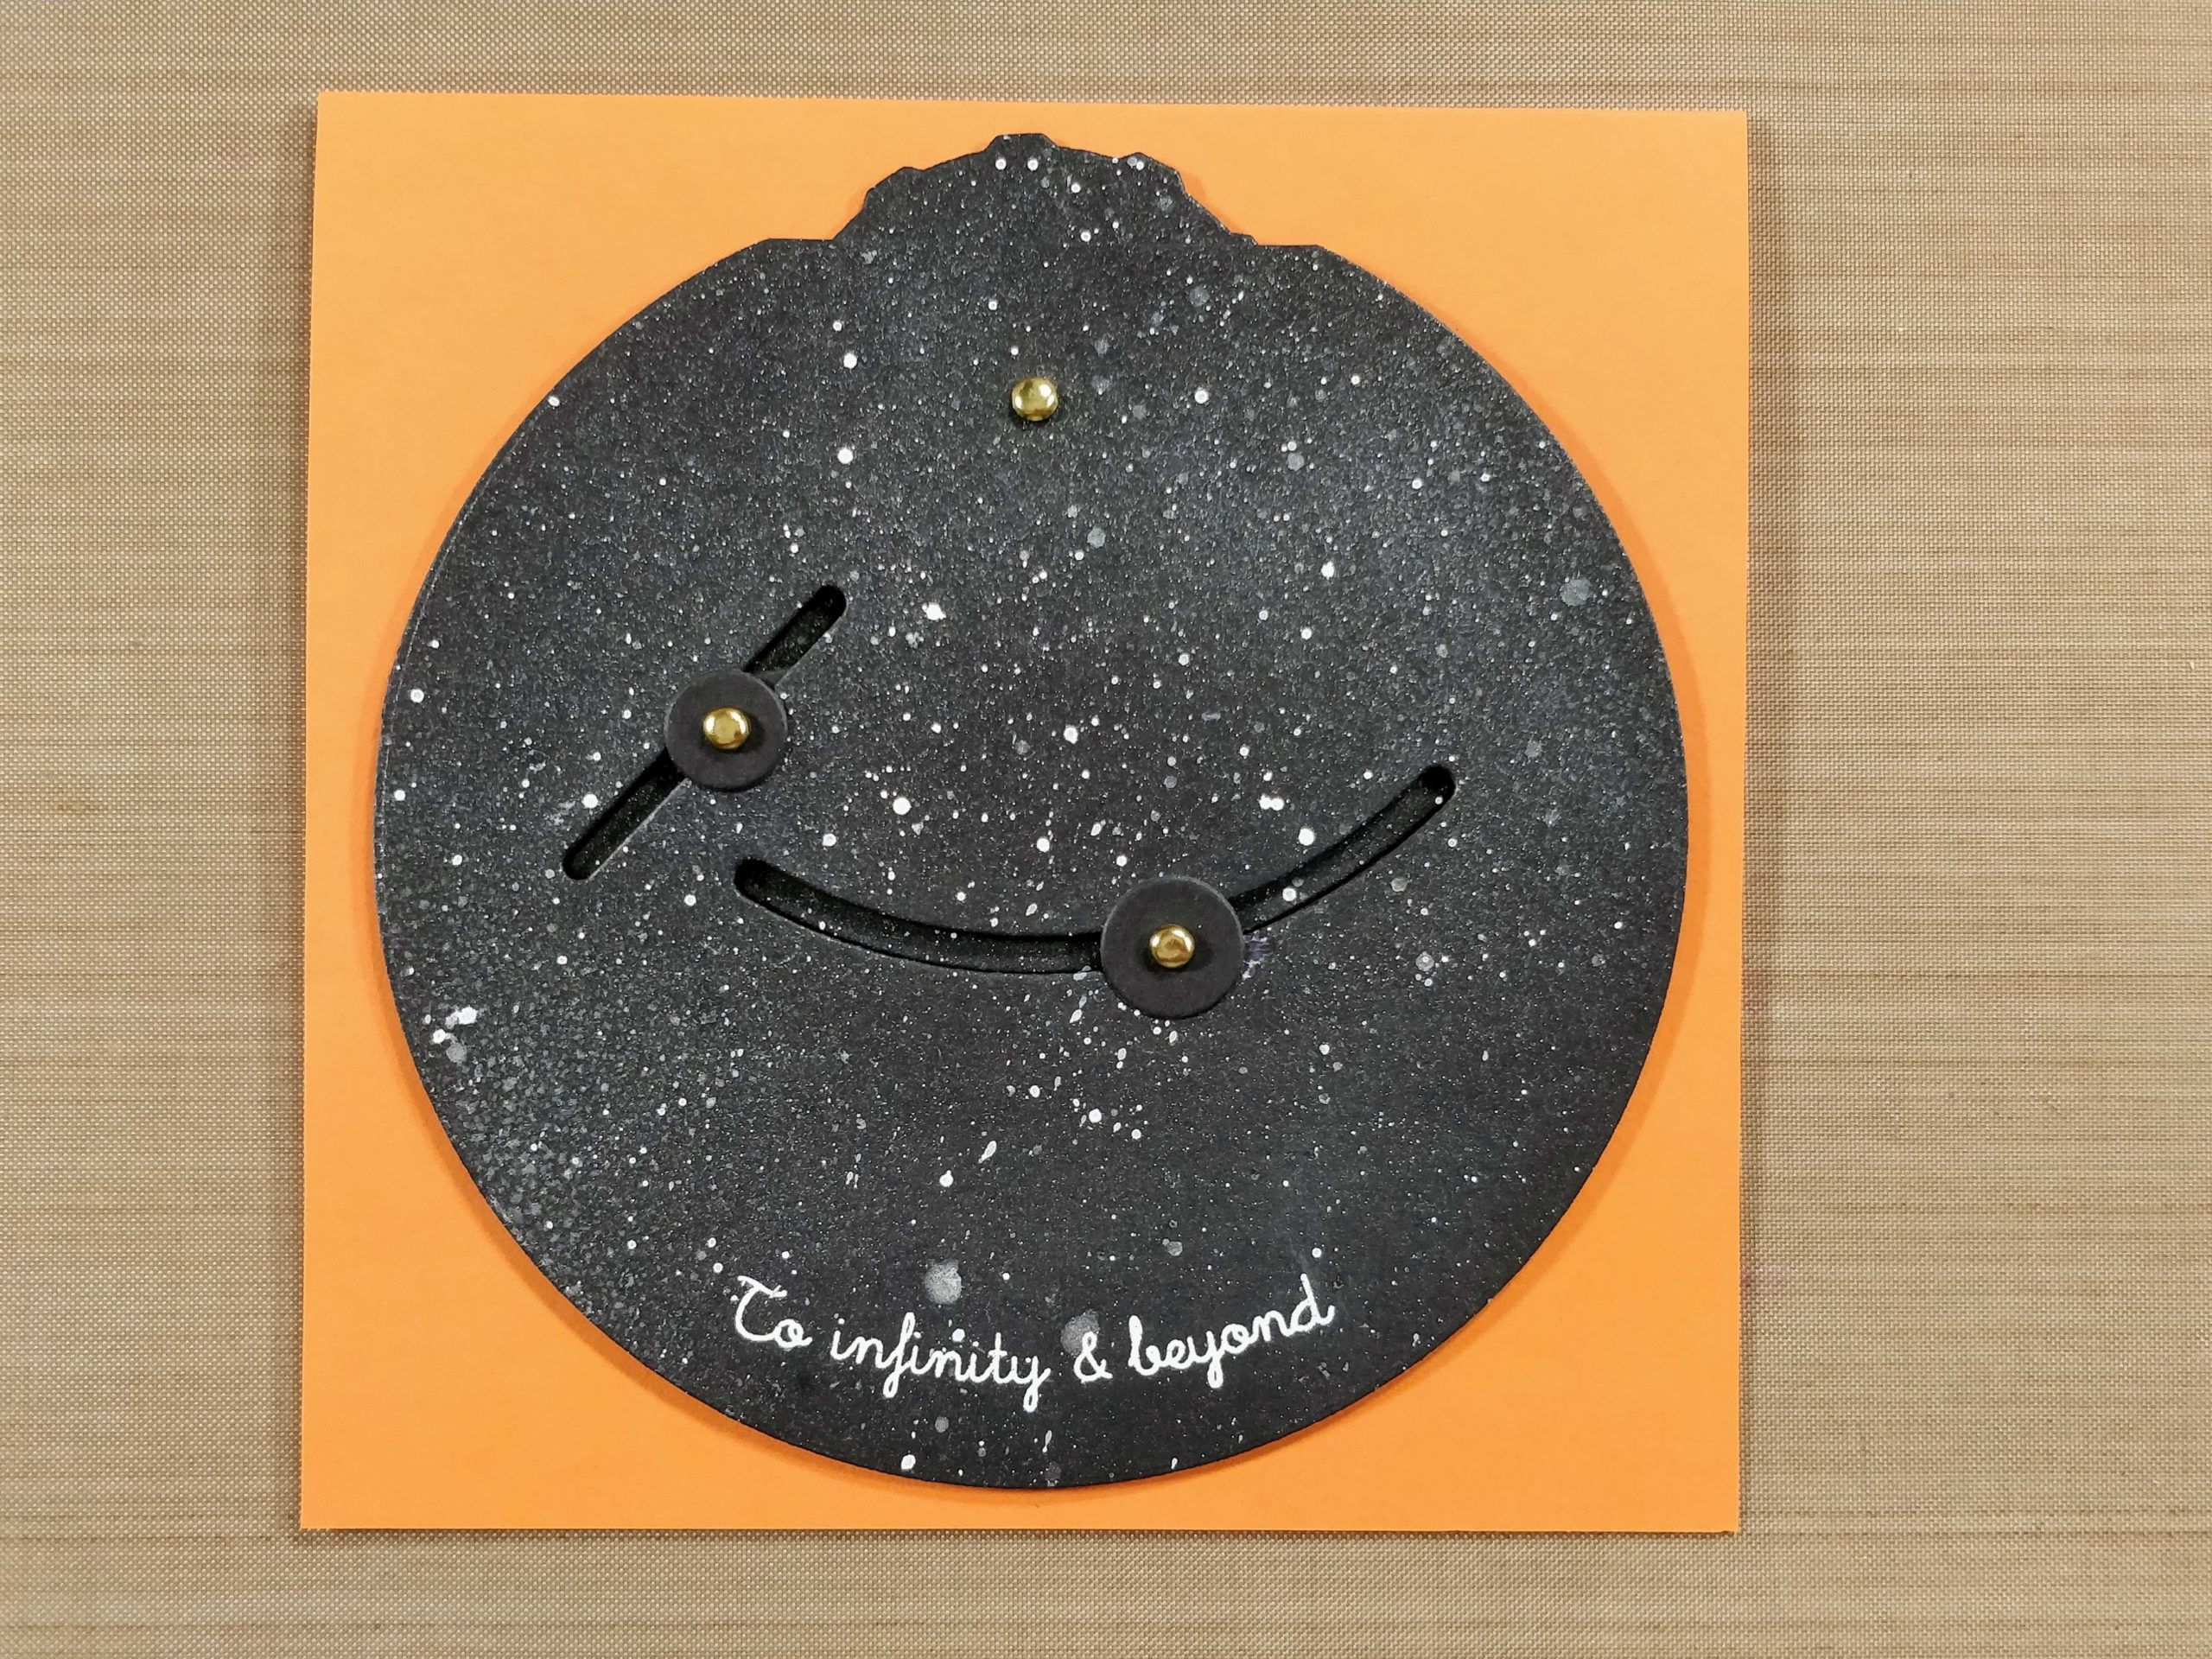
Swinging on the Moon Double Dial Card 
5. Attach card front to card base.

Swinging on the Moon Double Dial Card 
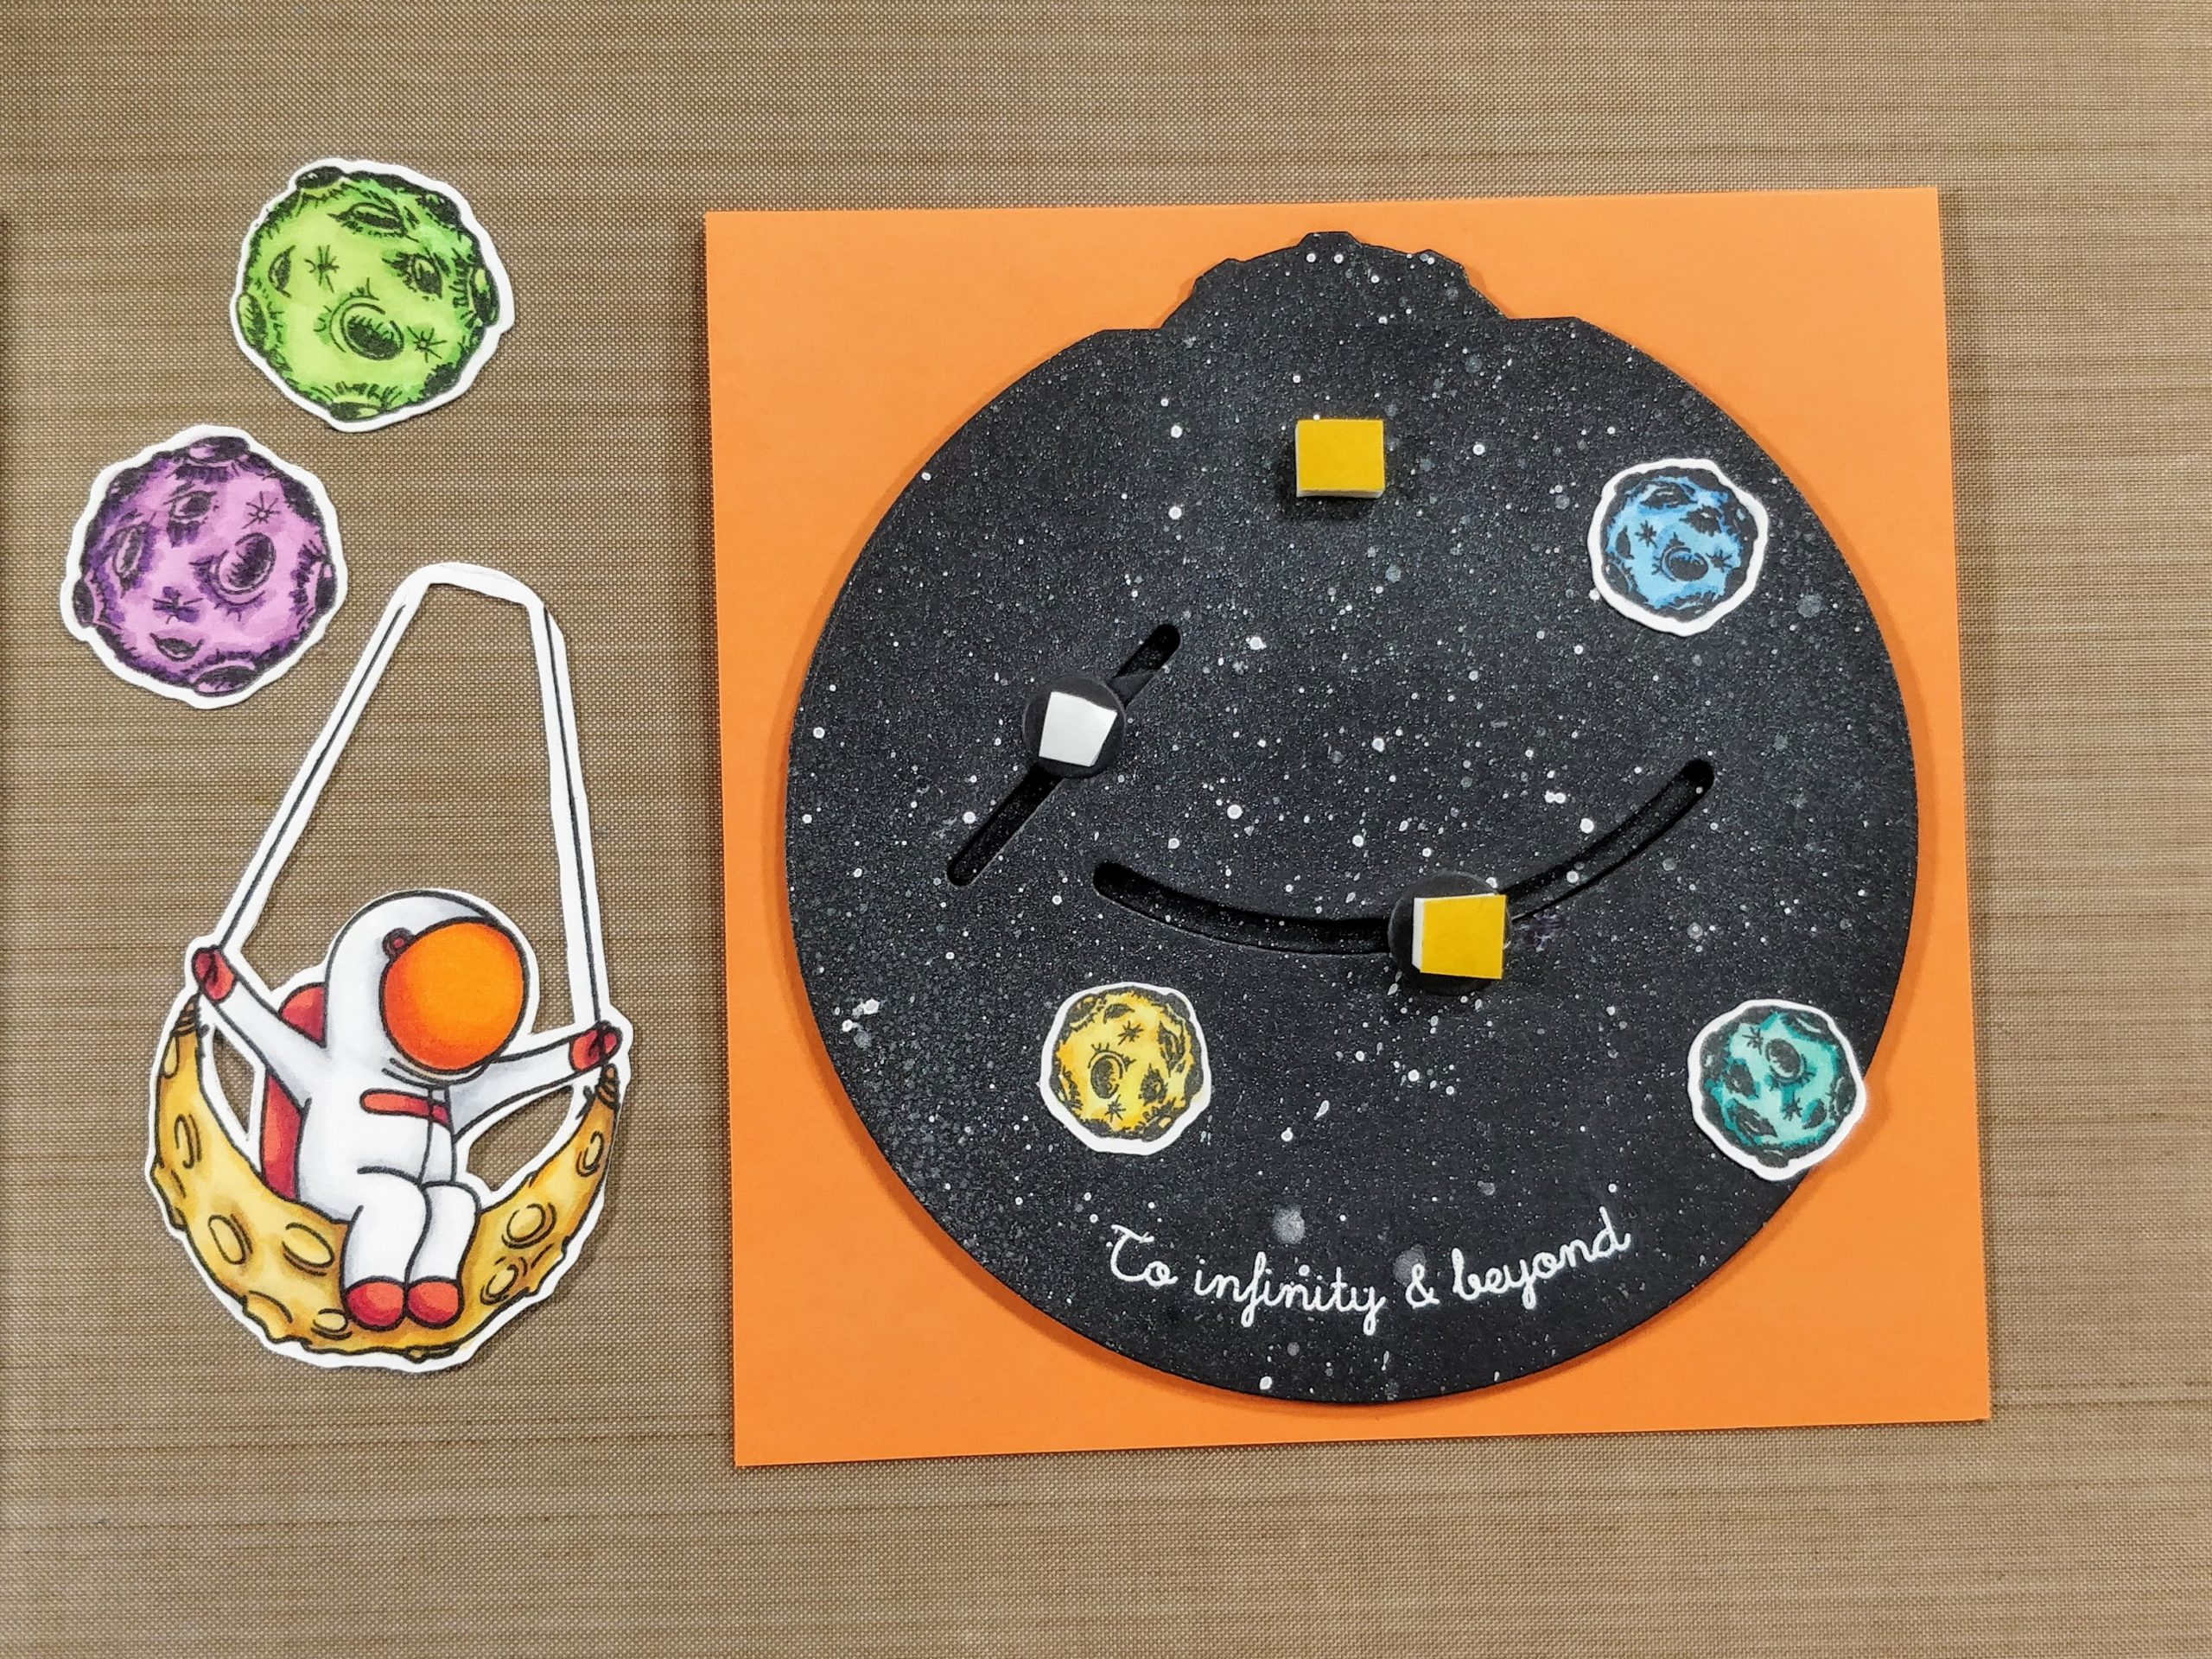
6. Apply double thick foam tape (yellow) on dial brads. Apply regular foam tape (white) on link brad. Glue small moons flat to panel.

Swinging on the Moon Double Dial Card 
7. Attach swing to foam on dial arm. Attach purple moon to foam on link.
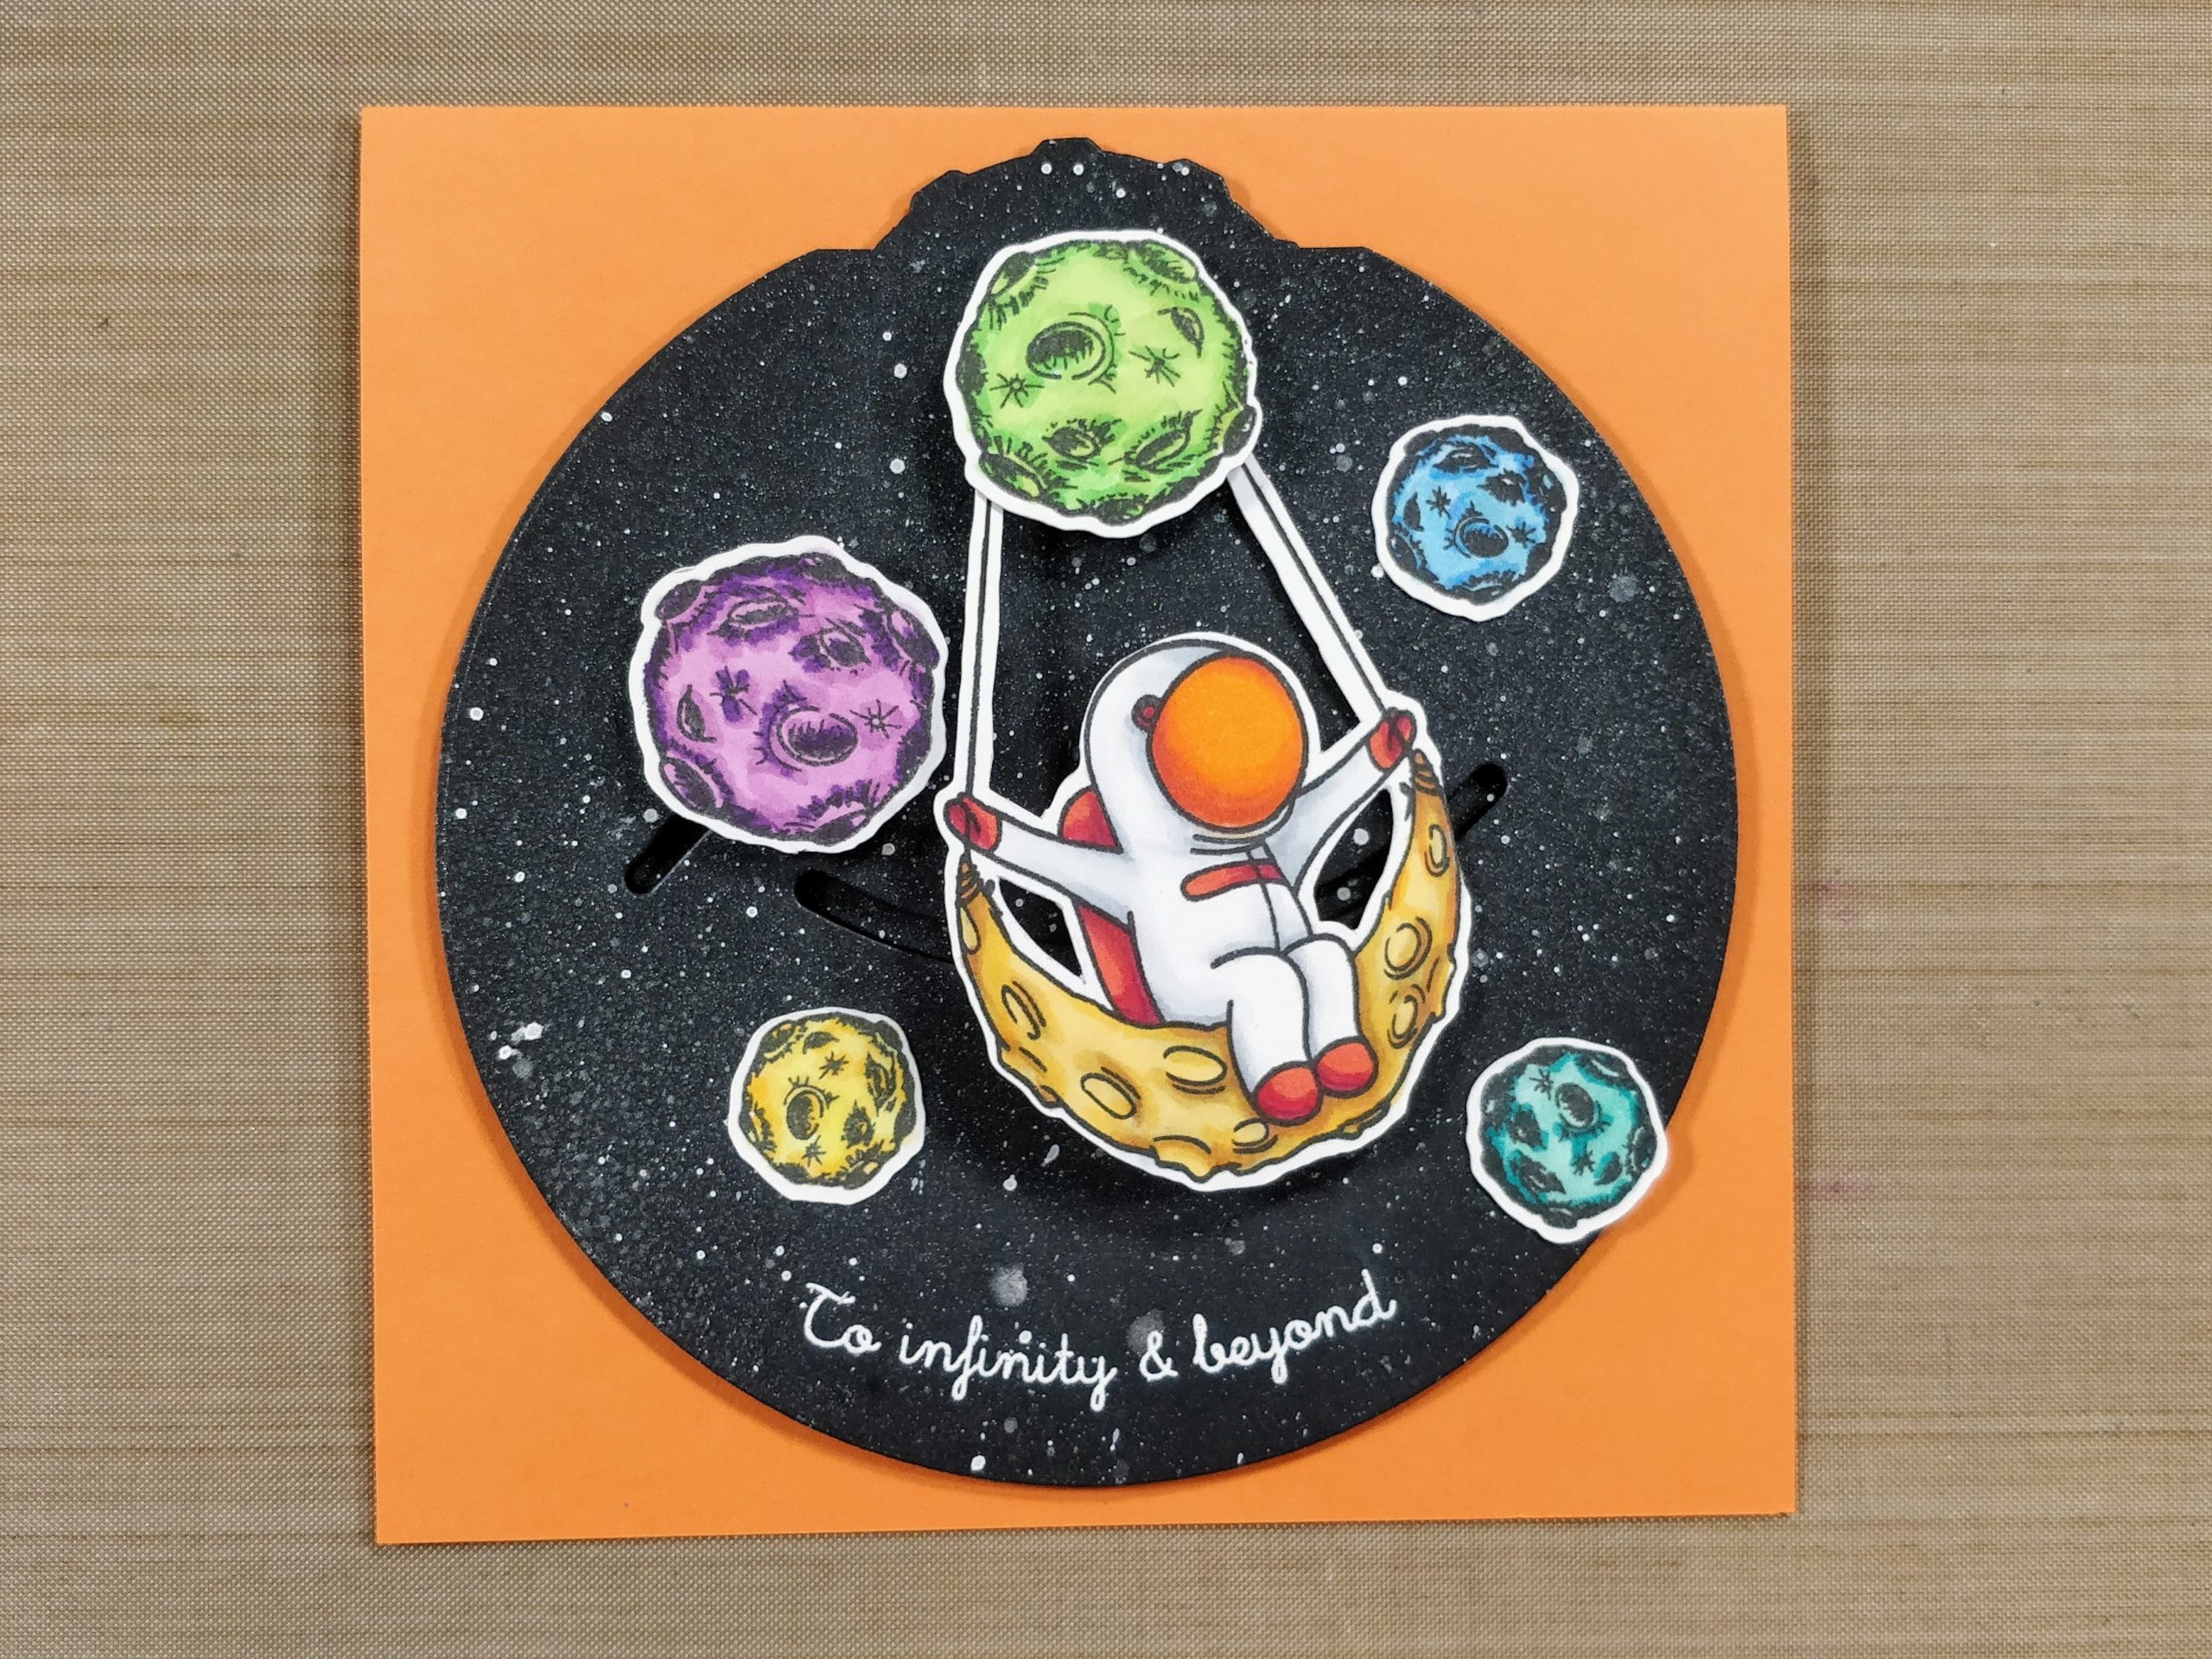
Swinging on the Moon Double Dial Card 
8. Attach green moon to top brad.

To finish the card, I added a few dots to the top right, and bottom left corners of the card base with black and white pens. I glued a bunch of round and star shaped gems all over too. And a hand drawn arrow on the dial, lets the recipient know how to operate the mechanism. 
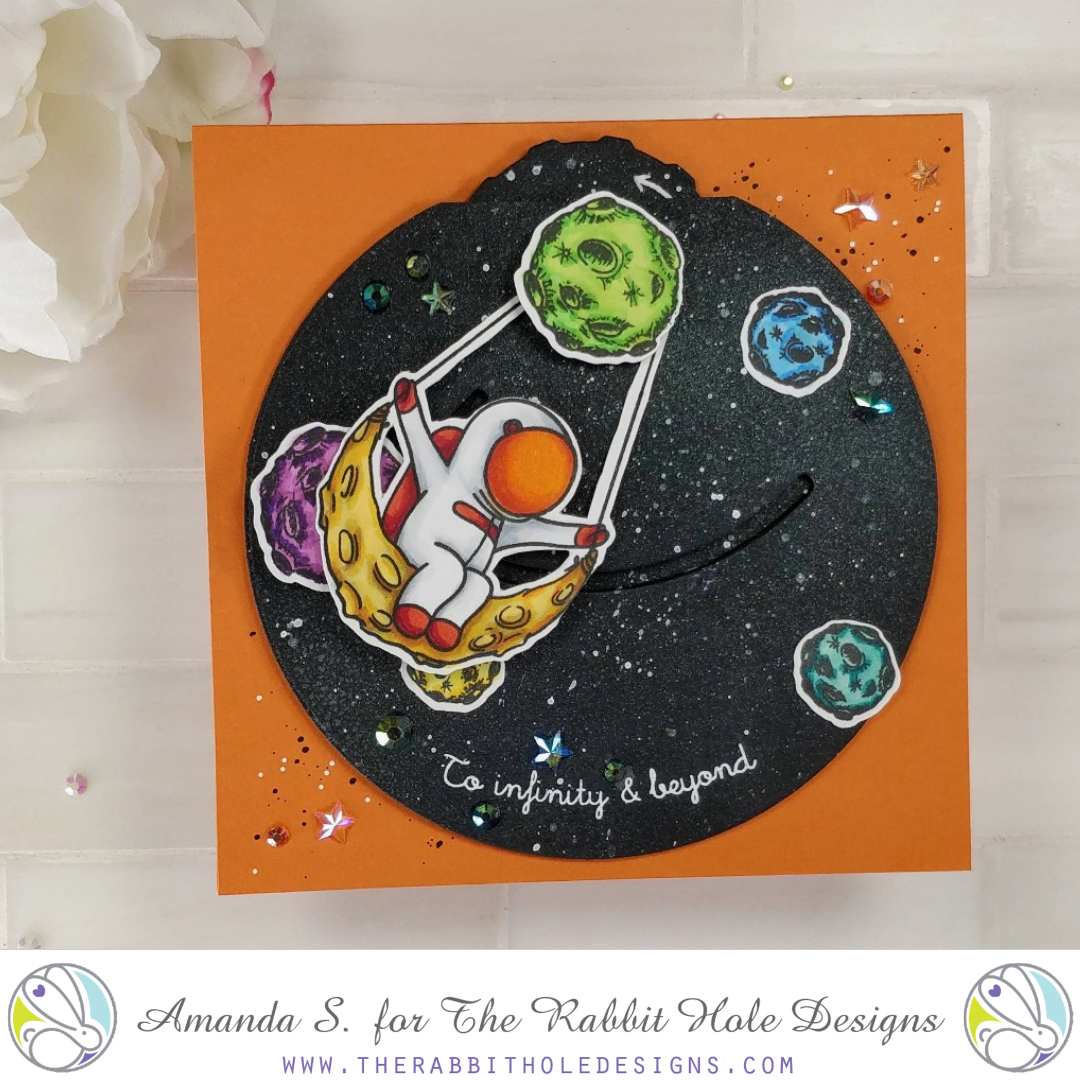
Swinging on the Moon Double Dial Card Swinging on the Moon Double Dial Card Swinging on the Moon Double Dial Card

Thanks for stopping by today. I'd love to know what you think of this one! You can find the sister article to this post on my blog. Head on over for links to the specific products I used. If you'd like to see more cards using these stamp sets, you might like this article, and this one. I'll be back soon with more fun cards to share.

For more inspiration with your The Rabbit Hole Designs Creations, be sure to follow along at these other locations:
The Rabbit Hole Designs BlogThe Rabbit Hole Designs InstagramThe Rabbit Hole Designs Facebook PageThe Rabbit Hole Designs PinterestThe Rabbit Hole Designs YouTube
Sassy Skates Magnetic Slider


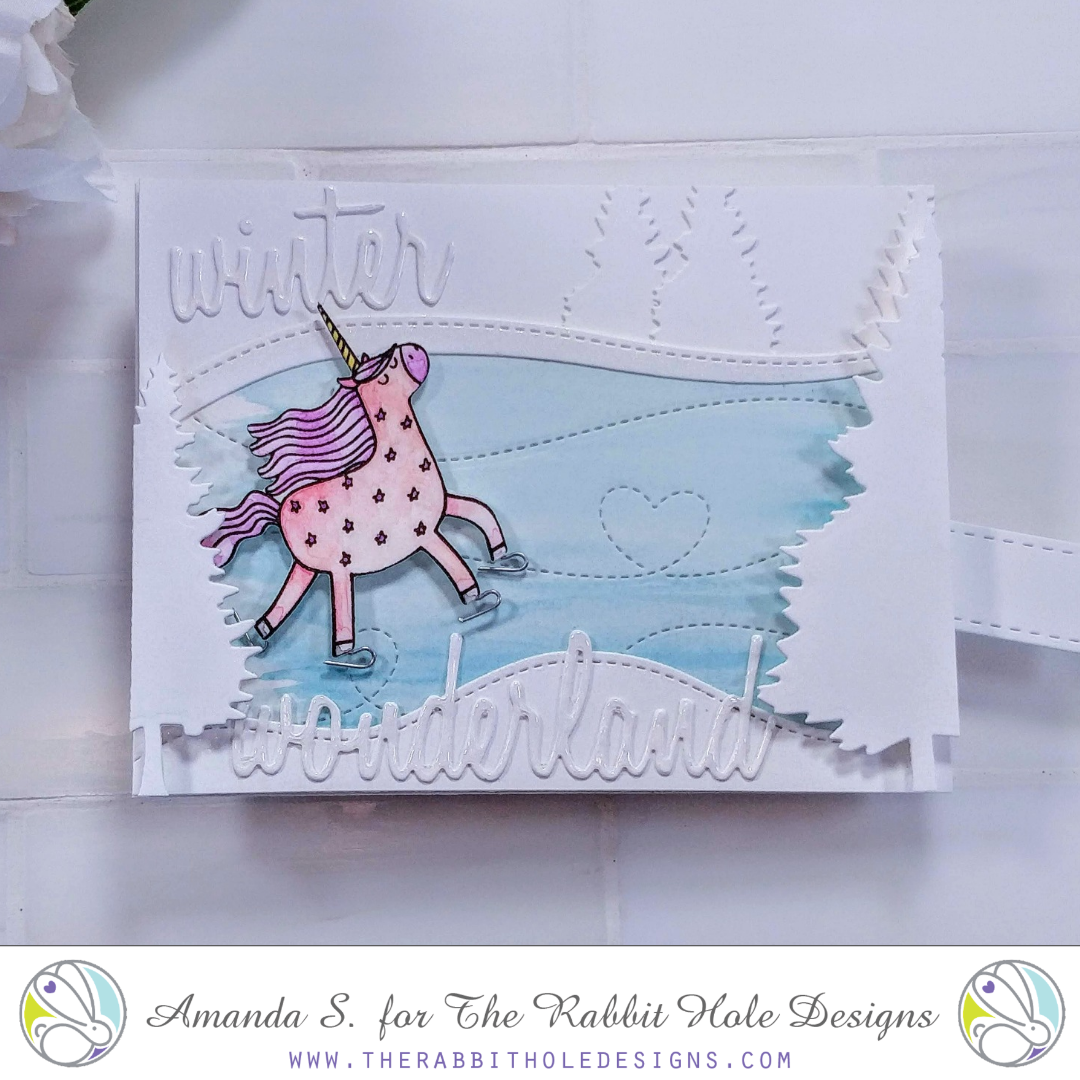
Hello my crafty friend, it's Amanda from Pear Blossom Press again. Today, I've got a fun new-to-me technique. It's not a new idea mind you, I just haven't ever tried it before. I have to say, I am having a blast playing with it too. So what's the technique? A magnet slider! I'm telling you, this is so much fun, you're not going to want to give it away. Luckily, I made this card in September, so I have plenty of time to play with it before I give it to my five year old niece for Christmas. It features a Sassy unicorn on ice skates and she can glide around the frozen pond by moving the tab.


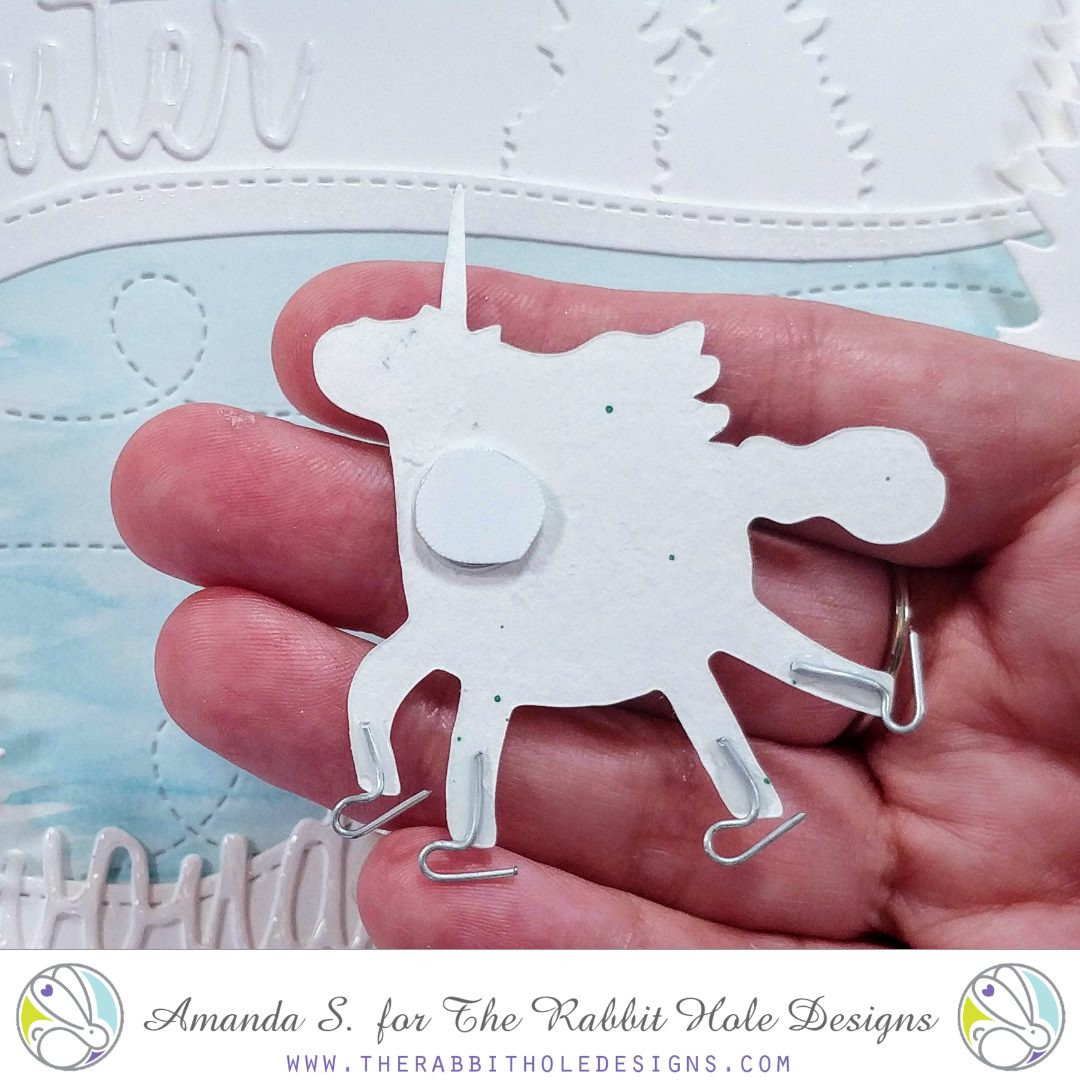
For this card, I wanted to create a simple scene and keep the focus on the Sassy unicorn. I stamped and embossed her onto watercolor paper and painted her in pink and purple. Then, I fussy cut her with my ScanNCut. To give her ice skates, I folded my wire pieces in half with round pliers (you can achieve the same round curve if you fold the wire around the end of a small paintbrush), then curved one end up. This gave me the weird "L" shape you see in the photo above. I started with about 2" lengths of wire because longer pieces are easier to work with. Then I trimmed the pieces down at the end so all four were the same size. I glued the skates onto her feet and added a small magnet near her neck. I covered the magnet with a scrap of white cardstock to keep the magnet from transferring any grey residue to the pond as it glides around.

For the background, I added a little blue paint to a watercolor paper panel to create the ice area, then used a die to cut swirls into the blue ice. I die cut the scenic elements and sentiment from white cardstock. Then, I assembled the scene using stitched hillside pieces and pine trees around the pond area. I made sure to layer the larger trees on top with a double layer of foam tape and make them hang off the bottom and side edges, to look like they are in the foreground; smaller trees went in the background. The sentiment is only one layer, not stacked like I often do, and glued flat to the background. Once the scene was created and the unicorn was ready, it was time to make the slider bar to go underneath.


I die cut three stitched strips and glued them together with another magnet between the top two layers. This created a sturdy bar that can slide around without accidentally buckling or folding up. I added a ¼" x 1½" strip to the back side of the end with the magnet, to form a "T" shape. The small strip will act as a stop, to keep the bar from pulling all the way out. I added a layer of foam tape around the perimeter of a card base, leaving an opening for the bar, and dusted the edges of the tape with my powder tool to ensure they wouldn't stick to the slider bar as it moves around. Then I sandwiched the bar in between the card base and the background piece. To finish the card, I applied Diamond Glaze to the words and Aqua Shimmer accents to the trees, edges of the snowbanks, and unicorn horn. When everything was dry, I attached the unicorn to the card and tested it out. Look! It's so much fun to play with!


Now, before you give a card like this to a child, please consider that the ends of the wire skates can be sharp, and if the child somehow accidentally ingests both magnets, that could be harmful. Just in case, younger children should be supervised when playing with it.

So what do you think? It's fun right?! I think the star covered Sassy unicorn is the perfect fit for this card. I chose soft pinks and purples for my color scheme specifically for my niece, but it would be adorable in other color schemes too. What colors would you use? If you'd like to see a few more projects featuring this stamp set, check out Unicorn Crush and Candy Twist. You can also hop on over to my blog to find the sister article with links to the other specific items I used for this card. Thanks for stopping by today; I'll be back soon with another new interactive card.

Free Hugs


Hello and welcome TRHD fans!  Shanna here today to share another adorable  card featuring the fabulous new release from The Rabbit Hole DesignsINKY!
These octopi just make me giggle every time I look at them, they are THAT cute!

I started by coloring my images with my Tombow markers and then did a simple ink blended base using Salty Ocean and Mermaid Lagoon Oxide inks and then decided I wanted to make a slider card!  Because....who doesn't like free hugs?!?
I really like how the end result worked out, the red guy seems really excited to give his friend a hug!! (Can we say STALKER ALERT!!)
I have a personal goal to improve my repertoire of interactive cards, and this one is super simple!


Do you have a favorite card design you reach for??  I am thinking a double slider is next on my interactive card wish list....stay tuned!!!


As always, thanks so much for stopping by! You can see more of my creations on my blog Caffeinated Craftiness, or be sure and follow my crafty adventures over on Instagram!
 See you all soon!
~Shanna

For even more inspiration, updates, and news make sure to check out these links.

Inking of You Pull-Tab Card

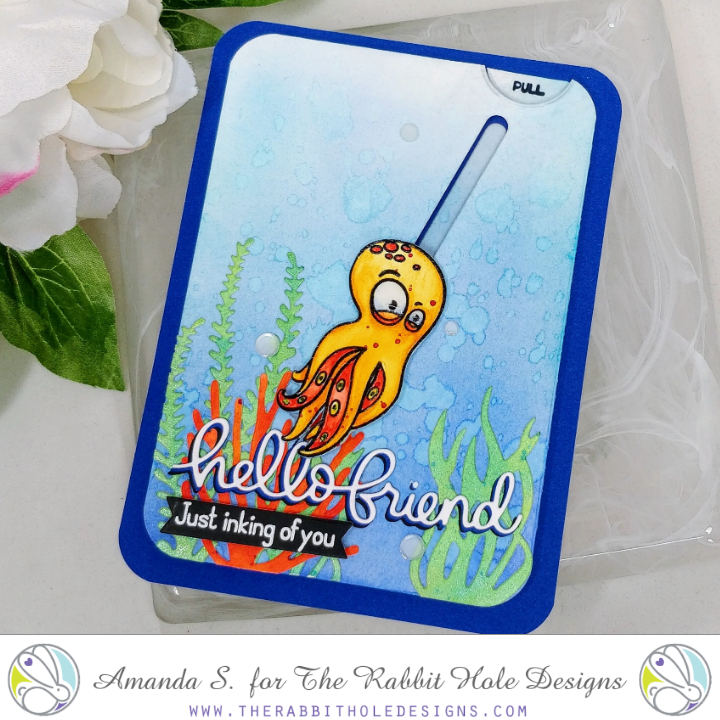
Hey crafty friend, it's Amanda from Pear Blossom Press back with another fun, interactive card! I've wanted to make this card since I first saw the new Inky stamp set. The set has three adorable octopi, several punny sentiments, and a pair of ink blots. I thought it would be really fun to have an octopus on a pull-tab, and have an ink blot under him, that only becomes visible as it swims away.
See what I mean? Isn't it cute?! I love the punny sentiment, combined with the ink blot. This card was pretty simple to make too. To start, I created an A6 card base from white cardstock. I cut blue and white panels to layer on top. I ink blended Chipped Sapphire and Mermaid Lagoon Distress Oxide Inks onto the white panel with a makeup brush, fading the color out almost to white at the top. I splattered on water to lift some color, then trimmed ½" from the top and side. I used a corner rounder to shape the edges of all three pieces.

Next, I stamped, embossed and watercolored my octopus. Then I cut him out with my ScanNCut. I painted a large scrap of watercolor paper with green and orange watercolor and die cut several pieces of seaweed from the green, and a piece of coral from the orange. I stamped and embossed my sentiment onto black cardstock and die cut it with a fishtail banner. I also die cut "hello friend" from white, blue, and black cardstock, gluing them together slightly offset.
Once I had my embellishment pieces cut out, I laid them out onto the ink blended panel and decided on placement for my slider track. I used a small slider die and a circle die to cut the track and finger notch into the panel, reserving both pieces that I cut out. Before I assembled the sliding mechanism, I stamped and embossed the ink blot onto the panel. Then, I glued the seaweed, coral and hello friend sentiment flat to the panel. At this point, I glued the solid blue panel to the card base, then lined up the ink blended panel and used it as a guide to glue the reserved piece cut out with the slider die. (That way the track would have the ink blended piece behind it, and you wouldn't see a big dark blue line.)

To assemble the sliding mechanism, or pull tab, I flipped the ink blended panel over and added double thick foam tape around the edges and inside, leaving a gap for a 1" x 4" strip of acetate over the track. (I left the release paper on the outer layer of foam tape because I wasn't ready to stick it to the card yet.) I used a powder tool on the sides of the track and the foam near the acetate strip, so it would be able to glide freely. I glued the reserved finger notch piece to the top of the acetate, making sure it lined up evenly with the top of the inked panel. I stamped and embossed "pull" on it. With the acetate strip slid down the track, and the pull tab lined up with the edge of the panel, I glued a Slider Element (looks like a plastic Tic Tac) to the acetate at the very bottom of the track. Then I glued the top of the octopus' head to the element. This locks the octopus to the front of the panel, and the acetate strip to the back, so I could remove the release paper from the foam tape and stick the panel to the card. I made sure to line it up so the track was right over the piece I'd already glued down. To finish the card, I popped the banner sentiment up with foam tape and glued on a few white sequins. To add a little more shine to the card, I covered the eyes and sequins with a coat of Diamond Glaze.


So what do you think? Pretty cute, right? I hope you love the new Inky set as much as I do because I have a bunch more ideas for it! If you'd like to see another set of fun cards I made with this set, check out Liquid Shaker Cards. You can also find the sister post to this on my blog today with links to the specific products I used to create this card. Hop on over for more inspiration! I'll be back soon with another fun card.


DIY Pop-Up Rainbow Slider


Hey crafty friends! It's Amanda from Pear Blossom Press again, and today I've got another fun interactive card for you! Have you seen the Rainbow Slider die set yet? I must've been hiding under a rock, because I missed it when it came out, but now I'm slightly obsessed! The super talented Ardyth Percy-Robb has a few videos featuring it, and now I #totallyneedit!

Since I don't have the set yet, I decided to piece one together using supplies I have on hand. (Still gettin' the die set though, just sayin' ;) ) And what goes better with rainbows than unicorns, right? So of course, the Caffeinated Unicorn is right there under the rainbow, along with a sassy sentiment. Let me show you how I put this card together...


What do you think; fun, right? Can you see why I couldn't wait to make one? In addition to the Caffeinated Unicorn, I also used the cloud stamps from the Love You More stamp set. If you'd like links to any of the other specific products I used, you can find them in the sister post to this article on my blog.


I love the way this card turned out. All of the sparkly details are really pretty and the pop-up rainbow is an unexpected element that adds a lot of wow. This would be a great card to send to a friend, just to make them laugh. Or tuck a coffee gift card inside, and you've got a fun birthday card/gift! Who would you send this card to? Let me know in the comments below. Thanks for swinging by today. I'll be back soon with another card to share...


Tropical Vibes Rocker Card


Hello my crafty friends, it's Amanda from Pear Blossom Press again. Today I'm sharing a rocker card with an extra surprise; there's a pendulum hanging under the Caffeinated Shark, so he sways on the tide as the card rocks.

This is the second card I designed to teach at the Unstoppable Retreat in Seattle this past weekend. (You can find the first one here.) The plan was to film it live, so you'd be able to watch us craft in real time and make one with us if you'd like. Unfortunately, we ran long with the first card and didn't get to do this one together. I passed out kits for this card to all of the attendees and I shot a quick video in my hotel room after. My apologies for the lighting and such; it's so hard to find a hotel that offers a full service filming studio ;)


For this card, you'll need the following stamps and dies (head on over to my blog for links to specific products):
  • Caffeinated Shark Stamp Set
  • Nesting Circle Dies (5½", 1¼", and ¾")
  • Stitched Wave Border Dies
  • Stitched Hillside Border Dies
  • Tropical Dies
  • Scalloped Circle Dies
You will also need a strip of paper that measures ¼" x 2½" and a penny to create the pendulum. The hardest part was die cutting all of the pieces. Which, to be honest, isn't actually hard, just time consuming. Especially, when you are cutting for 30 cards. I'd really like to thank the awesome ladies that sat around the dining room table with me the night before class and helped me finish cutting the pieces, Alison, Robin, Ernylee, Rachel, and Brianne, you ladies are fabulous!!!

I have to take a second to gush a little about the retreat...it was so much fun! I got to meet several of my online friends in person, and a whole new group of amazing ladies that I now get to call friends too! We were in a gorgeous setting and had a wonderful time crafting, chatting, laughing, and forging new friendships. We shared great meals and silly jokes all day, and funny stories and cocktails all night. I can't wait to do it again next year! A great big thanks to Beth Duff for organizing the retreat, and The Rabbit Hole Designs for being one of the generous sponsors. I was so happy to show off some of their fun stamps in my class!

Thanks for stopping by today; I'll be back again soon with another fun card for you!

Adding Motion to the Caffeinated Flamingo

Hello crafty friend! It's Amanda again and today I've got a quick and easy way to add some movement to your cards with a simple lever. This is one of those techniques that is much easier to watch than explain, so I've put together a video for you here...

In the video, you saw me stamp out the Caffeinated Flamingo and use her for my focal point. I also used the back of the Caffeinated Crab for the island on my ink blended background. I chose Copic markers to color the flamingo, as well as the tropical die cut pieces used to build the scene; I like the vibrant colors and blendability I get with them. To help the sentiment stand out, I embossed it on a black strip with white powder.

My card front was cut out with a stitched rectangle die and I added a thumb notch to it, as well as the A2 card base, with a stitched circle die. I cut the pull tab and sentiment strip with stitched dies to carry the theme through on all of my pieces. I used a clear piece of acetate to make the second part of the lever so it would blend into the background as much as possible. My ScanNCut is my favorite tool for fussy cutting, but before I could cut out the flamingo and arm, I needed to make sure I prepped my images by adding lines with a Copic Liner (0.3) and whiting out unwanted areas with a paint pen.

To attach the lever pieces together, I used mini brads. You can make thin fasteners from paper, but brads are fast and easier. In order to accommodate the thickness of the brads, I popped my card front and flamingo body up with foam tape. To finish the card, I added some shimmer and shine with several glitter products, and a clear glaze on her eye.

So what do you think of her? Do you have any stamps you can add motion to? Is the Caffeinated Flamingo in your stash yet?! I'd love to know how you add interactive elements to your cards. Be sure to tell me in the comments below...And until next time my friend, stay crafty!