Pages

Showing posts with label Happy Birthday. Show all posts

Candy Twist Happy Birthday

Welcome back to the blog! There is a great BOGO sale at The Rabbit Hole Designs store TODAY. Don't miss out on this amazing deal!


 Now onto today's card featuring new products from the July release. 

I first blended the new Candy Twist Stencil in gray on an A2 sized card panel. I left the Candy Twist Stencil in place and layered the Beam of Light Stencil on top and blended through both stencils with pink. I shifted the Beam of Light Stencil around carefully leaving the Candy Twist Stencil in place and blended two more times through both stencils - in blue and yellow. I added a thin strip of patterned black & white paper to the right side of the A2 stenciled panel. The "Happy Birthday" sentiment is from the new Sentimentally Speaking stamp set. I used the coordinating dies to stack multiple die-cuts together to add dimension. I finished the card off with a few sequins.

Thanks for visiting!

Amrita

You can find me on IG @amritapettus

For more inspiration, updates, and news check out these awesome places! 


The RHD Affiliate Disclaimer:

We want to ensure transparency and honesty in our interactions with you, our valued readers. Please be aware that the links provided on The Rabbit Hole Designs Blog may be affiliate links. This means that if you make a purchase through these links, the project designer may earn a small commission at no extra cost to you. Your support means the world to us!


We kindly request that you accept the tracking cookie for the affiliate websites. Rest assured, this will not expose your computer to viruses or compromise your information. It's a necessary step for the company to attribute the sale to the affiliate, ensuring that creators like our creatives receive their rightful commissions.


Your trust and support empower our creators to continue sharing creativity and inspiration through our blog. Thank you for being an integral part of The Rabbit Hole Designs community!

Cake for everyone!

Hello crafty friends! Melinda here to share another card for The Rabbit Hole Designs January birthday release. 

For todays card I wanted to combine the Open Heart stencil and the Just Cake stamp and die.


I started by adding a touch of blue ink onto my panel. I made it darker in the center fading out to a lighter color. Next I added some Nuvo glitter paste and set aside to dry. I watercolored my cake and cut it out with the coordinating die. After my glitter paste was dry I cut my panel down to 3 3/4 inches by 5 inches. I popped the base layer up with some foam tape and then added my die cut cake which I also popped up with some more foam tape. 


I absolutely love the way the Open Heart stencil spotlights the main image on your card! This stencil isn't just for Valentines day, its great on any card.


Thanks so much for stopping by and taking a look and I hope I've provided some inspiration for using these wonderful products!
For more inspiration on how I used these check me out on


For more inspiration, updates, and news make sure to check out these places.

Sailboat Rocker Card


Hello my crafty friend, it's Amanda from Pear Blossom Press again! I've got a new rocker card for you today, featuring the sweet little boy from the Beach Day stamp set. I made this one a birthday card, but you could easily change the sentiment and make it a card for a baby boy. I don't have a video tutorial because the card was very simple to make, but I do have a quick video of it in action...


Rather than trying to piece it out myself, I used an inexpensive pattern for the shaped card and cut it out with my ScanNCut. You can find a link to the cut file I used on my blog. Once I downloaded the pattern, I cut all of the pieces from white cardstock. I used a makeup brush to ink blend Distress Oxide inks onto the sailboat parts. Then I used a wood grain texture plate to add a pattern to the lower decorative piece and a basket weave texture plate on the sails. I colored the red flag with Copic markers because it was so small. Then I decided that the boat needed another decorative piece under the sails. I die cut a strip and colored it brown. I colored the round piece for the top of the mast with a copper gel pen and I added a copper line through the center of the brown strip. I glued the sailboat pieces together with PVA glue; it holds the textured pieces to the card base nicely.

For my focal point, I stamped, embossed, and Copic colored the little boy from the Beach Day stamp set. Then, I cut him out with my ScanNCut, leaving a narrow border. I added a few copper gel pen highlights to his hair to carry the copper theme through. I die cut a wide wavy banner from black cardstock, then curved the sentiment in my Misti to stamp it onto the banner. I embossed it with white powder, then popped it onto the boat with a single layer of foam tape. I used a double layer of foam tape behind the little boy to attach him to the card. To finish the card, I added a few sequins that The Rabbit Hole Designs has been including for free in recent orders. They coordinate perfectly!


I hope I've inspired you to give rocker cards a try! They are fun to make and such an easy way to add an interactive element. If you'd like to see another rocker card, check out this article. For more inspiration with the Beach Day stamp set, you might like this article. Also, the sister post to this article can be found on my blog, along with links to the products I used. I'll be back soon with another great card for you. Until then my friend, stay crafty!

Doggone Birthday


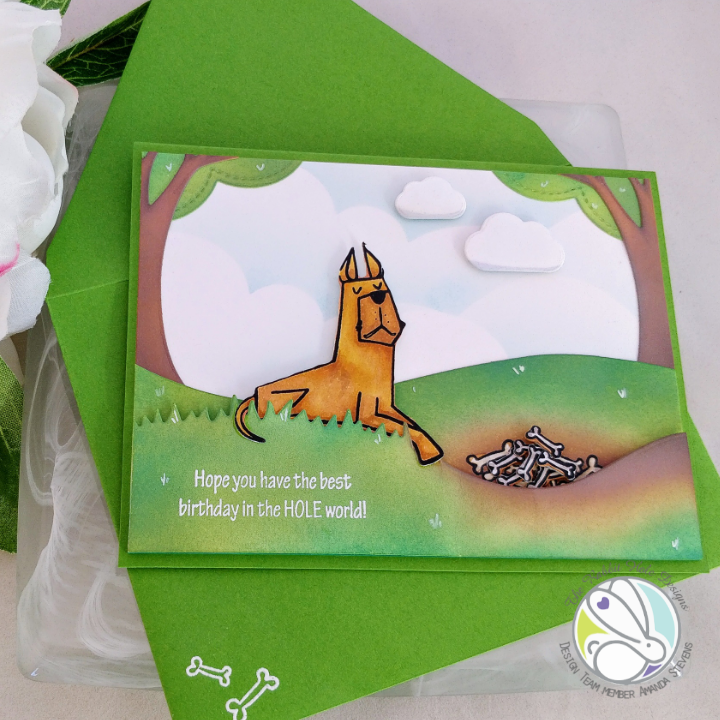
Hey crafty friends, it's Amanda from Pear Blossom Press again! Have you seen the new Doggone and Cattitude sets yet? The cats and dogs are cute, but not too cutsey, so you can make masculine cards with them as well. And I love that the sentiments are interchangeable. For today's card, I combined one of the Doggone dogs with a sentiment from Cattitude for a punny birthday card.

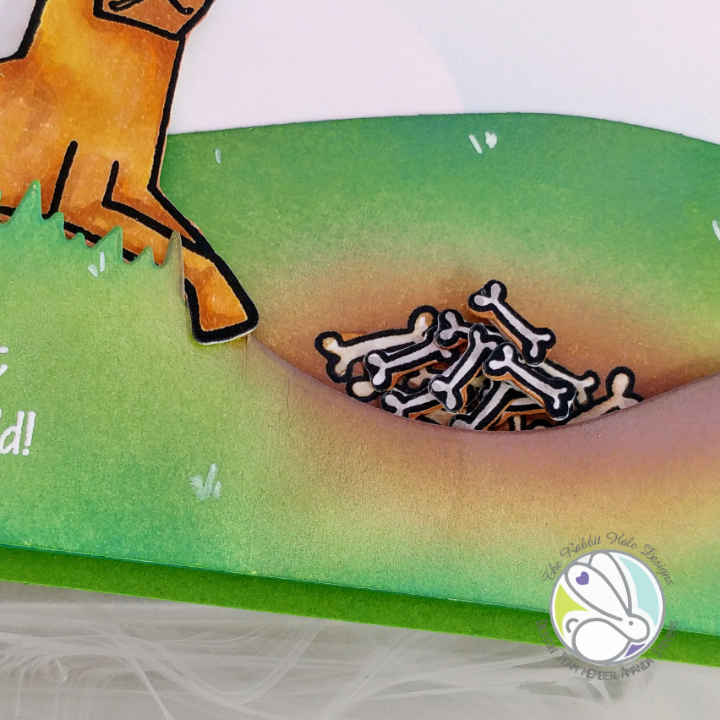
To make this card, I stamped, embossed, and Copic colored my dog and a bunch of bones. Then, I cut them out with my ScanNCut. Next I die cut my scene pieces - the trees, clouds, and hillside borders. The shorter, front hillside border was partially cut with a grass border, then a curved hillside border so that it looks like the grass drops off into a hole. I stamped, embossed, and Copic colored more bones on the back hillside layer. Then I coated them with masking fluid so I could ink blend on top of them.


I used makeup brushes to ink blend a cloudy sky onto a 4" x 5¼" panel. I also blended color onto the die cut pieces. I blended green into brown on the hillside pieces, around the bones, to look like a hole had been dug through the grass. Then I removed the masking fluid from the bones. I stamped and embossed the sentiment on the front hillside layer. I glued the trees and back hillside to the cloud panel and popped the front hillside, dog, and clouds up with foam tape. Then, I glued some of the cut out bones on top of the other bones and popped a few more up with foam tape. I added a few details with a white Posca pen in the grass and trees. I plan to give this card to my dad, so I didn't add any glitter or sequins. To finish the card, I popped the panel up onto a green A2 card base with a thin layer of fun foam and I stamped and embossed a pair of bones onto a coordinating envelope, just to hint at what's inside.


Thanks for stopping by today! I hope I've inspired you to make a punny card of your own. Make sure to check out Yippee! and Cattitude for more inspiration with these stamp sets, and for a discount code that's still good until tomorrow (details in the links). You can find the sister article to this on my blog. I'll be back soon with another fun card, so make sure you're signed up for the newsletter so you don't miss it!

Happy Birthday To Me!


Good morning Rabbit Hole fans, I hope you're having a good week!
It just so happens that today is my 50th birthday so I thought it only
appropriate to make a birthday card.
I thought it would be fun to incorporate a bunch of the caffeinated
critters on my card.  Putting party hats on their heads just made 
me laugh since they don't look like they are in a party mood.
It's been a rough week for me so it's kind of appropriate that these 
guys aren't smiling.
All in all though I really like how the card came out, the rainbow
letters really stand out against the black and white background.
Here is a list of all the caffeinated critters used on my card:


Thanks for joining me today for my birthday, I hope you enjoyed
my card, these caffeinated critters really can be used for any 
type of card you want to make..... just change up your sentiment.

For more inspiration, updates, and news make sure to check out these links.

Have a great day, I already am!
🎂Lisa 🎂


So Jelly it's your Birthday with Katie

Hello!  Katie here and I am thrilled that this is my first post as part of The Rabbit Hole Designs!

I have a bright and colorful card today featuring the Sofishticated stamp set.


To make this card, I started with a piece of 4 X 5.25 watercolor paper.  I stamped the jellyfish imaged multiple times on the sheet using Versamark and then used white embossing powder and heat set them.  Next, I added a variety of Lindy's Magicals over the paper and then spritzed the paper with water.  I frequently dried the wet sheet with my heat gun and added more until I achieved the colors and look I wanted.  


Next, I added the black bubbles and sentiment to the card front.   the sentiment.  I mounted the card onto a sheet of white cardstock just 1/8 of an inch larger on the two sides.  This I mounted onto a black A2 sized card, to draw pull out the black of the bubbles and sentiment. 


Supplies Used: 

Sofishticated 


For more inspiration, updates, and news make sure to check out these places:

Thanks for visiting me for my inaugural post, I hope you enjoyed it!  Feel free to visit my blog as well.  ~Katie