Pages

Showing posts with label Falling Leaves Stamp Set. Show all posts

Whimsical Camping Adventure Card: Glamping with Tailette & Tenting with Tailette Stamp Sets

Hello, fellow card makers! Rick here, bringing you another whimsical project for The Rabbit Hole Designs Blog. Today, I’m excited to share a fun and unique card design that combines the charming Tenting with Tailette and Glamping with Tailette Stamp Sets. This project is perfect for those who love a bit of adventure and whimsy in their card making. The process involves some delightful masking techniques to make our focal images pop, and I have a few pro tips to help you along the way! 

Tenting with Tailette & Glamping with Tailette Card by Rick Adkins flat lay view


The Inspiration Behind the Card

I’ve always enjoyed the idea of combining different stamp sets to create a cohesive scene. The Tailette character is irresistibly cute, especially when she's roasting an acorn by the campfire or peeking from behind a stack of logs. This card design was inspired by a recent camping trip, where we spent our evenings around the fire, sharing stories and roasting marshmallows. I wanted to capture that cozy, adventurous spirit in a card that could be perfect for any occasion.

Tenting with Tailette & Glamping with Tailette Card by Rick Adkins

Stamping and Coloring:

I began by stamping the adorable Tailette characters and the campfire on alcohol marker friendly cardstock using alcohol marker friendly ink from my stash. Coloring these images with my favorite alcohol brush markers was such a relaxing experience! 

Pro Tip: Always stamp your images first and then color them. It’s easier to correct any stamping mistakes on a blank piece of cardstock rather than one you’ve already spent time coloring.

Tenting with Tailette & Glamping with Tailette Card by Rick Adkins Front View

Building the Background: 

For the background, I used the a set of nesting arches dies from my stash to create a mask with masking paper. This allowed me to do some ink blending within a specific area of the cardstock, giving it a defined and clean look. Using two different muted blue inks from my stash created a soft, dreamy sky.

Next, I added some texture and depth with the Falling Leaves Stencil. Blending a lighter and darker green ink over the stencil gave a lovely leafy pattern that complemented the outdoor theme perfectly.  I then took the Falling Leaves 6 x 6 Stamp and stamped over the ink blended background to add a details to the leaves.

Pro Tip: When ink blending, start with lighter colors and gradually build up to the darker shades. This helps in creating a smooth transition and avoids harsh lines.

Tenting with Tailette & Glamping with Tailette Card by Rick Adkins Side View

Creating the Card Base: 

I dry embossed a piece of ivory cardstock using a leaf embossing folder from my stash. To add a bit of definition, I brushed the edges with one of the green inks I used for the ink blending. This panel was then adhered to a top-folding A2 card base.

Pro Tip: Dry embossing adds a beautiful texture to your cards without much effort. If you don’t have an embossing folder, you can achieve a similar effect with stencils and an embossing pad.

Tenting with Tailette & Glamping with Tailette Card by Rick Adkins Over Head View

Layering the Elements: 

Once my ink-blended panel was dry, I attached it to a piece of green cardstock for a nice contrast.  The fun part was arranging the focal images. The campfire went in the background with liquid glue, while the Tailette images were popped up with Foam Adhesive for a bit of dimension.

Finishing Touches: 

The sentiment “I’d be lost without you” was heat embossed on a scrap of the same green cardstock. Adding a subtle shimmer to certain parts of the stamped images so that they would catch the light beautifully.

Tenting with Tailette & Glamping with Tailette Card by Rick Adkins

Creating this card was such a joy, and I hope it inspires you to combine different stamp sets and techniques in your own projects. Masking and layering can seem a bit daunting at first, but with a bit of practice, it opens up so many creative possibilities.

Don’t forget to share your creations and tag us at The Rabbit Hole Designs—we love seeing what you come up with! Until next time, happy crafting and enjoy every creative moment.

Warmly, Rick

For more inspiration, updates, and news check out these awesome places! 


The RHD Affiliate Disclaimer:

We want to ensure transparency and honesty in our interactions with you, our valued readers. Please be aware that the links provided on The Rabbit Hole Designs Blog may be affiliate links. This means that if you make a purchase through these links, the project designer may earn a small commission at no extra cost to you. Your support means the world to us!


We kindly request that you accept the tracking cookie for the affiliate websites. Rest assured, this will not expose your computer to viruses or compromise your information. It's a necessary step for the company to attribute the sale to the affiliate, ensuring that creators like our creatives receive their rightful commissions.


Your trust and support empower our creators to continue sharing creativity and inspiration through our blog. Thank you for being an integral part of The Rabbit Hole Designs community!

Fall Foxes

Hello, Erin here sharing a card I made with the Fall Foxes stamp set from The Rabbit Hole Designs.  This stamp set is so cute!  It has adorable sentiments, four fox images and cute fall leaves.  What more could you want in a fall set?!


To make this card I started by using colored pencils to color one of the fox images.  I really like the one with the fox looking at the snail so I went with that one for this card.  After the image was colored, I used the coordinating die to cut it out.

Next,  I began working on the background.  I absolutely love the Falling Leaves stamp set and the Falling Leaves stencil.  I think both of those are my favorite items from the fall release at the Rabbit Hole Designs.  There are just so many options.  I've found myself reaching for either the stamp, the stencil or both for nearly every card I've made in the past few months! 

First I grabbed a few different shades of brown inks and stenciled them onto a light brown card stock.  The fox image will be the main focus of my card so I wanted a fairly monotone background. However, I couldn't help but add just a bit of yellow in a few places on the leaves for a small pop of color.  

Using my Misti stamping tool, which I use pretty much every time I stamp, I lined up the stenciled leaves with the leaf stamp set and used brown ink to stamp the leaf outlines.  I love how this background turned out!
To assemble the card, I used foam tape and mounted the fox on a dark brown circle in the bottom corner of the card.  For the sentiment, I taped over the 3rd line of text that says "friend is my first" and stamped it in dark brown ink.  Sometimes I find that the spacing in sentiment stamps in too close to mask out lines or words easily but that isn't the case with this set!  The spacing is perfect for this and I easily covered up a line of text with a piece of washi. 

 I mounted the whole card front onto a red card base that coordinates well with the red colors in the fox and mushroom. I added some white highlights with a white gel pen and, although you can't see it in the photo, I used Wink of Stella to add shimmer to the white parts of the fox and the mushroom top.  


 For this inside of the card, I made a white panel using the You've Been Framed Layering Dies.  Then I added some brown leaves with the Falling Leaves stencil, making it darker on the edges and lighter in the middle where the writing will be.  I used the same sentiment that I used on the card front but this time I masked off the top two lines and just stamped the last one. 

For more inspiration, updates, and news make sure to check out these places:

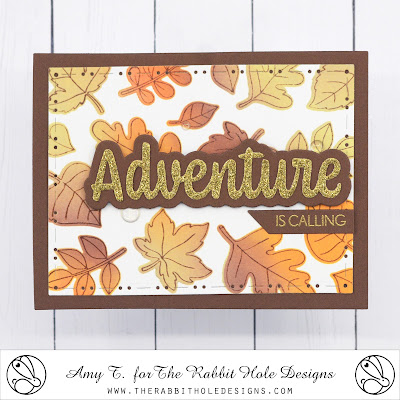
Adventure is Calling

 Hi everyone!  Amy here with you today sharing this card I created featuring the Falling Leaves Stamp and Stencil illustrated by Agota Pop.  

Falling Leaves Stamp and Stencil illustrated by Agota Pop, Adventure - Scripty Word Stamp and Die Set, You've Been Framed - Layering Dies by The Rabbit Hole Designs #therabbitholedesignsllc #therabbitholedesigns #trhd

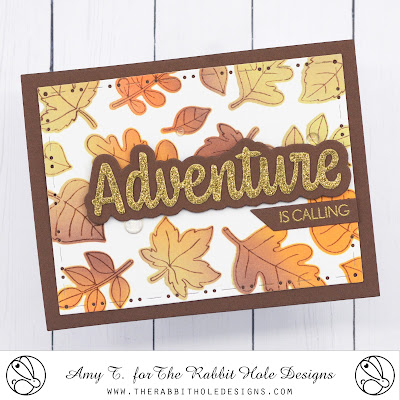
To start this card I die cut a piece of smooth white cardstock with the second largest die from the You've Been Framed - Layering Dies.  I used the Falling Leaves Stencil with Distress Oxide Inks Old Paper, Spiced Marmalade, and Vintage Photo to create a gorgeous color on the leaves.  I then stamped over the stenciled leaves in brown pigment ink with the Falling Leaves Stamp, and clear heat embossed.  

Falling Leaves Stamp and Stencil illustrated by Agota Pop, Adventure - Scripty Word Stamp and Die Set, You've Been Framed - Layering Dies by The Rabbit Hole Designs #therabbitholedesignsllc #therabbitholedesigns #trhd

I used the Adventure - Scripty Word with Shadow Layer Dies to create the sentiment.  I die cut "Adventure" from gold glitter cardstock, and used brown cardstock for the shadow.  Next, I die cut a brown sentiment banner using the You've Been Framed Die Set.  I stamped "is calling" from the Adventure - Scripty Stamp Set and gold heat embossed.

I assembled my card using brown cardstock for base, and adhered the sentiment with foam tape for some dimension.  

Falling Leaves Stamp and Stencil illustrated by Agota Pop, Adventure - Scripty Word Stamp and Die Set, You've Been Framed - Layering Dies by The Rabbit Hole Designs #therabbitholedesignsllc #therabbitholedesigns #trhd

For finishing touches on this card I added a few Clear Sparkle Enamel Dots!  Thank you and I hope you enjoyed my card today!

For more inspiration, updates, and news make sure to check out these places:


Falling Leaves

 Hello!  Erin here to share a fall card with you!  I love fall and all the fall things!  Other than cleaning leaves in the yard, I don't like that very much. 😄 For this fall card, I used the Falling Leaves 6x6 stamp set from The Rabbit Hole Designs.  

I colored the leaves a variety of colors with markers. I like that the Falling Leaves stamp set is so big. It gives great options for larger cards.  I make a lot of 5.5 by 5.5 square cards and this set is perfect for those. Since I was making an A2 sized card, I was able to choose what part of the image I cut my panel from and trimmed off some of the area where my coloring wasn't great. That green and red leaf, ugh!  I did not want that on my card.😂

I layered some orange and yellow card stock behind my leaf panel and mounted it all to a red card base.  The sentiment is from the stamp set Fall Foxes. Not only does the stamp set have four images of adorable little foxes, it also has some great sentiments. I personally like snarky sentiments and I have a lot more cards to share later this month using this stamp set.


For more inspiration, updates, and news make sure to check out these places:

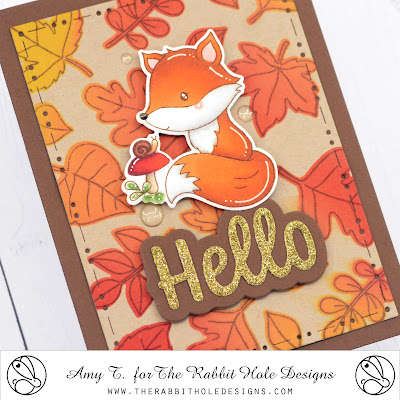
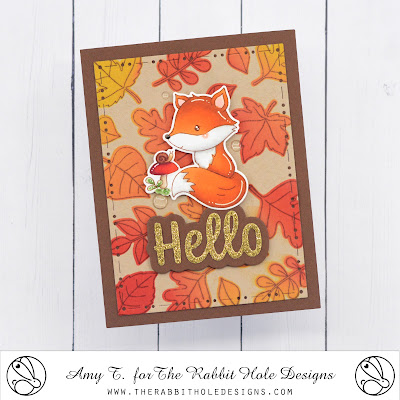
Hello

  Hi everyone!  Amy here with you today sharing this card I created featuring the super cute Fall Foxes Stamp Set and Falling Leaves Stamp both illustrated by Agota Pop.

Fall Foxes Stamp and Die Set illustrated by Agota Pop, Falling Leaves Stamp and Stencil illustrated by Agota Pop, Hello - Scripty Word with Shadow Layer Dies, You've Been Framed - Layering Dies by The Rabbit Hole Designs #therabbitholedesignsllc #therabbitholedesigns #trhd

To start this card I die cut a piece of kraft cardstock with the second largest die from the You've Been Framed - Layering Dies.  I used the Falling Leaves Stencil with Distress Oxide Inks Mustard Seed and Candied Apple to create a gorgeous background.  I then stamped over the stenciled leaves in brown pigment ink with the Falling Leaves Stamp.

Next, I stamped out this adorable fox from the Fall Foxes Stamp Set.  I colored the image with copic markers, and cut it out using the coordinating die set

Fall Foxes Stamp and Die Set illustrated by Agota Pop, Falling Leaves Stamp and Stencil illustrated by Agota Pop, Hello - Scripty Word with Shadow Layer Dies, You've Been Framed - Layering Dies by The Rabbit Hole Designs #therabbitholedesignsllc #therabbitholedesigns #trhd

For the sentiment I used the Hello - Scripty Word with Shadow Layer Dies.  I die cut "Hello" from gold glitter cardstock, and the shadow from brown cardstock.

I assembled my card using brown cardstock for the base.  I popped up the image and sentiment with foam tape for some dimension!

Fall Foxes Stamp and Die Set illustrated by Agota Pop, Falling Leaves Stamp and Stencil illustrated by Agota Pop, Hello - Scripty Word with Shadow Layer Dies, You've Been Framed - Layering Dies by The Rabbit Hole Designs #therabbitholedesignsllc #therabbitholedesigns #trhd

For finishing touches on this card I added accents with a white gel pen, glossy accents on the fox's nose, and a few Clear Enamel Dots!  Thank you and I hope you enjoyed my card today!

For more inspiration, updates, and news make sure to check out these places:

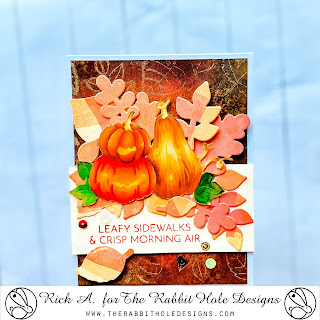
Silly Pumpkins and Playful Foxes: A Whimsical Fall Card

 Hello and welcome back to the Rabbit Hole Designs Blog.  It's Rick here with you today to bring you a fun whimsical Fall themed card.  To create the card I used not one, not two, but three different stamp sets from the Rabbit Hole Designs.  I used the brand new Silly Pumpkins Stamp Set from the latest release as the focal image and the other two sets are my supporting actors for this feature.  Here's a look at the card I created to share with you today.  

Silly Pumpkins Stamp Set, Falling Leaves 6x6 Stamp Set, Fall Foxes Stamp Set, Falling Leaves Dies, Card by Rick Adkins

After creating the backgrounds for the card, I stamped the Silly Pumpkins Stamp Set in a light colored ink because I knew I wanted to color it in a no line coloring style.  I used my alcohol markers for the coloring.  

Silly Pumpkins Stamp Set, Falling Leaves 6x6 Stamp Set, Fall Foxes Stamp Set, Falling Leaves Dies, Card by Rick Adkins

Which was super easy since the design that Agota Pop came up with for this stamp set was super easy to color.  I then decided that my original background needed a little something, something to jazz it up a little bit more.  So I used my Cottontail Embossing Powder Tool and adding some anti-static powder to the card panel.  I then stamped the Falling Leaves 6x6 Stamp Set in embossing ink and covered it with gold embossing powder.  I then heat set the embossing powder to add a little more glitz to the card front.  

Silly Pumpkins Stamp Set, Falling Leaves 6x6 Stamp Set, Fall Foxes Stamp Set, Falling Leaves Dies, Card by Rick Adkins


Once I had the background finished I then could add my add the Silly Pumpkins Image to the card front and the sentiment that I had stamped from the Fall Foxes Stamp Set.  To finish off the card I added a few die cut leaves that I created using the Falling Leaves Dies.  I used these die cuts in the creation of my background panels in the first stage of adding ink to get the fun fall ink colors onto them.  I simply tucked them behind the Silly Pumpkins to finish off the card.  

I hope that you have a wonderful day and thanks for joining us today.  

Happy Stampin' 

Rick