Pages

Showing posts with label Clear Sparkle Enamel Dots. Show all posts

Pinecones and Christmas Cheer

Hi friends! Carrianne here, sharing a glimpse of the outdoors inside, complete with pinecones and Christmas cheer, featuring the Poinsettia & Pinecones Stamp Set from The Rabbit Hole Designs.


The image was stamped on a white cardstock and colored with alcohol markers. I fussy cut it out, but there are matching dies available. I die-cut another panel with a stitched frame and stamped some winter frost in gold ink. I then adhered it to a white A2 card base.


The sentiment was stamped in green ink and fussy cut it out. Next, I adhered the image and sentiment with foam tape to add additional dimension. I also added some Clear Sparkle Enamel Dots from The Rabbit Hole Designs.


Thank you for dropping in with me today! Have fantastic day!!

~ Carrianne ~


For more inspiration, news, and updates, make sure to check out these places.


DISCLOSURE: THIS POST CONTAINS AFFILIATE LINKS, MEANING I GET A SMALL COMMISSION WHEN A PURCHASE IS MADE THROUGH THAT LINK AT NO ADDITIONAL COST TO YOU. THANK YOU FOR SUPPORTING ME SO THAT I MAY CONTINUE TO SHARE MY CREATIONS WITH YOU!


Easter Blessings | Easter Bunnies Stamp Set

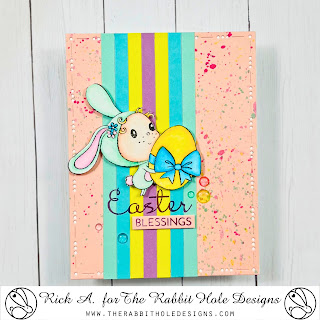
 Hello and welcome back to the blog; it's Rick back with you today to share a super cute and easy card using the brand new Easter Bunnies Stamp Set designed by Agota Pop for the Rabbit Hole Designs.  The Easter Bunnies Stamp Set features three cute little kids dressed up in easter bunny outfits; each in different posies getting Easter eggs ready for the hunt.  

Easter Blessing Card Easter Bunnies Stamp Set Rick Adkins

I stamped the super cute little bunny with the egg that has a cute little bow wrapped around it in VersaFine Clair Nocturne Ink, so that I could do a little watercoloring.  Once I got it colored up it was time to cut it out.  There are the matching Easter Bunnies Dies available but I didn't have them at the time I designed this card; so I did a little fussy cutting to cut it out.  

Easter Blessing Card Easter Bunnies Stamp Set Rick Adkins

Once I had the cute little bunny cut out I cut a standard A2 top folding card base.  I cut a piece of peach cardstock using the largest die from the You've Been Framed Dies.  Before attaching the card front to the card base I did a little ink splattering to add a little texture.  Once I was done with the splattering it reminded me of the Robin Egg Candy that was popular when I was a kid.  I attached the die cut piece of cardstock to the card base. 

Easter Blessing Card Easter Bunnies Stamp Set Rick Adkins

 I cut strips of cardstock in easter colors that matched the coloring done on the bunny.  I attached each strip alternating colors just off center.  I placed the card base into my stamp positioner and placed the little bunny where I wanted it to be.  I stamped Easter from the stamp set on the strips with a nice purple ink.  I then added a second strip of the same peach cardstock with the rest of the sentiment on it.  I finished off the card by taking a few of the Clear Sparkle Enamel Dots to the card front, but before attaching each I colored each one with coordinating pastel alcohol markers.  

Thanks for dropping by today I hope that you have a fabulous day.  

Happy Crafting, 

Rick 

A Happy Hello

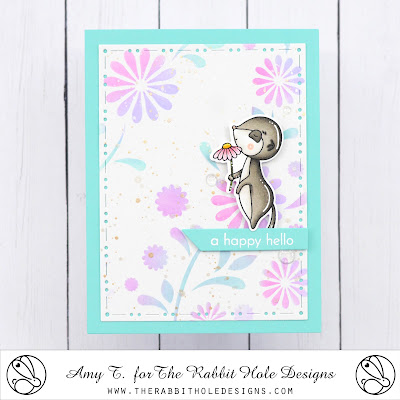
 Hi everyone!  Amy here with you today sharing a card I created featuring the super cute I Really Dig You Stamp Set illustrated by Agota Pop, and the Build Your Garden Stencil.

I Really Dig You Stamp and Die Set illustrated by Agota Pop, Build Your Garden Stencil, You've Been Framed - Layering Dies, Clear Sparkle Enamel Dots by The Rabbit Hole Designs #therabbitholedesignsllc #therabbitholedesigns #trhd

I started this card by die cutting a piece of smooth white cardstock with the second largest die from the You've Been Framed - Layering Dies.  I then used the Build Your Garden Stencil with Distress Oxide Inks Salvaged Patina, Kitsch Flamingo, and Shaded Lilac to create a gorgeous, colorful background!  I splattered the background with watercolor paint and set it aside to dry.

I stamped out this adorable meerkat image from the I Really Dig You Stamp Set, colored it with copic markers, and cut it out using the coordinating die set 

I Really Dig You Stamp and Die Set illustrated by Agota Pop, Build Your Garden Stencil, You've Been Framed - Layering Dies, Clear Sparkle Enamel Dots by The Rabbit Hole Designs #therabbitholedesignsllc #therabbitholedesigns #trhd

Next, I die cut a teal banner using the You've Been Framed Die Set.  I stamped the sentiment from the I Really Dig You Stamp Set and white heat embossed.

I assembled my card using teal cardstock for the base.  I used foam tape to pop up the image and sentiment banner for some dimension!

I Really Dig You Stamp and Die Set illustrated by Agota Pop, Build Your Garden Stencil, You've Been Framed - Layering Dies, Clear Sparkle Enamel Dots by The Rabbit Hole Designs #therabbitholedesignsllc #therabbitholedesigns #trhd

For finishing touches on this card I added white gel pen accents, glitter, glossy accents, and a few Clear Sparkle Enamel Dots!  Thank you and I hope you enjoyed my card today!

For more inspiration, updates, and news make sure to check out these places:

Mahalo

  Hi everyone!  Amy here with you today sharing this card featuring the Aloha - Pineapple Stamp Set illustrated by Agota Pop.

Aloha - Pineapple Stamp and Die Set, Spring Floral #1 Paper Pack, You've Been Framed - Layering Dies by The Rabbit Hole Designs #therabbitholedesignsllc #therabbitholedesigns #trhd

I started this card by die cutting a piece of patterned paper from the Spring Floral #1 Paper Pack with the largest die from the You've Been Framed - Layering Dies.  I then used the smallest frame die from the same set to die cut a piece of white cardstock on which I wanted to place the images.

Next, I stamped out these awesome pineapple images from the Aloha - Pineapple Stamp Set.  I colored the images with copic markers, and cut them out using the coordinating die set.

Aloha - Pineapple Stamp and Die Set, Spring Floral #1 Paper Pack, You've Been Framed - Layering Dies by The Rabbit Hole Designs #therabbitholedesignsllc #therabbitholedesigns #trhd

I stamped the sentiment, which is from the Aloha - Pineapple Stamp Set, directly onto the white cardstock with black pigment ink, and clear heat embossed for some shine!

I assembled my card using metallic gold cardstock for the base under the patterned paper so it can be seen through the die cut frame.  I used foam tape to pop up the images for some dimension!

Aloha - Pineapple Stamp and Die Set, Spring Floral #1 Paper Pack, You've Been Framed - Layering Dies by The Rabbit Hole Designs #therabbitholedesignsllc #therabbitholedesigns #trhd

For finishing touches on this card I added accents with a white gel pen, glitter, glossy accents, and a few Clear Sparkle Enamel Dots.  Thank you and I hope you enjoyed my card today!

For more inspiration, updates, and news make sure to check out these places:

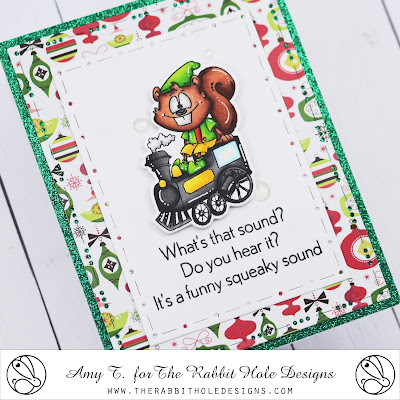
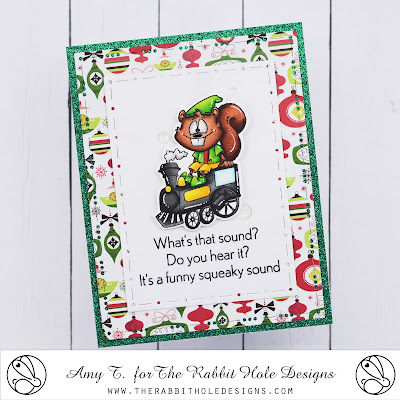
Clarence Christmas

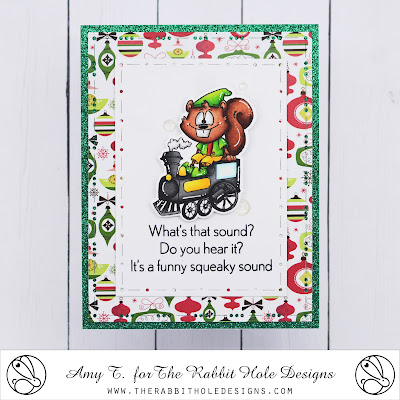
 Hi everyone!  Amy here with you today sharing a card I created using the Clarence Christmas Stamp Set illustrated by Dustin Pike.

Clarence Christmas Stamp and Die Set illustrated by Dustin Pike, You've Been Framed - Layering Dies, Retro Christmas Paper Pack, Clear Sparkle Enamel Dots by The Rabbit Hole Designs #therabbitholedesignsllc #therabbitholedesigns #trhd

I started this card by using the largest die in the You've Been Framed - Layering Dies to die cut a piece of patterned paper from the Retro Christmas Paper Pack.  I then used the smallest frame die from the same set to die cut a piece of white cardstock.

Next, I stamped this super cute image of Clarence riding the train from the Clarence Christmas Stamp Set.  I colored the image with copic markers, and cut it out using the coordinating die set

Clarence Christmas Stamp and Die Set illustrated by Dustin Pike, You've Been Framed - Layering Dies, Retro Christmas Paper Pack, Clear Sparkle Enamel Dots by The Rabbit Hole Designs #therabbitholedesignsllc #therabbitholedesigns #trhd

I stamped the sentiment, which is from the Clarence Christmas Stamp Set, directly onto the white cardstock in black pigment ink, and clear heat embossed for some shine!

I assembled my card, adhering the layers together and using green glitter cardstock for the base.  I popped up the image with foam tape for some dimension!

Clarence Christmas Stamp and Die Set illustrated by Dustin Pike, You've Been Framed - Layering Dies, Retro Christmas Paper Pack, Clear Sparkle Enamel Dots by The Rabbit Hole Designs #therabbitholedesignsllc #therabbitholedesigns #trhd

For finishing touches on this card I added accents with a white gel pen, glossy accents to Clarence's nose, and few Clear Sparkle Enamel Dots!  Thank you and I hope you enjoyed my card today!

For more inspiration, updates, and news make sure to check out these places:

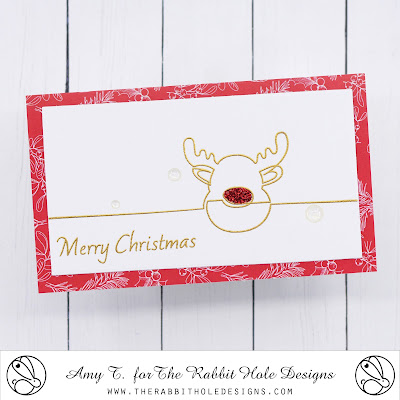
Quick and Easy Christmas Card

 Hi everyone!  Amy here with you today sharing a quick and easy card I created using the 1 Line Reindeer Stamp Set.  These types of cards are always great when you need a card, and you need it fast!

1 Line Reindeer Stamp Set, Retro Christmas Paper Pack, Clear Sparkle Enamel Dots by The Rabbit Hole Designs #therabbitholedesignsllc #therabbitholedesigns #trhd

I started this card by cutting a piece of white cardstock to mini slimline size.  I then stamped the 1 Line Reindeer image and sentiment, then gold heat embossed.  

1 Line Reindeer Stamp Set, Retro Christmas Paper Pack, Clear Sparkle Enamel Dots by The Rabbit Hole Designs #therabbitholedesignsllc #therabbitholedesigns #trhd

For the cardbase, I used a piece of patterned paper from the Retro Christmas Paper Pack.

1 Line Reindeer Stamp Set, Retro Christmas Paper Pack, Clear Sparkle Enamel Dots by The Rabbit Hole Designs #therabbitholedesignsllc #therabbitholedesigns #trhd

For finishing touches on this card I added some red glitter stickles to the reindeer's nose, and a few Clear Sparkle Enamel Dots!  Thank you and I hope you enjoyed my card today!

For more inspiration, updates, and news make sure to check out these places:

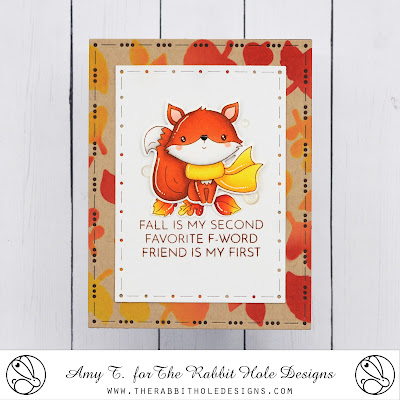
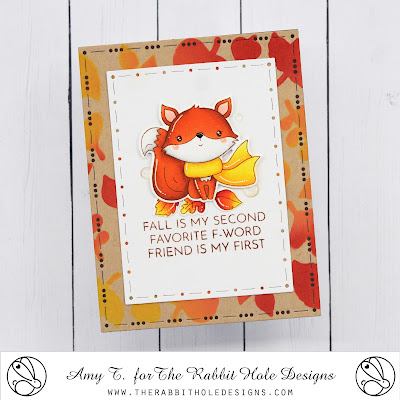
Fall is my Second Favorite F-word

  Hi everyone!  Amy here with you today sharing this card I created featuring the adorable Fall Foxes Stamp Set illustrated by Agota Pop.

Fall Foxes Stamp and Die Set illustrated by Agota Pop, Falling Leaves Stencil, You've Been Framed - Layering Dies by The Rabbit Hole Designs #therabbitholedesignsllc #therabbitholedesigns #trhd

I started this card by die cutting a piece of kraft cardstock with the largest die from the You've Been Framed - Layering Dies.  I then used the smallest frame die from the same set to die cut a piece of smooth white cardstock.  I used the Falling Leaves Stencil with Distress Oxide Inks Mustard Seed and Candied Apple to create the background on the kraft cardstock.

Next, I stamped this super cute image of the fox, and a few leaves, from the Fall Foxes Stamp Set.  I colored the images with copic markers, and cut them out using the coordinating die set.

Fall Foxes Stamp and Die Set illustrated by Agota Pop, Falling Leaves Stencil, You've Been Framed - Layering Dies by The Rabbit Hole Designs #therabbitholedesignsllc #therabbitholedesigns #trhd

I stamped the sentiment, which is from the Fall Foxes Stamp Set, directly onto the white cardstock in brown pigment ink.  I clear heat embossed for some shine! 

I assembled my card, adhering the layers together, and using brown cardstock underneath the base so you can see it through the die cut frame.   I popped up the image with foam tape for some dimension!

Fall Foxes Stamp and Die Set illustrated by Agota Pop, Falling Leaves Stencil, You've Been Framed - Layering Dies by The Rabbit Hole Designs #therabbitholedesignsllc #therabbitholedesigns #trhd

For finishing touches on this card I added accents with a white gel pen, glossy accents on the fox's nose, and a few Clear Sparkle Enamel Dots!  Thank you and I hope you enjoyed my card today!

For more inspiration, updates, and news make sure to check out these places:

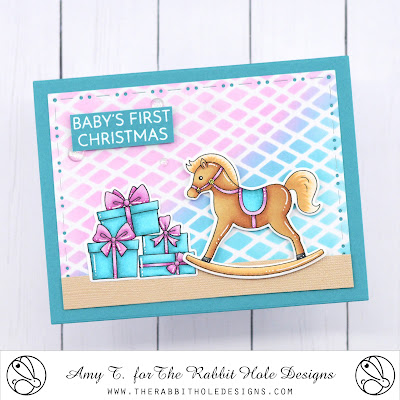
Baby's First Christmas

  Hi everyone!  Amy here today with this card featuring the Baby's 1st Christmas Stamp Set illustrated by Agota Pop.

Baby's 1st Christmas Stamp and Die Set illustrated by Agota Pop, Mesh - Optical Illusion Stencil, You've Been Framed - Layering Dies by The Rabbit Hole Designs #therabbitholedesignsllc #therabbitholedesigns #trhd

I started this card by die cutting a piece of smooth white cardstock with the second largest die from the You've Been Framed - Layering Dies.  I then used the Mesh - Optical Illusion Stencil with Distress Oxide Inks Kitsch Flamingo and Peacock Feathers to create the background! 

Next, I stamped out these super cute images from the Baby's 1st Christmas Stamp Set, colored them with copic markers, and cut them out using the coordinating die set.

Baby's 1st Christmas Stamp and Die Set illustrated by Agota Pop, Mesh - Optical Illusion Stencil, You've Been Framed - Layering Dies by The Rabbit Hole Designs #therabbitholedesignsllc #therabbitholedesigns #trhd

I stamped the sentiment onto teal cardstock, and white heat embossed. 

I assembled my card using teal cardstock for the base.  I adhered the gifts directly onto the background, and popped up the rocking horse and sentiment with foam tape for some dimension!

Baby's 1st Christmas Stamp and Die Set illustrated by Agota Pop, Mesh - Optical Illusion Stencil, You've Been Framed - Layering Dies by The Rabbit Hole Designs #therabbitholedesignsllc #therabbitholedesigns #trhd

For finishing touches on this card I added accents with a white gel pen, glitter, and a few Clear Sparkle Enamel Dots.  Thank you and I hope you enjoyed my card today!

Just An Otter Day In Paradise

Hello Everyone!  I'm excited to share a card that I made using the new Otter Play stamp set, illustrated by Agota Pop. This set features three otters and a crab, along with some accessories and fun sentiments. 
To make this card, I used one of the otters with the coordinating die and the sentiment "Just an otter day in Paradise." I colored the otter using Caran D'Anche colored pencils.


For the blue background, I used the new Making Waves stencil to add some very subtle texture. I didn't want it to look too busy with the embossed background so I used the stencil to lightly add some blue waves.  To finish the card, I added a few of the Clear Sparkle Enamel Dots for some shine.


For more inspiration, updates, and news make sure to check out these places

The Rabbit Hole Designs

The Rabbit Hole Designs Instagram

The Rabbit Hole Designs Facebook Page

The Rabbit Hole Designs Pinterest

The Rabbit Hole Designs YouTube


A Happy Hello

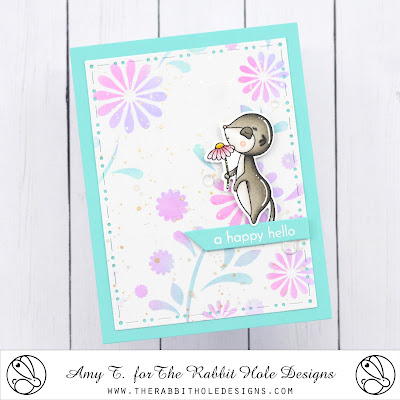
 Hi everyone!  Amy here with you today sharing a card I created featuring the super cute I Really Dig You Stamp Set illustrated by Agota Pop, and the Build Your Garden Stencil.

I Really Dig You Stamp and Die Set illustrated by Agota Pop, Build Your Garden Stencil, You've Been Framed - Layering Dies, Clear Sparkle Enamel Dots by The Rabbit Hole Designs #therabbitholedesignsllc #therabbitholedesigns #trhd

I started this card by die cutting a piece of smooth white cardstock with the second largest die from the You've Been Framed - Layering Dies.  I then used the Build Your Garden Stencil with Distress Oxide Inks Salvaged Patina, Kitsch Flamingo, and Shaded Lilac to create a gorgeous, colorful background!  I splattered the background with watercolor paint and set it aside to dry.

I stamped out this adorable meerkat image from the I Really Dig You Stamp Set, colored it with copic markers, and cut it out using the coordinating die set 

I Really Dig You Stamp and Die Set illustrated by Agota Pop, Build Your Garden Stencil, You've Been Framed - Layering Dies, Clear Sparkle Enamel Dots by The Rabbit Hole Designs #therabbitholedesignsllc #therabbitholedesigns #trhd

Next, I die cut a teal banner using the You've Been Framed Die Set.  I stamped the sentiment from the I Really Dig You Stamp Set and white heat embossed.

I assembled my card using teal cardstock for the base.  I used foam tape to pop up the image and sentiment banner for some dimension!

I Really Dig You Stamp and Die Set illustrated by Agota Pop, Build Your Garden Stencil, You've Been Framed - Layering Dies, Clear Sparkle Enamel Dots by The Rabbit Hole Designs #therabbitholedesignsllc #therabbitholedesigns #trhd

For finishing touches on this card I added white gel pen accents, glitter, glossy accents, and a few Clear Sparkle Enamel Dots!  Thank you and I hope you enjoyed my card today!

For more inspiration, updates, and news make sure to check out these places: