Pages

Showing posts with label Stenciled Background. Show all posts

I'd Give You the Moon

Hello! Alison here with a card using a couple of the newest release items from The Rabbit Hole Designs. I really love the June release's theme of outer space, as I have always enjoyed learning about it. So working with these stamps and stencils is a win for me!

I used the Space- Infinity and Beyond stamp set as my jumping off point. I really wanted to do something with just the moon, so I inked only that up (and used some tape to mask off the string) and stamped it repeatedly using Silvery Shimmer Delicata Ink on black cardstock. Also from that stamp set is my sentiment, which I heat embossed with silver powder on purple cardstock.
I really wanted an all-over star pattern in my background so I applied the new Aim for the Stars stencil a couple of times to cover my gray cardstock. I used VersaMark ink and then applied a glittery purple embossing powder to give it some sparkle and shine. I also added some purple ink to my white card base to tie the purples together.
If you would like more information on my card, please visit my personal blog HERE. I hope you can look at your sets a little differently, and see how masking off certain elements can completely change the look of your creations.


Have an inspiring day!
-Alison


Thanks for joining us today on the blog!
Come back for more inspiration using The Rabbit Hole Design products. 

For more information, news and updates check out these links:

Ready to Par-Tea!!!

Hello there!
I hope you are all getting excited for 
The Rabbit Hole Designs' First Birthday Bash!!!

But today we celebrate our very own, Heather Ferguson's birthday!!!
We wish you a very happy birthday, Heather!!!

Michelle here! I started off with my chosen stencil, Twisted Sunshine, and layered
some distress oxide inks beginning with the darkest shade: black soot, 
picked raspberry and worn lipstick. Than I added some splattered white and gold paint.
Set aside to dry.

Next, I stamped and colored this hilarious flamingo!!!
I used Copic Markers in shades RV13, RV14, RV25; R21, R22;  
W3, W5, W6, W7; BG10, BG11, BG15; Y19.
For the sentiments, I used the stamp set Perfectly Blended! This stamp
set is full of fun caffeine puns!!! I embossed the sentiments with
gold embossing powder.

I adhered the flamingo, sentiments and gold thread with some foam tape.
I scattered some sequins and added some clear stickles glitter glue.

I hope you enjoyed this post!!!
Thanks for stopping by!!

For more inspiration, updates, and news make sure to check out these places.The Rabbit Hole DesignsThe Rabbit Hole Designs InstagramThe Rabbit Hole Designs Facebook PageThe Rabbit Hole Designs PinterestThe Rabbit Hole Designs YouTube


Deck the Halls!

Hello everyone! DTM Shanna here today with a card featuring The Rabbit Hole Design‘s new release for November, Christmas Frost! Christmas cards are always a favorite to make, and this card was no exception.


I started by taking a couple scraps of christmassy-paper (I like making up my own adjectives!)( and tearing one before layering them and die cutting my panel.  Next I used DecoFoil Metallix gold gel to stencil snowflakes from the Light Me Up stencil all across the background.  

While the background was drying, I stamped and colored the tree decorating couple from the Love you More--Christmas Frost stamp set.  They were watercolored with my Zig real brush markers. They were mounted with foam tape to the background for a bit of dimension.


My sentiment came from the same stamp set, and was matted in black cardstock and then added to the panel with foam tape too.  The panel was mounted to a teal card panel to bring out the color of the tree a bit more.  


Here is the full stamp set, isn't it cute??


That wraps up my post for today, I will be back next week for another trip down The Rabbit Hole!  Until then you can find me over on my blog, Caffeinated Craftiness or over on Instagram
-Shanna


For even more inspiration, updates, and news make sure to check out these links.

All I want for Christmas

Hello everyone! DTM Shanna here today with a card featuring The Rabbit Hole Design‘s new release for November, Hoggy Holidays! I love making non-traditional Christmas cards, and the presents image in this set was just perfect for a rainbow card!!  (any excuse for a rainbow right?!?)


I started by making a watercolored background for my presents by ink smooshing a rainbow of distress inks across a piece of watercolor paper.  I let the dry and then actually stenciled over it with Ranger Transparent Texture paste using the Diamond Flower stencil from TRHD.  The end result was quite pretty, but silly me ended up covering most of the stencil work with the card elements.  So here is a close up I took on my phone of the scrap so you could see how pretty the stencil work turned out.

Next I stamped out a bunch of the presents and colored them with my Zig markers, sticking to the colors of the rainbow. I lined them all up across the watercolored background in rainbow order, adhering with foam tape.


I chose a split card design for this card, die cutting 2 panels to adhere to my card base with foam tape above and below my stamped images.  The accent makes it look like the presents are *floating* in the negative space between the panels.  Kinda fun!!


Here is the full stamp set, isn't it cute??  


That wraps up my post for today, I will be back next week for another trip down The Rabbit Hole!  Until then you can find me over on my blog, Caffeinated Craftiness or over on Instagram
-Shanna


For even more inspiration, updates, and news make sure to check out these links.

Hoggy Holidays - Believe

Hello there crafty friends!  It's Cassie here on the blog for the first time and I'm sooooo excited!  I got the chance to ink up this cutie patootie pig from Hoggy Holidays and colored him in with alcohol markers.  The background was so super fun to make, because I pulled out the new Light Me Up Stencil and did a little ink blending onto some dark cardstock.  For a last bit of embellishment I used some fun Christmas sequins.


He's so fun all dressed up in his Christmas outfit, isn't he?!  He makes you want to squeal doesn't he, lol?  

Here is the process video if you'd like to watch:


Check out these stamps and more at The Rabbit Hole Designs and Simon Says Stamp!
Thanks for stopping by!
Cassie

Putting On My Hat

Hello everyone! Shanna here today with another Halloween card featuring Hex Yeah!

  
I have been bitten by the stencil bug recently, and have been playing around with different techniques and stumbled upon a fun one!  I used Distress Oxides on black cardstock for my background with the Puzzle Box stencil from The Rabbit Hole Designs.  The opaque nature of the oxides gives almost a foggy look to the colors when applied on black, and I really like how it blended out!  I used Seedless preserves, Carved Pumpkin, and Mustard Seed oxide inks in random areas over the puzzle box stencil to create my background.  For a bit of glitz, I pulled a spiderweb stencil from my stash and used to Gina K Glitz glitter gel in black for another layer of interest. 


My witch hat was a long forgotten extra I found tucked away in my fall embellishments and I couldn’t resist pairing it with the sassy sentiment from the Hex Yeah stamp set!  I heat embossed the sentiment in gold on the same black cardstock I had used for my base panel.  Last touches were a couple strips of Washi tape from my stash and I was all done.

This card came together fairly easily, and I am in love with the end result.  What is your favorite stenciling technique?  The Rabbit Hole Designs has some pretty neat stencils, if you haven’t seen them yet check them out here.

That wraps up my post for today, I will be back next week for another trip down The Rabbit Hole!  Until then you can find me over on my blog, Caffeinated Craftiness or over on Instagram!  
-Shanna

For even more inspiration, updates, and news make sure to check out these links.

Golden Boo to You

Hello TRHD fans!! Did you have fun falling down the rabbit hole this last week with our new release inspiration hop??  Aren't the new stamps just fabulous!?! Just in time for all of our Halloween and Fall crafting and card making!


I have been having so much fun coloring these stamps, but today wanted to do something that *GASP* has NO COLORING!! 
I was inspired by a background I made using Deco Foil Mettalix gel in Gold on black cardstock, and the Circles and Stars stencil.  I kept going with the black and gold theme and my card was born!


I heat embossed the sentiment and image from Boo to You in detail gold embossing powder, and fussy cut out both.  Before fussy cutting the sentiment though, I added the spider to the bottom of the "N" in Halloween and heat embossed it as well to make it look like all one stamp.  After all the fussy cutting was done (phew!) I matted my stenciled panel on top of a gold foil cardstock panel, then lastly onto a black card base.  My image and sentiment were adhered using foam tape for dimension.  I really enjoy how classic this color combo is, and it could be turned into any occasion, not just Hallloween!

Do you have a favorite color combo you like to use?? 

As always, thanks so much for stopping by! You can see more of my creations on my blog Caffeinated Craftiness, or be sure and follow my crafty adventures over on Instagram!
 See you all soon!
~Shanna

For even more inspiration, updates, and news make sure to check out these links.


Watercolor Peonies


Hey crafty friends, It's Amanda Stevens from Pear Blossom Press, back with another pair of pretty cards I made using images I colored in the last Daily Marker 30 Day Coloring Challenge. I colored and fussy cut so many images that I have a stack just waiting to be turned into cards. For today's cards, I used watercolored floral images from the Pretty in Peony set and  popped them up onto backgrounds that I stenciled with the Diamond Flower Stencil and added some splatters with the same orange paint I colored the flowers with. I added a sentiment from Sassy Sentiments to each one, and finished the cards with sequins coated with Diamond Glaze. Aren't they lovely?


I'm so excited to go meet Kathy Racoosin next month when her Coloring Challenge Road Trip brings her to Southern California! Luckily, I get to go with MaryAnn and Heather from The Rabbit Hole Designs; it's going to be a party!!!


If you're looking for more inspiration with the Pretty in Peony set, you might like this article. You can find the sister article to this post on my blog today. Hop on over for more fun! I'll be back soon with another great card to share...

Born to be a Unicorn!


Hello and welcome TRHD fans!  Shanna here today to share another fun card using one of The Rabbit Hole Designs newest releases, Sassy!

I have a soft spot for Unicorns...Fun fact: I used to collect unicorns as a child!!  I have been coloring up these Sassy unicorns like crazy!  They are addictive!


I wanted to play around with my metallic watercolors, so I created a shimmery background for my unicorn.  I love the glimmer it came out with!
To ground my image some, I pulled out the new Candy Twist stencil and some opaque matte distress paste from Ranger.  That paste gives a slight peek of background color through it, but still dries fairly white.  I just stenciled a small area on the bottom right corner, adding some interest.  
I wanted a soft look to my unicorn, so I opted for no line coloring and some muted watercolor tones using my Zig markers.  Just dreamy!
I opted to heat embossed my sentiment in gold, but embossed “unicorn” 3 times to give a really smooth and raised appearance.


This week has been full of AMAZING projects with the new release!  Have you had a moment to hop yet??  If not, there is still time!  Here are some links to get you started!


Or just visit The Rabbit Hole Designs blog and check it all out there too!!
You have until 11:59 PST TONIGHT to hop for a chance at the prizes! Good luck!!

As always, thanks so much for stopping by!  See you all soon!
~Shanna

For even more inspiration, updates, and news make sure to check out these links.

Pinky Finger Up!


Hello again my crafty friends, it's Amanda from Pear Blossom Press! Now that another of Kathy Racoosin's 30 day coloring challenges is over, I've got a stockpile of colored images all ready to be made into cards. Have you colored along for any of the challenges? The idea is simple, just color a little every day. No pressure; just practice. I love the challenges because I approach cardmaking a little differently during the run. Instead of starting with an idea for a card, picking out all of the papers and elements, and then coloring my images to coordinate, I just stamp out lots of images and color them in. Usually, I fussy cut the images with my ScanNCut so I have images ready to go. (If I don't use them right away, I will tuck the cut out pieces into the pockets with the stamp sets.) Once I have the images ready to use, I lay them out on my grid mat and play with different configurations. So instead of starting with an overall design, then decorating it, I start with the decorations and work backwards.

Often when I'm coloring, I will color images from different sets in the same colors schemes, since I already have those supplies out. This inadvertently allows stamps from different sets to work together. Hooray for happy accidents! For today's card, I pulled several watercolored images from different sets from The Rabbit Hole Designs and combined them because they were all yellow. I laid out the flowers and leaves from Pretty in Peony on my grid mat and decided I liked the Caffeinated Bee up in the top corner. To keep the images in the exact same configuration, I picked them all up with a piece of Press'n Seal, then glued the flower pieces together from the back.


I wanted to create a background for my card that would tie the elements together and also add a little pizzazz to the scene. I needed to use a color in the yellow family since the flowers and bee took up so much of the space on the card. If I introduced another color under them, it would get too busy. I opted to apply Gold Deco Foil Metallix Gel over a hexagon stencil. It gave the illusion of golden honeycombs. I only applied it where it would be mostly covered by the flowers. After the gel was dry, I stamped my sentiment from Perfectly Blended and popped the Caffeinated Bee and peonies up with foam tape. To add some of the gold shimmer to the flowers and bee, I used a gold gel pen to draw on highlights and quickly blended them out with my finger. I also added some Aqua Shimmer to the bee's wings and coffee mug. I applied a thick coat of Diamond Glaze to the bee's eyeball and mug to finish the card.

I love how this card turned out and I honestly don't think I would have ever considered using the bee and peonies together if I hadn't colored them at the same time for the coloring challenge. So what do you think? Too big of a stretch, or do you like them together? Let me know down in the comments below.

Thanks for buzzing by today. If you'd like to see more cards featuring these stamps, check out Sassy Peonies and March Release. You can also find links to the other products I used for this card in the sister article to this post on my blog. I'll be back again soon with another fun card for you... And now I'm wondering what other caffeinated critters the peonies might go with!

Mermaid Kisses


Hello again my crafty friend, it's Amanda from Pear Blossom Press. I am so happy summer is finally here. I love the long, warm days and splashing around in the pool. There are bright colors everywhere and we get to sleep in while school is out. Kelly and I have been hanging out more in the craft room; she's been busy drawing while I've been coloring along with Kathy Racoosin's #thedailymarker30day coloring challenge. In the spirit of summer, I've been coloring everything in rainbow colors.

Mermaid Hair Perfectly Blended

For today's cards, I did some masking and turned the little girl holding a shell in 
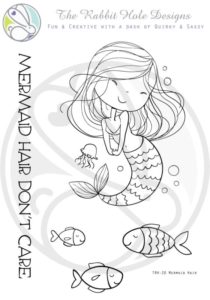
By the Shore into a mermaid. I stamped the top half of her, then stamped the bottom half of the mermaid in Mermaid Hair. It was super simple to do since they both have the same sized waists. I drew in a line to turn her dress into a bikini top and I gave her a little belly button. I considered using a mirror stamp for the tail, so they'd curl in opposite directions, but I wasn't sure I'd be able to get the lines as crisp (sometimes my mirror images end up a little fuzzy). I stamped a pair of mermaids like this. I also stamped out a bunch of fish and a pair of the whole images of the mermaid so I had two different girls (four mermaids in total). I colored them all with Arteza Real Brush pens. I knew I could cover up most of the shell in the first mermaid's hands with the hair of the other mermaid, so I chose to color the shell like it was her hair. It worked out perfectly! Once the images were all colored, I cut them out with my ScanNCut and outlined the cut edges with a black Sharpie. Then it was time to turn them into cards...

I think I've seen the Starbucks® logo so many times that the idea of combining mermaids with coffee/tea just seemed natural. I decided to put these little cuties into a large teacup, sort of like a hot tub. My ScanNCut has preset designs; one of which is a teacup and saucer set. I scaled it to 4" wide and cut out two sets. I pulled out the Perfectly Blended set for sentiments and got to work...


For the Ready to Par-Tea card, I ink blended Twisted Citron and Peacock Feathers Distress Oxide ink over a mermaid scale stencil onto one teacup and saucer. With the stencil still in place, I applied a thin coat of Vicki Boutin's Iridescent Glitter Paste. This paste is AWESOME! There are big chunks of iridescent glitter in there and it really shimmers. (You can now find it in The Rabbit Hole Designs' shop - woot, woot!) Once I removed the stencil and let the paste dry (on the paper, not the stencil; don't let it dry on the stencil), some of the chunky glitter pieces extended beyond the edges of the teacup. I just flaked those off for a cleaner look. I stamped and embossed the sentiment onto a small square, then chopped off the top corners to look like a tea bag label. I stapled on a piece of twine and tucked it into the top of the cup. I colored the tea with brown markers, then glued the cup parts together. I was going to put the girls into the cup, but I decided to put them in front of it for this card.


To pull the card together, I popped up a jade colored wonky stitched rectangle with a thin piece of fun foam onto a top folding A2 card base. I glued the cup on top of the rectangle, then popped the mermaids on top with foam tape. Since the sentiment is party themed, I decided to give them party hats. I cut out a pair of hats and quickly colored them with the same colors I used for their tails. I glued/foam taped the hats in place and added the fish to the scene. To keep the sentiment from just hanging limply, I secured it with foam tape. I used a combination of tiny rhinestones and sequins to add more sparkle to the card. To help the sequins look more like gems, I coated them with Diamond Glaze after they were glued in place. It's hard to see in the photos, but in person, the extra dimension is really cool.


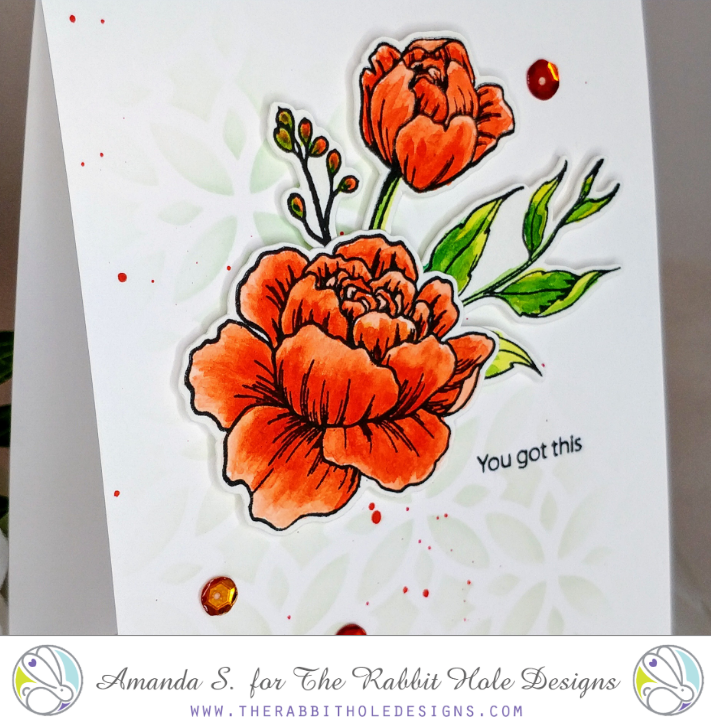
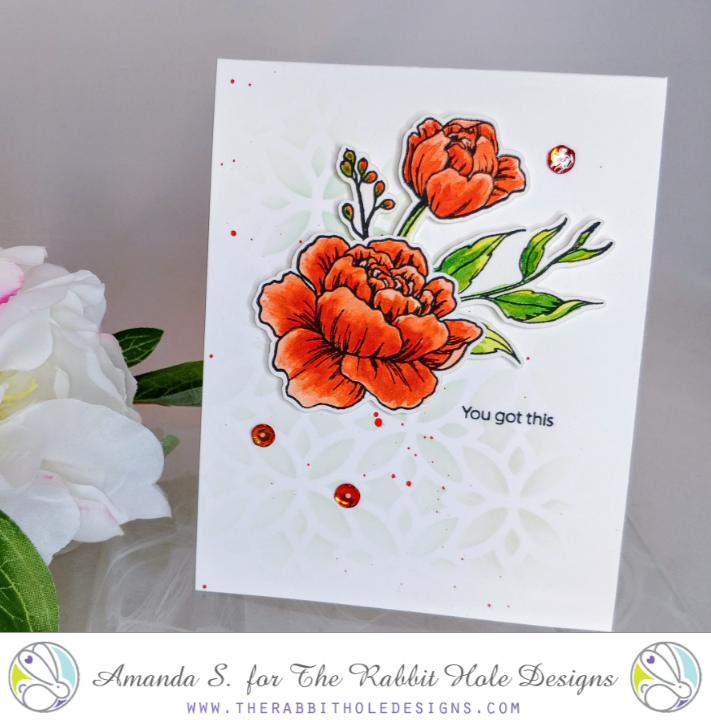
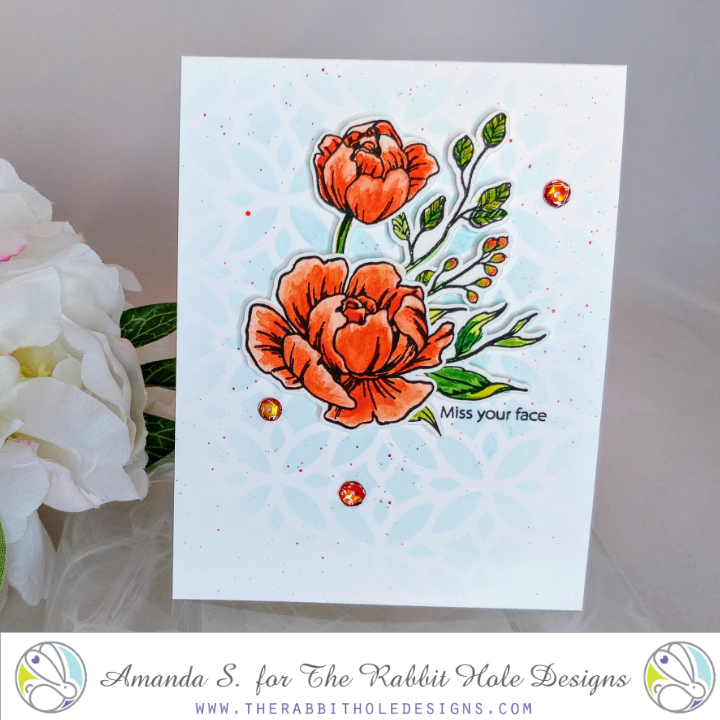
For my second card, I went with a similar design layout, but I tried a different technique for the teacup. I spread a thin layer of white texture paste over a floral stencil. I removed the stencil and let the cup and saucer dry. Once they were dry, I dropped on Coral, Orange, and Fuchsia Aqua Pigments, along with a few drops of water, and tilted them from side to side so the colors would spread and mix. This is a technique I saw in a video from Pretty Little Button and I just had to try it. I love the way the paste grabbed the colors, but if you want it to resist more and be darker in the grooves, you can add the color while the paste is still wet. To add some sparkle to my teacup, I sprayed it with Glimmer Mist. I really like the way the mist settled into the grooves and bumped up the contrast.

Once the cup was completely dry, I assembled it the same way as the first one, except I tucked the mermaids inside this time. (To be honest, so much of the tails were covered up, I didn't need to alter the girl holding the shell at all.) I chose a sentiment that says Bes-Teas for the label and added a small fish to help fill some of the extra space. I decided on a neutral grey for the background color. It helped all of the other colors pop and, even though I die cut it with a fancy scalloped rectangle, it still has a modern feel. I popped the cup and mermaids in place with foam tape (I was generous with the foam tape since the paper was fairly warped). I added the fish to the scene and this time I used red flat backed gems to finish the card.


I love these cards so much that I'm thinking about making them in different colors for different seasons. Imagine them in reds and burnt oranges for pumpkin spice season (that is an official season now, right?!)... I also had a ton of fun playing with my stencils! I've got a whole list of other techniques to try and a bunch of new pastes too! I've made space on my desk for a glass baking dish that I'll fill with water and a squirt of dish soap to pop the dirty stencils into. #planningahead

What is your favorite stenciling trick or technique? Let me know in the comments below! If you'd like to see more cards made with these stamp sets, check out Watercolor Fun for Beachy Cards. You can find the sister article to this one on my blog too. Feel free to hop on over for even more inspiration and links to the specific products I used! I'll be back soon with another fun card for you...

Happily Ever After Stenciled Rose Cards


Hi, everyone! It's Lynnea Hollendonner and I'm here with two cards using the Happily Ever After stamp set! I hope you enjoy my stenciled background and learning how to use up "leftovers" to create a second card!


How - To 

  • Stencil rose background with red and green inks and trim background to 4" x 5 1/4"
  • Color couple from the Happily Ever After stamp set. Cut out and adhere to card. 
  • Stamp sentiment with black ink from the Happily Ever After stamp set
  • Adhere background to card front with fun foam. 


How - To

  • Without cleaning the stencil from the first card - spritz the leftover ink with a mist of water. 
  • Press watercolor cardstock onto the top of the stencil. 
  • Stamp sentiment from the Happily Ever After stamp set.


Product List


For more inspiration, updates, and news make sure to check out these places


Thank you all so much for stopping by! I hope you're inspired to use up the "leftover" ink on your stencils! See you soon! 

Grateful for Family


Welcome back to the The Rabbit Hole Designs blog!
It's Lisa here with you today and I have a 
sweet card to share with you using the We Are Family stamp set.
I've been loving what the design team has been doing with this
stamp set by using both the mom and dad on a card at the same time.
I thought I'd give it a go for this card.
I'm so glad I did because they are just darling together!

I started out by making a rainbow blended background through
a fun stencil.  I used a black scalloped heart to break up the busy pattern
and to really make the colors pop.
The sentiment from the stamp set "So grateful you are my"
was almost perfect for this card but since I wanted a family
themed card, I searched through my stash of sentiment stamps
until I found the word family.  It was the perfect addition!
 I stamped it on white paper and matted it in black.
I popped the family and sentiment up on foam tape over the heart
and my sweet card was done.
I love how it came out and I hope you do too!


For more inspiration, updates, and news make sure to check out these links.

Have a great day, I already am!
❤️Lisa ❤️