Pages

Showing posts with label Valentine's day card. Show all posts

You Are a Little Quirky - Fun Little Valentine's Day Card

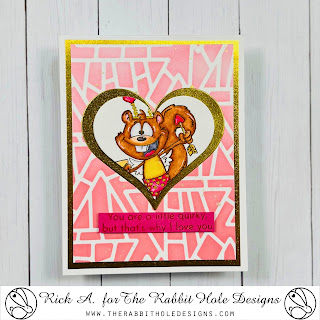
 Hello crafty friends, and welcome back to the Rabbit Hole Designs Blog; It's Rick back with you today to share a fun little Valentine's Day card that's perfect for that quirky person in your life.  For my card I used the brand new Cupid Clarence 4 x 4 Stamp Set designed by Dustin Pike for the Rabbit Hole Designs.  I also used the Triangle Mosaic 6 x 6 Stencil for the background.  

Cupid Clarence Valentine's Day Card by Rick Adkins

To add more color to the Cupid Clarence stamp set I used my alcohol markers to color him in and added some fun little gold details with a gold gel pen.  I also added some other little gold foil details as well.  But I thought the fun little gold gel pen accents to his arrow, strings on his head band, and the hearts on his boxers was a fun little touch.  So, don't forget those little details when it comes to making your projects.  Sometimes it's those little touches that takes your cards to the next level. 

Cupid Clarence Valentine's Day Card by Rick Adkins Second view


When I am designing a card I love to take one of the stencils that you normally wouldn't think of for the occasion and add it to the backgrounds of my cards.  For example here I used the Triangle Mosaic Stencil which is not your typical Valentine themed stencil.  But the geometric pattern mixed with the fun Cupid Clarence just works and adds that little whimsical touch to the card.  To finish off the card all I had to do was add a sentiment to the card on a coordinating piece of cardstock.  

I hope this post has given you a little inspiration about combining products that you normally wouldn't put together to create a fun card.  


Remember, it's all about experimentation and finding what resonates with you. And don't forget to share your creations on social media and tag The Rabbit Hole Designs to spread the card-making love.


Thanks for dropping by today I hope you have a wonderful day and that you found this post helpful. You can find all the supplies that I used on today's cards on my blog post by clicking here! 


You can find me on the following Social Media Channels with more crafty inspiration: 

Blog:  https://www.rckinsmonstudio.net/rickadkinscards

Facebook Page:  https://www.facebook.com/rickcraftycorner

YouTube:  https://www.youtube.com/@RickAdkins

TikTok:  https://www.tiktok.com/@rickadkinscardmaker

Instagram:  https://www.instagram.com/rickadkinsdesigns/


I hope that you have a crafty day.  For more inspiration, updates, and news make sure to check out these places.  


The Rabbit Hole Designs

The Rabbit Hole Designs Instagram

The Rabbit Hole Designs Facebook Page

The Rabbit Hole Designs YouTube


Have a crafty day!

Rick 

Sketched Love Bunnies


Hi everyone! It's Lauren on the blog today sharing my easy pull tab Valentine card. The sketched look of the new Je t'aime stamp set gave me the idea to create this black and white "chalk on a blackboard" looking pull card. This is an easy interactive card to make that you do not need any special tools or dies for.


I started out by stamping the bunny couple onto an A2 (5.5x4.25) black cardstock panel using white ink. Then onto white cardstock, I inked the word LOVE from the new Valentine stencil using Fired Brick then Candied Apple distress oxide inks. Using an acrylic block and the straight tines on my glass mat, I traced then cut with scissors the shape of the hidden pull panel.  


After the Love shape pull part was complete, I cut a slit on the black panel above the bunnies using a ruler and xacto knife on my cutting mat. I cut it centimeter (cm) longer than the word love. My word measured 10cm so I cut an 11cm long slit. I put a small pencil dot to mark the center of the panel (7cm mark). I then lined up the 6.5cm mark of my ruler with the pencil dot and made my 11cm long cut. I trimmed the black panel smaller so that a white border of the card base would show and fit the pull panel through the slit in the panel. 


I stamped a bunch of the hearts included in the kit all over the black panel in white. Then 2 hearts on the white pull tab using black ink.

Next, on the back of the black panel I placed double sided foam tape right under the bottom to create a stop. Also along the sides to as guides so that it slides up straight. Then I added more foam tape over the back of the panel. 


Lastly, I peeled off the foam tape backing and placed the panel onto the white card base. I hope you enjoy this simple interactive card and give it a try. Thanks for visiting! 

Lauren