Pages

Showing posts with label Birthday Card. Show all posts

Clean, Simple and Sassy!


Hello! It's Lauren today sharing my cas card that features this awesome balloon monkey image from the new Balloon Animal #1 stamp set illustrated by Dustin Pike.

You can watch me put this card together in this short video on my YT channel.


I love these fun new balloon animal images! They are so fun to color and create cards with! 

Below you will find links to the products I used. Thanks for visiting!


I use affiliate links when I can. This does not add any extra cost to you, but I do receive a small commission which helps keep me creating.
Thank you for visiting!

Balloon Animals 1 stamp set: https://shrsl.com/4mrbm

Balloon Animals #1 Die Set: https://shrsl.com/4mrbv

Rhombus Diamond Hot Foil Cover Plate: https://shrsl.com/3oeij


You can follow me here:


Birthday Twist - Interactive Pinwheel Card

Hello crafty friends!  Jenn here with a sassy and fun interactive birthday card. This one you can actually blow and spin the pinwheel! 

I am using the balloon dog image included on the Balloon Animals #1 stamp set and the coordinating die set. They are from The Rabbit Hole Designs' new August Release. These whimsical balloon animals ar illustrated by Dustin Pike.  I paired it up with the Candy Twist stencil, Balloon Animals #2 stamp set and the Everyday Sentiments stamp set.

Supply List 

Supplies from my stash
Pastel pink, blue and green ink
Red cardstock (for balloon dog)
Mylar or light weight paper for the pinwheel 
Long brad for the pinwheel 

Here are the photo steps to make the Pinwheel from a 2 3/4" square piece of lightweight paper
By adding the small cardstock square with a piece of double sided adhesive tape facing away form the pinwheel, you have created a spacer between the pinwheel and the card.  This allows the pinwheel to spin when you blow on it even after you stick it to the project.

Thank you, I appreciate you taking time from your day to stop by and check out today’s The Rabbit Hole Design project.  I hope you are inspired to create something lovely today!


Be Creative ~ Stay Inspired

Jenn Gross


Follow me, Journey Coach Jenn, on 

Instagram - https://www.instagram.com/journeycoachjenn/

YouTube - http://www.youtube.com/c/JourneyCoachJenn

Blog - https://journeycoachjenn.blogspot.com/  


For more inspiration, updates, and news make sure to check out these places


The Rabbit Hole Designs

The Rabbit Hole Designs Instagram

The Rabbit Hole Designs Facebook Page

The Rabbit Hole Designs Pinterest

The Rabbit Hole Designs YouTube

Sparkle and Shine! It's your Birthday!


Hello crafty friends!  Jenn here with a fun and sparkly Birthday card!   I wanted to try stenciling on a piece of fine glitter cardstock.  I thought it would be interesting to see the sparkle through the stenciled colors.

I am using The Rabbit Hole Designs' new Paisley Bandana 2 Layer stencil paired with the Happy Scripty Word and Shadow Layer dies, the Birthday Scripty Word with Shadow Layer die, and the Matte White Enamel Dots.  I created a frame using the You've Been Framed dies.  
On a piece of 6"x6" snow white glitterstock from my stash, I am use the Cottontail Blending Brushes with Distress Oxide inks randomly stenciled with Cracked Pistachio, Dusty Concord and Picked Raspberry with the Layer #2 stencil. I let it dry for five minutes and then positioned the Layer #1 stencil and randomly inked it with Rusty Hinge and Uncharted Mariner. I am pleased with the results!
I ink blended the same ink colors on a piece of 5 1/2" x 4 1/4" white cardstock.  I added flecks of white gold watercolor and red gold watercolor to the ink blended panel. While it dried, I die cut Happy and Birthday twice from white cardstock  and glued the 2 layers together. I die cut the Happy and Birthday from the ink blended panel making sure to use all the ink blended color bands. I glued the ink blended words to the white layers.
I cut the 6"x 6" stenciled glitterstock to a 5 1/4" x 4 " card front. I nested and die cut the small and medium frames (from the You've Been Framed dies) and cut them from white cardstock. I centered and glued the frame to the card front.  I positioned the Happy Birthday sentiment in the frame and glued it into place. Using the Bitty Blending Brushes, I colored the Matte White Enamel Dots with the Distress Oxide inks.  After letting them dry, I added the colored Enamel Dots to the card front and attached it to an A2 green cardbase.
TRHD Supplies

Other Supplies (from my stash)
White Glitterstock
Gansai Tambi - Stary Night Gold watercolors
Distress Oxide inks in: Cracked Pistachio, Dusty Concord  Picked Raspberry, Rusty Hinge and Uncharted Mariner

Thank you for taking time to check out this fun and sparkly Birthday card!  I had a lot of fun creating it.  You can follow me on social media @journeycoachjenn
I hope you are inspired to create something lovely today!

Be Creative ~ Stay Inspired

Jenn Gross


Follow me, Journey Coach Jenn, on 

Instagram - https://www.instagram.com/journeycoachjenn/

YouTube - http://www.youtube.com/c/JourneyCoachJenn

Blog - https://journeycoachjenn.blogspot.com/  


For more inspiration, updates, and news make sure to check out these places


The Rabbit Hole Designs

The Rabbit Hole Designs Instagram

The Rabbit Hole Designs Facebook Page

The Rabbit Hole Designs Pinterest

The Rabbit Hole Designs YouTube


Make a Wish - a new interactive birthday card surprise!

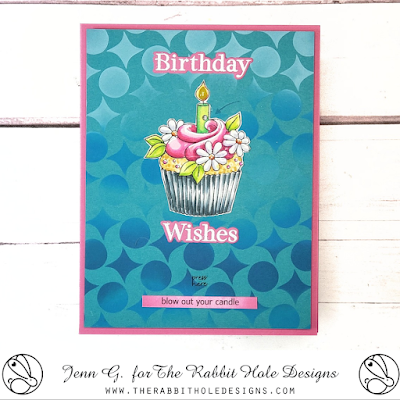
How crafty friends, Jenn here with an bright and cheery interactive birthday card featuring The Rabbit Hole Designs'  Pinwheel stencil and Sentimentaly Speaking stamp set with coordinating dies both from the June Release. I paired it with the Cupcake image from the Year 4 Birthday stamp set.

TRHD Supply List
Year 4 Birthday stamp set 

Other Supplies
Candle Light Pear Blossom Press 
World's Best Foam Tape 
Zero Centered Ruler 
OLO Markers
Distress Oxide inks 
White Embossing Powder
Using the Cottontail Blending Brushes I blended the Pinwheel  background on a piece of 4" x 5 1/4 Oceanside cardstock using Salvaged Patina, Salty Ocean, and Uncharted Mariner Distress Oxide inks.  I am using the new Candle Light interactive blow-out candle by Pear Blossom Press to create the interactive component.  The cupcake image is colored with OLO Markers. The sentiment is created by treating a piece of Sweet Pea cardstock with the Cottontail Embossing Powder Tool. The sentiment is the word Birthday and Wishes is heat embossed with white embossing powder and then die cut with the coordinating dies.
I positioned the cupcake image and Candle Light on the card front to locate the placement. I use a no-photo blue pencil to mark important areas, 1) where the candle flame will light up and 2) the hole needed for the action to blow out the candle flame. I glued the cupcake  onto the card front with liquid glue. I created a die placement template by die cutting the top 1/2 of the small flame (from the PB Press Stamp & Die set) onto a small piece of scrap cardstock This template helps to position the tiny flame die in place. I secure the die with low tack tape and die cut the flame.
 I punched a small hole in the right side of the candle for the small activator to turn off the light. Turning the card front over to the backside, I glue a small piece of yellow vellum over the flame. I lined up the candle light and created a double thick foam channel to slide the light into position. I removed the release paper and cover the channel with a piece of cardstock.  This channel allows the candle to slide into position and helps guide the air you blow at the candle light to extinguish the candle flame.
I framed out the card with The World's Best Foam Tape. I also creating a door opening in the pink card base allowing you to change the battery if needed.  I use a zero centered ruler and the blue pencil to mark the location for the hidden door. 
After die cutting the hidden door, I removed the release paper from the foam tape and centered the card front onto the card base.  I folded a small bit of washi tape over the bottom flap of the door for easy battery changing access.
I stamped the words "press here" in black ink over the candle''s on button.  I typed and printed out the sentiment "blow out your candle". It is ink blended it in pink ink and glued to the card front.

Make sure to visit my Instagram - @journeycoachjenn to see this card in action!

Thank you for stopping by to check out this fun Rabbit Hole Designs interactive blow out candle Birthday card. I hope you are inspired to create something lovely today!

Be Creative ~ Stay Inspired

Jenn Gross


Follow me, Journey Coach Jenn, on 

Instagram - https://www.instagram.com/journeycoachjenn/

YouTube - http://www.youtube.com/c/JourneyCoachJenn

Blog - https://journeycoachjenn.blogspot.com/  


For more inspiration, updates, and news make sure to check out these places


The Rabbit Hole Designs

The Rabbit Hole Designs Instagram

The Rabbit Hole Designs Facebook Page

The Rabbit Hole Designs Pinterest

The Rabbit Hole Designs YouTube


Birthday Twist Card - Sentimentally Speaking Stamp set


Hello crafty friends! Welcome to today's blog featuring The Rabbit Hole Designs New Paisley Bandana 2 Layer stencil paired with the Sentimentaly Speaking stamp set with coordinating dies. I had a funny little crafty mishap when I was creating this card and took a photo of it to share with you.  It was a good laugh out loud moment.

The new Sentimentally Speaking stamp set with coordinatind dies is a card makers "must have"! The set contains 14 everyday sentiments and the coordianting dies frame them beautifully.  This set has quickly become one of my favorites!  I am using the Happy Birthday stamp and matching die for today's Birthday twist card.

I used  Creamsicle, Watermelon and Wildberry inks to stencil the first layer, stencil #1, of the Paisley Bandana stencil. For second layer, stencil #2, I used Grasshopper, Eucalyptus and Rainforest inks.

A - I decided to stamp the main sentiment Happy Birthday in a dark purple ink in the middle of the card using the Stampwheel. Keeping the sentiment in place on the stamping platfoem, I cleaned it off the ink and  I rotated the stamp platform counter clockwise one notch. I masked off the word Birthday and injked only the word Happy in Wildberry ink to stamp it four times rotating the stamp platform one notch  to stamp the sentiment four times the around the top of the card.

B & C - You can see I accidentally inked the wrong side of the stamp platform.  Oooops no stamp there, it was on the other side.  That was a great laugh and easily fixed by whiping off the ink and flipping over the platform to try again. 

I cleaned off the stamp and rotated the stamping platform to place the sentiment one notch rotation below the main Happy Birthday sentiment.  I masked off the Happy portion of the word while inking only the word Birthday. This is stamped in Rainforest ink four times rotating the stamping platform clockwise one additional notch rotation each time.  

D -  I was not excited about the look of the main dark purple Happy Birthday sentiment so I pivoted.  I die cut the purple sentiment out of the card front.   I lined up the card front over an A2 card base and   re-stamped the sentiment with Rainforest ink on a light peach A2 card base.  The card front is attached using adhesive foam squares and the Happy Birthday sentiment show as a recessed sentiment.  A much better results in my opinion.
Supply List 

Thank you, I appreciate you taking time from your day to stop by and check out today’s The Rabbit Hole Design project.  I hope you are inspired to create something lovely today!


Be Creative ~ Stay Inspired

Jenn Gross


Follow me, Journey Coach Jenn, on 

Instagram - https://www.instagram.com/journeycoachjenn/

YouTube - http://www.youtube.com/c/JourneyCoachJenn

Blog - https://journeycoachjenn.blogspot.com/  


For more inspiration, updates, and news make sure to check out these places


The Rabbit Hole Designs

The Rabbit Hole Designs Instagram

The Rabbit Hole Designs Facebook Page

The Rabbit Hole Designs Pinterest

The Rabbit Hole Designs YouTube


Quick Springtime Birthday Card

Hello crafty friends, it's Rick back with you again this week to share a springtime birthday card with you.  This card actually came together super easy.  Especially with the help of the Deco Flower 6 x 6 Layering Stencil Bundle from The Rabbit Hole Designs.   If you have not seen this cute set of stencil and the floral background that it creates you are missing out. 


The Deco Flower 6 - Layering Stencil Bundle comes with the six layering stencil to create the floral background pattern that you see on my card today.  But it also comes with a coordinating die to cute out one of the flowers.  You can actually cut out any of the flowers from the design using this one die.  Which opens up the possibilities for so many more projects.  


Each stencil is numbered and it's actually more easy to line them up than you may think.  I made about four different backgrounds in about an hour.  And could have made more if I didn't have to come in to cook dinner.  I cut this panel down to a 3 3/4" x 5" and popped it onto a mat layer cut from black cardstock (cut at 4" x 5 1/4") and attached it to a standard A2 size card base.  


To finish off my design I stamped the Happy Birthday sentiment from the Mindful Magnolia Stamp Set onto a piece of white cardstock in black ink.  I trimmed down the sentiment into a smaller strip and matted it with a layer of black cardstock before attaching it to the center of my card.  Then all I had to do was add a few of the Matte White Enamel Dots sprinkled around the card.  

And there you have it, how I made this super quick springtime birthday card.  I hope that you give this new stencil a try.  I do have one piece of advice to share with you.  I did find it much easier to ink up using the Bitty Bunny Blending Brushes instead of the larger Cottontail Blending Brushes, just because of their size.  I would highly recommend pick up a few of them when you order this stencil bundle.  You can thank me later.  

Happy Crafting 

Rick 

Yappy Birthday! - The Rabbit Hole Designs 5 Year Celebration!


Hello my crafty friend!  Hope your new year is off wonderful start. The Rabbit Hole Designs is celebrating 5 years, Happy Birthday!


Let's get this pawty started and take a closer look at how I created this card!
I started with a piece of 4" x 5 1/4" premium coloring cardtock.  I stamped the image of the dog with balloons in the center using a stamp positioner.  I stamped a second image on a piece of Masking Magic. This is a reusable delicate tack adhesive backed paper used to block of areas on a project. You can either fussy cut the mask image or die cut it using the coordinating dies. I placed over the stamped image on the cardfront.  

I used a low tack sticky mat under the card front to hold it while I ink blended the background with pink and purple Distress Oxide inks.  I placed the Mid-Century Modern #2 layering stencil, the starburst layer, over the top of the ink blended card front.  It is a 6x6 stencil and grips to the sticky mat over the A2 card front.  For this technique you can use a damp baby wipe or damp paper towel to daub over the starburst openings.  Daubing the slightly damp cloth will lift off some of the ink color on the blended background.  When you remove the stencil, you will see the starburst shapes show up lighter on the background.
I moved the card front from the sticky mat to a splatter box and a proceeded to add splatters of white ink using a paint brush and slightly diluted white liquid ink.
I pealed off the Masking Magic and colored the birthday balloon dog image with OLO Alcohol Markers.
I die cut the Happy, Birthday, and You Scripty Word and Shadow Layer dies from pale pink cardstock. I used the "Y" from You to replace the "H" in Happy making it read "Yappy Birthday" for the sentiment. I glued the sentiment into place and added Clear Sparkle Enamel Dots to the front of the card.  The finished card front is attached to an light pink A2 card base.

The Rabbit Hole Designs Products

Thank you, I appreciate you taking time from your day to stop by to celebrate 5 year with The Rabbit Hole Designs.  I hope you are inspired to create something lovely today!


Be Creative ~ Stay Inspired

Jenn Gross


Follow me, Journey Coach Jenn, on 

Instagram - https://www.instagram.com/journeycoachjenn/

YouTube - http://www.youtube.com/c/JourneyCoachJenn

Blog - http://www.journeycoachjenn.com/


For more inspiration, updates, and news make sure to check out these places


The Rabbit Hole Designs

The Rabbit Hole Designs Instagram

The Rabbit Hole Designs Facebook Page

The Rabbit Hole Designs Pinterest

The Rabbit Hole Designs YouTube

A Look Back at 2023 - Fun Holiday Birthday Card

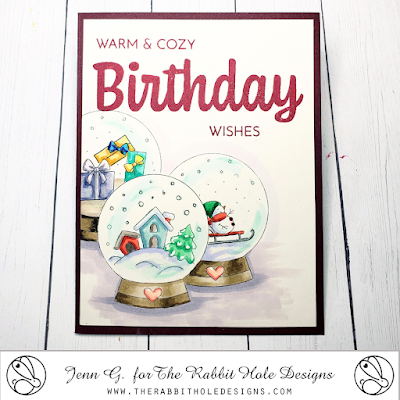
Hello there crafty friends! We are looking back at a sweet winter birthday card create this past summer using two stamps sets from The Rabbit Hole Designs - Christmas In July Release from 2023.

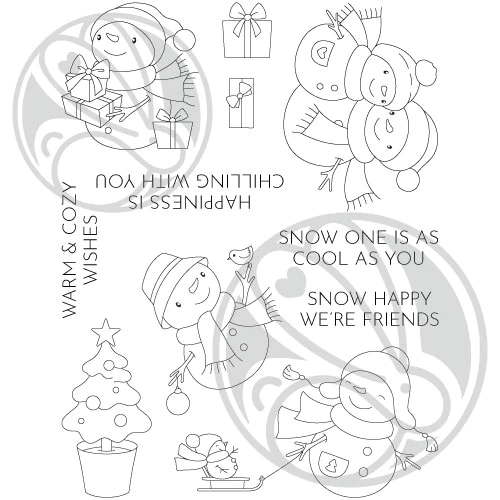
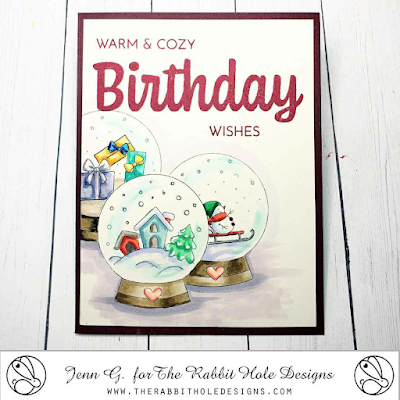
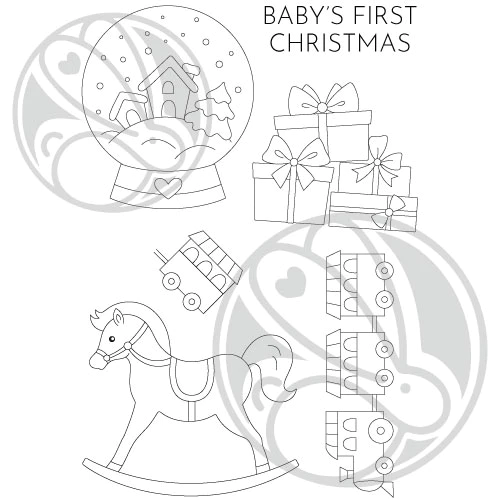
The Rabbit Hole Designs Baby's 1st Birthday stamp set, Warm & Cozy stamp set, and Birthday Scripty stamp set were combined to create this A2 Snowglobe Birthday Wishes card.

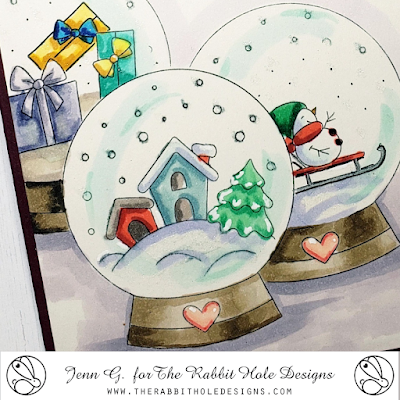
I stamped the snowglobe image on a 4" x 5 1/4" piece of coloring cardstock and masking it off.  I stamped the snowglobe two more times masking the middle of these two globes.  I added the sledding snowman image to the partial snowglobe on the right and the gifts to the partial snowglobe on the left.
I colored each of the snowglobe images and added shading using OLO Markers. A sparkle pen is used to add glitter to the snowglobes.
I positioned and stamped the sentiment in red ink and glued the card front to a dark red A2 card base.


Thank you for stopping by check out today's look back at one of my 2023 The Rabbit Hole Designs card.  I hope you are inspired to create something lovely today!

Be Creative ~ Stay Inspired

Jenn Gross


Follow me, Journey Coach Jenn, on 

Instagram - https://www.instagram.com/journeycoachjenn/

YouTube - http://www.youtube.com/c/JourneyCoachJenn

Blog - http://www.journeycoachjenn.com/


For more inspiration, updates, and news make sure to check out these places


The Rabbit Hole Designs

The Rabbit Hole Designs Instagram

The Rabbit Hole Designs Facebook Page

The Rabbit Hole Designs Pinterest

The Rabbit Hole Designs YouTube 

Snowglobe Birthday Wishes


Hello there crafty friends!  Thank you for stopping by to check out today's fun snowglobe birthday card!

This card is created with two stamps sets from The Rabbit Hole Designs new Christmas In July Release and inspired by the Craft Roulette weekly card challenge. The card needed to includes these parameters:
1) Type of Card - a Birthday card 
2) Colors - picnic colors (red and white)
3) Theme -  a collection (3 snow globes)
4) Random - black dots (snowman buttons)

I am using The Rabbit Hole Designs Baby's 1st Birthday stamp set, Warm & Cozy stamp set, and Birthday Scripty stamp set for this A2 Snowglobe Birthday Wishes card.

I stamped the snowglobe image on a 4" x 5 1/4" piece of coloring cardstock and masking it off.  I stamped the snowglobe two more times masking the middle of these two globes.  I added the sledding snowman image to the partial snowglobe on the right and the gifts to the partial snowglobe on the left.
I colored each of the snowglobe images and added shading using OLO Markers. A sparkle pen is used to add glitter to the snowglobes.
I positioned and stamped the sentiment in red ink and glued the card front to a dark red A2 card base.
 
The Rabbit Hole Designs Products 

Thank you for stopping by The Rabbit Hole Designs Blog to check out today's card.  I hope you are inspired to create something lovely today!

Be Creative ~ Stay Inspired

Jenn Gross


Follow me, Journey Coach Jenn, on 

Instagram - https://www.instagram.com/journeycoachjenn/

YouTube - http://www.youtube.com/c/JourneyCoachJenn

Blog - http://www.journeycoachjenn.com/


For more inspiration, updates, and news make sure to check out these places


The Rabbit Hole Designs

The Rabbit Hole Designs Instagram

The Rabbit Hole Designs Facebook Page

The Rabbit Hole Designs Pinterest

The Rabbit Hole Designs YouTube