Pages

Showing posts with label Tatsiana Zayat. Show all posts

Versatility on Your Stamps


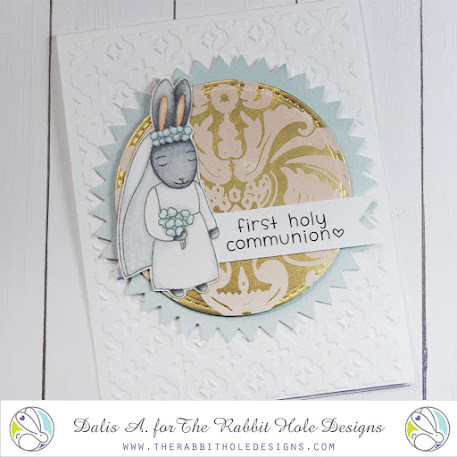
Looking at your stamps in a different way is always the best part of getting a new stamp set. The "Happily Ever After" is a sweet wedding stamp set, but what else can it be? If you mask the groom bunny out of the picture you get this adorable girl bunny that is perfect for a First Holy Communion card. What else do you see when you look at the Happily Ever After couple? Maybe a PROM card, if you mask the veil of the bride? 
After coloring the bunny with alcohol markers, I decided to create the golden backdrop with some stickers to convey the idea of the osties. The embossed folder used even though does not have a cross image, it does bring an idea of a cross, helping bring the theme and the card all together.


For more inspiration, updates, and news make sure to check out these places:

Living the Sweet Life

Hello my fellow creatives!  Welcome to today's The Rabbit Hole Designs' blog.  My creation is featuring the new Bunny Mac stamp set paired with the Scooped 3 Layer stencil.  I am only using the scoop stencil and I rotate it 180° to create the green looking Macaron background.

The Bunny Mac image is by artist, Tatsiana Zayats. It is colored with Copic markers. The background is stenciled in the Twisted Citron Distress Oxide ink.

 The card front is cut the corners are rounded. It is added to an A2 pink card base, also with rounded corners.

The Rabbit Hole Designs Products Used


Thank you for hopping over to see today's blog. I hope you have a very sweet day!

Be Creative ~ Stay Inspired

Jenn Gross


Follow me, Journey Coach Jenn, on 

Instagram - https://www.instagram.com/journeycoachjenn/

YouTube - http://www.youtube.com/c/JourneyCoachJenn

Blog - http://www.journeycoachjenn.com/


For more inspiration, updates, and news make sure to check out these places


The Rabbit Hole Designs

The Rabbit Hole Designs Instagram

The Rabbit Hole Designs Facebook Page

The Rabbit Hole Designs Pinterest

The Rabbit Hole Designs YouTube


Looking back at a Butterfly Kiss

Hello my crafty friends!  I hope you had a relaxing holiday with family and friends.  Today I am revisiting another of my favorite cards from 2021.  I created this Whisper - i love you... card for The Rabbit Hole Designs' June 2021 Release.  

When I saw this sweet bunny image (illustrated by Tatsiana Zayat), I knew I wanted him laying in the grass to whisper to this butterfly. You can re-visit my May 24th blog here.
Thank you for stopping by and revisiting The Rabbit Hole Designs Brand Ambassadors' favorite creations of 2021.  Wishing you a very crafty 2022!

Creative ~ Stay Inspired

Jenn Gross


Follow me, Journey Coach Jenn, on 

Instagram - https://www.instagram.com/journeycoachjenn/ 

YouTube - http://www.youtube.com/c/JourneyCoachJenn

Blog - http://www.journeycoachjenn.com/ 


For more inspiration, updates, and news make sure to check out these places


The Rabbit Hole Designs

The Rabbit Hole Designs Instagram

The Rabbit Hole Designs Facebook Page

The Rabbit Hole Designs Pinterest

The Rabbit Hole Designs YouTube


Sparkling Warm Wishes!

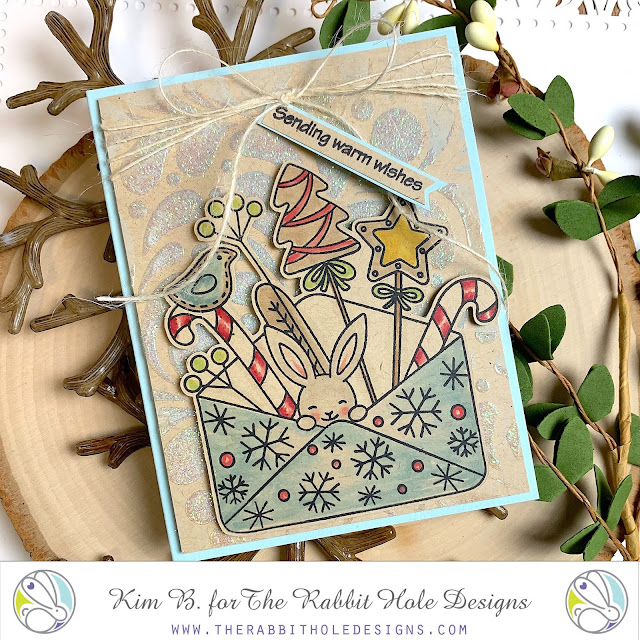
Hello crafty friends! Kimberly here and I am so smitten with the new release "Hoppy Holidays" illustrated by Tatsiana! Isn't this bunny the sweetest?


To make this card, I blended Speckled Egg distress oxide through the Splish Splash stencil on Kraft cardstock. Then, without lifting it, I spread glitter paste through the stencil over the distress ink. Next, I put it to the side to dry. 

While I waited for the glitter paste to dry, I stamped the image from the "Hoppy Holidays" stamp set on Kraft cardstock, colored it in with Copic markers and fussy cut it out. Then, I stamped the sentiment on a strip of Kraft cardstock. I cut a flag in one end and layered it on a piece of blue cardstock. 

Once the glitter paste dried, I wrapped twine around the card and tied a bow. I popped the stenciled background up on foam tape and added it to a blue card base. To finish the card, I popped the image up on foam tape, attached it to the card and tucked the sentiment under the bow.  

Thank you so much for stopping by! Check out more awesome products in The Rabbit Hole Designs shop! I hope I have inspired you to create something today!!

Kimberly

Joyful Greetings!


Hello! I just cannot get enough of this sweet image from the Hoppy Holidays stamp set. It is so darn cute and fun to color.

For this card, I heat embossed and water colored my image. I started out by stamping my image onto water color paper using an embossing ink pad. I then covered my image with silver embossing powder and heat set it. 

I then colored the whole image using water color brush markers.


Once my image had died completely, I die cut it out using a dotted oval die from my stash. 

Then I added my sentiment under the envelope. I stamped it with the embossing ink and heat set silver embossing powder on top.

I chose a pretty patterned holiday paper that coordinated with my image. Then I trimmed it to 4.25 x 5.5 ( A2 Sized) and adhered it to an A2 card base. I then adhered my oval water colored image onto the card.

To finish off the card, I added some self adhesive silver embellishments to each corner of the card and 3 tiny ones on the oval.

I hope my card inspires you to work on some Christmas in July cards to get a jump on the holidays. Thanks for visiting!


For more inspiration, updates, and news make sure to check out these places:


Here's the link to the Hoppy Holidays stamp set: Hoppy Holidays 4x6 – The Rabbit Hole Designs


.


Making Merry! a Layered Holiday Card

Hello my crafty friends and welcome to today's The Rabbit Hole Design blog.  I am sharing this multi-layered card.  The moose image, an illustration by Tatsiana Zayats, is from the July Release Merry Christmoose-Moosemas stamp set and dies.  I have paired it up with the Candy Twist dies.
I stamped the Moose in a Peaches and Cream Ink, colored it with Copic alcohol markers, and die cut the image out.  I die cut three Candy Twist shapes from a 110lb white cardstock.  I glued the three Candy Twist shaped vertically in a row on a piece of 4"x 5 1/4" white 110lb cardstock.  I cut a 3/8" thick cardstock frame from a 4 1/8" x 5 3/8" piece of white cardstock.  I added the frame over the candy twist cardstock with Double Sided Adhesive Foam Tape.  I stamped the sentiment "Wishing you a Merry Christmoose" in black ink and cut it as a strip.  This is attached to th lower front of the frame.  I added adhesive foam squares behind the Moose image and attached it to the middle of the frame.  The completed cards front is attached to a red A2 card base.


I hope you enjoyed the Making Merry card featuring the Merry Christmoose-Moosemas stamp set. Please feel free to leave a comment or ask a question.


Be Creative ~ Stay Inspired

Jenn Gross


Follow me, Journey Coach Jenn, on 

Instagram - https://www.instagram.com/journeycoachjenn/

YouTube - http://www.youtube.com/c/JourneyCoachJenn

Blog - http://www.journeycoachjenn.com/


For more inspiration, updates, and news make sure to check out these places


The Rabbit Hole Designs

The Rabbit Hole Designs Instagram

The Rabbit Hole Designs Facebook Page

The Rabbit Hole Designs Pinterest

The Rabbit Hole Designs YouTube