Pages

Showing posts with label Shanna Slater. Show all posts

Baaaaad Decisions

Hello Rabbit Hole Designs Fans!! DTM Shanna here today with my final post as a design team member for The Rabbit Hole Designs..  I appreciate the opportunity both Heather and MaryAnn gave me, and all of the encouraging and inspirational teamies I got to play along side throughout this journey!  It has been an unforgettable experience, Thank You!


Today I am sharing a card featuring the hilariously grumpy Caffeinated Goat.  If you have yet to notice, my favorite coloring medium here lately has been my Zig Real Brush pens, and this goat was an absolute joy to color!!  I paired it with a background I made using the Spell It stencil!!  Baaaaaad Goat!!


I chose a slimline card size, using some dies in my stash for the card base.  Masking off the letters on the stencil, I worked right to left to keep my spacing accurate.  I added the sentiment from the Caffeinated Goat directly under my stenciled lettering.  My Goat was then fussy cut and adhered using some foam tape to the left side of the card base.  
Final touches included a smattering of sequins for a bit of texture and shine!


Well folks, that wraps up my post....
 You will still be able to find me over on my blog, Caffeinated Craftiness or over on Instagram


Real life Caffeinated Goat!!!!  


It's been fun, keep on crafting friends!!
~Shanna
For even more inspiration, updates, and news make sure to check out these links.

Puff and a Cuppa Coffee

Hello Rabbit Hole Designs Fans!! DTM Shanna here with another fun card using my newest favorite Caffeinated Critter, Caffeinated Dragon!  
I was playing around with my Zigs again, and had a lot of fun making a green dragon.....pairing it with a background I made using the Spell It stencil!!  You know you are singing the song with me right now!!


To add some sparkle and detail to my critter, I used Liquid Pixie Dust, from Inkon3, to paint oval-scales on the body of the dragon.  This was my first time intentionally painting with the pixie dust, and oh my goodness will I be doing it again!  Subtle-sparkly-texture-goodness!!! 


Lastly, I added a sentiment banner using a sassy sentiment from the Perfectly Blended sentiment set.  Dragons are old right? So of course they drank coffee before it was cool!!  (or so my 10 year old says!!!)


What is your go-to supply for sparkle??  I am enamored with the Liquid Pixie Dust right now, but have used many things in the past.  
 
That wraps up my post for today, I will be back for another trip down The Rabbit Hole next week!  Until then you can find me over on my blog, Caffeinated Craftiness or over on Instagram
***BONUS*** I have a speed coloring video with me coloring this dragon over on my FB page and IGTV channel!!  Take a peek, I will be sharing it in the fan group as well!
-Shanna

For even more inspiration, updates, and news make sure to check out these links.

My Magical Elixir


Hello Rabbit Hole Designs Fans!! DTM Shanna here today with another caffeinated card featuring my new favorite Caffeinated Critter, Caffeinated Dragon!  
I can't seem to stop coloring this guy!  He is so fun to color up in ANY color combo!  I have 2 cards here today that I watercolored with my Zig Real Brush pens. 


My first card was colored in dark, rich jewel tones for a fun and dramatic effect.  I added extra scaly-esque detailing to the belly and underside for a bit of texture.  The background was watercolored onto an A2 panel of cold press watercolor paper using my Jane Davenport pan watercolors.  Such vibrant colors! LOVE!


My second card I flipped from cool-tones to warm-tones and reached for my oranges and reds.  I still added some scaly type texture, but chose more of a diamond shape to repeat this time. 


I think I love this one even more, which is hard for me to say!  The background was watercolored similarly to the first card's...but I first masked off stripes to create a patterned paper.


Which one is your favorite!?!  Any color combo you want me to do next??  I will ask in the Facebook group, and be sure to let me know!  


That wraps up my post for today, I will be back soon for another trip down The Rabbit Hole!  Until then you can find me over on my blog, Caffeinated Craftiness or over on Instagram-Shanna

For even more inspiration, updates, and news make sure to check out these links.

Orange ya Glad its your Birthday??

Knock Knock!!
Who's there?
Orange!
Orange who?????
Orange ya glad....... 
LOL!

Hello Rabbit Hole Designs Fans!! DTM Shanna here today with a cheery and ORANGE card using the Celebrate with Cake stamp set and Twisted Sunshine stencil!  I will definitely be sticking to card making, and leave the jokes for the comedians though!!
Something about the color orange just makes my heart happy.  It never fails to brighten my day (pun intended!)!  I decided to go nearly monochromatic with this card and am in love with the end result!


I started by stenciling the Twisted Sunshine stencil using distress oxides and a blending brush.  I kept the center darker, and worked outwards to a lighter shade.  
Next I stamped and colored the cake with my Nuvo alcohol markers.  I glitzed up the flowers a bit with some orange Stickles from my stash.  It needed a little bit of sparkle!!  The cake was glazed as well with Diamond glaze over the frosting.  Once everything was dry, I adhered it to the stenciled card panel with foam tape.


Lastly I added my sentiment to the card base in black ink.  The sentiment made me giggle and it is from the Sassy Birthday 2 stamp set.  I mounted the entire card panel onto a A2 orange card (you saw that coming, right?!?)  and the card was finished!

That wraps up my post for today, I will be back soon for another trip down The Rabbit Hole!  Until then you can find me over on my blog, Caffeinated Craftiness or over on Instagram-Shanna


For even more inspiration, updates, and news make sure to check out these links.

It's an elegant Celebration!

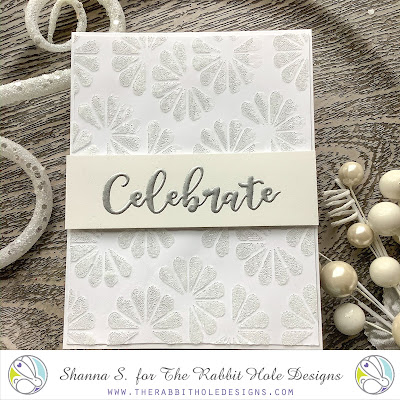
Hello Rabbit Hole Designs Fans!! DTM Shanna here today a clean and simple celebration card using the Celebrate with Cake stamp set and Twisted Sunshine stencil!  


For this card, I opened for a very clean look with white on white with a touch of silver for the sentiment.  I used a micro glass bead gel over the Twisted Sunshine stencil on white cardstock to create my background.  While that was drying, I heat embossed the "celebrate" sentiment in sterling.  I actually heat embossed over the sentiment a total of 3 times, layering more embossing powder for a thicker, smoother finish.


I popped the sentiment onto the card using foam tape and I had a elegant Celebrate card fit for many occasions.  Wedding, baby shower/gender reveals, job promotions....the list goes on!  Celebrate with Cake can be used for SO much more than birthdays!!  


That wraps up my post for today, I will be back soon for another trip down The Rabbit Hole!  Until then you can find me over on my blog, Caffeinated Craftiness or over on Instagram-Shanna


For even more inspiration, updates, and news make sure to check out these links.

Doggone treats!

Hello Rabbit Hole Designs Fans!! DTM Shanna here today with a fur-baby treat bag for your favorite pup!  I loved creating these simple treat bags filled with Milk Bones and embellished using the Doggone stamp set!  


I got some 4x6 cello bags from Amazon, and made a topper to staple onto the top, easiest thing ever and SO customizable! 
I cut my base cardstock (happened to be wintery patterned paper from my stash) at 4.25" x 6" and scored at 3" on the long side.  I freehand cut the gray polka dot down the middle of a rectangle to create 2 hills with one single cut, NO WASTE!  I adhered those onto the patterned paper, and matted then mounted it to the scored base.


The dogs and the little icons from the Doggone set I stamped onto a gray kraft cardstock and then die cut into a circle and then adhered to the topper.  

There are a ton of different sentiments you can choose to place, or just go simple and stamp "WOOF".  

To finish it off, I folded the topper along the scored line and stapled it directly to the top of the treat bag after folding it down a bit to seal.  All done!

Do you make fur-baby treats?? 


That wraps up my post for today, I will be back soon for another trip down The Rabbit Hole!  Until then you can find me over on my blog, Caffeinated Craftiness or over on Instagram-Shanna


For even more inspiration, updates, and news make sure to check out these links.

Chocolate Understands

Hello Rabbit Hole Designs Fans!! DTM Shanna here today with a card matched up with a sweet treat! This card features the new  Square Illusions stencil paired with the tried and true Sassy Sentiments!


I started by stenciling the Square Illusions stencil onto a A2 size card panel.  I used Distress Oxide ink in Wilted Violet, Peacock Feathers, and Twisted Citron with blender brush to create a to ink blend over the stencil.
My sentiment is from the Sassy Sentiments stamp set, and was stamped in black ink onto a die cut fishtail banner.  I used the banner to hold a Ghiradelli chocolate square onto the card front.  Sweet treat and a card!!
This card would work for birthdays, Valentine's Day, Easter.....all the things!!  Because, when is chocolate the wrong answer?!?


That wraps up my post for today, I will be back soon for another trip down The Rabbit Hole!  Until then you can find me over on my blog, Caffeinated Craftiness or over on Instagram-Shanna


For even more inspiration, updates, and news make sure to check out these links.
The Rabbit Hole Designs
 The Rabbit Hole Designs Instagram 
The Rabbit Hole Designs Facebook Page
The Rabbit Hole Designs Pinterest
The Rabbit Hole Designs YouTube


Love in the Winter

Hello everyone! DTM Shanna here today with a card featuring The Rabbit Hole Design‘s new release for December, Love You More--Heart Dance! This couple is adorably in love, and I had a lot of fun making a wintery scene for them!


I started by ink blending my card panel with Distress Oxides in Milled Lavender and Dusty Rose.  Sooo pretty and pastel, totally not my normal palette!  Next I used the Light Me Up stencil to add snowflakes to the background. I used VersaMark ink and smooshed the pad over the stencil, then heat embossed in a platinum pearl embossing powder.  The end result was just dreamy!!  My sentiment was borrowed from the Love You More--Christmas Frost stamp set, which also happens to feature our favorite couple!!


I am in full Christmas Card and Tag making mode in my crafty space...what's on your table!?!

That wraps up my post for today, I will be back next week for another trip down The Rabbit Hole!  Until then you can find me over on my blog, Caffeinated Craftiness or over on Instagram
-Shanna


For even more inspiration, updates, and news make sure to check out these links.


Deck the Halls!

Hello everyone! DTM Shanna here today with a card featuring The Rabbit Hole Design‘s new release for November, Christmas Frost! Christmas cards are always a favorite to make, and this card was no exception.


I started by taking a couple scraps of christmassy-paper (I like making up my own adjectives!)( and tearing one before layering them and die cutting my panel.  Next I used DecoFoil Metallix gold gel to stencil snowflakes from the Light Me Up stencil all across the background.  

While the background was drying, I stamped and colored the tree decorating couple from the Love you More--Christmas Frost stamp set.  They were watercolored with my Zig real brush markers. They were mounted with foam tape to the background for a bit of dimension.


My sentiment came from the same stamp set, and was matted in black cardstock and then added to the panel with foam tape too.  The panel was mounted to a teal card panel to bring out the color of the tree a bit more.  


Here is the full stamp set, isn't it cute??


That wraps up my post for today, I will be back next week for another trip down The Rabbit Hole!  Until then you can find me over on my blog, Caffeinated Craftiness or over on Instagram
-Shanna


For even more inspiration, updates, and news make sure to check out these links.

All I want for Christmas

Hello everyone! DTM Shanna here today with a card featuring The Rabbit Hole Design‘s new release for November, Hoggy Holidays! I love making non-traditional Christmas cards, and the presents image in this set was just perfect for a rainbow card!!  (any excuse for a rainbow right?!?)


I started by making a watercolored background for my presents by ink smooshing a rainbow of distress inks across a piece of watercolor paper.  I let the dry and then actually stenciled over it with Ranger Transparent Texture paste using the Diamond Flower stencil from TRHD.  The end result was quite pretty, but silly me ended up covering most of the stencil work with the card elements.  So here is a close up I took on my phone of the scrap so you could see how pretty the stencil work turned out.

Next I stamped out a bunch of the presents and colored them with my Zig markers, sticking to the colors of the rainbow. I lined them all up across the watercolored background in rainbow order, adhering with foam tape.


I chose a split card design for this card, die cutting 2 panels to adhere to my card base with foam tape above and below my stamped images.  The accent makes it look like the presents are *floating* in the negative space between the panels.  Kinda fun!!


Here is the full stamp set, isn't it cute??  


That wraps up my post for today, I will be back next week for another trip down The Rabbit Hole!  Until then you can find me over on my blog, Caffeinated Craftiness or over on Instagram
-Shanna


For even more inspiration, updates, and news make sure to check out these links.

Whoooo Needs Coffee???


Hello & welcome!!

I have always loved Owls, and the Caffeinated Owl is one of my favorite critters! I started my card by masking off a 2-ish inch section on my card base and ink blended some distress oxides in a nice fall palette. I watercolored the owl using my Zig markers. Isn't he cute and under-caffeinated?? There is a coordinating die that can be used to cut him out, but I used my scan n' cut. Then the card was easily finished by mounting the owl with some foam tape and it was done!!

I am so excited for you to accompany us as we join up with the Coffee Loving Cardmakers for their Fall/Winter Coffee Lovers Blog Hop. I am joining in as part of The Rabbit Hole Designs. This is our second time joining them and we are happy to announce we are Super Sponsors for this event. For the duration of the Coffee Lovers Blog Hop, The Rabbit Hole Designs will be offering specials ...


SPECIALS WE ARE OFFERING FOR THE DURATION OF THE HOP: 15% off everything in the Caffeinated section of the shop.
Use Code: FallBrew
You can shop for all of the Caffeinated Critters HERE


Make sure you come back tomorrow to see Charmaine sharing more Caffeinated Critters. Make sure you also head over to CLC Fall/Winter Blog Hop to link up to win some awesome prizes. The hop goes through November 8th.


That wraps up my post for today, I will be back next week for another trip down The Rabbit Hole!  Until then you can find me over on my blog, Caffeinated Craftiness or over on Instagram
-Shanna


For even more inspiration, updates, and news make sure to check out these links.


This is My Costume!

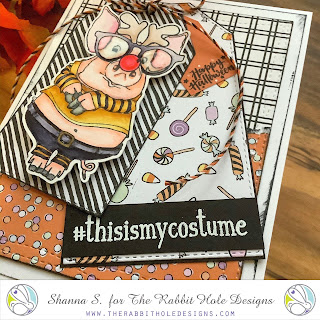
Hello everyone! DTM Shanna here today with a card featuring The Rabbit Hole Design‘s new release for November, Hoggy Holidays! With today being Halloween, I just couldn't bring myself to make a Christmas card!!  Sooooo....who else loves a piggy dressed up for halloween in a Rudolph mask??  LOL


My card design actually used a lot of pattern paper scraps from a 6x6 pad I had in my stash. I inked all the edges in black ink to help tie everything in together.  My Pig was colored using my Zig Real Brush Markers and fussy cut out.  I popped him up with foam tape on top of the tag to add some dimension. Extra touches included adding glossy accents to the lenses of the glasses to make them more  “realistic”!


My sentiment came from the Pumpkin Hair Don't Care stamp set.  It was the perfect sentiment to turn my *Christmas* stamp into something for Halloween!!  


Here is the full stamp set, isn't it cute??  


That wraps up my post for today, I will be back next week for another trip down The Rabbit Hole!  Until then you can find me over on my blog, Caffeinated Craftiness or over on Instagram
-Shanna


For even more inspiration, updates, and news make sure to check out these links.

A dose of Reali-tea


Hello everyone! DTM Shanna here today with a card featuring The Rabbit Hole Design‘s New Release for October, Caffeinated Reindeer! All of them new caffeinated critters are so flipping fun to play with, you will want to check them all out here, if you haven’t already.

Moving on to my card for today... I had a lot of fun watercoloring my reindeer, and then was *puzzled* by what to do for a backgound.  Puzzled you say?  My perfect solution was found with TRHD’s Puzzle Box stencil!  I used Nuvo expanding mousse, but chose not to heat set it so it retained more of the metallic finish.  The stencil was applied over a Barn Door distress oxide ink blended card panel. The red and green came together for a fun Christmassy background I think!


I added a bit of interest by die cutting a circle from some metallic gold printed vellum and stamped the caffeine symbol from the stamp set all over it.  The sentiment is from the Perfectly Blended sentiment stamp set, and was stamped on a banner die cut and water colored to match.


Have you started making Christmas cards yet?
That wraps up my post for today, I will be back next week for another trip down The Rabbit Hole!  Until then you can find me over on my blog, Caffeinated Craftiness or over on Instagram!
-Shanna
For even more inspiration, updates, and news make sure to check out these links.
The Rabbit Hole DesignsThe Rabbit Hole Designs InstagramThe Rabbit Hole Designs Facebook PageThe Rabbit Hole Designs PinterestThe Rabbit Hole Designs YouTube

Putting On My Hat

Hello everyone! Shanna here today with another Halloween card featuring Hex Yeah!

  
I have been bitten by the stencil bug recently, and have been playing around with different techniques and stumbled upon a fun one!  I used Distress Oxides on black cardstock for my background with the Puzzle Box stencil from The Rabbit Hole Designs.  The opaque nature of the oxides gives almost a foggy look to the colors when applied on black, and I really like how it blended out!  I used Seedless preserves, Carved Pumpkin, and Mustard Seed oxide inks in random areas over the puzzle box stencil to create my background.  For a bit of glitz, I pulled a spiderweb stencil from my stash and used to Gina K Glitz glitter gel in black for another layer of interest. 


My witch hat was a long forgotten extra I found tucked away in my fall embellishments and I couldn’t resist pairing it with the sassy sentiment from the Hex Yeah stamp set!  I heat embossed the sentiment in gold on the same black cardstock I had used for my base panel.  Last touches were a couple strips of Washi tape from my stash and I was all done.

This card came together fairly easily, and I am in love with the end result.  What is your favorite stenciling technique?  The Rabbit Hole Designs has some pretty neat stencils, if you haven’t seen them yet check them out here.

That wraps up my post for today, I will be back next week for another trip down The Rabbit Hole!  Until then you can find me over on my blog, Caffeinated Craftiness or over on Instagram!  
-Shanna

For even more inspiration, updates, and news make sure to check out these links.