Pages

Showing posts with label christmas in july. Show all posts

Such a Cool Friend! - A look back a Warm & Cozy stamp set


Today we are taking a look back to July 2023 and revisiting this cool card.

Hello crafty friend!  I hope you are keeping cozy during The Rabbit Hole Designs Christmas in July Release.

Today I am on The Rabbit Hole Designs blog with these two flakes friends.  They are keeping it cool and stylish with their colorful hats and scarves.  I am using the Warm and Cozy stamp set and coordinating die set. I used a retired candy twist stencil from my stash for the backgroundin the oval.

I stamped the snowmen in a light pink ink on coloring cardstock and colored them with soft blue, yellow green, and red OLO Markers. I stamped the sentiment at the bottom of the oval and popped up the snowman image with adhesive foam tape.  The background layer is a 4" x 5 1/4" Christmas red cardstock with flecks of white gold water color to make a snowy background. I rounded the four corners of both the red card front and the white A2 card base and glued them together.  I added the oval layer with images on top to complete the card.

The Rabbit Hole Designs Products

Thank you, I appreciate you taking time from your day to stop by and check out these two cool friends on The Rabbit Hole Designs Blog. I hope you are inspired to create something lovely today! 


Be Creative ~ Stay Inspired

Jenn Gross


Follow me, Journey Coach Jenn, on 

Instagram - https://www.instagram.com/journeycoachjenn/

YouTube - http://www.youtube.com/c/JourneyCoachJenn

Blog - http://www.journeycoachjenn.com/


For more inspiration, updates, and news make sure to check out these places


The Rabbit Hole Designs

The Rabbit Hole Designs Instagram

The Rabbit Hole Designs Facebook Page

The Rabbit Hole Designs Pinterest

The Rabbit Hole Designs YouTube

Such a Cool Friend!

Hello crafty friend!  I hope you are keeping cozy during The Rabbit Hole Designs Christmas in July Release.

Today I am on The Rabbit Hole Designs blog with these two flakes friends.  They are keeping it cool and stylish with their colorful hats and scarves.  I am using the Warm and Cozy stamp set and coordinating die set. I used a retired candy twist stencil from my stash for the backgroundin the oval.
I stamped the snowmen in a light pink ink on coloring cardstock and colored them with soft blue, yellow green, and red OLO Markers. I stamped the sentiment at the bottom of the oval and popped up the snowman image with adhesive foam tape.  The background layer is a 4" x 5 1/4" Christmas red cardstock with flecks of white gold water color to make a snowy background. I rounded the four corners of both the red card front and the white A2 card base and glued them together.  I added the oval layer with images on top to complete the card.

The Rabbit Hole Designs Products

Thank you, I appreciate you taking time from your day to stop by and check out these two cool friends on The Rabbit Hole Designs Blog. I hope you are inspired to create something lovely today! 


Be Creative ~ Stay Inspired

Jenn Gross


Follow me, Journey Coach Jenn, on 

Instagram - https://www.instagram.com/journeycoachjenn/

YouTube - http://www.youtube.com/c/JourneyCoachJenn

Blog - http://www.journeycoachjenn.com/


For more inspiration, updates, and news make sure to check out these places


The Rabbit Hole Designs

The Rabbit Hole Designs Instagram

The Rabbit Hole Designs Facebook Page

The Rabbit Hole Designs Pinterest

The Rabbit Hole Designs YouTube


No Peeking! - Holiday card

Hello my crafty friends! Thank you for stopping by The Rabbit Hole Designs blog.  Happy Christmas in July!  Today I am sharing this easy sweet card with the bunny who just cannot seem to keep out of the presents.  So much for  "No Peeking!", right?

The Bunny Christmas stamp set is a large 6"x 8" set. It is illustrated by Tatsiana Zayats. There are three holiday bunny images and a variety of sentiments.  I have paired it up the present image with this up with one of the Retro Christmas 6x6 paper backgrounds. 

I cut the Retro Christmas paper to 4" x 5 1/4" to use as the background. To tone down the background and allow the focus to be on the image, I cut a piece of vellum to 5" x 5 1/4".  I folded and wrapped 1/2" of the vellum around both sides of the 4" background and glued the folded edges to the back side.
I stamped and colored the bunny image with colored pencils and attached it o the vellum. I treated a piece of red cardstock with the Cottontial Embossing Powder Tool and stamped the sentiment Merry Christmas with VersaMark watermark ink.  I heat embossing it with black embossing powder and cut it to a 4"x 3/4" strip and glued it over the image.  I attached the  car front to an A2 white card base.

The Rabbit Hole Designs Products

Thank you, I appreciate you taking time from your day to stop by and check out The Rabbit Hole Designs New Release Blog. I hope you are inspired to create something lovely today! 


Be Creative ~ Stay Inspired

Jenn Gross


Follow me, Journey Coach Jenn, on 

Instagram - https://www.instagram.com/journeycoachjenn/

YouTube - http://www.youtube.com/c/JourneyCoachJenn

Blog - http://www.journeycoachjenn.com/


For more inspiration, updates, and news make sure to check out these places


The Rabbit Hole Designs

The Rabbit Hole Designs Instagram

The Rabbit Hole Designs Facebook Page

The Rabbit Hole Designs Pinterest

The Rabbit Hole Designs YouTube


CAS Watercolored Holly Card - Christmas in July with The Rabbit Hole Designs


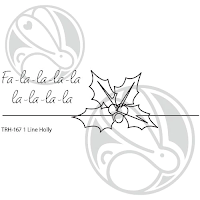
Hello my crafty friends!  I am sharing this simple watercolored card using The Rabbit Hole Designs' Line Holly stamps set from the Chrismas in July release and it is illustrated by Tatsiana Zayats. 
I die cut a piece of  white cardstock to an A2 card front size using a deckle edged die from my stash.
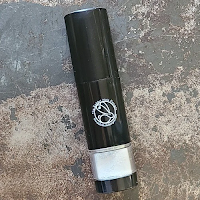
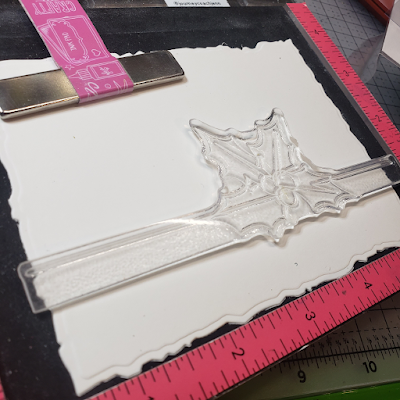
I prepped the card front using the Cottontail Embossing Powder Tool and placed it into my MISTI stamp positioning tool. I stamped the Line Holly with VersaMark Clear Watermark ink.
I heat embossed the image in clear embossing powder to create a resist of the image.
I used some of the handmade watercolor shift paints in my stash to color the image of the holly leaves and the berries.
I cut the Fa la la la la / la la la la sentiment in half to break it up over the length of the card. This can be achieved by masking off part of the stamp as well.  I glued a few holiday gems to the card front and mounted it to a green A2 card base to complete the card.  And there youi have it, another easy peasy clean and simple holiday card.

The Rabbit Hole Designs Products

Thank you, I appreciate you taking time from your day to stop by and check out  this clean and simple holiday card featuring The Rabbit Hole Designs new Line Holly stamp set.  I hope you are inspired to create something lovely today! 


Be Creative ~ Stay Inspired

Jenn Gross


Follow me, Journey Coach Jenn, on 

Instagram - https://www.instagram.com/journeycoachjenn/

YouTube - http://www.youtube.com/c/JourneyCoachJenn

Blog - http://www.journeycoachjenn.com/


For more inspiration, updates, and news make sure to check out these places


The Rabbit Hole Designs

The Rabbit Hole Designs Instagram

The Rabbit Hole Designs Facebook Page

The Rabbit Hole Designs Pinterest

The Rabbit Hole Designs YouTube

Time to Get the Tree! - The Rabbit Hole Designs Christmas in July


Hello my crafty friends! Thanks for stopping by The Rabbit Hole Designs blog.  We continue Christmas in July with this fun and festive A2 cards.  It features the new Bunny Christmas stamp set.  

This is a large 6x8 stamp set illustrated by Tatsiana Zayats.  It includes three nice size holiday bunny images.  I choose the image of the bunnies taking their Christmas tree home. There are also a variety of sentiments, making this holiday stamp sets one to use for nearly all your holiday greetings!  The Bunny Christmas stamp set also has the Bunny Christmas coordinating die set

I colored the image (the bunny family bringing home their Christmas tree) with Triblend alcohol markers, cut it out and set it aside.  I used the Mid Century Modern #2 4 Layer stencil with Bitty Blrnding Brushes to create the background.  On a piece of 4" x 5 1/4" piece of white cardstock, I stenciled the starburst layer with Poppy ink, the largest circle layer is stenciled in Auqa Sky ink,and the small circle layer is in Eggplant ink.  

To mute the background colors, I cut a piece of heat resistant vellum to 4" x 5 1/4" and stamped the sentiment Jolly Holly Days to you and yours with VersaMark Watermark ink and heat set the sentiment with black embossing powder.  I added small dots of liquid glue to the top of the small purple stenciled circles on the stenciled background.  I positioned the heat embossed vellum sentiment piece over the top and let the glue set.  I added the Christmas Tree Bunny image to the card front using adhesive foam squares.  The card front is mounted to a white A2 card base, completing the holiday card.

The Rabbit Hole Designs Products Used 


Thank you for taking time from your day to stop by. I hope you enjoyed learning how to create this fun holiday card, may it inspire you to create something lovely today!


Be Creative ~ Stay Inspired

Jenn Gross


Follow me, Journey Coach Jenn, on 

Instagram - https://www.instagram.com/journeycoachjenn/

YouTube - http://www.youtube.com/c/JourneyCoachJenn

Blog - http://www.journeycoachjenn.com/


For more inspiration, updates, and news make sure to check out these places


The Rabbit Hole Designs

The Rabbit Hole Designs Instagram

The Rabbit Hole Designs Facebook Page

The Rabbit Hole Designs Pinterest

The Rabbit Hole Designs YouTube

Sparkling Warm Wishes!

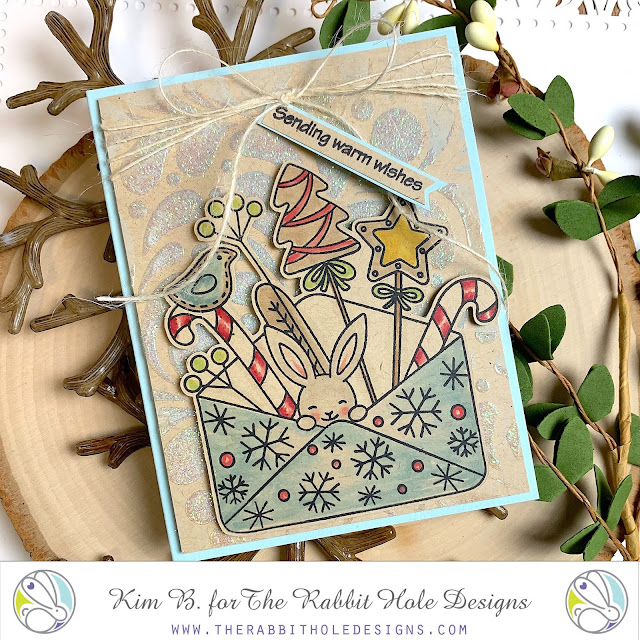
Hello crafty friends! Kimberly here and I am so smitten with the new release "Hoppy Holidays" illustrated by Tatsiana! Isn't this bunny the sweetest?


To make this card, I blended Speckled Egg distress oxide through the Splish Splash stencil on Kraft cardstock. Then, without lifting it, I spread glitter paste through the stencil over the distress ink. Next, I put it to the side to dry. 

While I waited for the glitter paste to dry, I stamped the image from the "Hoppy Holidays" stamp set on Kraft cardstock, colored it in with Copic markers and fussy cut it out. Then, I stamped the sentiment on a strip of Kraft cardstock. I cut a flag in one end and layered it on a piece of blue cardstock. 

Once the glitter paste dried, I wrapped twine around the card and tied a bow. I popped the stenciled background up on foam tape and added it to a blue card base. To finish the card, I popped the image up on foam tape, attached it to the card and tucked the sentiment under the bow.  

Thank you so much for stopping by! Check out more awesome products in The Rabbit Hole Designs shop! I hope I have inspired you to create something today!!

Kimberly

Joyful Greetings!


Hello! I just cannot get enough of this sweet image from the Hoppy Holidays stamp set. It is so darn cute and fun to color.

For this card, I heat embossed and water colored my image. I started out by stamping my image onto water color paper using an embossing ink pad. I then covered my image with silver embossing powder and heat set it. 

I then colored the whole image using water color brush markers.


Once my image had died completely, I die cut it out using a dotted oval die from my stash. 

Then I added my sentiment under the envelope. I stamped it with the embossing ink and heat set silver embossing powder on top.

I chose a pretty patterned holiday paper that coordinated with my image. Then I trimmed it to 4.25 x 5.5 ( A2 Sized) and adhered it to an A2 card base. I then adhered my oval water colored image onto the card.

To finish off the card, I added some self adhesive silver embellishments to each corner of the card and 3 tiny ones on the oval.

I hope my card inspires you to work on some Christmas in July cards to get a jump on the holidays. Thanks for visiting!


For more inspiration, updates, and news make sure to check out these places:


Here's the link to the Hoppy Holidays stamp set: Hoppy Holidays 4x6 – The Rabbit Hole Designs


.


Wishing you a Merry Christmoose!

Hello crafty friends!!! I love this new The Rabbit Hole designs Christmoose-Moosemas set illustrated by Tatsiana!!! How sweet are these adorable birds that are adorning this festive moose's antlers???!!??? I had so much fun creating with this set this month.


I started out by stamping the snowflake stamp from the Christmoose-Moosemas set all over my white panel with embossing ink. I heat embossed white embossing powder over the ink. Then, I ink blended Twisted Citron Oxide ink and Tumbled Glass Oxide ink through my Splish Splash stencil over the embossed snowflakes. I used a tissue to wipe any excess ink off the snowflakes. Next, I stamped, colored  and cut out the Moose image and glued it to the white stenciled background. 

To finish the card, I stamped the sentiment on a white strip, layered it on a green strip of cardstock and adhered it with foam tape. Then, layered my card front on a green card base. 

Thank you for stopping by! I hope I inspired you to create something today!!
Kimberly
 

Santa's Favorite Cookie


Hello! Lauren here with a cute Christmas in July card featuring the new Christmas Sweets stamp set. I love all the different things you can do with this set. My card has a plate of cookies for Santa! I think he's had a bite!

I started out this card by stamping the dove cookie using no line/fade out ink onto white cardstock. I then colored them up using colored pencils. After I had colored them, I fussy cut them out.

I then created a plate by die cutting a circle using a circle die from my stash. I then created a shadow of the rim on the inside of the plate by tracing around the border of a smaller die. I also die cut 2 smaller circles and adhered them to the bottom of the plate. This will raise the plate off the card base. Then I adhered the cookies onto the plate. I tore one of the cookies and added "crumbs" from the part I tore off. 


Next, I picked out a Christmas patterned paper and trimmed it to 4.25 x 5.5" and then adhered it to a top folding 4.25 x 5.5" (A2 sized) card base. 

Then, I die cut out a stitched banner using a die from my stash and stamped my sentiment on it in black ink.

I adhered the plate of cookies, the sentiment banner, and the last cookie onto the card base to complete the card. 

This card reminds me of our tradition of putting treats out for Santa every Christmas Eve. So magical to come downstairs Christmas morning and find he has enjoyed his snack! I hope you enjoyed this card and it gives you some inspiration to try your own Christmas cookie card. 

For more inspiration, updates, and news make sure to check out these awesome places! 


Thank you so much for stopping by!


July 2021 Inspiration Hop - Day 2

Hello and welcome to Day 2 of the Inspiration Hop. We are so excited for you to join us as we present to you our July release. Our fabulous Design Team will be sharing their projects over the next couple days, so be sure to visit their blogs and leave them some crafty love.

 The 4 new stamps sets, and 3 die sets are all available to purchase right now in the shop.

The new stamp set being highlighted today is ...

Hoppy Holidays 4x6 Stamp Set

Make Sure you stop back tomorrow for our last day of our inspiration hop.

Here is the line up for the hop:

_________________

**Giveaway**

To celebrate the July release, The Rabbit Hole Designs is giving away two savings vouchers; one to a lucky Instagram follower and one to a lucky Fan Page follower.  Winner will be chosen at random from the comments left on the INSTAGRAM post, and tagging friends, and also from commenting on the Fan Page post.  So make sure to head on over to INSTAGRAM and look for the giveaway post @therabbitholedesignsllc and look for the post at
by 11:59 p.m. PST 07-01-2021. 
Winner will be announced on The Rabbit Hole Designs blog 07-02-2021.

This is the graphic you are looking for on our IG and FB

__________________

For more inspiration, updates, and news make sure to check out these awesome places! 


Thank you so much for stopping by today!

July 2021 Inspiration Hop - Day 1

Hello and welcome to Day 1 of the Inspiration Hop. We are so excited for you to join us as we present to you our July release. Our fabulous Design Team will be sharing their projects over the next few days, so be sure to visit their blogs and leave them some crafty love.


 The 4 new stamps sets and 3 new dies are all available to purchase right now in the shop.


The two new stamp sets being highlighted today are ...


 Christmoose- Moosemas 4x6 Stamp Set


Make Sure you stop back tomorrow for Day 2 of our inspiration hop.


Here is the line up for the hop:

__________________


**Giveaway**


To celebrate the July release, The Rabbit Hole Designs is giving away two savings vouchers; one to a lucky Instagram follower and one to a lucky Fan Page follower.  Winner will be chosen at random from the comments left on the INSTAGRAM post, and tagging friends, and also from commenting on the Fan Page post.  So make sure to head on over to INSTAGRAM and look for the giveaway post @therabbitholedesignsllc and look for the post at The Rabbit Hole Designs Fan Page
by 11:59 p.m. PST 07-01-2021. 
Winner will be announced on The Rabbit Hole Designs blog 07-02-2021.

This is the graphic you are looking for on our IG and FB

___________________


For more inspiration, updates, and news make sure to check out these awesome places! 


Thank you so much for stopping by today!