Pages

Showing posts with label Jenn Gross. Show all posts

Bright and Joyful Christmas Tree


Hello my crafty friends, Jenn here with a Bright and Joyful Christmas tree card featuring The Rabbit Hole Designs Warm and Cozy stamp set (illustrated by Agota Pop). I wanted to create and easy card, but som,ething that is a little bit elegant too. I hope you enjoy this twist on a traditional Christmas card.

Supply List

Other supplies (from your stash)
Paint brushes
Metalic watercolors
Bearly Arts Craft Glue
White ink
VersaMark Watermark ink
Gold Embossing Powder
Let's take a look at this simple step tutorial:
A - Use either a Bitty Blending Brush or Cottontail Blending Brush with white ink to stencil the Candy Twist stencil design in an oval shape in the center of a piece of 4' x 5 1/4" black cardstock

B - Use a paint bush and gold watercolor to add gold splatters the card front and set it aside to dry

C & D - Use the white ink and lightly stamp the Christmas tree image (from the Warm and Cozy stamp set) onto a piece of black coloring cardstock.  Watercolor the image with green, gold, red, and brown metalic and/or shift watercolors
E - Fussy cut or die cut the colored Christmas tree 

F -  Use the Cottontail Embossing Powder Tool to treat a piece of black cardstock. Stamp the Merry Christmas sentiment (from the Poinsettia and Pinecone stamp set) with VersaMark Watermark ink.  Dust it with gold embossing powder and heat set the sentiment. Use the coordinating dies to die cut the sentiment

G & H - Glue the stenciled card front on a green A2 cardbase.  Use adhesive foam squares to attach the painted Christmas tree to the center of the stenciled Candy Twist oval. Glue on the Merry Christmas sentiment above and below the tree as shown
Thank you for taking time  to visit today's blog and check out this Bright and Joyful Christmas Tree card created with The Rabbit Hole Designs' Warm and Cozy stamp set, Poinsettia and Pinecone stamp and die set, and Candy Twist stencil. I hope you are inspired to create something lovely today!

Be Creative ~ Stay Inspired

Jenn Gross


Follow me, Journey Coach Jenn, on 

Instagram - https://www.instagram.com/journeycoachjenn/

YouTube - http://www.youtube.com/c/JourneyCoachJenn

Blog - https://journeycoachjenn.blogspot.com


Deer Santa... Sweet Cookie Card


Hello crafty friends,  Jenn here with sweet treat of a card for you using The Rabbit Hole Designs' 1 Line Reindeer stamp set and making them into cookies for Santa.  I also added a sentiment from the Bunny Christmas stamp and die set.

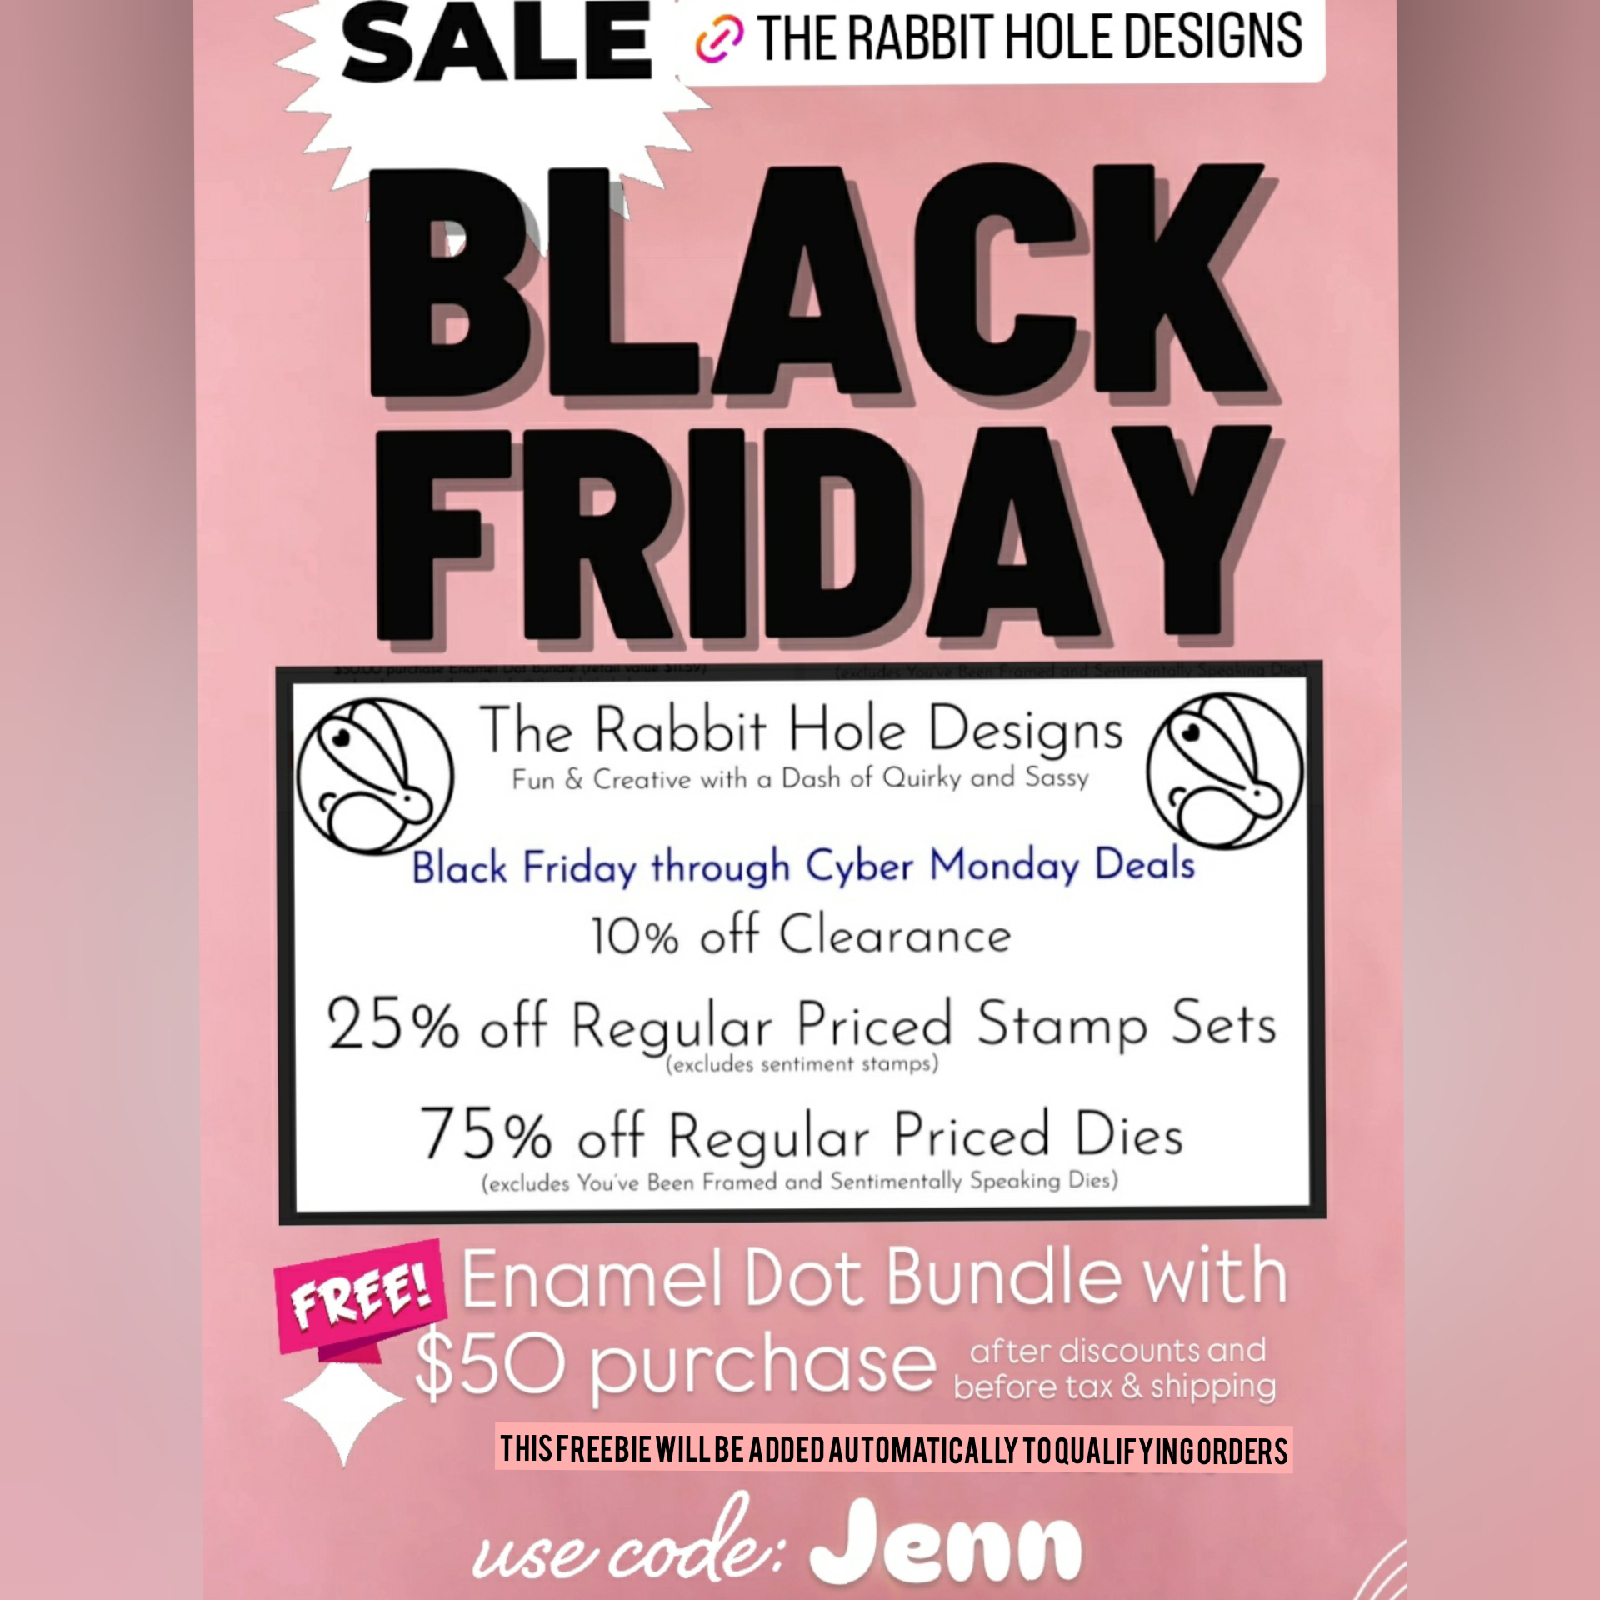
Make sure to take advantage of the BLACK FRIDAY and CYBER MONDAY sales at The Rabbit Hole Designs!  
Sales are from 11/27/2024 through 12/02/2024 11:59pm PST  (No Codes Needed)
Use Code Jenn at check out to share you saw this sale on today's blog!
Let's take a look at this easy step tutorial:
A & B - I stamped out the 1 Line Reindeer using brown ink on light brown cardstock and colored three of them with OLO Markers

C & D - I die cut three 2 1/2" circles from kraft cardstock and shaded the edges using a Bitty Blending Brush and Gathered Twigs Distress Oxide ink to look like a baked cookies
E & F - I die cut three 2 1/4" white cardstock circles to use as frosting on the cookies.  I softly recut the edges to give it a slight wave for more of a hand-iced  look.  I added shadowing with OLO Markers BV2.0 and BV2.2   I fussy cut the reindeer heads and glued them down on the white frosting circles.  I glued these on top of each cookie

G - To create the cookie plate, I die cut a 5" circle with a 4" circle centered inside from a piece of double sided winter printed cardstock in my stash

H - The circle card base is die cut from a piece of folded kraft cardstock and a 5 1/4" circle leaving 1 1/4" of the fold intact as shown in the photo
I & J -  I opened up the circle card base and glued the outer plate circle centering it on one side of the card base.  I truned over the middle circle for the plate and glued it to the center

K - I glued one cookie to the plate and attached the second cookie with adhesive foam squares.  The third cookie has a  bite taken out of it.  I uses a circle die form my stash that has a zig zag decorating the edge and die cut a bit out of the third cookie.  The bitten cookie is attached to the card  with two layers of foam tape.

L - I stamped out the Jolly Holly-Days to you using a sentiment from the Bunny Christmas stamp and die bundle.  I cut out the sentiment and added it above the cookies on the plate to complete the Deer Santa cookie card.

Supply List

Other Supplies (from your stash)
OLO Markers
Gathered Twig Distress Oxide
Circle Nesting Dies

Be sure to check out The Rabbit Hole Designs for the BLACK FRIDAY Specials
Use the code Jenn at check out to let us know you saw this post!

Thank you, I appreciate you taking time from your day to stop by and check out today's blog featuring The Rabbit Hole Designs stamps and dies. I hope you are inspired to create something lovely today!

Be Creative ~ Stay Inspired
Jenn Gross

Follow me, Journey Coach Jenn, on 
Instagram - https://www.instagram.com/journeycoachjenn/
YouTube - http://www.youtube.com/c/JourneyCoachJenn
Blog - https://journeycoachjenn.blogspot.com

For more inspiration, updates, and news make sure to check out these places 

Strolling Down Memory Lane - Christmas Gifts - with The Rabbit Hole Designs Warm & Cozy stamp set


Hello crafty friends are you ready to take a stroll down memory lane?  Today we are taking a look back at one of my favorite simple cards created for The Rabbit Hole Designs. You see a neutral gray tone winter background paired with this colorful snowman created for last years World Card Making Day 2023.  Let's revisit this clean and simple winter card:

Wishing you a very Happy World Cardmaking Day! Thank you for stopping by to check out today's fun snowman card.

I created this adorable snowman card featuring The Rabbit Hole Designs' Warm & Cozy stamp set and coordinating dies. The stamp set is an Agota Pop Illustration.  
The background for this card is created using two pale grey cardstocks, one printed and one solid color.  I die cut individual trees from the solid pale grey cardstock and the tree line from the pale grey snowflake printed cardstock using dies from my craft stash. The die cuts are glued to a 4" x 5 1/4" piece of the printed cardstock to created a subtle tone on tone card front.  

The snowman is stamped and colored with OLO markers before die cutting and adding to the card front with adhesive foam squares.  

The sentiment is stamped on the card front and a few snowflake embelishments are added. The card front is glued to a 4 1/8" x 5 3/8" light tan cardstock layer and adhered to a white A2 card base.

The Rabbit Hole Designs Products


Other Products
OLO markers

Thank you, I appreciate you taking time from your day to stop by and check out today's blog featuring The Rabbit Hole Designs stamps and dies. I hope you are inspired to create something lovely today! Happy World Card Making Day! 

Be Creative ~ Stay Inspired
Jenn Gross


Follow me, Journey Coach Jenn, on 
Instagram - https://www.instagram.com/journeycoachjenn/
YouTube - http://www.youtube.com/c/JourneyCoachJenn
Blog - https://journeycoachjenn.blogspot.com

Please note - Affiliate links are provided when available, If you purchase products from these links, I will receive a small commission from the company. This is at no additional charge to you. I appreciate and thank you for your support.  Find additional affiliate links at https://hype.co/@journeycoachjenn

Snow Much Fun Holiday Gift Tag


Hello crafty friends! I created and colored a holiday tag featuring The Rabbit Hole Designs Warm & Cozy stamp set.  The stamp set is an Agota Pop illustration and includes 4 snowman images, a Christmas Tree, 2 presents and 4 cozy sentiments

TRHD Supply List

Other Supplies 
Distress Oxide inks - Salvaged Patina, Victorian Velvet
Pawsitively Saturated ink - Melon
Masking Magic 
OLO Markers
I stamped the snowman with the bird onto a 3" x 7" piece of white cardstock along with the Snow Happy We're Friends sentiment. I created masks for both the snowman and sentiment. I used the Bitty Blending Brushes to ink blended the Melon around the snowman then added the Victorian Velvet to ink blend around the Melon color.  The last color added is Salvaged Patina.

I splattered the ink blended tag with white iridescence watercolor for a snowy effect. I removed the Masking Magic from the tag and colored the image with OLO markers - BV2.2, BV1.4, BV4.4 / R0.3, R0.4, R1.7 / B0.2, B0.3 / O7.3, O7.7

I cut the tag to 3 1/2" x 4 1/2" and attached a teal and pink ribbon to finish the tag.

Thank you, I appreciate you taking time from your day to stop by and check out this easy Holiday Gift Tag created with The Rabbit Hole Designs' Warm & Cozy stamp set. I hope you are inspired to create something lovely today!


Be Creative ~ Stay Inspired

Jenn Gross


Follow me, Journey Coach Jenn, on 

Instagram - https://www.instagram.com/journeycoachjenn/

YouTube - http://www.youtube.com/c/JourneyCoachJenn

Blog - http://www.journeycoachjenn.com/


For more inspiration, updates, and news make sure to check out these places


The Rabbit Hole Designs

The Rabbit Hole Designs Instagram

The Rabbit Hole Designs Facebook Page

The Rabbit Hole Designs Pinterest

The Rabbit Hole Designs YouTube


Poinsettia Holiday Decor and More


Hello my crafty friends! It is time to take a look back at a lovely 3D paper project I made using the Poinsettia and Pinecone stamp set from The Rabbit Hole Designs. 

The Poinsettia and Pinecone stamp set is illustrated exclusively by Kelly Taylor for The Rabbit Hole Designs. It is large 6 x 8 stamp set with a gorgeous main image using both Poinsettia and pines along with individual images of both and sentiments. The coordinating die set cuts the images beautifully.

It is easy to adapt your stamping and praper crafting to something more than a card.  Here we have used the Poinsettia and Pinecone stamp set to create a 3D wreath. 

I stamped and colored seven of the single Poinsettia images and six of the pine boughs images with OLO Markers. They are die cut with the coordinating die set.

I cut a large circle from a cardboard box and cut out a smaller center circle creating a donut or hoop shape to support the wreath. I tied a length of red ribbon around the wreath (adding a bow at the top) creating a way to hang it when finished.

I arranged the flowers on the wreath base and filled in the extra openings with the pine sprigs. The pine sprigs are cut into two pieces to use as filler.

Once I had an arrangement I liked, I attached the pieces in place with a combination of liquid glue and foam squares. 
I used white gold water color and gently added a bit of splatter to the wreath. The wreath can be hung on a door or even used flat for a holiday center piece. Just add a candle or other deco to the center with the floral wreath surrounding it. 

Products Used


Thank you, I appreciate you taking time from your day to stop by and check out this Holiday Wreath using The Rabbit Hole Designs' Poinsettia and Pinecone stamp and coordinating dies. I hope you are inspired to create something lovely today! 


Be Creative ~ Stay Inspired

Jenn Gross


Follow me, Journey Coach Jenn, on 

Instagram - https://www.instagram.com/journeycoachjenn/

YouTube - http://www.youtube.com/c/JourneyCoachJenn

Blog - http://www.journeycoachjenn.com/


For more inspiration, updates, and news make sure to check out these places


The Rabbit Hole Designs

The Rabbit Hole Designs Instagram

The Rabbit Hole Designs Facebook Page
The Rabbit Hole Designs Pinterest

The Rabbit Hole Designs YouTube

Lovely Poinsettia Card with a Foil Plate Press Technique!


Hello crafty friends!  Jenn here sharing this lovely holiday card using three products from The Rabbit Hole Designs.   

I love the beautiful Poinsettia and Pinecone stamp set (illustrated by Kelly Taylor)  it is paired with the Fall Foxes stamp set an Agota Pop illustration) and the Garden Trellis foil plate.

Yes,  you can letter press foil plates!
I used a metallic silver ink on the foil plate and BetterPressed the background image onto a 4" x 5 1/4" piece of gray blue cardstock.  The result is a gorgeous frosty background for this card.
I stamped and colored the Poinsettia and Pinecone images with OLO Markers and did the same for the fox image. I stamped the Merry Christmas sentiment on the gray blue cardstock.  The coordinating dies for the Poinsettia and Pinecone stamp set cut the sentiment and flora images perfectly.  I assembled and attached the die cut images to the Garden Trellis background with glue and adhesive foam strips.

The Rabbit Hole Designs Supply List 

Thank you for taking time to stop by today's The Rabbit Hole Designs Blog to check out this foil plate pressing technique and the Lovely Poinsettia Card. I hope you are inspired to create something lovely today!

Be Creative ~ Stay Inspired

Jenn Gross


Follow me, Journey Coach Jenn, on 

Instagram - https://www.instagram.com/journeycoachjenn/

YouTube - http://www.youtube.com/c/JourneyCoachJenn

Blog - http://www.journeycoachjenn.com/


For more inspiration, updates, and news make sure to check out these places


The Rabbit Hole Designs

The Rabbit Hole Designs Instagram

The Rabbit Hole Designs Facebook Page

The Rabbit Hole Designs Pinterest

The Rabbit Hole Designs YouTube


Revisiting a fun step tutorial for this Whimsy and Bright Holiday Shaker Card!


Hello crafty friends! Today we are revisiting this fun holiday shaker card from last November!  Here is a great idea to get more use of your stencils!  I love how this whimsical tree background turned out! It is created with six of The Rabbit Hole Designs stencils and it is a super easy technique!

This card also uses a whopping 13 of The Rabbit Hole Designs products! WOW!  Six are stencils revolving around the Beam of Light Stencil.  This is used for all the bright holiday trees in the back ground.  Each one is stenciled in a different color combo with another stencil for the pattern on the tree. 3 stamps and dies - Warm and Cozy stamp set, the Poinsettia & Pinecone stamps and coordinating dies, and the You've Been Framed die set. I also use three essentials; the Cottontail Embossing Powder Tool, Cottontail blending Brushes and the A2 Shaker Acetate Sheets. Whew!  
This may be a record, LOL!  

Let's go ahead and take a look at the steps and techniques!
I use the Beam of Light stencil to create holiday trees. 
A - Start with a piece of 4 1/8" x 5 3/8" piece of white cardstock for your card front. Position the Beam of Light stencil on the card front. Secure it with low tack paper tape like Mint Tape.  Using a Cottontail Blending Brush and a light green ink and stencil the beam.

B & C - I  placed the Mesh-Optical Illusion stencil over the Beam of Light stencil and secure it with low tack tape. I used the blending brush to stencil a darker green ink over the top to create a patterned triangle (for the tree).

D - Using Masking Magic, I traced and cut out the Beam of Light  shape 5 times and use one to mask off the green stenciled tree.
E & F - After cleaning off the stencils, I place the Beam of Light stencil on the card front just left and higher than the masked off green tree. I repeated the same stenciling steps, but choose a light and medium pink ink with the Splish Splash stencil.

G - I removed the stencils and masked of the pink tree. After cleaning the stencil, I repeated the process three more times.

H & I - The third tree is stenciled with bright green ink (a light and medium shade) with the Mid-Century Modern #1 stencil. The fourth tree uses light and medium teal ink with the Taste Like Honey stencil. The fifth and final tree uses light an medium purple ink with the Cat Eye stencil.
J -  After masking off the last tree, I used Prize Ribbon and Villainous Potion Distress Oxide inks to blend in a background sky.

K & L -  After I completed the ink blending, I splashed a bit of water onto the background. Next I used champagne gold watercolor paint to add specs of gold in the background sky.

M -  After allowing the background to dry, I peeled off the masking over each tree to reveal the card front.
N & O - I used one of the A2 Shaker Acetate Sheets and attached it to the card front per the directions on the package, making sure to leave a opening at the top of the card front to add shaker bits.

P - I added sequins and curl shaker bits and sealed the top acetate tab.

Q - I use the two largest You've Been Framed dies  to cut a frame from white glitter paper and attached it to the card front with narrow red lines adhesive tape. 
R -  I stamped and colored the snowman from the Warm and Cozy stamp set with OLO markers.

S -  I use the Cottontail Embossing Powder Tool to prep a piece of black card stock foe heat embossing. Using my stamping tool, I stamped  Poinsettia & Pinecone sentiment "Merry" "and bright"  with clear embossing ink. I heat set both using a white glitter embossing powder.  The sentiment is die cut using the coordinating dies.

T - I added the sentiment to the bottom of the card front and glued the Snowman in the lower right corner just above the sentiment.  The finished card front is added to a white A2 card base.

Supply List
TRHD STENCILS

TRHD TOOLS

TRHD STAMP & DIES

SAVE 10% off your Rabbit Hole Designs Order by using any of my links and the code" jenn10" at check out!

Thank you, I appreciate you taking time from your day to stop by and check out my Whimsy and Bright Holiday Shaker Card for The Rabbit Hole Designs!  I hope you are inspired to create something lovely today!


Be Creative ~ Stay Inspired

Jenn Gross


Follow me, Journey Coach Jenn, on 

Instagram - https://www.instagram.com/journeycoachjenn/

YouTube - http://www.youtube.com/c/JourneyCoachJenn

Blog - http://www.journeycoachjenn.com/


For more inspiration, updates, and news make sure to check out these places


The Rabbit Hole Designs

The Rabbit Hole Designs Instagram

The Rabbit Hole Designs Facebook Page

The Rabbit Hole Designs Pinterest

The Rabbit Hole Designs YouTube


Have a Brilliant Fall Y'all!


Hello my crafty friends!  Jenn here with another bright and fun fall card featuring The Rabbit Hole Designs Jack of All Faces stamp set paired with a sentiment from the Fall Foxes stamp set.

TRHD Supply List

Supplies from my Stash
VersaMark Watermark ink 
Black Embossing Powder 
White Embossing Powder 
Blue and Purple ink
Colored Pencils 
I stamped the pumpkin with the witch hat using VersaMark Watermark ink on a piece of dark blue cardstock treated with the Cottontail Embossing Powder Tool.  This treatment repels unwanted embossing power allowing the embossing powder to only stick to the stamped image. The images is heat embossed with black embossing powder and then colored with colored pencils.  The eye openings are cut with a craft knife and yellow cardstock is glued behind the image.  The image is fussy cut and a red flower is attached to the hat.
I added four crumpled autumn leaves to the bottom of the card front and added the pumpkin images to the front with adhesive foam tape. The sentiment is stamped on a piece of blue cardstock using VersaMark Watermark ink and heat embossed in white embossing powder.  It is cut to a strip and added to the cardftont with adhesive foam tape completing the card.

Thank you for stopping by to check out this Brilliant Autumn card created with The Rabbit Hole Designs' Jack of All Faces stamp set.  I hope you are inspired to create something lovely today!


Be Creative ~ Stay Inspired

Jenn Gross


Follow me, Journey Coach Jenn, on 

Instagram - https://www.instagram.com/journeycoachjenn/

YouTube - http://www.youtube.com/c/JourneyCoachJenn

Blog - http://www.journeycoachjenn.com/


For more inspiration, updates, and news make sure to check out these places


The Rabbit Hole Designs

The Rabbit Hole Designs Instagram

The Rabbit Hole Designs Facebook Page

The Rabbit Hole Designs Pinterest

The Rabbit Hole Designs YouTube


BOO-tiful Silly Pumpkins

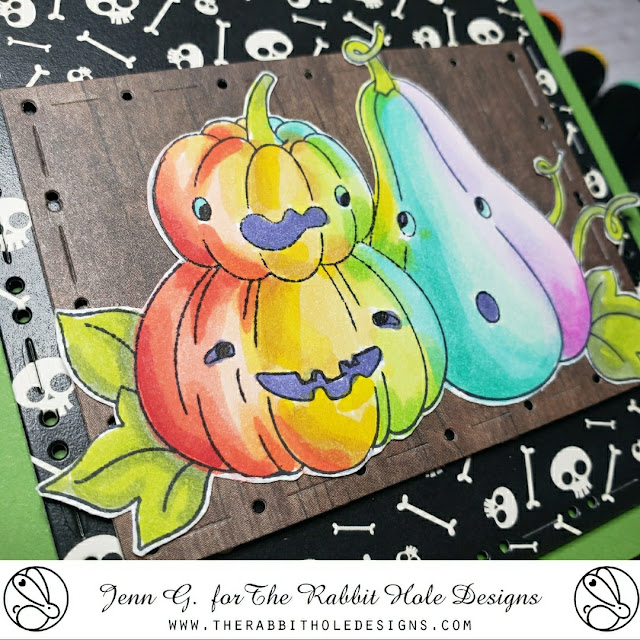
Hello my crafty friends!  Jenn here with a colorful Halloween card featuring The Rabbit Hole Designs  Silly Pumpkins stamp set paired with the You've Been Framed dies set. These pumpkins are so silly and whimsy. I decided to color them in rainbow colors. I’m using printed cardstock from my stash for the background layers.

Supply List: 

From my stash:
OLO Markers 
Boo word die
Printed cardstock 

I stamped he Silly Pumpkin image (an Agota Pop illustration) with black ink and colored them with OLO Markers in a rainbow blend.  I grabbed some printed Halloween cardstock  with skulls and die cut the medium You've Been Framed die.  The woodgrain  cardstock uses the smallest You've Been Framed die and it is cut smaller using the inside frame die to trim off about 2" from the long end.  

I layered the Halloween cardstock on a green A2 card base with adhesive foam squares and added the You've Been Framed  wood cardstock layer on top with adhesive foam squares.  The Silly Pumpkins are glued to the woodgrain cardstock The Boo sentiment from my stash and is added above the pumpkins with adhesive foam squares.

It is a super simple card.  Thank you for stopping by to check out this fun and whimsy Halloween card created with The Rabbit Hole Designs Silly Pumpkins stamp set.  I hope you are inspired to create something lovely and fun today!.

Be Creative ~ Stay Inspired

Jenn Gross


Follow me, Journey Coach Jenn, on 

Instagram - https://www.instagram.com/journeycoachjenn/

YouTube - http://www.youtube.com/c/JourneyCoachJenn

Blog - http://www.journeycoachjenn.com/


For more inspiration, updates, and news make sure to check out these places


The Rabbit Hole Designs

The Rabbit Hole Designs Instagram

The Rabbit Hole Designs Facebook Page

The Rabbit Hole Designs Pinterest

. - . The Rabbit Hole Designs YouTube