Pages

Showing posts with label Amy. Show all posts

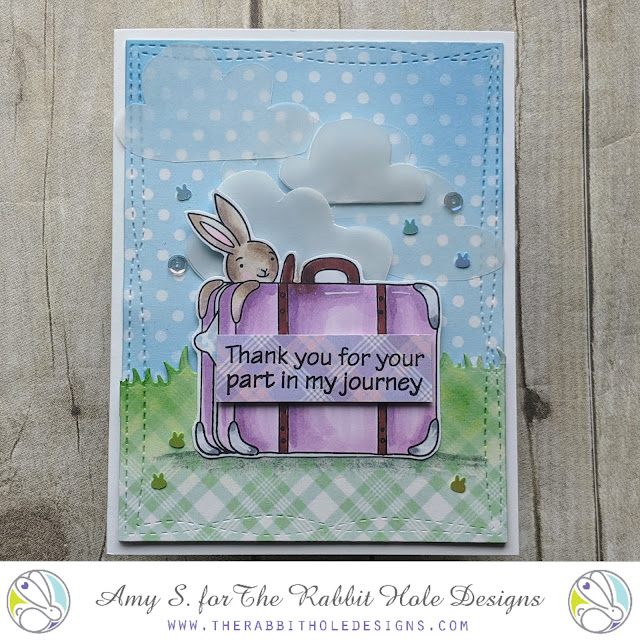
Adios! Safe Travels

 Hi Rabbit Hole fans. I am so excited to share this card today featuring the adorable Adventure Awaits stamp set and the Spring Floral #1 paper pack from the March release at The Rabbit Hole Designs!


On this card I created the background and set the scene with the new Spring Floral #1 paper pack. I love the colors and designs in this paper pack. I used this double sided paper to create a backdrop for the ground and the sky. I ink blended a little bit on the die cut pieces just to give it a little more depth. I also hand cut some pieces of vellum to create the clouds in the sky and layered those on the background. 


For the adorable bunny, I chose one featured from the new Adventure Awaits stamp set. I stamped the image out in black ink and colored it in with my alcohol markers. I fussy cut the image out but Coordinating dies are available for that stamp set. 


I stamped one of the sentiments also from the stamp set onto a piece of the pattern paper and popped that up on the suitcase part of the image. All that was left was to attach all the pieces onto the A2 size card base.

I had so much fun creating this card. I hope that you found some inspiration here. Be sure to check out all the fabulous products that The Rabbit Hole Designs carries. You can follow this link HERE to see their whole product line. 

Thanks for stopping by!
If you want to you can check out my blog at amyswares.com 

-Amy

For more inspiration, updates, and news make sure to check out these places.

Happy Easter Y'all

Hi TRHD Fans! I have a fun card to share today featuring the awesome One Line Happy Easter Stamp from the February release at The Rabbit Hole Designs!


As you can probably see this is a pretty simple design on the card. But honestly, when you have such a clever and unique product to work with, it really doesn't take much to make a cool card! 
For this card I started with a panel of striped pattern paper in A2 size. I used my powder bag to prep the surface of the paper and then stamped the image with some clear embossing ink using my MISTI. I did the same with the sentiment. I then poured some white embossing powder on top of the sticky clear ink and set it with my heat tool. I wanted the white embossed part to really stand out on the striped background so I did a little bit of ink blending as well over it with a navy ink to help it stand out more. 


Next, I popped the panel up on an A2 size card base and added a few sequins for some additional interest. Cool huh? I told you it was easy. I'm really happy with how this design turned out!

I hope that you liked the card today. Be sure to check out all the fabulous products that The Rabbit Hole Designs carries. You can follow this link HERE to see their whole product line. 

Thanks for stopping by!
If you want to check out additional information on the products that I used to create this card you can visit my blog at amyswares.com 
-Amy

For more inspiration, updates, and news make sure to check out these places.


Watch out Monday, I'm comin' for ya!

Hi crafty friends! Thanks for stopping by today. Today's card is all about the grumpy and sassy Caffeinated Unicorn! Isn't she the best? This feels so relatable to me most mornings, not just Mondays!! 


This card is pretty clean and simple but it packs a sassy punch. I started by ink blending directly onto an A2 size card base. I ink blended through the Aim for the Stars Stencil also from TRHD.

I set that aside and stamped and colored in the hilarious Caffeinated Unicorn with my alcohol markers. I did fussy cut her out but there are coordinating dies available. 


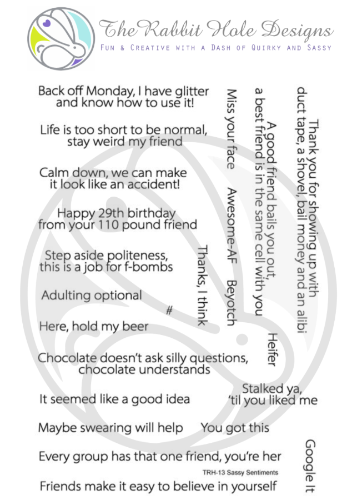
For the sentiment, I chose one from the amazing Sassy Sentiments stamp set from The Rabbit Hole Designs. This is one of my most beloved and most used stamp sets. There are just so many good sentiments on that one!  


All that was left was to assemble the pieces. I popped the sentiment and the unicorn up on the ink blended card base. I used a corner chomper on the card base (and the sentiment) for continuity and to add a little extra interest. 


I hope that you enjoyed the card today! Wishing you an amazingly caffeinated day! Be sure to check out all the fabulous products and other caffeinated critters that The Rabbit Hole Designs carries. You can follow this link HERE to see their whole product line. 


Thanks for stopping by!
If you want to check out additional information on the products that I used to create this card you can visit my blog at amyswares.com 

-Amy


For more inspiration, updates, and news make sure to check out these places.


Glitzy Star Power!

Hi TRHD friends! Today is all about stencils! Today's card features the Splish Splash Stencil and the Intersection Stencil


I don't know about you guys and gals, but I really like to stretch my supplies. It's for this reason that I really LOVE stencils. They can be used in so many ways and the price point on them is so reasonable! 

For today's card I wanted to show you two different techniques to use your stencils and really get the most out of them. 


To start I took some heavyweight white card stock and placed the Splish Splash Stencil down on top of it. I used a scraper tool and applied some glitz glitter gel through the stencil to create that awesome design. I then die cut multiple stars from it (once it dried of course).

For the background panel I did a dry embossing technique with the Intersection stencil from the December Mini release. I used my manual platform die cutting machine and a rubber pad and essentially turned the stencil into an embossing folder of sorts. Look at the instructions for your particular embossing machine to see what the best embossing plates "sandwich" would be for your machine. 

I chose a sentiment that I felt fit it really well from the Turtle Botanical stamp set. I stamped it on some card stock and cut it into a sentiment strip. I assembled all the pieces onto an A2 size card base. I used foam tape to pop up the pieces and give it more dimension and interest. That's it guys, easy peasy lemon squeezy! 


I hope that you enjoyed today's card and that you are positively beaming with new ideas on how to use your stencils! Be sure to check out all the  fabulous products that The Rabbit Hole Designs carries. You can follow this link HERE to see their whole product line. 


Thanks for stopping by!
If you want to check out additional information on the products that I used to create this card you can visit my blog at amyswares.com 

-Amy


For more inspiration, updates, and news make sure to check out these places.


Harmony and Balance...yes please!

Hola Rabbit Hole Fans! Amy here with another card to share featuring some of the awesome products that TRHD carries! Read on for more details!!


Today's card features the stunning Turtle Botanical Stamp set that came out in the September release. These stamp sets are just so stunning aren't they? I love florals and I think pairing them with animals is just so clever and beautiful. 


For this card I stamped the bloom flower by itself as well as the bloom that's on the turtle around the edge of an A2 size piece of watercolor paper. I used a sticky clear embossing ink and heat embossed the flowers with silver embossing powder. I then used watercolors and filled in the blooms. I find that having those raised embossed edges really helps contain the watercolor and lets it flow beautifully. If you have the patience to do so, don't heat set it, just let it dry on it's own. That's where the real magic is with watercolor! 

I also die cut out a shape and stamped and heat embossed a sentiment from the Flamingo Botanical Stamp Set as well as another one of the blooms. I incorporated some beige colored card stock and popped the sentiment up with some foam tape for added dimension. I assembled all the pieces together and that finishes my card today. These stamps are just so beautiful on their own, you don't really need much in terms of the design to really have that WOW factor. 


I hope that you found some inspiration here today. Be sure to check out all the  fabulous products that The Rabbit Hole Designs carries. You can follow this link HERE to see their whole product line. 


Thanks for stopping by!
If you want to check out additional information on the products that I used to create this card you can visit my blog at amyswares.com 

-Amy


For more inspiration, updates, and news make sure to check out these places.


Who knew?

Hi TRHD Fans! Amy here and I have a fun caffeinated card to share featuring lots of products from The Rabbit Hole Designs! 


The star of the show is of course the hilarious Caffeinated Goat! But I used several other previous TRHD goods like the Drop It Stencil, Marquee Words, and the fabulous Perfectly Blended Stamp set. 


For this card I used my favorite Cotton tail blending brushes to ink blend through the Drop It Stencil onto a white card panel to create the background. 


I colored the adorable caffeinated goat with my alcohol markers, and fussy cut him out. I also stamped the large sentiment from the Marquee Words stamp set and heat embossed the smaller sentiment from the Perfectly Blended Stamp set. I assembled all these awesome pieces together onto an A2 size card base and there you have it! 


Thank you for checking out my project today. I hope that you enjoyed it! Be sure to check out all the  fabulous products that The Rabbit Hole Designs carries. You can follow this link HERE to see their whole product line. 


Thanks for stopping by!
If you want to check out additional information on the products that I used to create this card you can visit my blog at amyswares.com 

-Amy


For more inspiration, updates, and news make sure to check out these places.


Clouds in my coffee...

Hola Crafty Friends! Amy here and I'm so excited to share a card with you today featuring the Blended Sentiments 2 Stamp set and the Clouds In My Coffee Stencil from the November 2020 Release at The Rabbit Hole Designs


It's so hard to pick a sentiment when you have so many like this to choose from!


For this card I was really inspired by the name of the stencil Clouds in My Coffee, so I used that as the inspiration to create my card. For this card I did some actual drawing to create the coffee cup because I didn't have any stamps or dies that fit the look I was going for. 


I essentially drew the shape of the coffee cup and masked around all over the card to create the sky and the gradient on the coffee cup itself. For the Sky I used the negative pieces of the cloud stencil and ink blended around them to leave the center portions white. I then mirrored the same clouds as a reflection in the coffee and ink blended with brown inks to create the coffee itself. 

I then chose a very fitting sentiment from the Blended Sentiments 2 set and angled it so that it fit the contour of the coffee cup shape. I attached the panel to the card base and that's it, a sassy and snarky caffeinated card to share with a love one. 


Thank you for checking out my project today. I hope that you enjoyed it! Be sure to check out all the items from the new release as well as all the other fabulous products that The Rabbit Hole Designs carries. You can follow this link HERE to see their whole product line. 


Thanks for stopping by!
If you want to check out additional information on the products that I used to create this card you can visit my blog at amyswares.com 

-Amy


For more inspiration, updates, and news make sure to check out these places.

Best Friend + Coffee = The Best Medicine


**Hi Guys! I'm so excited because The Rabbit Hole Designs is a Super Sponsor for the Coffee Lovers Fall/Winter Blog Hop! To Celebrate, TRHD is offering 10% off on caffeinated images. Use coupon code CAFFEINE. Happy Shopping**


In celebration of all things caffeine, I have a card with you today featuring the Blended Stentiments 2 Stamp set from the November 2020 Release at The Rabbit Hole Designs


This card was relatively simple to create in design but packs a beautiful glittery punch!


For this card I started with an A2 size panel of white cardstock. I used the Splish Splash Stencil from the October release and applied some glitz glitter gel through it directly onto the panel. I used two different colors and I love the parts where the two blended together. 


While the panel was drying I got to work on the sentiment. I chose one from the new amazing Blended Sentiments 2 stamp set. I adore this sentiment set and I know that I will be using it a ton in the future. I stamped and white heat embossed one of the sentiments on some black cardstock. To assemble the card I simply attached the panel to an A2 size card base and popped the amazing sentiment strip up in the the middle with some foam tape, added some embellishments, and that finishes my card today!


 I hope you enjoyed my card today! Be sure to check out all the items from the new release as well as all the other fabulous products that The Rabbit Hole Designs carries. You can follow this link HERE to see their whole product line. 


Thanks for stopping by!
If you want to check out additional information on the products that I used to create this card you can visit my blog at amyswares.com 

-Amy


For more inspiration, updates, and news make sure to check out these places.

Current Mood: Caffeinated and Feisty

Hi TRHD Fans! Amy here and I'm so excited to share a card with you today featuring the Rory-Caffeinated Racoon Stamp set from the November 2020 Release at The Rabbit Hole Designs


She is just so cute with her big eyes and sassy sentiments. This is a large stamp too, so she's really fun to color and makes for a great focal point on a card.


For this card I wanted to use some watercolor brush pens to color her in and also to create the background. I chose Bristol smooth paper because it could hold up to the water that I was using. 


I stamped Rory out using a waterproof crisp black ink and colored her in with my watercolor markers. I added some white with my gel pens and then fussy cut her out. To create the background I did the water smooshing technique. I scribbled some of the watercolor pen down onto my glass mat and added some water. I used a piece of acetate to pick up the ink and apply it to the background panel. I find that I have a little more control with this method rather then when I put the panel down directly into the ink. 


For the sentiment, I actually had to choose one from the new amazing Blended Sentiments 2 stamp set. I LOVE LOVE LOVE the sassy snarky sentiments on this set and they pair so well with all my caffeinated critters that I have amassed over the last year or so lol. I white heat embossed one of the sentiments from the set on some black cardstock. All that was left was to assemble the pieces and attach them to my A2 size card base. I used some pattern paper for the back and added some bling and That's it! A cute, fun, sassy caffeinated card ready to bring a smile to someone's face!


 I hope that you enjoyed this card and found some inspiration. Be sure to check out all the items from the new release as well as all the other fabulous products that The Rabbit Hole Designs carries. You can follow this link HERE to see their whole product line. 


Thanks for stopping by!
If you want to check out additional information on the products that I used to create this card you can visit my blog at amyswares.com 

-Amy


For more inspiration, updates, and news make sure to check out these places.