Pages

Showing posts with label Sofishticated. Show all posts

Chocolate Truffles

Scented Embossing Chocolate Truffles

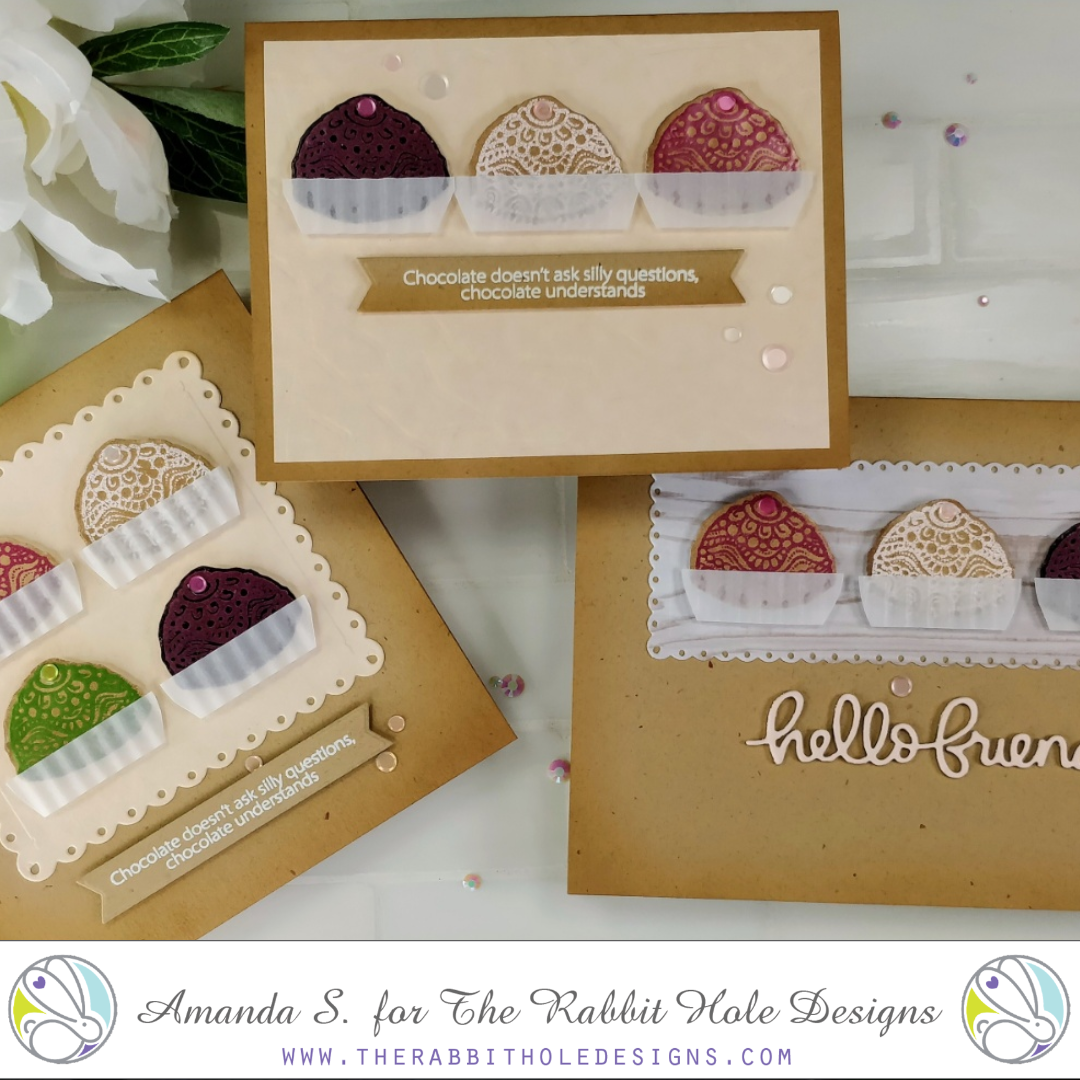
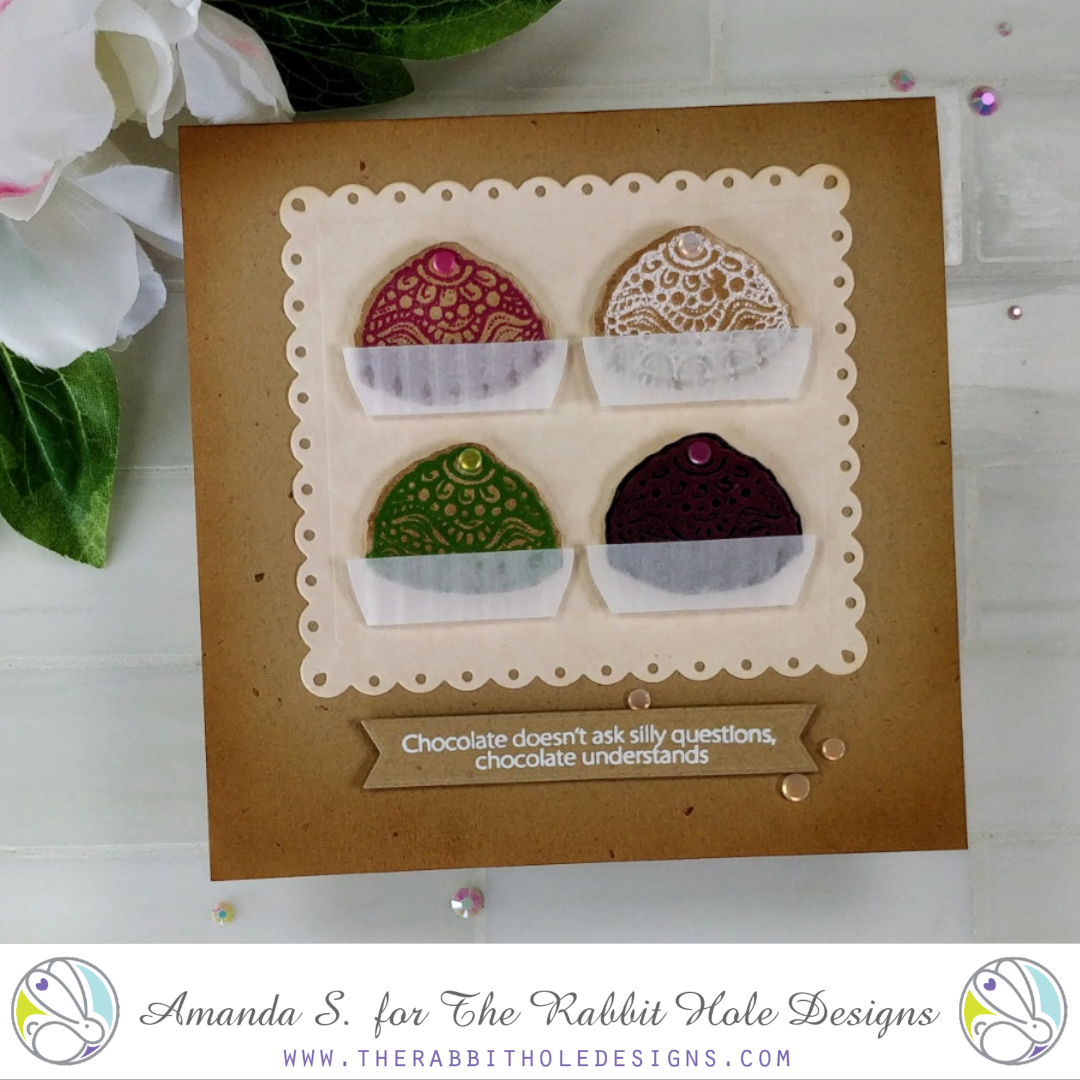
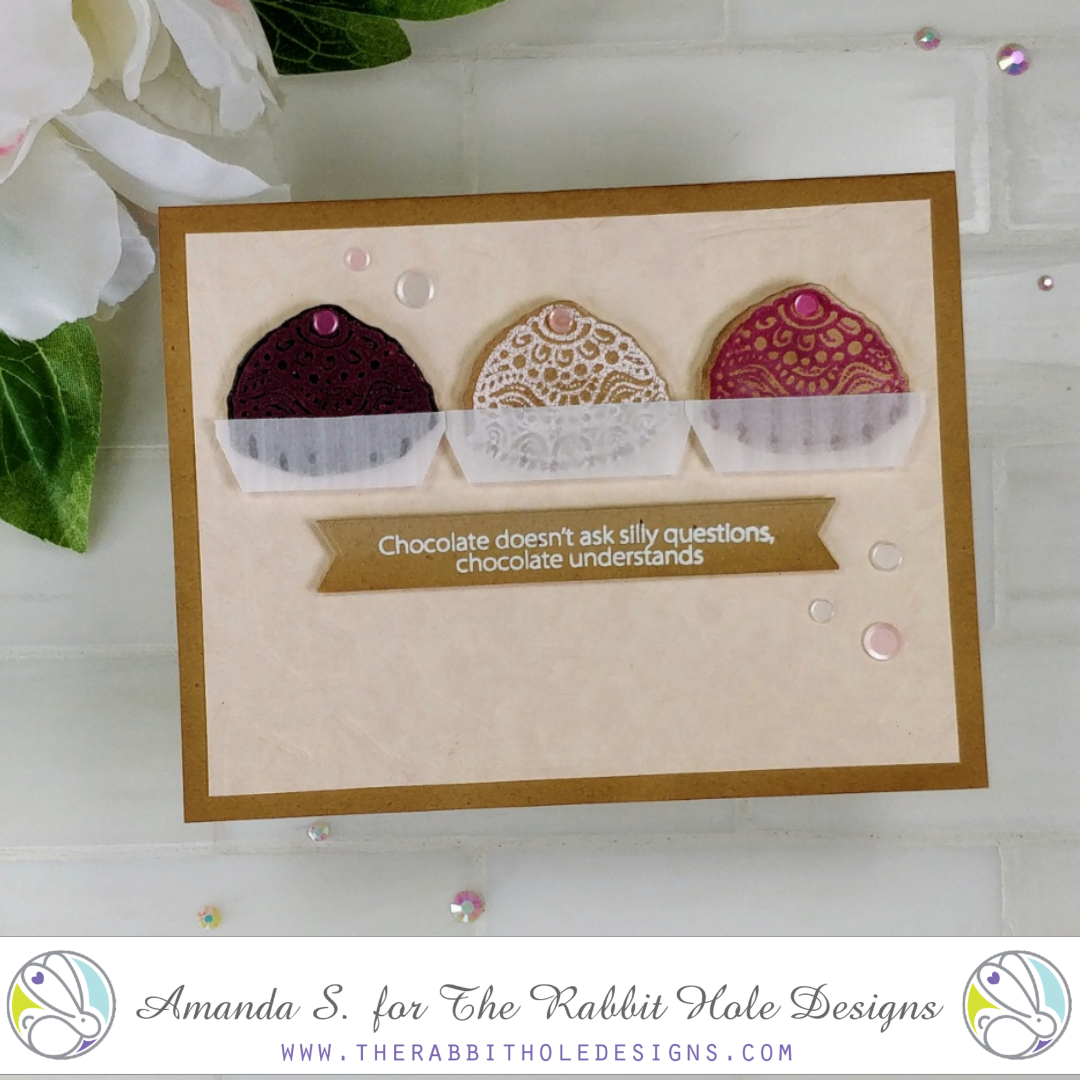
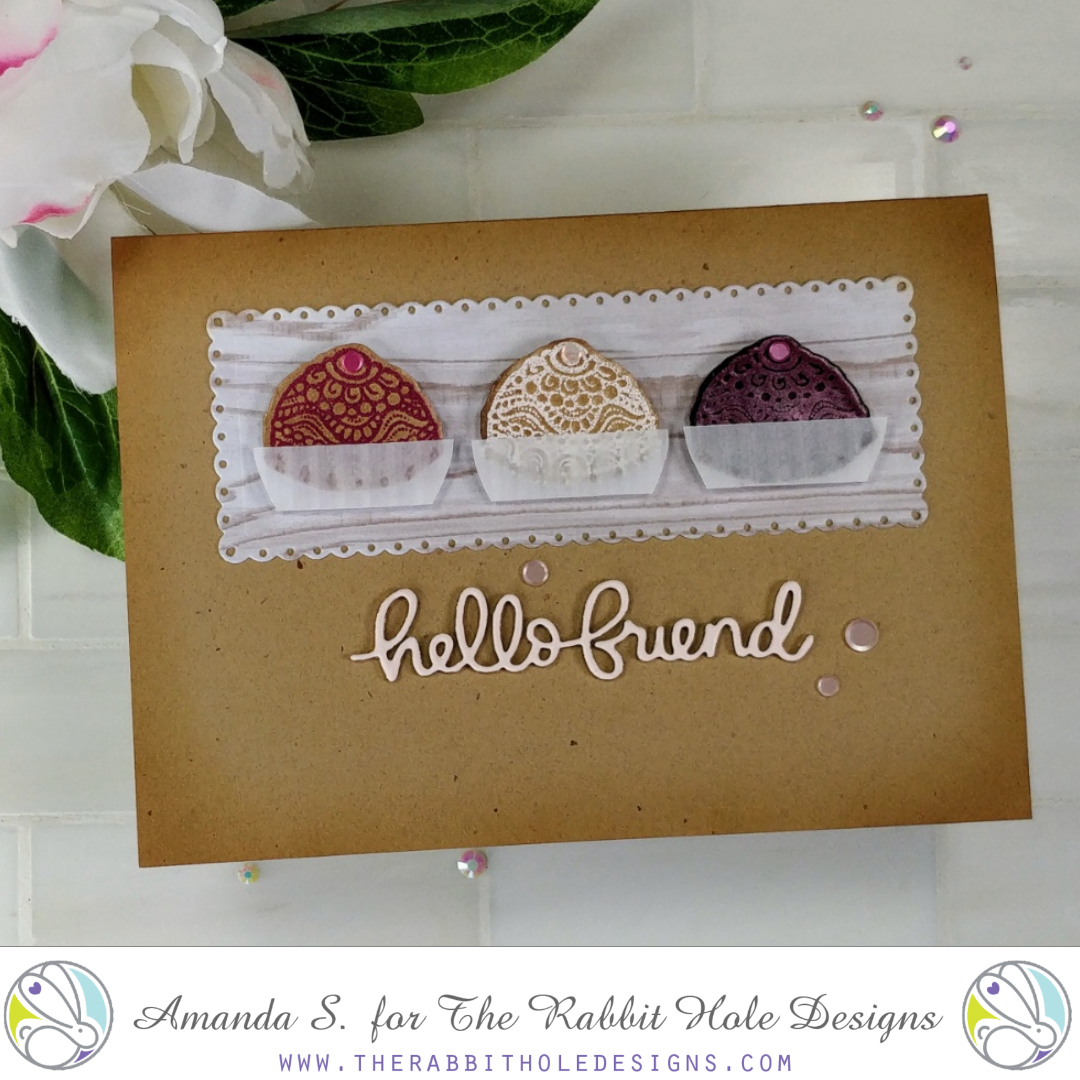
Hey crafty friend, it's Amanda from Pear Blossom Press, back with some more scented cards today. These were inspired by my friend, Katie Brooks. When the Sassy Sentiments stamp set came out last year, she had the brilliant idea to turn the jellyfish from Sofishticated into a truffle and pair it with the funny chocolate saying. As soon as my scented embossing powders arrived, I knew I wanted to recreate the idea!

To start, I stamped the top of the jellyfish onto white cardstock, then added a narrow border to it, and cut it out multiple times with my ScanNCut. (You could fussy cut the shape, or use a circle die and cut the bottom flat if you don't have a ScanNCut.) I coated the entire front of each cutout with Versamark ink, and melted several layers of chocolate embossing powder on top. Next, I lined the cutouts up in my Misti, and stamped the top of the jellyfish over the chocolate with more Versamark ink. I sprinkled on a second scented powder and heat embossed it. The new layer melted into the chocolate, creating a smooth, flat surface, but leaving crisp lines. (The different scents used were raspberry, rose, and apple.)

Scented Embossing Chocolate Truffles

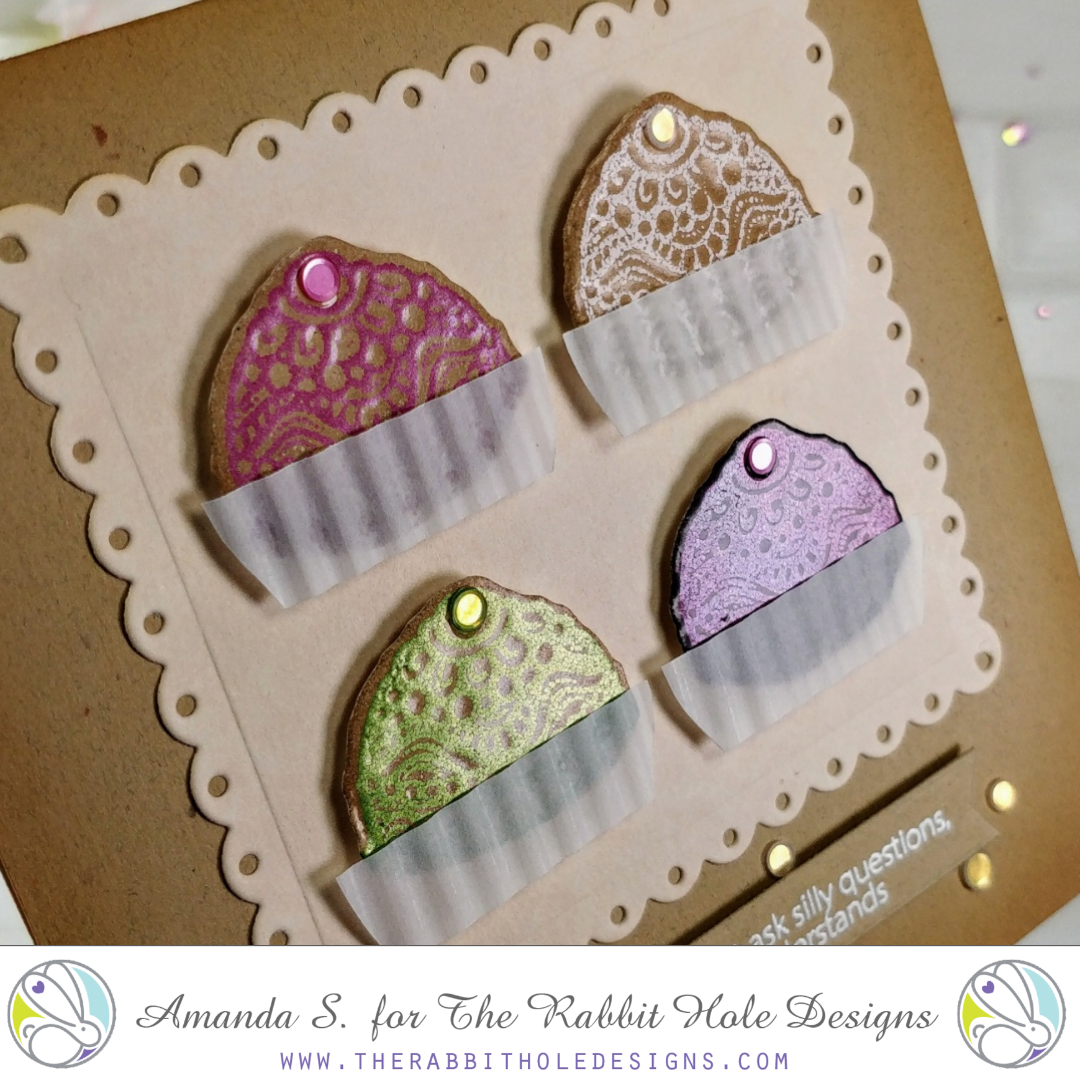
To create the paper cups for the truffles, I cut strips of vellum and ran them through my paper crimper. I trimmed the strips to fit over each truffle and glued them in place.

To complete my cards, I created various backgrounds and either die cut them with a fancy scalloped rectangle, or dry embossed with the new Broken Glass stencil. A die cut sentiment pulled the cards together, and a few sequins finished them off.

Scented Embossing Chocolate Truffles Scented Embossing Chocolate Truffles Scented Embossing Chocolate Truffles

I have to tell you, these cards smell so good! The chocolate isn't very strong, so the other scents don't get lost. They all blend nicely, and smell like a fancy box of candy. But fair warning, everyone in the house will want to know what you're baking if you start melting the scented embossing powders.

Thanks for stopping by today! I hope Katie and I have inspired you to give this idea a try. Wouldn't it be great for Valentine's Day too? You can find the sister article to this over on my blog; head on over for links to the specific products I used. I'll be back soon with more fun cards to share.

For more inspiration, updates, and news make sure to check out these places.
The Rabbit Hole Designs

Therm O Web Collab with Lisa


Hello Rabbit Hole fans and welcome back to the blog!
It's Lisa here with you today and I am so excited because as you may have seen,
The Rabbit Hole Designs has teamed up with Therm O Web to bring you some awesome
projects! Today I have 2 fun cards to share with you using the Rainbow and Teal Decofoil.
I had so much fun with the Decofoil because I've never used it before.
Once I foiled one or two images I was hooked and the dog and cats were lucky I didn't foil them too!

Here is my first card using the Rainbow Decofoil and the Sofishticated
stamp set from The Rabbit Hole Designs.


For my first card I decided to try foiling an image printed from my laser printer.
Since I knew that the Decofoil would stick to toner I had the idea to stamp an image
in black ink and scan it into my laser printer.  Once the printer printed out the scanned image
I ran it through my laminator with the Rainbow Decofoil and watched the magic happen.
The results were stunning!  As always with foiling on cards, it's so hard to capture the true
shine and magic in a a photograph.  Those of you who have tried foiling and photographing
know what I mean. The Zentangle style of the fish in the Sofishticated stamp set really pick
up the rainbow foil in such amazing detail. I was so impressed with the results of foiling
over the toner, I decided to foil the sentiment as well!


Here is the Seahorse on a bookmark from the same stamp set foiled the exact same way 
and I love it just as much as the pretty fish!


For my second card I decided to try foiling with a different technique.
I used the Decofoil Transfer Gel and the Teal Decofoil.
I used a wavy stencil and layered the transfer gel over top and let it dry over night.
The next morning I took the stenciled panel and laid the Teal Decofoil over it and sent it
through the laminator. Once again, amazing results!
I just love the Inky stamp set from The Rabbit Hole and I thought that
googly eyed octopus would look so good against all that shiny foiling!
I cut out a circular shape from the center of the wavy panel for this card and I used the rest
of the panel for another shaker card I'll share below.


There are so many ways to foil and they're all so much fun!
I used the leftover panel from the above card to make this awesome shaker card
once again using the Sofishticated stamp set.


You can really see the shine in this picture because of the way the light is hitting it.
Once again the shine is so impressive!

This was my first experience with foiling and I was surprised how easy it was to do!
There is plenty of inspiration on the Therm O Web website and tons of YouTube videos
to show you the many ways to achieve that beautiful shiny look!
A big thank you to Therm O Web for supplying our DT with products so 
that we could try out this fun technique!


For more inspiration, updates, and news make sure to check out these links.

Bowl of love


Hi TRHD fans!  Shanna here today with a fun shaped card showcasing my favorite goldfish!!  The stamps set is The Rabbit Hole Design's So-Fishticated set, and it is gorgeous!  I love how artsy all the different stamps are, it makes them so fun to color!  


I started off by die cutting 2 fish bowls and creating a "hinge" on one of them to attach and make a card.  I inked the edges of the top bow with Tumbled Glass Distress Ink to give some dimension to the bowl.  My water is another diet piece, that I die cut out of Bristol paper knowing I wanted to do some watercoloring on it.  I stamped the pretty goldfish from So-Fishticated on the water piece using Versa Clair Nocturne ink and heat set it to dry.  My coloring was done with Tombow markers, in shades of orange and teal.  Once I was don't coloring the fish, I masked it off with some masking fluid and then used a wet on wet technique with a couple of blue tones from my Tombow collection for the water.  


My sentiment came from the set, and I stamped it on white cardstock, cut it down to a strip, and popped it up with foam adhesive.  I did trim the line of the strip to match the shape of the bowl.  A white gel pen helped me add some final highlight lines to the bowl and I was done!

 **Well, ALMOST done**  

At the last minute I decided that gorgeous Goldy needed some sparkle!  Liquid Pixie Dust to the rescue! (cue Peter Pan music??!!)  I am in LOVE with this stuff, and guess what?!?  The Rabbit Hole Designs carries it in their shop!!  They actually have a bunch of new *Crafter's Essentials* that are totally worth checking out!  Take a peek at what they have to offer here.

Well, that's all today....Thank you so much for stopping by!  Be sure to swing by and say hi over at my blog, and follow along with my caffeinated adventures on Instagram!  See you all again soon
~Shanna


For more inspiration, updates, and news make sure to check out these places


Mermaid Love


Hello Rabbit Hole fans! Today I have a mer-mazing shaker card for you using the
newly released stamp set Mermaid Hair. I just love that sweet mermaid and she literally 
looks good on any card you put her on.  Since my favorite type of card to make is a shaker card
I knew that's where she belonged.  For my sentiment I used the previously released 
Sofishticated stamp set.  Here are the details for my card.

Card Recipe

  • Start with white A2 card base cut to 11 1/2" x 4 1/4" and fold in half at 5 1/2"
  • Cut panel of Strathmore Bristol Smooth card stock down to 5 1/4" x 4" and dry emboss with scalloped embossing folder.
  • Sponge Distress Inks in 3 different colors over embossed panel in purple, blue and green, blending where colors overlap. Adhere embossed panel to base of card.
  • Die cut scalloped rectangle frame for top of card and back with clear acetate. Once acetate is secure to back of frame, build up foam tape around frame border to house your shaker bits.
  • (Optional step) Stamp, color and cut several fish from the Mermaid Hair stamp set and glue in place to embossed panel.  I always like some details not to move around on my shaker cards so they are always in view.
  • Next pick out your favorite sequins and shaker bits for the inside of your window.  This is the fun part because you can be creative and pick out a fun assortment of sequins, sprinkles and other fun additions. Spread your mix on to the embossed panel towards the center so you can lay your frame down over the top.
  • Expose adhesive from foam tape and lay your frame down over the shaker bits making sure to center your frame over your embossed panel.
  • Stamp, color and cut your sweet Mermaid and pop her up on foam tape towards the bottom corner of your card and stamp your sentiment from Sofishticated on to a white banner and adhere to top of card.
Now try your own shaker card, they are so much fun to make and they are
even more fun to play with once they're put together!

Thanks for stopping by today, make sure to check out all of 
The Rabbit Hole's social media sites for much more inspiration
everyday!


🧜🏻‍♀️ Lisa 🧜🏻‍♀️


Jellyfish Thank You


Welcome back to the blog Rabbit Hole fans!
It's Lisa back again today to bring you a Thank You card using the
Sofishticated stamp set. I just love the Jellyfish stamp from this set. 
It has such beautiful intricacies in the main body and tail and 
I think it looks very elegant when heat embossed in gold.

I started by doing some ink blending with several colors of
distress inks. I used Twisted Citron, Broken China, Squeezed Lemonade,
and Salty Ocean. After all of the blending I sprayed some water droplets
for a more distressed look.  I also sprayed some homemade glimmer mist
for some extra shine. The camera doesn't pick that up very well.
I made sure to use my anti-static tool over the ink blending to I could 
heat emboss without making a mess.  I stamped the Jellyfish stamp
in clear Versamark ink and then sprinkled gold embossing powder
over it. I used my heat gun to melt the powder and I just love the results!
I also added a gold frame with foil card stock to finish off the edges.
The Thank You sentiment was cut with the same gold foil as the frame and 
I added some blue jewels for some added interest and sparkle.

I love how this card came out, the ink blending was the perfect background
for this whimsical Jellyfish and the gold accents are so elegant.

For more inspiration, updates, and news make sure to check out these links.

Have a great day, I already am!
🌊Lisa 🌊 


Chocolate Understands with Katie

Hi friends!  Happy Tuesday and welcome to The Rabbit Hole Designs blog.  I have something for all you chocolate lovers out there. 


This card was inspired by the Sofishticated set.  When I first saw the jellyfish and the designs on it, I thought the top looked like a specialty chocolate or truffle.  I had it in my mind to make it that way one day, so when we came out with the Sassy Sentiments set, I knew I had my match!  

Here is how I made this card:
  • I stamped the jellyfish and masked off the bottom.  Which in retrospect, probably wasn't necessary since I fussy cut it out, but oh well.  :)  I colored it using my Copics and then cut it out and set it aside.
  • I die cut a white panel with a wonky stitches die from my stash.  Then I added some distress inks to the background to make the chocolate pop.  
  • Next, I mounted the base on some craft cardstock to pull on the brown and chocolate theme. 
  • I stamped the sentiment from the Sassy Sentiments set on pink cardstock using brown ink, cut the ends and mounted on my cardstock.  
  • I created a chocolate wrapper using a slightly opaque vellum and folded it around the chocolate and glued it down, then I popped both up on the front using dimensionals. 
  • Lastly, I added these glassy looking heart embellishments. 


Right, chocolate just knows!  It knew last night when I was trying to relax after a long day...  :D  


I had one of those "I feel smart" moments when I made the jellyfish into a chocolate- teehee.  I hope you like it too.  For more inspiration from me feel free to visit my blog.  

Thank you so much for your visit today! 


For more inspiration, updates, and news make sure to check out these places.

Anglerfish Light-Up Box Card


Hello my crafty friends, it's Amanda from Pear Blossom Press again! Today I'm sharing a fun box card with an extra surprise; it lights up! I designed this card for a class that I'll be teaching at the Seattle Unstoppable Retreat next week. Woohoo! Who would've ever thought people would want me to travel to teach cardmaking classes? #lifegoals #squee #nowtogetagigonacraftingcruise

The Rabbit Hole Designs is one of the awesome sponsors of this retreat! If you are one of the lucky ducks coming, you'll be making this card in person with me. If not, don't worry, I made a video tutorial and that's just like being there with us. Except we won't know if you didn't get dressed today ;) Okay, enough blabbering from me. Let's put this card together! Step one: watch the video...


Step two: wait, I covered all the steps in the video... Lol, I did promise you links to the products I used though. You'll find the Sofishticated stamp set right here in the shop. For all of the other products I used, including the Power Pack Kit (shameless plug), head on over to my blog... https://pearblossompress.com/anglerfish-light-up-box-card/

Thanks for stopping by today! I'll be back soon with another fun interactive card for you. Until then my friend, stay crafty!


Sorry I was so Crabby


Hello The Rabbit Hole Designs fans!  Maria here with you and I am back today to share another clean and simple card ("CAS"), showcasing the ever-classy, Sofishticated Stamp set.


Here's how I made the card:
  • stamp the crab image on some Neenah classic crest solar white card stock and color him in with alcohol markers (or any medium of your choice).
  • use some painter's tape to mask the spaces between the crab.
  • use the waves stencil with the make-up brush to color in some waves (avoiding the crab image if at all possible).  The ink that I used here is so light that I didn't really have to mask the image itself.


  • die-cut the "sorry" sentiment using a die from my stash.  Adhere this piece with some liquid adhesive
  • stamp the sentiment "I was so crabby" using Versafine Onyx black in and the card is all finished.  Simple and classy!


Here's a little close-up:


I have been really loving some clean and simple designs lately!  I hope you do as well.  If you are looking for further details about my project including supplies used, I would be so grateful if you can stop by my blog today at:


I hope you like my project today.  Happy crafting!

For more inspiration, updates, and news make sure to check out these places.

So-fishticated Stamp Set

Hi there, Martha Lucia with  you today!
I’m back highlighting the So-fishticated stamp set, one of my favorites sets for this season.


The base and second layers of the card are whisper white card stock. I just cut the second layer a little small.

Directions:
1. Cut the card base using whisper white card stock. The size of my card is 4-1/4" x 11" with score in 5-1/2".
2. Cut the second layer. The size that I used is 4"x5-1/4".
3. Splatter the second layer with Fireworks. I used the colors Bahama Blue and Paris Dusk. If you are not familiar with the Fireworks, they are the same quality of the memento ink but liquid and with shimmer touch.
4. Let the paper dry or speed the process with a heat tool.
5. Stamp the sea horse included on the Sofishticated stamp set using Memento Tuxedo Black Ink.
6. Color the image with Alcohol Markers and fussy cut it with the scissors.
7. Cut a circle border using Violet /Gold Glossy Rinea Foiled Paper.
8. Paste the circle over the sprayed area and stamp a sentiment inside of the border with Memento Tuxedo Black Ink.
9. Paste the main image using double sided foam tape.
10. Finalize the decoration adding some aqua sequins.


Check out my Stampartpapel Blog to see more inspiration using these fabulous stamps from The Rabbit Hole Designs. Thanks so much for stopping by!

SoFishticated Zentangle


Hey crafty friends, it's Amanda with Pear Blossom Press again! Today, I've got a fun zentangle card for you. If you're not familiar with the term, let me explain. It's the art of doodling, or drawing tiny repetitive patterns within the lines of a bigger image or scene. For those of us who love to doodle, but wouldn't consider ourselves great artists, the Sofishticated stamp set is the perfect way to get started! It is full of gorgeous underwater creatures drawn in zentangle fashion. (And some great sentiments too.) You can use these images as focal points for your own zentangle scenes, like I did.

For this card, I started by stamping my images with black ink, then I used my stitched hillside dies as guides to draw in the wave lines around the images with a Copic liner. You can freehand that part, but I wanted to make sure my lines curved in the same places. Next, I filled in the waves with little doodles and patterns. (Don't be intimidated by this; think dots, scallops, Vs, swirls, and crosshatched lines. This is the fun part!)

Once the patterns were all filled in, I used Copic markers to color the waves and images. Then I glued the scene onto a blue A2 card base. For the sentiment, I stacked the die cut word, Congrats, several times and added a layer of copper embossing powder on top. I stamped the smaller sentiment onto a strip and embossed it with the same powder, then glued them in place. Details on the fish were added with white, gold, and copper gel pens. I try to save anything with a long dry time as the last thing I add to a card, so I'm less likely to smear it. So for my final touch, the fish and bubbles got some extra pizzazz with an Aqua Shimmer pen and a coat of Diamond Glaze (the most challenging of all things to photograph).

Are you a doodler? Have you tried any zentangle art yet? This card was a ton of fun to create, but I never would have given it a try without the Sofishticated stamp set to get me started. I have several more ideas for different scenes that I can't wait to try! I hope you'll give it a try too and let me know what you think.

If you'd like links to other specific products I used for this card, you can find them on the sister post here. I'll be back soon with another fun card. Until then my friend, thanks for swimming by and I'll SEA you soon!

All You Need is a Little Vitamin Sea


Hello The Rabbit Hole Designs fans!  Maria here on the blog with you .  Before I start with my post, I just want to let you all know that TRHD is having a St. Patrick's day special (see details below).   Take advantage and order your favorites now!


For my project today, I am showcasing the beautiful Sofishticated 6x8 stamp set.   Here's what it looks like:


HERE'S HOW I MADE MY CARD:
  • Stamp the images on smooth white card stock and color the images in with Copic markers (or any coloring medium of your choice).
  • Die-cut the image with an electronic die-cutting machine or fussy cut with scissors.  I used my Brother Scan N Cut 2.
  • Use some 110 lb card stock to die-cut using the Coral Collage die and the Under the Sea Collage die.
  • Color with copic markers.


  • Use the Under the Sea Collage die again to die-cut fun foam.  Adhere this piece on top of the "colored" Coral Collage to give them dimension.
  • Adhere the colored images on the foreground.
  • Use Peacock Feathers distress oxide ink to stamp the sentiment "All you need is a little vitamin sea" with your MISTI stamping tool.
Here's a closer look:


I finished my design by adding some sparkling clear jewels to make them look like bubbles.  Here's another look:


If you are looking for further details about my project including supplies used, I would be so grateful if you can stop by my blog today at:


I hope you like my sea-themed card today.  Have an amazing day and happy crafting!

For more inspiration, updates, and news make sure to check out these places.


Seas the Day


Hello everyone and welcome to The Rabbit Hole Designs,

Heather here and I am sharing a new card with you today using our Sofishticated Clear Stamps.  I wanted to try something a little different so I picked out three colors I would not normally use and grabbed some white card stock and got to work.  I started by taking a piece of white card stock cut to 4" by 4" and using my home made wreath builder laid it into my stamping platform. I then took the large reef image and stamped it with Shabby Shutters Distress Oxide, I rotated the paper four times then moved onto the starfish image.  I stamped the starfish in Milled Lavender Distress Oxide Ink four times also and cleaned the stamp and then took the little sea snail and stamped him in Scattered Straw Distress Oxide Ink.  After I was done I decided it needed a little more, so I took three of the bubbles and stamped them in Tumbled Glass Distress Oxide Ink around the images to fill in.  Then I took the sentiment lined it up in the center and stamped it in black ink.... and I hated it.  So I got creative, inked up a small piece of scrap paper with the Milled Lavender and when it was dry I stamped the sentiment with Versmark Ink and , cut it out and placed it on top.  I liked that so much better and no one will ever know about the oops underneath.....  Then a cut another piece of white card stock to 4 1/2" by 4 1/2" and using the Scattered Straw inked up the edges to match the front.  I then put the wreath layer onto the Scattered Straw layer and then put the whole thing onto a top folding white card base cut to 5" by 5"
So in the end I really liked how it turned out and am so glad I stretched my creative wings and tried something new.I know sometimes when your crafty mojo is on vacation just giving it a jump strat is so helpful, so will try this again in the future.

Don't forget we have some amazing new products that were released on March 1 so go on over to the shop and check them out. 

Sea you all soon!


So Jelly it's your Birthday with Katie

Hello!  Katie here and I am thrilled that this is my first post as part of The Rabbit Hole Designs!

I have a bright and colorful card today featuring the Sofishticated stamp set.


To make this card, I started with a piece of 4 X 5.25 watercolor paper.  I stamped the jellyfish imaged multiple times on the sheet using Versamark and then used white embossing powder and heat set them.  Next, I added a variety of Lindy's Magicals over the paper and then spritzed the paper with water.  I frequently dried the wet sheet with my heat gun and added more until I achieved the colors and look I wanted.  


Next, I added the black bubbles and sentiment to the card front.   the sentiment.  I mounted the card onto a sheet of white cardstock just 1/8 of an inch larger on the two sides.  This I mounted onto a black A2 sized card, to draw pull out the black of the bubbles and sentiment. 


Supplies Used: 

Sofishticated 


For more inspiration, updates, and news make sure to check out these places:

Thanks for visiting me for my inaugural post, I hope you enjoyed it!  Feel free to visit my blog as well.  ~Katie