Pages

Showing posts with label Rabbit Hole Designs. Show all posts

September 2024 Release Hop


Hello and welcome to the Inspiration Hop. We are excited for you to join us as we present to you our August 2024 release. Our Brand Ambassadors and Special Guests will be sharing their projects, so be sure to visit their blogs and leave them some crafty love.

In this fantastic release we have a small release this month featuring only 1 stamp set (Jack of All Faces Stamp Set) Which is available to purchase right now in the shop.

The products being highlighted today are:


Thank you so much for being here for our inspiration hop.

Balloon Animals #2 Snarky Clean & Simple Card

Hello crafty friends, today I am sharing another card using the Balloon Animals #2 Stamp Set that just released the first of this month.  It has sentiments that are not as snarky as this one, but if you know me you know I am a sarcastic person, so I was all about this sentiment when I saw this stamp set.   

Snarky Clean & Simple Balloon Animals #2 Card by Rick Adkins

For my card I used two of the images from the Balloon Animals #2 Stamp Set.  I picked the Octopus and the Crab.  I thought that they were super funny paired with the sentiment I picked for today's Snarky Clean & Simple Card design.  I colored the two images with my alcohol markers and used the matching Balloon Animals #2 Dies to cut each one of them out.  

Balloon Animals #2 Snarky Clean & Simple Card by Rick Adkins

For the inside panel of my card I used the Making Waves Stencil to add a little fun underwater plants.  I just keep the color scheme super simple.  I only used two different colors of ink for the background.  For the stencil I just used my Bitty Bunny Blending Brushes and went a little heavier with the ink application.  

Thanks for dropping by today I hope that you you enjoy my little snarky clean and simple card today! 

Rick 

For more inspiration, updates, and news check out these awesome places! 


Affiliate Disclaimer: This post contains affiliate links. If you make a purchase through these links, I may receive a small commission at no additional cost to you. Thank you for supporting The Rabbit Hole Designs LLC and helping us continue to bring you creative content!

August 2024 Release Hop


Hello and welcome to the Inspiration Hop. We are excited for you to join us as we present to you our August 2024 release. Our Brand Ambassadors and Special Guests will be sharing their projects, so be sure to visit their blogs and leave them some crafty love.

In this fantastic release we have 2 stamp set (Balloon Animals 1 & Balloon Animals 2 Stamp Sets) with coordinating dies (Balloon Animals 1 Dies & Balloon Animals 2 Dies)! All of which are available to purchase right now in the shop.

The products being highlighted today are:


Thank you so much for being here for our inspiration hop.

Above & Below Water Slimline Scene Card

Hello and welcome to the Rabbit Hole Designs blog; it's Rick back with you again today and I am sharing a slimline scene card that will take you both above the water surface and below. This was actually very easy to create it was a mater of putting the elements in the right place and changing the tones and values of the ink blending from the sky and underneath the water.

Easter Hugs

 Hello and welcome back to the blog; It's Rick back with you today sharing a card that's prefect during Easter.  I am using the Easter Basket Stamp Set to create a fun card that can be sent any time during the Easter season.  


I stamped the Easter Basket image from the Easter Basket Stamp Set in black ink on the card base and then again after I attached all the colorful strips of cardstock. I finished off the cards with the Hugs Scripty Word Die.  


Thanks for dropping by today I hope that you have a wonderful weekend.  

Rick

Create Stunning Handmade Easter Cards with The Rabbit Hole Designs Stamp Sets

Hello and welcome back to the blog; It's Rick back with you today.   Today, we're diving headfirst into the wonderful world of Easter card making, and boy, do I have some fun ideas to share with you! If you're anything like me, Easter is not just about chocolate eggs and fluffy bunnies—it's also about spreading joy through handmade cards.

So, grab your favorite stamp sets and let's get crafting with The Rabbit Hole Designs! We'll be using their adorable Easter Bunnies and Easter Basket sets to create some seriously stunning cards. And trust me, it's going to be egg-ceptional!

Easter Basket Stamp Set, Easter Bunnies Stamp Set, Rick Adkins


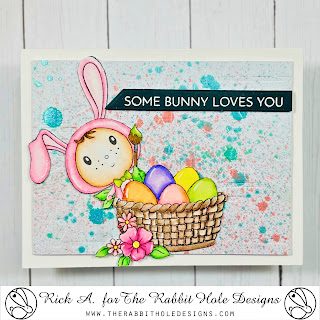
To create charming Easter cards, begin by stamping your chosen images onto paper using a waterproof ink pad to avoid smudging. Next, enjoy the delightful process of coloring with Twimarkers or other water based markers, relishing the control they offer for shading and blending. Once colored, introduce a touch of magic by gently brushing water over the images to achieve a watercolor effect, allowing colors to blend naturally. Add some splatters to the background with mica spray stains for added shimmer and texture. With patience, assemble your card components, arranging bunnies, basket, and any additional embellishments until satisfied with the layout. Finally, add heartfelt sentiments or sparkly sequins for those finishing touches, infusing each card with a touch of your creativity and care.
Easter Bunnies Stamp Set, Easter Basket Stamp Set, Rick Adkins

Thanks for dropping by today I hope that you have a fabulous weekend. You can find a full list of the supplies that used on today's card over on my blog.

Happy Crafting

Rick


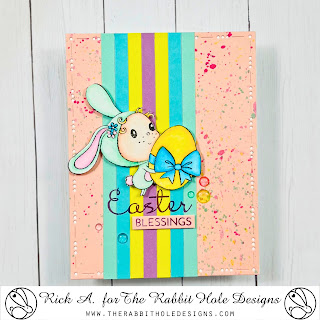
Easter Blessings | Easter Bunnies Stamp Set

 Hello and welcome back to the blog; it's Rick back with you today to share a super cute and easy card using the brand new Easter Bunnies Stamp Set designed by Agota Pop for the Rabbit Hole Designs.  The Easter Bunnies Stamp Set features three cute little kids dressed up in easter bunny outfits; each in different posies getting Easter eggs ready for the hunt.  

Easter Blessing Card Easter Bunnies Stamp Set Rick Adkins

I stamped the super cute little bunny with the egg that has a cute little bow wrapped around it in VersaFine Clair Nocturne Ink, so that I could do a little watercoloring.  Once I got it colored up it was time to cut it out.  There are the matching Easter Bunnies Dies available but I didn't have them at the time I designed this card; so I did a little fussy cutting to cut it out.  

Easter Blessing Card Easter Bunnies Stamp Set Rick Adkins

Once I had the cute little bunny cut out I cut a standard A2 top folding card base.  I cut a piece of peach cardstock using the largest die from the You've Been Framed Dies.  Before attaching the card front to the card base I did a little ink splattering to add a little texture.  Once I was done with the splattering it reminded me of the Robin Egg Candy that was popular when I was a kid.  I attached the die cut piece of cardstock to the card base. 

Easter Blessing Card Easter Bunnies Stamp Set Rick Adkins

 I cut strips of cardstock in easter colors that matched the coloring done on the bunny.  I attached each strip alternating colors just off center.  I placed the card base into my stamp positioner and placed the little bunny where I wanted it to be.  I stamped Easter from the stamp set on the strips with a nice purple ink.  I then added a second strip of the same peach cardstock with the rest of the sentiment on it.  I finished off the card by taking a few of the Clear Sparkle Enamel Dots to the card front, but before attaching each I colored each one with coordinating pastel alcohol markers.  

Thanks for dropping by today I hope that you have a fabulous day.  

Happy Crafting, 

Rick 

Sending Some Love - Cupid Clarence

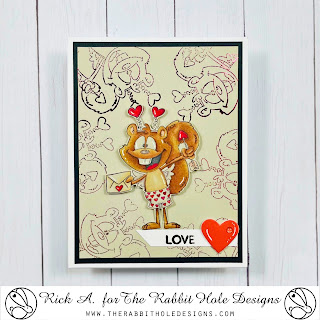
Hello and welcome to the blog; it's Rick back with you today to share a super cute little Sending Some Love card using the Cupid Clarence Stamp Set.  Cupid Clarence is a 4 x 4 stamp set designed by Dustin Pike for the Rabbit Hole Designs.  It's a fun little set that you can color up Clarence in any media you would like, and has some sweet sentiments as well.  Some of the sentiments include "love" (which we used on today's card), "Happy Galentine's Day",  "Happy Valentine's Day", " sending some love your way", and the sentiment that I used on my last card "You are a little quirky, but that's why I love you".  So, you can see you can pretty much hit up any occasion with this little love themed stamp set.   Here's a look at the card I designed to share with you today.  

Sending Some Love Cupid Clarence Card by Rick Adkins

For my card today I took and stamped Clarence in his little cupid outfit randomly all over the background in a clear sticky ink and covered it in clear embossing powder.  I then heat set the embossing powder and ran the background through my laminator with heat transfer foil in a nice dark pink color.  I then cut out the panel and matted it onto a piece of black cardstock and placed it on my card base.  I then stamped Clarence onto some alcohol marker friendly paper and stamped him in an alcohol marker friendly coloring ink.  I used my alcohol markers to color him in and bring this cute little cupid to life.  

Sending Some Love Cupid Clarence Card by Rick Adkins

Once I had him all colored up I added some white highlights with my white gel pen and cut him out.  There is the coordinating Cupid Clarence Die available to cut him out I didn't have it when I designed today's card so I had to fussy cut him out.  Which wasn't to bad but if I had to do it over I would use the die instead.  To finish off the card I added my sentiment on a strip of white cardstock and popped both him and the sentiment up.  I then added a small heart die cut from my stash with one of the Clear Sparkle Enamel Dots added to it for a little bling.  

Thanks for dropping by today I hope you have a wonderful day and that you found this post helpful. You can find all the supplies that I used on today's cards on my blog post by clicking here!

You can find me on the following Social Media Channels with more crafty inspiration: 
I hope that you have a crafty day.  For more inspiration, updates, and news make sure to check out these places.  

Snowy Night Scene - Penguining Stamp Set

Hello crafty friends and welcome back to the blog; it's Rick back with you again today to share a little more inspiration with you.  Today I am sharing a fun night scene card that I created using the Penguining Stamp Set illustrated by Tatsiana Zayats for the Rabbit Hole Designs.  I started this snowy night scene out by stamping the adorable penguins in embossing ink onto a piece of black cardstock.  I then covered them in white embossing powder and heat set.  After that was done I cut masks for each penguin and masked them off.   

Night Scene Card with the Penguining Stamp Set by Rick Adkins

I then took the Cat Eye Stencil and turned it on it's side and die a little ink blending with a hybrid ink in three or four different colors.  I did the ink blending very lightly so that it would look like the northern lights.  I then colored my penguins with some colored pencils and added some snow mounds in the background along with some snow falling and some trees covered in snow. 


Night Scene Card with the Penguining Stamp Set by Rick Adkins

 Remember when you are adding snow to your cards make sure to go over your stamped designs.  Snow in nature doesn't fall around things so you have to go over them to make it look realistic.  I hope that you have a wonderful day and I will see you soon. 

Stay Crafty 

Rick 

Easy Clean & Simple Fall Card

Hello and welcome back to the blog; it's Rick back with you today on this fabulous Black Friday!  I hope that you save some time to do a little crafting today after all your shopping adventures.  And if you have been out all day shopping and want to do a little crafting than my card today featuring the Falling Leaves Dies is the perfect one to recreate.  

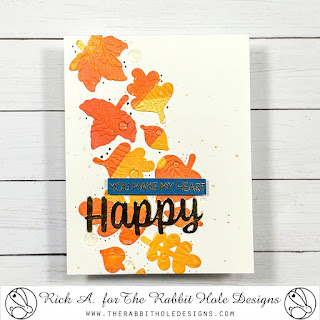
Clean & Simple Fall Card by Rick Adkins using the Falling Leaves Dies


If you remember I mentioned on Monday that I would be sharing another card with you this week using more of the leaves that I die cutting and Gelli printed.  Well, this is that card!  To increase the fall vibes on the card I took the leaves die cuts and ran them through and embossing folder to add just a little more texture to the die cuts.  I simply attached the die cuts to my A2 card front cut from Cream Cardstock from the top left corner down to the bottom left corner but with a slight curve in the middle for added interest.  

Close up view of Rick's Fall Clean & Simple Card Design

 Once I had all the leaves attached and the extra trimmed off the edges.  I took a black pen and drew on a few dots around a few of the leaves on the card.  I also added a little gold splatter to the card front as well.  Even through I have a lot of white space on the card, all the colorful leaves make it quite colorful.  The little extra details add to the texture and help provide a little more interest to the card, but they are so shuttle they do not over power the clean and simple design. 

Falling Leaves Dies, Happy Scripty Dies, Happy Scripty Stamp Set, Rick Adkins

 For the sentiment to the card I cut out the word happy from the, Happy Scripty Word with the Shadow Layering Die, just without the shadow layer and cut it from some gold metallic cardstock.  I attached the die cut sentiment to the card front with a little liquid glue.  I then took and stamped one of the sentiments from the Happy Scripty Stamp Set. I made sure to prep the cardstock with my Cottontail Embossing Powder Tool before adding gold embossing powder and heat setting it.  The sentiment strip was stamped on a scrap of navy cardstock (also left over from a pervious project).  For the sub-sentiment I popped it up with a little foam tape for a little dimension on the card.  Just a little side note if you don't have on of the Cottontail Embossing Powder Tools, do yourself a favor and pick one up as a little early Christmas present to yourself.  You will thank me for that little piece of advice.  

Falling Leaves Clean & Simple Card Design By Rick Adkins

To finish off the card and to add a little more bling to my clean & simple card; I added a few of the Clear Enamel Dots sprinkled around the card and on the leaves.  Since this was a clean and simple design I wanted something that would add a little bling but not over power the card design.  And the Clear Enamel Dots was the ticket.  They provide just the right amount of sparkle and shine but do not over power the card design.  I really love how on the leaves they look like dew drops from an early fall morning.   

I hope this post has shown you that creating a clean and simple design isn't as hard as you may think. Sometimes stepping outside of your comfort zone while crafting can truly elevate your designs.


Remember, it's all about experimentation and finding what resonates with you. And don't forget to share your creations on social media and tag The Rabbit Hole Designs to spread the card-making love.


Thanks for dropping by today I hope you have a wonderful day and that you found this post helpful. You can find all the supplies that I used on today's cards on my personal blog! 


You can find me on the following Social Media Channels with more crafty inspiration: 

Blog:  https://www.rckinsmonstudio.net/rickadkinscards

Facebook Page:  https://www.facebook.com/rickcraftycorner

YouTube:  https://www.youtube.com/@RickAdkins

TikTok:  https://www.tiktok.com/@rickadkinscardmaker

Instagram:  https://www.instagram.com/rickadkinsdesigns/


I hope that you have a crafty day.  For more inspiration, updates, and news make sure to check out these places.  


The Rabbit Hole Designs

The Rabbit Hole Designs Instagram

The Rabbit Hole Designs Facebook Page

The Rabbit Hole Designs YouTube


Have a crafty day!

Rick 

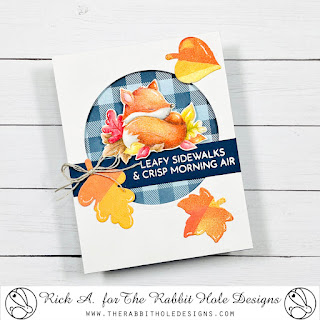
Leafy Sidewalks & Crisp Morning Air

 Hello crafty friends it's Rick back to share another fun project with you during this holiday week with it's crisp morning air and leaves falling on the sidewalks!  Which was the inspiration for my little card today.  I hope you have gotten all your trimmings and things ready to go for the big day on Thursday!  So, in the spirit of Thanksgiving I created a super cute little Fall themed card using the Fall Foxes Stamp Set and some colorful fall leaves die cuts that I cut our using the Falling Leaves Dies.  


Fall Foxes Stamp Set, Falling Leaves Dies, Window Card, Rick Adkins, Rabbit Hole Designs LLC, Agota Pop

For the cute little napping fox (which I am sure we all will be doing come Thursday after our Thanksgiving meal) I decided to do a little no line coloring with my colored pencils.  I stamped him in a light color ink and colored up up.  The trick to no line coloring is to make sure you have all your values in place to make the image look dimensional.  I used my paper snips to cut him out and used a set of nesting circle dies to cut out the window in the center of the card base.  I then placed my little fox in the center on some foam tape.  

Fall Foxes Stamp Set, Falling Leaves Dies, Window Card, Rick Adkins, Rabbit Hole Designs LLC, Agota Pop

To ground this adorable little guy I added a strip of navy cardstock with the sentiment heat embossed in white just below him.  This gives the impression that he is resting on the sentiment strip.  I then embellished the card with a few of the fall colored leaves that I die cut from a gel print using the Falling Leaves Dies.  

Fall Foxes Stamp Set, Falling Leaves Dies, Window Card, Rick Adkins, Rabbit Hole Designs LLC, Agota Pop

And there you have my simple little fall card just in time for nap time on Thursday.  All know that everyone is enjoying the crips morning air and leafy sidewalks during your morning strolls.  So, I hope that you have a fabulous day and I will be back with another card later this week using the Falling Leaves Dies for another fun little card design.  So, stay tune for that. 

Thanks for dropping by today I hope you have a wonderful day and that you found this post helpful.  You can find all the supplies that I used on today's card on my blog post by clicking here!

You can find me on the following Social Media Channels with more crafty inspiration: 

I hope that you have a crafty day.  For more inspiration, updates, and news make sure to check out these places.  

Have a crafty day!
Rick 

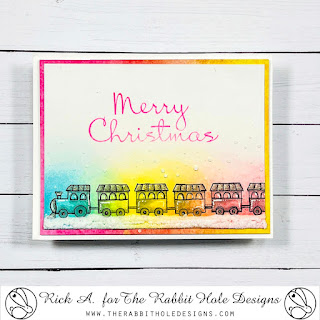
Create Colorful Christmas Cards in a Flash

Hello and welcome back to the Rabbit Hole Designs Blog; it's Rick back with you today with a fun and festive Christmas Card Idea using the Baby's 1st Christmas Stamp Set.  I know that a lot of you may have your holiday cards all ready to go plus some may have started sending them out.  But if you're like me and in need of another idea that's quick and easy I have you covered.  

Baby's 1st Christmas Stamp Set, Rabbit Hole Designs, Rick Adkins, Train, Ink blended Card

Like I said this card is super easy and actually depending on how you choose to embellish it could be mass produced rather quickly. Okay, so this is the deal. You will need to pick a red blue and yellow ink color that's water reactive. Pull out your CottonTail Blending Brushes or even your Bitty Bunny Blending Brushes and slap down the three primary colors onto your Bristol smooth or watercolor cardstock where you are planning on stamping your focal image. Let the three primary colors overlap a little; but the blending doesn't have to be perfect. So, if you are not the best at ink blending no worries. Make sure you add enough ink to cover your chosen stamped image.

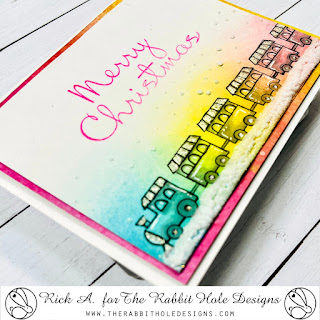
Baby's 1st Christmas Stamp Set, Rabbit Hole Designs, Rick Adkins, Train, Ink blended Card

Now the magic can happen! Spritz the ink with a little water and take a large flat brush and swipe through the ink. This will soften and blend the ink together. You want the ink to run a little that's okay. Next you are going to dry your cardstock panel completely. Once you have the panel dried stamp your focal image in the colored area. I picked the train from the Baby's 1st Christmas Stamp Set and added a few extra cars at the end of mine to extend the train a little. Make sure to stamp the image in a darker ink and something that want smear with your chosen color additive (markers or colored pencils). I stamped mine in Versafine Clair Nocturne Ink but stamped it off once to make it just a little lighter.

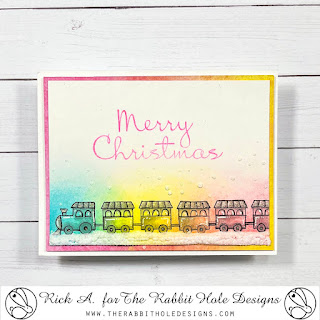
Baby's 1st Christmas Stamp Set, Rabbit Hole Designs, Rick Adkins, Train, Ink blended Card

Next I added some slight shading with a warm gray marker to the engine and box cars to give them a little more life. And then added a little glitter to sections of each with a glitter pen. I then added some snow below the train and sprinkled around the sky. All I had to do then was to stamp my sentiment in a coordinating ink color. I picked the Merry Christmas from the Poinsettia & Pinecones Stamp Set for my sentiment today but you can use any of the wonderful sentiments from your collection of Rabbit Hole Designs stamps.

Baby's 1st Christmas Stamp Set, Rabbit Hole Designs, Rick Adkins, Train, Ink blended Card

To finish off the card all I had to do was mat my inked panel with coordinating cardstock (or even pattern paper would work) and added it to my A2 (4 1/4" x 5 1/2" folded) Card Base.

I hope this post has given you another idea to add to your crafty arsenal. Whether you're making cards to brighten someone's day or as a creative outlet for yourself; having a fun technique to use for quick cards is a game changer.

Remember, it's all about experimentation and finding what resonates with you. And don't forget to share your creations on social media and tag The Rabbit Hole Designs to spread the card-making love.

Thanks for dropping by today I hope you have a wonderful day and that you found this post helpful. You can find all the supplies that I used on today's cards on my blog post by clicking here!

You can find me on the following Social Media Channels with more crafty inspiration: 
I hope that you have a crafty day.  For more inspiration, updates, and news make sure to check out these places.  


Have a crafty day!
Rick