Pages

Showing posts with label Cotton Tail Blending Brushes. Show all posts

Create a Meowgical Halloween Highlight!


Hello! It's Lauren on the blog today to share this sweet as can be meowgical cat Halloween card I created using the Meowgical Stamp set and the coordinating die set. 

You can watch me create it here in this quick video on my YT channel:


I just love all the cute images that are in this set and I hope I've given you a bit of Halloween inspiration today. Below are my links to products I used for my card. Thanks for visiting! 

*Disclosure: I use affiliate links where I can. This does not add any extra cost to you, but I do receive a small amount which helps keep me creating. Thank You*

Meowgical Stamp Set: https://shrsl.com/4nzof

Meowgical Die Set: https://shrsl.com/4oq0p

Cottontail Blending Brush: https://shrsl.com/3htkd

You can follow me here:

Creating a Snow Globe-themed Card with Baby's 1st Christmas Stamp Set

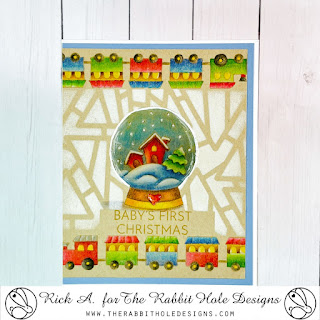
Hello crafty friends, it's Rick back again with another fun card to share with you for the Rabbit Hole Designs.   Today I have another fun little card to share with you using the Baby's 1st Christmas Stamp Set (designed by Agota Pop exclusively for Rabbit Hole Designs). 

Baby's 1st Christmas Stamp Set, Rabbit Hole Designs, Triangle Mosaic Stencil, Colored Pencils, Diamond Glaze Card by Rick Adkins

To start this card I stamped the snow globe from the Baby's 1st Christmas Stamp Set onto a piece of Kraft colored cardstock in a slightly darker brown ink color.  I then stamped the train and the extra box car to the back of the train along the bottom edge and then flipped the cardstock and repeated that along the top to create a fun little border to frame the snow globe.  I then stamped the sentiment at the bottom of the snow globe to act as an anchor.  

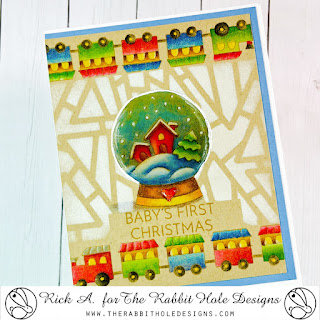
Baby's 1st Christmas Stamp Set, Rabbit Hole Designs, Triangle Mosaic Stencil, Colored Pencils, Diamond Glaze Card by Rick Adkins view 2

Once the stamping was completed I then took some plain old inexpensive Crayola Colored Pencils and started coloring the images.  Yes, I did say Crayola Colored Pencils!  You can get great results with them so don't be afraid to use what you have.  Once all the coloring was completed I then masked off the Snow Globe and sentiment with a simple mask made from Post It Notes and placed the Triangle Mosaic Stencil over the top.  Next I took some White Pigment Ink and a CottonTail Blending Brush (that is designated for White Pigment Ink only) and added the ink over the top of the stencil.  I made sure to not go over the trains at the top and bottom with the white pigment ink.  

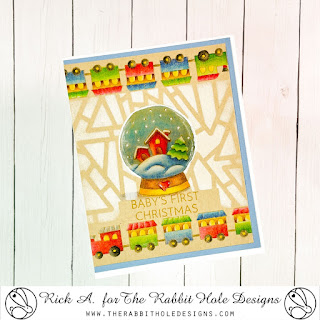
Baby's 1st Christmas Stamp Set, Rabbit Hole Designs, Triangle Mosaic Stencil, Colored Pencils, Diamond Glaze Card by Rick Adkins view 3

Once the White Pigment Ink dried I then added a thin layer of Diamond Glaze over the snow globe's glass and the little heart.  When that dried I cut down the panel a little bit and added it to a light blue cardstock mat layer and then to my white card base.  And that my crafty friends finishes my card for today using the Baby's 1st Christmas Stamp Set.  Thanks for dropping by today and I hope that you have a wonderful crafty day! 

For more inspiration news and updates make sure to follow us on Social Media and check out these places as well! 

The Rabbit Hole Designs

The Rabbit Hole Designs Instagram

The Rabbit Hole Designs Facebook Page

The Rabbit Hole Designs Pinterest

The Rabbit Hole Designs YouTube


Breakfast in the Clouds


Hello! It's Lauren here on the blog today. Do you ever dream of waking up to enjoy a beautiful breakfast on a big, fluffy, soft cloud? That is exactly what I envisioned for this sweet little bunny.

To create this dreamy card, I stamped the image onto white cardstock using black ink. I knew I wanted to paper piece the pillow and bed comforter, so I picked a paper from my stash that I thought would work well with my cloud vision. I stamped the bunny in bed image onto the patterned paper as well. 

Next, I colored the areas of the image on the white cardstock that were not going to be paper pieced using colored pencils.


Then, I fussy cut out the colored image and also the patterned paper pieces for the pillow and the comforter. With everything cut out, I adhered the patterned paper pieces onto the colored image. 

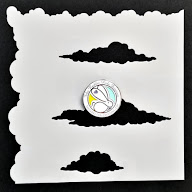
To create my cloud background, I used the Clouds in my Coffee stencil with blue Distress oxide ink that was left on my blender brush. I blended clouds all over a white A2 (4.24x5.5") cardstock panel. I then trimmed it using an A2 sized stitched rectangle die from my stash. 


I adhered my cloud background panel onto a white, top folding, A2 card base. Then adhered my bunny in bed image onto the card. The final step was to stamp the sentiment in black below the image directly onto the background. 

That completes my card for today. I hope this inspires you to create a fun setting for this bunny to enjoy breakfast! Thanks for visiting!

Below are The Rabbit Hole Designs products used to create this card: 


For more inspiration, updates, and news make sure to check out these places


You're Brewtiful!

 Hello there, Rabbit Hole fans. 
It is Kelly here and I am sharing a coffee themed card featuring "Spring Coffee" with their new stencil "Cat Eye"

To make this card, I stamped and colored the coffee image.  If you compare my card image with the original image, you'll see that I trimmed off a part of the stamped image.  I was planning on making a tag, but changed my mind.  

Next, I used yellow, green, purple and orange inks with Cotton Tail brushes on the stencil to create the background panel. 
I stamped the sentiment in purple and matted it on purple paper. I adhered the coffee image with dimensional tape.  

Shimmer pen on the flowers completes the card.


 Spring Coffee


 Cat Eye Stencil


Thank you for visiting the blog.
Come back often for more inspiration using The Rabbit Hole Designs products.

-Kelly


Life Is Short Get The Extra Scoop!

 Hi everyone! Von Marie here and I am so happy to be on the blog today and I have a fun card to share with you using some of my favorite products from the latest release!


I adore this bunny from Tastes Like Summer. I also used the Tastes Like Summer Dies and the Scooped Three Layers Stencil which I love so much for my card today. I had so much fun making this card. I first stamped this image onto Neenah Solar White cardstock with Jellyfish ink from Lawn Fawn and colored it in with my Copic Markers using a no line coloring method. When I was done I cut my bunny image out with the Tastes Like Summer Dies.

I then cut out some white cardstock and used the cone stencil first with brown ink and my Cotton Tail Blending Brushes. Next, I used the scoop stencil with rainbow colors for my scoop colors. I used my brown ink and water to flick some splatters with a paint brush for interest. When that was dry I cut it out with a scalloped rectangle A2 die. I added my panel with foam tape to a Kraft card base and added my bunny image with foam tape. I stamped the sentiment from the same stamp set onto white cardstock using my Misti. I then used my paper trimmer to make a fishtail banner which was then added with foam tape too. I then added sequins to match. I hope you enjoyed my card. Thank you for stopping by!

TRHD Products used:

Tastes Like Summer Stamp

Tastes Like Summer Dies


Scooped Three Layers Stencil

Cotton Tail Blending Brushes

For more inspiration, updates, and news make sure to check out these awesome places! 

The Rabbit Hole Designs 

The Rabbit Hole Designs Instagram

The Rabbit Hole Designs Facebook Fan Page

The Rabbit Hole Designs Pinterest

The Rabbit Hole Designs YouTube

Thank you for stopping by and Happy Crafting!

Von Marie


Snail Mail Delivery


Greetings, Rabbit Hole Fans!
Kelly here and I am sharing this spring inspired card featuring the  "Snail Mail" stamp set, "Amanda" stencil and "Clouds in my Coffee" stencil.
 
I started by stamping the snail on white cardstock, coloring him and die cutting it to get the stitching.  I decided to add the grass and clouds. I used 
"Clouds in my Coffee" stencil with Cotton tail Blending brushes.  I put paper over my snail to keep off the blue ink.  I decided to stamp him again and color the flower section, cut it out and raise it with dimensional foam. I put that panel aside and worked on the top card panel.

I took a piece of smooth white card stock and adhered the "Amanda" stencil with sticky spray.  I inked the panel using a Cotton Tail Blending brush with green ink.  

I adhered my snail panel on top and then put the "hello" on which is covered in glaze.
  
  
Dimension:


 Clouds in My Coffee


A Sweet Koala Hi!

 Hi everyone! Von Marie here and I am so happy to be on the blog today. I have a card to share with you using some of my favorite New TRHD products.

I used the Koala Botanical stamp set, Amanda StencilClear Foam Tape 5MM Wideand Space-Miss You Stamp set for my card today. I first stamped my flower and Koala onto Neenah Solar White 80lb. cardstock using my Misti. I then colored up my images using a little No-Line ink coloring with Altenew Artist Markers and Prismacolor Colored Pencils. I chose to fussy cut the flower and put my Koala to the side to work on my background.


I used some Neenah Desert Storm 80lb cardstock and used the Amanda Stencil with Bundles Sage Distress Oxide ink with a Cotton Tail Blending brush. I then sprayed Picket Fence Distress Oxide Spray Stain through the stencil onto my panel. When it was dry I cut it out with a A2 stitched rectangle die. I then chose to cut my Koala out with a oval stitched die and stamp the sentiment "Hi" with green dye ink. I love how the oval frames her. I then glued my flower to my oval and added them with the New Clear foam tape 5mm Wide to my stenciled rectangle panel. I then added sequins to match and white gel accents to my Koala's eyes . My panel was then added to a A2 card base. I hope you enjoyed my card.

TRHD Products Used:


Amanda Stencil


Space-Miss You


Cotton Tail Blending Brush


Clear Foam Tape 5MM Wide


For more inspiration, updates, and news make sure to check out these places

For more information, news and updates check out these links:

 Thank you for stopping by and Happy Crafting!

Von Marie


Sprinkles Please!

Hello my crafty friends!  This has such a summer warm vibe to it.   This fun shaker card is featuring The Rabbit Hole Designs' Taste Like Summer stamp set.  I paired it up with the Corner Mandala stencil because it created such a whimsy  likeness of the Sun.

 I started by stamping the bunny image from the Taste Like Summer stamp set onto a piece of yellow cardstock with brown ink. The bunny is colored with colored pencils an so is the cone.  I used a kraft knife to carefully cut the three ice cream scoop opening in the card.   I positioned the Corner Mandala stencil on the top left hand corner of the yellow cardstock and masked of some of the stencil leaving only what looks like the sun and rays to stencil.  I used Cracklin Campfire, Carved Pumpkin and Squeezed Lemonade  Distress Oxide ink with the Cotton Tail Blending Brushes to create the sun.

 I die cut some grass from green card stock and added it to the bottom portion of the card front. I die cut some grass from green card stock and added it to the bottom portion of the card front. I stamped the sentiment "life is short get the extra scoop" just above the grass on the left side of the card front. I turned the card over and attached a piece of clear acetate for the shaker window. I outlined the shaker window with The  Rabbit Hole Designs' new Double Thick Crystal Clear Foam Tape - 5mm wide. This tape is clear, so you can see through it.  You will not see any white foam at the edges of this card!  I added my shaker elements and then sealed the opening with a piece of cardstock.  I then added the Double Thick Crystal Clear Foam Tape - 5mm wide around the outer side back of the card front and attached it to in A2 grapefruit colored card base.  I embellished the Sun with some sequins to complete the card.


Here are The Rabbit HoleDesign products used in this card:

Taste Like Summer stamp set


Corner Mandala Stencil

I hope you enjoyed this Sprinkles Please! Shaker card featuring the Taste Like Summer stamp set, Corner Mandala stencil and NEW Double Thick Crystal Clear Foam Tape.   I love hearing from you. Please feel free to leave comment or a question.


Be Creative ~ Stay Inspired

Jenn Gross


Follow me, Journey Coach Jenn, on 

Instagram - https://www.instagram.com/journeycoachjenn/ 

YouTube - http://www.youtube.com/c/JourneyCoachJenn

Blog - http://www.journeycoachjenn.com/


For more inspiration, updates, and news make sure to check out these places


The Rabbit HoleDesigns

The Rabbit Hole Designs Instagram

The Rabbit Hole Designs Facebook Page

The Rabbit Hole Designs Pinterest

The Rabbit Hole Designs YouTube


Happy St. Patrick's Day!

 Hello Everyone! Von Marie here and I wanted to wish you a Happy St. Patrick's Day! I hope you are wearing green today. I have a card to share with you today using the New Clover Bunny Stamp Set.


Isn't this Clover Bunny cute? I adore this image. I chose use No Line Coloring technique which is really new for me and I need practice but this bunny doesn't take much coloring so I tried that technique with this image. I first stamped the image with Gina K Designs Skeleton Leaves onto Neenah Solar White 80lb using my Misti. I colored the image in with Copic Markers and used the Clover Bunny Die set to cut my image out.


Sometimes in my stash I have extra scraps that are inked and so I had this ink blended grass scrap of paper that was die cut with a grass die and was ink blended with Mowed Lawn Distress Oxide onto Sweet Sentiment cardstock. I also ink blended some clouds onto Neenah Solar White Cardstock 80lb using Broken China Distress Oxide ink, Clouds in My Coffee Stencil, and Cotton Tail Blending Brushes. I cut out my grass and clouds with a double stitched rectangle and layered them together. I used a A2 rectangle die with the Spring Floral #2 6x6 paper Pack. My sentiment was stamped onto a cloud scrap of paper with green ink that was cut to a banner with a die. Everything was glued with liquid glue to a A2 card base, except my bunny that is popped up with foam tape. Lastly, I added white gel accents with my Signo pen and sequins to match. I hope you like my card.

TRHD Products Used:

Clover Bunny Stamp 3x4


For more inspiration, updates, and news make sure to check out these places


Thank you for stopping by and Happy Crafting!

Von Marie