Pages

Showing posts with label A2 card. Show all posts

A Very Merry Retro Christmas Card


Hello my crafty friends and welcome to today's blog.  I created a retro Christmas card using The Rabbit Hole Designs Poinsettia & Pinecone stamps (a Kelly Taylor Cards illustration) along with the coordinating dies.
After coloring the images with OLO Markers, I die cut them with their coordinating die.  I cut apart the pine sprig to create two sprigs. Each sprig is gently shaped to bring in some depth to the the pinecones and needles.  I added splashes of white gold watercolor to create a falling snow effect on the Poinsettia flower and pine sprigs.
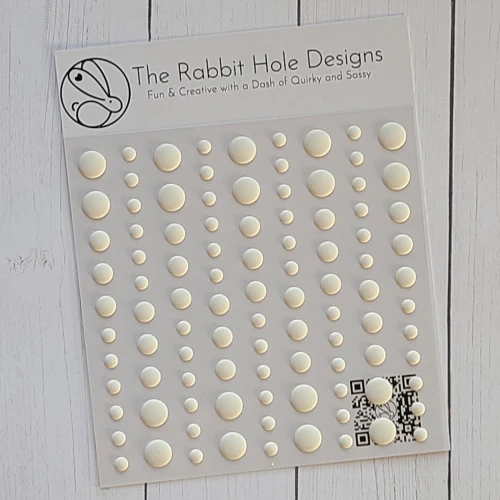
I used a pale pink ink to stamp the solo Poinsettia flower in a random pattern to  4" x 5 1/4" white card front.  I checked the placement of the sprigs and flower on the top right of the card front to see where to stamp the sentiment to the panel.  Once the sentiment is stamped, I attached the poinsettia and sprigs to the card front with glue and foam tape.  I finished the card by mounting it to a sage green A2 card base.  I colored the Matte White Enamel Dots with the white gold paint and lt them dry before adding them to the lower left corner of the card front.

Thank you for taking the time to stop by today's blog.  I hope you enjoyed this tutorial and are inspired to create something lovely today.

Be Creative ~ Stay Inspired

Jenn Gross


Follow me, Journey Coach Jenn, on 

Instagram - https://www.instagram.com/journeycoachjenn/

YouTube - http://www.youtube.com/c/JourneyCoachJenn

Blog - http://www.journeycoachjenn.com/


For more inspiration, updates, and news make sure to check out these places


The Rabbit Hole Designs

The Rabbit Hole Designs Instagram

The Rabbit Hole Designs Facebook Page

The Rabbit Hole Designs Pinterest

The Rabbit Hole Designs YouTube


Celebrating Love! Happy Year of the Rabbit


Hello crafty friends and Happy Chinese New Year!  Today begins the Year of the Rabbit and I am super excited to share this Love-N-Heart die from The Rabbit Hole Designs.  Do you know there are two ways you can get this die and one of them is for free!

The Love-n-Heart Die is free with a $75.00 product purchase (prior to shipping and taxes).  It can also be purchased seperately for $9.99.  Add the Love-N-Heart die to your cart and the discount (if applicable) will be applied upon checkout. No code is needed. This is a while supplies last type of discount.

Let's take a look at this easy to make card.
I die cut the Love-N-Heart die twice.  Once from a glossy black cardstock and a second from a matte white cardstock.  
I used the white die cut outline and positioned the black glossy die cut inside pieces to fill in.  The background printed paper is from my stash.  It is a red paper with gold foiled firework bursts.  It is perfect to celebrate the Chinese New Year. I cut a piece to 4" x 5 1/4" to use as a card front.
I glued the white Love-N-Heart outline down on the middle of the printed card front.  I then glued the remaining black pieces in place.  I glued this card front to a white A2 cardbase completing this festive card.

Products used

Thank you for stopping by and checking out this festive card featuring the Love-N-Heart die.  Remember there are two ways you can get this die while supplies last.  I hope you are inspired to create something lovely today!  May you have a happy and abundant Year of the Rabbit! 

Jingle Wishes Shaker Card


Hello Everyone! Justin here, and today I am sharing this fun shaker card that I made using the new Kringle set, and a couple elements from the Slice of Christmas stencil!

First, I colored up my Santa from Kringle with Copic Markers, fussy cut him out and set him to the side.

Using my Slice of Christmas Stencil, I blended one of the trees onto white cardstock using a Cotton Tail Blending Brush, using a green blend of Oxide Inks for the body of the tree, and a brown ink for the stem. I fussy cut my tree out and set it aside with my Santa.

I took a square piece of white cardstock and ink blended a light blue green to navy ombre blend using Oxide Inks and a  Cotton Tail Blending Brush. I spritzed this piece with water and set it aside for later.

Taking an A2-sized piece of white cardstock, I used the "snowbank" from the Slice of Christmas stencil and blended up a horizontal wonky stripe pattern using a red Oxide Ink with a  Cotton Tail Blending Brush. I took a square die cut, and cut a window in the upper center of my image.

Next, I took an A2-sized piece of kraft cardstock. I used 2 square dies to cut out a frame that would fit perfectly over my square cut out from my red striped panel. I distressed the edges with a brown Oxide Ink, and adhered my frame directly over my window. Then, I cut a .75" strip from the bottom of my kraft cardstock, and blended a darker brown ink over the Circle Illusion stencil, creating a wood effect that I like to use with a  Cotton Tail Blending Brush. I adhered this strip to the bottom of my stripe panel to act as the flooring.

Taking the banner stamp from Kringle, I stamped the banner, and then stamped the buildable sentiment "Jingle Wishes" inside the banner in an alcohol marker safe ink. I heat set the ink, and then colored over the banner in red Copic Markers.

I took my fussy cut Christmas Tree and adhered some sequins to it from a shaker pack. I alsåo cut out a small tree skirt from my scrap patterned paper stash, adhered it to the bottom of my tree, and adhered my tree to the lower right portion of my panel. I also took my sentiment banner, tucked it behind the tree, and adhered it down.

I flipped my panel over, and adhered acetate to cover my window. I then took my Kringle Santa and adhered him so that he looked like he was peeping into the window to say hello. I also adhered a very small piece of his hat directly to the visible acetate, just to help keep him flush against the shaker window.

Using doubled up foam tape, I made a border around the outside of my shaker window on the backside. I removed the backing, and then went over the edges of the tape (not the tape backing portion) with an anti-static powder tool. I took my blue-green-to-navy ombré piece and poured a shaker pack on top of it (very carefully, so that none of the sequins went astray). I took my mail card panel, carefully placed my card over the ombré piece, and pressed down to fully adhere it. I gave my card a shake to make sure none of my shaker bits flew out, and I got the all clear to finish this card up!

I used doubled up foam tape to cover some remaining back portions of the panel, removed the backing, and adhered it to an A2-sized card base. I also wanted to add a little extra glitz, so I took a couple more sequins from the pack and adhered them onto my card as well.

And that's how I made my project!

Here are the products I used:


Circle Illusion stencil


For more inspiration with your The Rabbit Hole Designs Creations, be sure to follow along at these other locations:


For more details about products used in this post, you may also follow along at my personal blog, Just a Note by Justin, as well!

I cannot wait to see what you craft up using these super cute new Christmas in July release products! Be sure to share them in The Rabbit Hole Designs Fan Page (and don't forget about the Anything Goes Challenge Album as well!

Happy Crafting!


C-ANT before Coffee

Hello Everyone! 
Donna here with you today sharing our mid-month post.
I can't believe it's already the middle of May.
I hope you've been able to enjoy some creative time as a diversion 
during all the craziness going on in our world right now.

For my post this month I created this cute little layered card using lots of
scraps from my stash along with some new products.

I chose water color for my medium on this cute little Ant from the
Buggy For Caffeine stamp set.


Buggy for Caffeine
This stamp set has a bazillion possibilities and there is also a coordinating Buggy for Caffeine die set. 


Broken Glass Stencil

To add some interest on my card base I used the Broken Glass Stencil and created some
shadows which I kinda sorta think look like ant trails. I used Picket Fence distress ink for the shading on that element of my card.  

Thank you so much for joining me today!
Wishing you the most beautiful day.
~Donna K


For more information, news and updates check out these links:

Earthy Mantis Card


Hey Everyone! Justin here, and I am buzzing with excitement to share today's project, which uses the adorable Praying Mantis from the new Buggy for Caffeine set!

I wanted to do something that had a lot of earthy tones, so I knew it was time to break out some kraft cardstock!

First, as always, I colored up my Praying Mantis with alcohol markers and fussy cut them out. Next, I used some glossy accents to give the Praying Mantis's eye pop and a little shine! I set my bug aside to dry.

Next, I took a 4.125" x 5.375" piece of kraft cardstock and placed the Diamond Flower Stencil over top. I took 3 shades of an earthy green ink and blended them onto the cardstock to give them a light to dark ombré. I then took this panel and mounted it onto an A2-sized piece of grassy colored cardstock.

I also wanted to create a striped piece out of cardstock as well. So I cut (3) strips of light green cardstock and (2) strips of that grassy green cardstock, all cut at .25" x 4.25". I took a piece of kraft cardstock and carefully adhered each of the strips in a careful pattern to create almost a striped banner. I placed this going horizontally across the center of the card.

I could now begin to finish up my card. I adhered my Mantis onto a piece of dark green paper, and fussy cut them out so they had a little bit of a dark green frame. I also stamped the sentiment "#deadbeforecaffeine" in green ink onto kraft cardstock, framed it in light green cardstock and cut it into a strip. I adhered my mantis and sentiment with foam tape, and some sequins. I adhered my whole panel onto an A2-sized card base and I was finished!

The products I used in this card are:


For more inspiration with your The Rabbit Hole Designs Creations, be sure to follow along at these other locations:


For more details about products used in this post, you may also follow along at my personal blog, Just a Note by Justin, as well!

I hope you're loving these new critters and are finding some amazing inspiration for your next crafty project!

Happy Crafting!

Puff and a Cuppa Coffee

Hello Rabbit Hole Designs Fans!! DTM Shanna here with another fun card using my newest favorite Caffeinated Critter, Caffeinated Dragon!  
I was playing around with my Zigs again, and had a lot of fun making a green dragon.....pairing it with a background I made using the Spell It stencil!!  You know you are singing the song with me right now!!


To add some sparkle and detail to my critter, I used Liquid Pixie Dust, from Inkon3, to paint oval-scales on the body of the dragon.  This was my first time intentionally painting with the pixie dust, and oh my goodness will I be doing it again!  Subtle-sparkly-texture-goodness!!! 


Lastly, I added a sentiment banner using a sassy sentiment from the Perfectly Blended sentiment set.  Dragons are old right? So of course they drank coffee before it was cool!!  (or so my 10 year old says!!!)


What is your go-to supply for sparkle??  I am enamored with the Liquid Pixie Dust right now, but have used many things in the past.  
 
That wraps up my post for today, I will be back for another trip down The Rabbit Hole next week!  Until then you can find me over on my blog, Caffeinated Craftiness or over on Instagram
***BONUS*** I have a speed coloring video with me coloring this dragon over on my FB page and IGTV channel!!  Take a peek, I will be sharing it in the fan group as well!
-Shanna

For even more inspiration, updates, and news make sure to check out these links.

Deck the Halls!

Hello everyone! DTM Shanna here today with a card featuring The Rabbit Hole Design‘s new release for November, Christmas Frost! Christmas cards are always a favorite to make, and this card was no exception.


I started by taking a couple scraps of christmassy-paper (I like making up my own adjectives!)( and tearing one before layering them and die cutting my panel.  Next I used DecoFoil Metallix gold gel to stencil snowflakes from the Light Me Up stencil all across the background.  

While the background was drying, I stamped and colored the tree decorating couple from the Love you More--Christmas Frost stamp set.  They were watercolored with my Zig real brush markers. They were mounted with foam tape to the background for a bit of dimension.


My sentiment came from the same stamp set, and was matted in black cardstock and then added to the panel with foam tape too.  The panel was mounted to a teal card panel to bring out the color of the tree a bit more.  


Here is the full stamp set, isn't it cute??


That wraps up my post for today, I will be back next week for another trip down The Rabbit Hole!  Until then you can find me over on my blog, Caffeinated Craftiness or over on Instagram
-Shanna


For even more inspiration, updates, and news make sure to check out these links.

All I want for Christmas

Hello everyone! DTM Shanna here today with a card featuring The Rabbit Hole Design‘s new release for November, Hoggy Holidays! I love making non-traditional Christmas cards, and the presents image in this set was just perfect for a rainbow card!!  (any excuse for a rainbow right?!?)


I started by making a watercolored background for my presents by ink smooshing a rainbow of distress inks across a piece of watercolor paper.  I let the dry and then actually stenciled over it with Ranger Transparent Texture paste using the Diamond Flower stencil from TRHD.  The end result was quite pretty, but silly me ended up covering most of the stencil work with the card elements.  So here is a close up I took on my phone of the scrap so you could see how pretty the stencil work turned out.

Next I stamped out a bunch of the presents and colored them with my Zig markers, sticking to the colors of the rainbow. I lined them all up across the watercolored background in rainbow order, adhering with foam tape.


I chose a split card design for this card, die cutting 2 panels to adhere to my card base with foam tape above and below my stamped images.  The accent makes it look like the presents are *floating* in the negative space between the panels.  Kinda fun!!


Here is the full stamp set, isn't it cute??  


That wraps up my post for today, I will be back next week for another trip down The Rabbit Hole!  Until then you can find me over on my blog, Caffeinated Craftiness or over on Instagram
-Shanna


For even more inspiration, updates, and news make sure to check out these links.

This is My Costume!

Hello everyone! DTM Shanna here today with a card featuring The Rabbit Hole Design‘s new release for November, Hoggy Holidays! With today being Halloween, I just couldn't bring myself to make a Christmas card!!  Sooooo....who else loves a piggy dressed up for halloween in a Rudolph mask??  LOL


My card design actually used a lot of pattern paper scraps from a 6x6 pad I had in my stash. I inked all the edges in black ink to help tie everything in together.  My Pig was colored using my Zig Real Brush Markers and fussy cut out.  I popped him up with foam tape on top of the tag to add some dimension. Extra touches included adding glossy accents to the lenses of the glasses to make them more  “realistic”!


My sentiment came from the Pumpkin Hair Don't Care stamp set.  It was the perfect sentiment to turn my *Christmas* stamp into something for Halloween!!  


Here is the full stamp set, isn't it cute??  


That wraps up my post for today, I will be back next week for another trip down The Rabbit Hole!  Until then you can find me over on my blog, Caffeinated Craftiness or over on Instagram
-Shanna


For even more inspiration, updates, and news make sure to check out these links.

A dose of Reali-tea


Hello everyone! DTM Shanna here today with a card featuring The Rabbit Hole Design‘s New Release for October, Caffeinated Reindeer! All of them new caffeinated critters are so flipping fun to play with, you will want to check them all out here, if you haven’t already.

Moving on to my card for today... I had a lot of fun watercoloring my reindeer, and then was *puzzled* by what to do for a backgound.  Puzzled you say?  My perfect solution was found with TRHD’s Puzzle Box stencil!  I used Nuvo expanding mousse, but chose not to heat set it so it retained more of the metallic finish.  The stencil was applied over a Barn Door distress oxide ink blended card panel. The red and green came together for a fun Christmassy background I think!


I added a bit of interest by die cutting a circle from some metallic gold printed vellum and stamped the caffeine symbol from the stamp set all over it.  The sentiment is from the Perfectly Blended sentiment stamp set, and was stamped on a banner die cut and water colored to match.


Have you started making Christmas cards yet?
That wraps up my post for today, I will be back next week for another trip down The Rabbit Hole!  Until then you can find me over on my blog, Caffeinated Craftiness or over on Instagram!
-Shanna
For even more inspiration, updates, and news make sure to check out these links.
The Rabbit Hole DesignsThe Rabbit Hole Designs InstagramThe Rabbit Hole Designs Facebook PageThe Rabbit Hole Designs PinterestThe Rabbit Hole Designs YouTube

Putting On My Hat

Hello everyone! Shanna here today with another Halloween card featuring Hex Yeah!

  
I have been bitten by the stencil bug recently, and have been playing around with different techniques and stumbled upon a fun one!  I used Distress Oxides on black cardstock for my background with the Puzzle Box stencil from The Rabbit Hole Designs.  The opaque nature of the oxides gives almost a foggy look to the colors when applied on black, and I really like how it blended out!  I used Seedless preserves, Carved Pumpkin, and Mustard Seed oxide inks in random areas over the puzzle box stencil to create my background.  For a bit of glitz, I pulled a spiderweb stencil from my stash and used to Gina K Glitz glitter gel in black for another layer of interest. 


My witch hat was a long forgotten extra I found tucked away in my fall embellishments and I couldn’t resist pairing it with the sassy sentiment from the Hex Yeah stamp set!  I heat embossed the sentiment in gold on the same black cardstock I had used for my base panel.  Last touches were a couple strips of Washi tape from my stash and I was all done.

This card came together fairly easily, and I am in love with the end result.  What is your favorite stenciling technique?  The Rabbit Hole Designs has some pretty neat stencils, if you haven’t seen them yet check them out here.

That wraps up my post for today, I will be back next week for another trip down The Rabbit Hole!  Until then you can find me over on my blog, Caffeinated Craftiness or over on Instagram!  
-Shanna

For even more inspiration, updates, and news make sure to check out these links.

Golden Boo to You

Hello TRHD fans!! Did you have fun falling down the rabbit hole this last week with our new release inspiration hop??  Aren't the new stamps just fabulous!?! Just in time for all of our Halloween and Fall crafting and card making!


I have been having so much fun coloring these stamps, but today wanted to do something that *GASP* has NO COLORING!! 
I was inspired by a background I made using Deco Foil Mettalix gel in Gold on black cardstock, and the Circles and Stars stencil.  I kept going with the black and gold theme and my card was born!


I heat embossed the sentiment and image from Boo to You in detail gold embossing powder, and fussy cut out both.  Before fussy cutting the sentiment though, I added the spider to the bottom of the "N" in Halloween and heat embossed it as well to make it look like all one stamp.  After all the fussy cutting was done (phew!) I matted my stenciled panel on top of a gold foil cardstock panel, then lastly onto a black card base.  My image and sentiment were adhered using foam tape for dimension.  I really enjoy how classic this color combo is, and it could be turned into any occasion, not just Hallloween!

Do you have a favorite color combo you like to use?? 

As always, thanks so much for stopping by! You can see more of my creations on my blog Caffeinated Craftiness, or be sure and follow my crafty adventures over on Instagram!
 See you all soon!
~Shanna

For even more inspiration, updates, and news make sure to check out these links.


The Hat Makes the Outfit by Niccole

Hello everyone!


It's Niccole from Nic & Viv Designs back again to share another card I made using one of The Rabbit Hole Designs stamp sets. 

For today's card I used the Hex Yeah & Boo to You stamp sets.


How to create this card:


  • Black A2 card base
  • Added purple layer 
  • Added my white layer with the sentiment from Hex Yeah
  • Stamped the Hat from Boo To You set.
  • Copic colored the image
  • Fussy cut the hat out because I didn't want to use the cat in the image
  • Raised the hat up with foam tape for dimension
  • Added orange Nuvo Drops randomly
Here is one more picture of the full card ...


TRHD Products used:

For more inspiration, updates, and news make sure to check out these places

The Rabbit Hole Designs YouTube


I have had so much fun playing with the Hex Yeah and Boo To You stamp sets.

Thank you so much for stopping by and spending some time with me.

Until next time ... Hugs & inky fingers!   -Nic-