Pages

Showing posts with label Congrats die. Show all posts

The Happy Couple


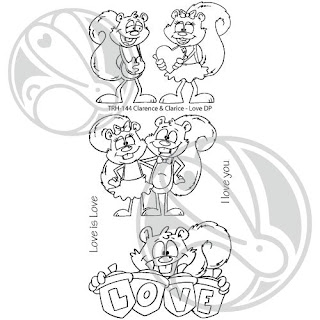
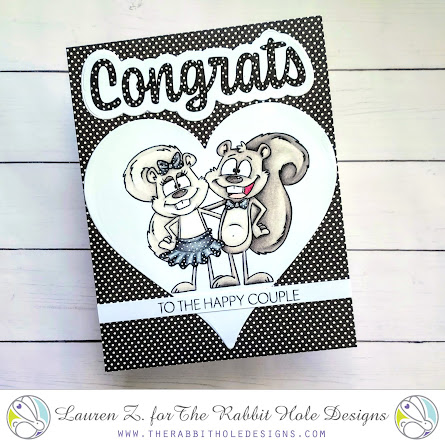
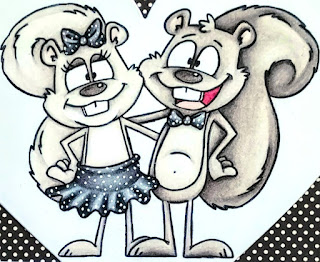
Hello! Lauren here today sharing my cute polka dotted Clarence and Clarice card. I love these adorable squirrels illustrated by Dustin Pike. This image is included in the newly released Clarence & Clarice - Love Stamp set. I thought it would make a cute engagement or wedding card when paired with the Congrats Scripty stamp set. 

I started by stamping my image in black onto white cardstock. I then colored it using colored pencils. I wanted them to match and be a little formal so I chose to color the bows and skirt in shades of cool gray. I used a white gel pen to add the polka dots to the bows and skirt.


With the coloring done, I die cut out the happy couple using a heart die from my stash. 

I then adhered the heart to a black polka dotted A2 (4.25x5.5) panel, then onto a white A2 sized card base. 

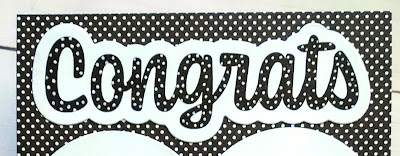
Next, I stamped the word Congrats and also the sentiment "to the happy couple" in black onto white cardstock. I used the coordinating congrats shadow die to cut out the word. I trimmed the sentiment down and added it to the card, below Clarice and Clarence. I waited for the ink of the Congrats to dry fully before using my white gel pen to add polka dots to it too. Then I adhered it to the card above the heart.


I love how this polka dotted card turned out! I think Clarence and Clarice look super cute fancied up! I hope you enjoy this card too! Thanks for visiting! 

For more inspiration, updates, and news make sure to check out these awesome places! 


Another Fave from 2021: At Your Age...

Happy Thursday!  Tangii here and I'm back with another one of my favorite cards from 2021!!

I had this fantastic glittery, shimmery paper and it was perfect for this festive card!  I die-cut the Congrats word from my base, and the shadow in black cs.  The shadow covers the the negative from my die-cutting and now my word has the same colors/gradient as the background.  My sentiment is from the Sassy Birthday 2 set, I stamped it on a white die cut piece and then blended some Oxide ink on the edges.  Finally I stamped, colored and then die cut some candles from the Just Cake stamp set & coordinating dies.  The candles are floating under the sentiment and popped up with pop dots.

The lighting on this pic stinks, but it shows the shimmery-goodness! Lookie at all of those layers & all of that texture! Swoon! 

 All of the items I linked in my post are available at The Rabbit Hole Designs.

You can also read about this card on my blog, here with links to the products I used, etc.  Thanks for popping by, come back again soon!

Hot Foil Plates are FAB-U-LOUS!


Hey y'all, happy Friday-eve! Oh my gosh!  I had some serious fun playing with our new Hot Foil Plates.  For this card I used the Congrats Hot Foil Plate and then used the Scripty Congrats die (the word die, not the shadow).


First I ran the foil plate through, then I placed the word die over it and ran it through again.  My eyesight isn't excellent, but I didn't have a hard time making sure it was lined up.  I adhered it to my Alcohol Ink panel and added a gold ribbon, a heart and a few enamel dots...voila!  Easy peasy and I love how it turned out!

You can also read about this card on my blog, here with links to the products I used, etc.  Thanks for popping by, come back again soon!

Modern Congrats card with Video Tutorial.

Hello my crafty friends and welcome to The Rabbit Hole Designs blog.  Have you seen all the fabulous projects the Brand Ambassadors posted over the last three days?  OMGeee, what an amazing release and what creativity!  

Today's card features the Mid Century Modern stencilBitty Bunny Blending Brushes and the Congrats die set!   This is one of those cards where the photos do not do it justice. I've included a couple different angles, so you can check out the glitter paper, holographic cardstock and the stenciling up close.  Light definitely plays differently with specialty papers.
I have a YouTube video showing how I created the background design using the Mid Century Modern stencil with the Bitty Bunny Blending Brushes to bring out thd detail. Click on the YouTube image to link to the stenciling tutorial.

I love how this photo brings out the glitter paper with much more detail.

The Rabbit Hole Designs Products

I hope you enjoyed this Modern Congrats card and video tutorial featuring Mid Century Modern stencil, Congrats die set and Bitty Bunny Blending Brushes.  Please let me know if you have any questions.


Be Creative ~ Stay Inspired

Jenn Gross


Follow me, Journey Coach Jenn, on 

Instagram - https://www.instagram.com/journeycoachjenn/

YouTube - http://www.youtube.com/c/JourneyCoachJenn

Blog - http://www.journeycoachjenn.com/


For more inspiration, updates, and news make sure to check out these places


The Rabbit Hole Designs

The Rabbit Hole Designs Instagram

The Rabbit Hole Designs Facebook Page

The Rabbit Hole Designs Pinterest

The Rabbit Hole Designs YouTube