Pages

Showing posts with label Marquee Words. Show all posts

Cupid -FND a slimline card


Hello my crafty friends!  Welcome to today's The Rabbit Hole Designs blog!  So a question for you...  Is it Galantine's or Valentine's Day?  Well, either way you look at it, that little cherub is so FND. That is Fat, Naked and Dangerous! So let's put him on a slimline card, right?

My Cupid -FND slimline card features The Rabbit Hole Designs' new Valentine stencil, the Sassy Anti Valentine stamp set and the soon to be retired Marquee Words stamps set

This is one of those cards where you see it in your mind, try it out, change your mind midway thought, and start over.  Sometimes this is the process when you create - trying by trying and learning as we makers make! 
  

I started off with a piece of 3 1/4" x 8 1/4" pink cardstock.  I stamped the word LOVE, from the Marquee Words stamp set in clear pigment ink 7 times  straight down the card front.  This gives the large letters a subtle shadow of the sentiment for the background.  I placed the three striped hearts on the Valentine stencil on the front of the card front about 1/2' below the top of the card front.  Using a Cotton Tail Blending Brush, I started to stencil it with Honeysuckle Ink.  Once I removed the stencil to reveal the image, I found it to be far too much pink.  I used my heat gun to make sure the ink was dry.  I replaced the stencil over the pink heart stripes and re-stenciled the three hearts in Black Soot Distress Oxide ink.   


Much better!  I needed one more black striped heart, so I positioned the striped heart stencil to add a 4th small striped heart at the bottom of the slimline card front. 


 Chubby cupid, from the Sassy Anti Valentine stamp set, is stamped on white cardstock with Versa Mark clear pigment ink and heat embossed with red glittery Oriental Fire embossing powder.  He is fussy cut and added to the card front. I layered the card front on a piece of red cardstock and tied it with some black twine.


I stamped and added the Fat, Naked and Dangerous  sentiment from the Sassy Anti Valentine stamps set and  attached it to the black twine. I mounted the card front on a dark grey slimline card base and added three black gemstone to finish the card.


Thanks you so much for stopping by today.  I hope you enjoyed this Cupid -FND slimline card featuring The Rabbit Hole Designs' new Valentine stencil, the Sassy Anti Valentine stamp set and the soon to be retired Marquee Words stamps set.  Feel free to ask any question or leave a comment below.


Be Creative ~ Stay Inspired

Jenn Gross


Follow me, Journey Coach Jenn, on 

Instagram - https://www.instagram.com/journeycoachjenn/

YouTube - http://www.youtube.com/c/JourneyCoachJenn

Blog - http://www.journeycoachjenn.com/


For more inspiration, updates, and news make sure to check out these places


The Rabbit Hole Designs

The Rabbit Hole Designs Instagram

The Rabbit Hole Designs Facebook Page

The Rabbit Hole Designs Pinterest

The Rabbit Hole Designs YouTube


Hello New Year!


Happy Monday and happy, happy New Year!  Tangii here for today's share!  I whipped up a pretty little card to add to a gift bag for a friend.  I used
Pretty in Peony and Marquee Words for this card. 

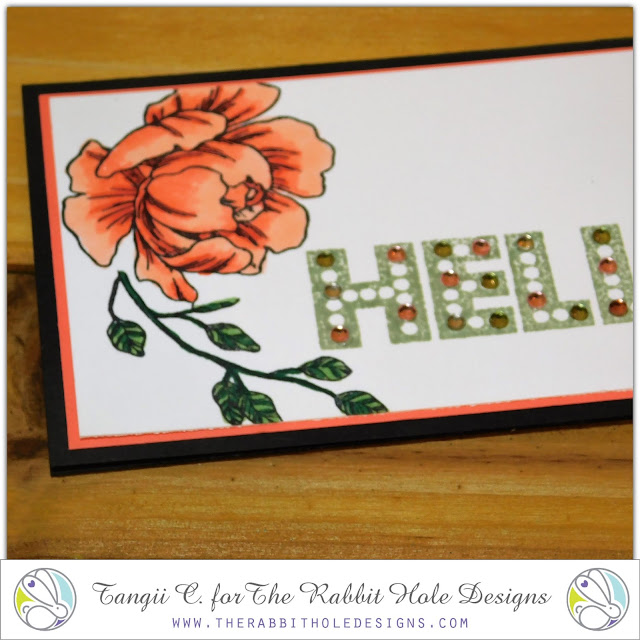
I stamped one of the larger flowers and added one of the stems and colored with Copic markers.  I  love flowers and I LOVE coloring them.  One of the things I love about this set is that you can color up those flowers with great detail or you can quickly add some color and they are still beautiful.  So easy to color!!!

Next up I stamped the "Hello" in green ink and then added some teeny rhinestones, pinks and greens.

All of the items I linked in my post are available at The Rabbit Hole Designs.

You can also read about this card on my blog, here with links to the products I used, etc.  Thanks for popping by, come back again soon!

A Caffeinated Hello!


Hello! It's Lauren on the blog today sharing this sweet Caffeinated Raccoon that has a caffeinated hello! Don't you just love that cute face!!! I thought she'd look great on the fun Pinwheel stencil. Both are from this months new release. TRHD is a super sponsor for the Fall/Winter Coffee Lover's Blog Hop Nov. 6-13 over at The Coffee Loving Card Makers, so be sure to head over to check it all out. You'll find the link down below.


I started out by dry embossing a white A2 sized cardstock panel. To do this, I ran them through my die cutting machine using an embossing mat along with the embossing plates. Then, using my Cotton Tail blending brush I lightly blended Picked Raspberry Distress Oxide ink over the panel to make the pinwheel shape stand out. then I trimmed it down slightly and adhered it to a teal cardstock background and then that onto an A2 sized card base.


Next, onto white cardstock, I stamped the word Hello from the Marquee Words stamp set using the picked raspberry ink. I also stamped it onto masking paper and fussy cut the individual letters out.


I then masked the letters and positioned the raccoon over the word so that the word would be under her chin. I stamped her using Black Versafine ink. I took off the masked letters and coloured her using Prismacolor pencils. Then I fussy cut her out. The colours I used were:
Raccoon body: Light Aqua, Aquamarine, Cobalt Turquoise
Eyes and cup: Lilac, Parma Violet, Dioxazine Purple Hue, White
Mouth: Pink


I toped her off with a pink flower and then adhered her to the front of the card using double sided tape.

I hope you are loving the release this month as much as I am. Thanks for stopping by. You can also see this card and my links to other products used on my blog.


As a Super Sponsor of the hop, TRHD is offering a 10% discount on all caffeinated images. Just use the code CAFFEINE.

Here's the link to the Coffee Loving Card Makers Fall/Winter Blog Hop

https://l.facebook.com/l.php?u=http%3A%2F%2Fcoffeelovingcardmakers.com%2F2020%2F11%2F2020-fall-winter-coffee-lovers-blog-hop%2F%3Ffbclid%3DIwAR0nEvz-XQxUwDC6cPpatgbYiU43X8DzdhrheRnHZwsWvwLgm58GfYdMfwA&h=AT3w_CQP9H0dX9cVIVDhUSFTxUriG1mXpq6NWm_kVt9x0jM9ONv8mZR2Xw3x4aqRlZwyf0_U8OI6gRbd6Kml5qcyiUynl3vi5yBeEMxB3nOadTAhSIrjBqeMSIyX6ScQRbAw_A_zMv0o_oaTmUGw&__tn__=-UK-R&c[0]=AT2kf6tKYZVJ1TGa4cSKV5__4EiglTAR0d8Vj21y0-YwD_DUQGjdGRFL-70DDBAXLepq_nU2N8IWLlnFLquqHJzO-K9M_pZPdFrk8TiP6vatgT4Wf4GEikMsHbK29cPGeY9SRF4_gg064vjT8y0NOrkZ-B2MKcni8D_1_Q1hMDBWjBS6BpT3mPuZ7McIoIePwekCqwH_C3GQhFga_Q


HELLO

 Hello there and welcome to The Rabbit Hole Designs.

It's Kelly here and I am sharing a card featuring several products from the shop.

This card was so fun to make!

I started with Bristol paper and the new "Splish Splash" stencil.

I used Cotton Tail blending brushes with two shades of green ink for the "splashes" and I used a yellow ink with a dauber on the circle/dot parts. Once it was done, I loved it!  I decided to go big on this one and leave it the full 6x6 stencil size.  Cutting it would have been fine, but it'll be a striking BIG card for someone.  I set that aside and worked on the other elements.

I stamped, copic-colored and fussy cut the botanical from "Turtle Botanical". 

Then I stamped the "Hello" from "Marque Words" with green ink .

I went back to the 6x6 panel, relayered it and carefully added neon yellow glitz gel with a paint brush. 

Once it was all dry, I assembled it using foam to pop the botanical. I finished the flower off with glitter pen. 


 Turtle Botanical:

 
Marquee Words:


 Cotton Tail Blending Brushes:


Thank You

Hello there! Michelle here, sharing a quick one layer, CAS design using one of the newest stencils, 
Splish Splash and a previously released stamp set, Marquee Words. I trimmed and scored a piece of
Bristol Smooth cardstock to 4 1/4 x 5 1/2. 
Next, I created a mask with a piece of scrap paper. I trimmed the scarp paper to fit the same size as the card base. Using circle dies ( any manufacturer will do), die cut a few randomly placed circles. 
This is your mask!

Lay the may over the face of the card and secure with washi tape. Lay the stencil over 
and ink up die cut "windows". I used distress oxide inks in shades fossilized amber,
dried marigold, and picked raspberries. Remove the mask. I placed the card in my Misti Mini
and stamped the sentiments. I masked the letter S in the word THANKS before stamping.
I splattered some gold paint and added some silver stickles glitter glue.
For a finishing touch I added some sequins.

Thanks for stopping by for a peek!

Michelle


grab coffee. go VOTE.


Hello my crafty friends and welcome to The Rabbit Hole Designs blog.  Are you ready to rock the Vote this fall?  I was inspired by the fun star studded shorts the Caffeinated Rhino is sporting.  I am using the Ribbon Star stencil and the Marquee Word Stamp set. 

I started with a piece of 4" x 5 1/4" blue printed cardstock.  I used the Ribbon Star stencil and clear embossing ink to stencil the left side of the printed cardstock. I embossed it with white embossing powder and heat set it.  I repeated this technique on the right side of the printed cardstock and embossed it with blue embossing powder and heat set it.  I colored the Rhino and his bird with alcohol markers.  Using a set of click able letters, I created the sentiment  "grab coffee" and "go" on to strips of white cardstock.  Using the Marquee Words I stamped out and created the word "VOTE".  I used the "W" masking off one side to create the letter "V".  I fussy cut each of the letters out and glued them to the strip to read "go VOTE"


so...  Remember to grab your coffee and go vote!


Here are The Rabbit Hole Design products used in this card:

Caffeinated Rhino 3"x4" stamps set

Ribbon Star 6"x6" stencil

Marquee Words 5" x 6.5" stamp set


I hope you enjoyed "grab coffee, go VOTE". card featuring the Caffeinated Rhino stamps set and the Star Ribbon  stencil and Marquee Words stamp set.  Please let me know if you have questions.


Be Creative ~ Stay Inspired

Jenn Gross


Follow me, Journey Coach Jenn, on 

Instagram - https://www.instagram.com/journeycoachjenn/

YouTube - http://www.youtube.com/c/JourneyCoachJenn

Blog - http://www.journeycoachjenn.com/


For more inspiration, updates, and news make sure to check out these places


The Rabbit Hole Designs

The Rabbit Hole Designs Instagram

The Rabbit Hole Designs Facebook Page

The Rabbit Hole Designs Pinterest

The Rabbit Hole Designs YouTube


Clean, Simple, Masculine...


Why are masculine cards so hard? Is it just me, or are clean and simple cards hard too? It's never that they take a lot of work; it's just that the ideas are hard to come up with. And it's hard to know the difference between clean and simple, versus plain and boring, right? Amanda from Pear Blossom Press here again, and today, I'm sharing a two versions of a clean and simple, masculine card. Since I already took care of the hard part (coming up with the idea), you're going to love how fast you can whip up a whole batch of these to have on hand!

STEP ONE:

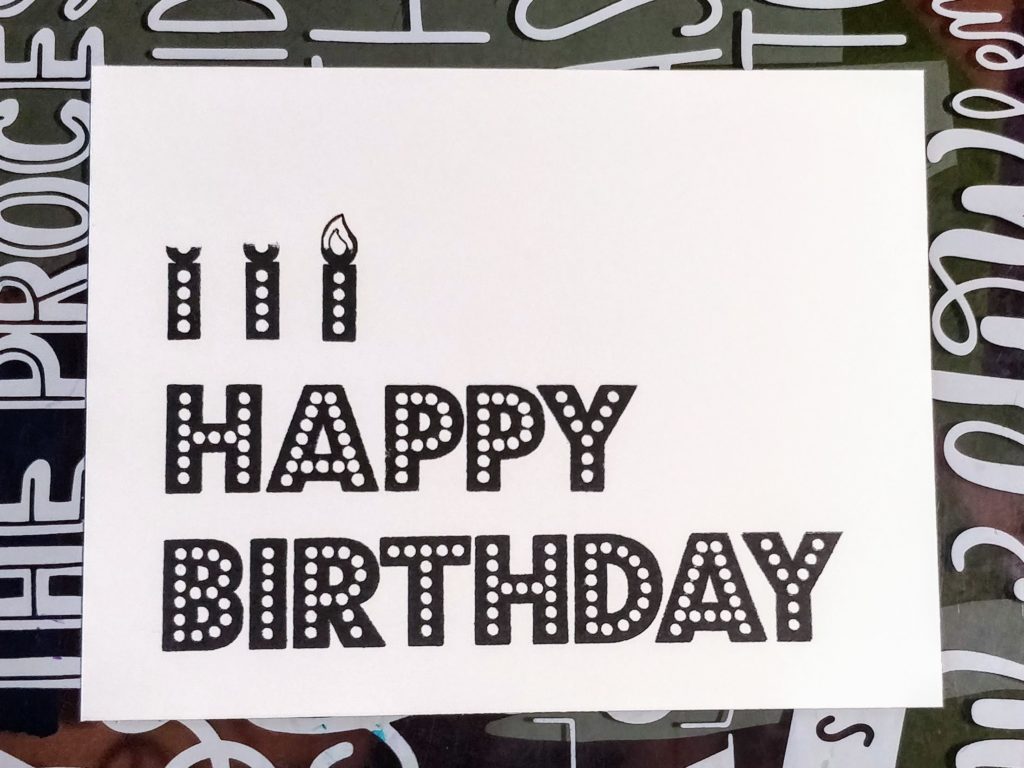
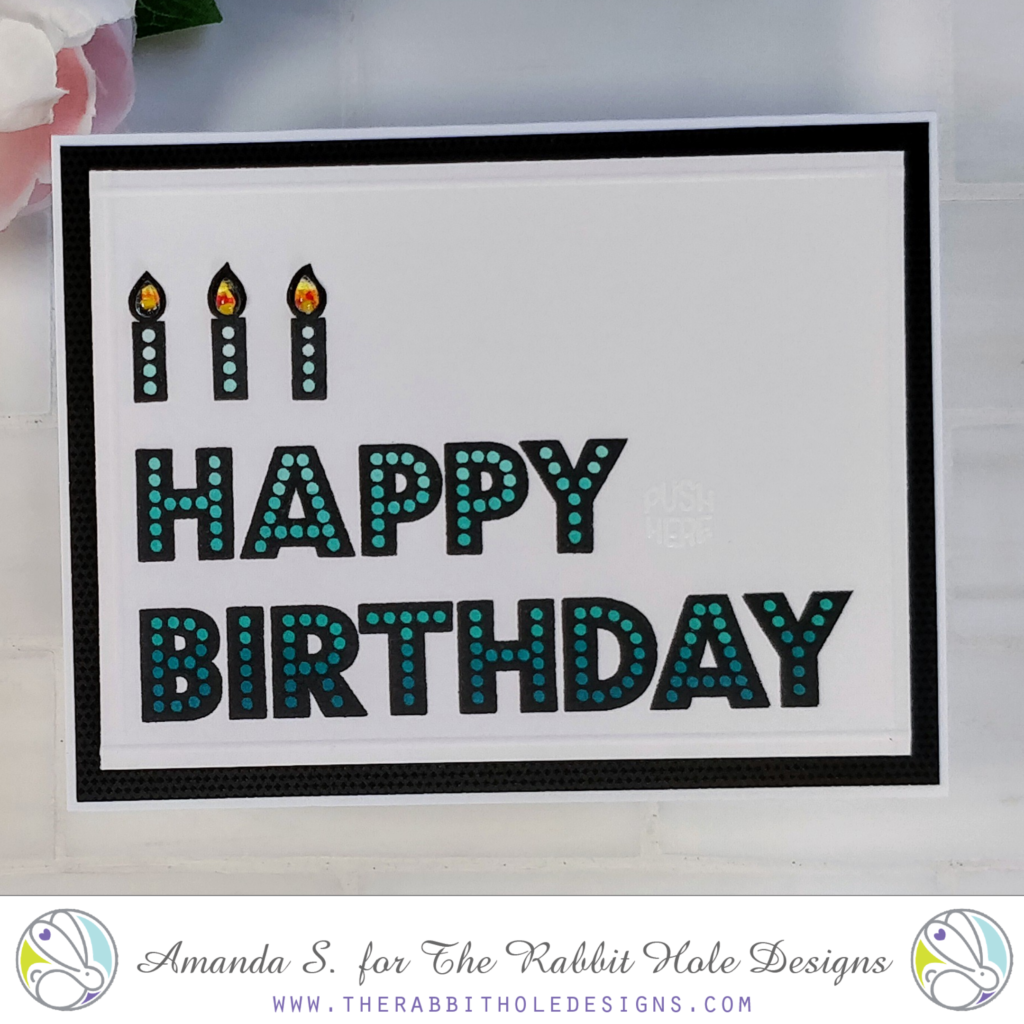
Stamp HAPPY BIRTHDAY from the Marquee Words set onto a white panel. Turn the exclamation point upside down and stamp the bottom portion of it (mask off the top of the dot) above the words. Move it over and stamp it two more times. Next, use a Copic Multiliner and draw the top of the dot to look like a candle flame.  
STEP TWO:

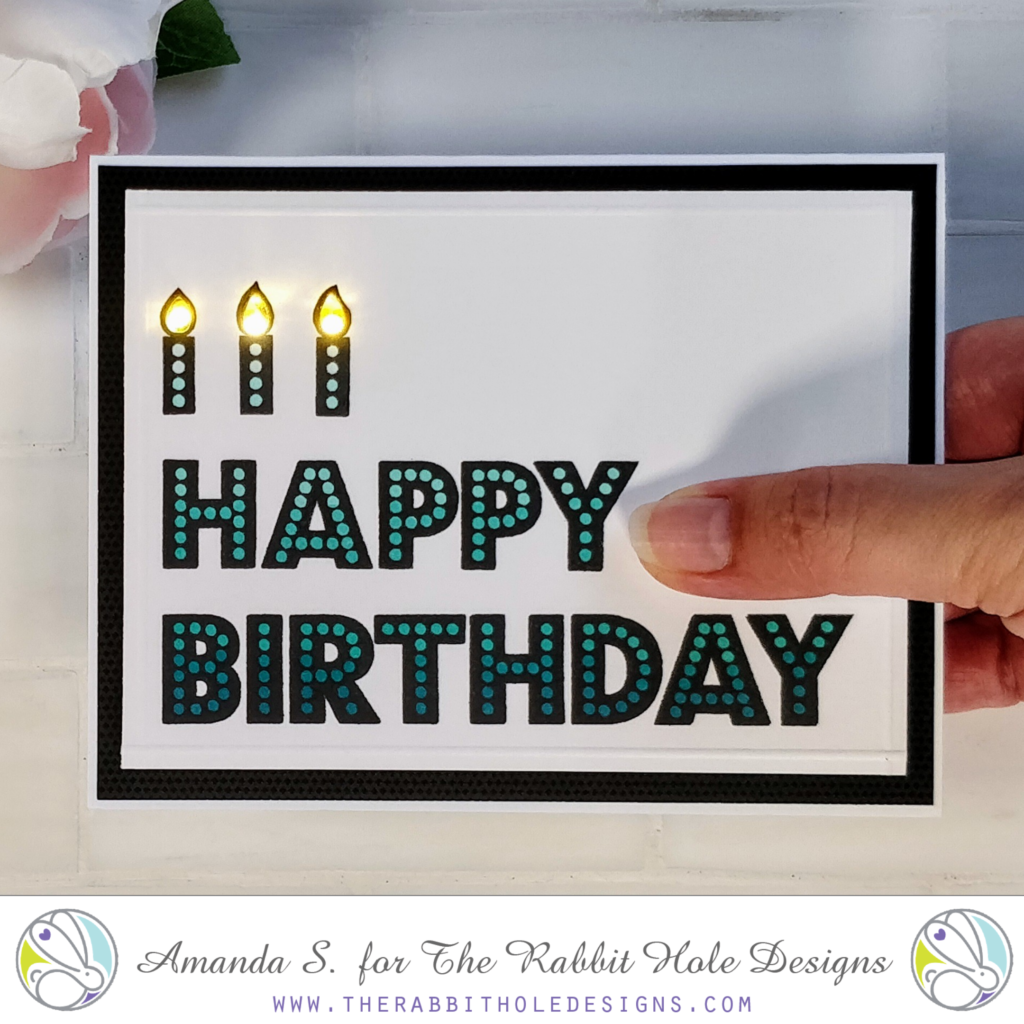
Color the dots and flames with Copic markers. I used shades of green for one card, and blue greens for the second. Next, I trimmed the panels down to 5" x 3¾" and added a raised border, by scoring 1/8" on all four sides of the panels in my Scor-Pal. At this point, you can pop the panels up with fun foam on black mats and white card bases. (That's what I did for the green card.) But if you want to spend a few more minutes on the cards, you can add lights to the flames with EZ-Lights. They'll add a real pop of light! To do that, you'll want to punch a small hole at the base of each candle flame. And if you look closely, you'll see that I embossed PUSH HERE next to the Y in happy. I used white powder to allow it to blend into the background. In person, you can see the raised, shiny text, but it doesn't detract from the clean layout. 
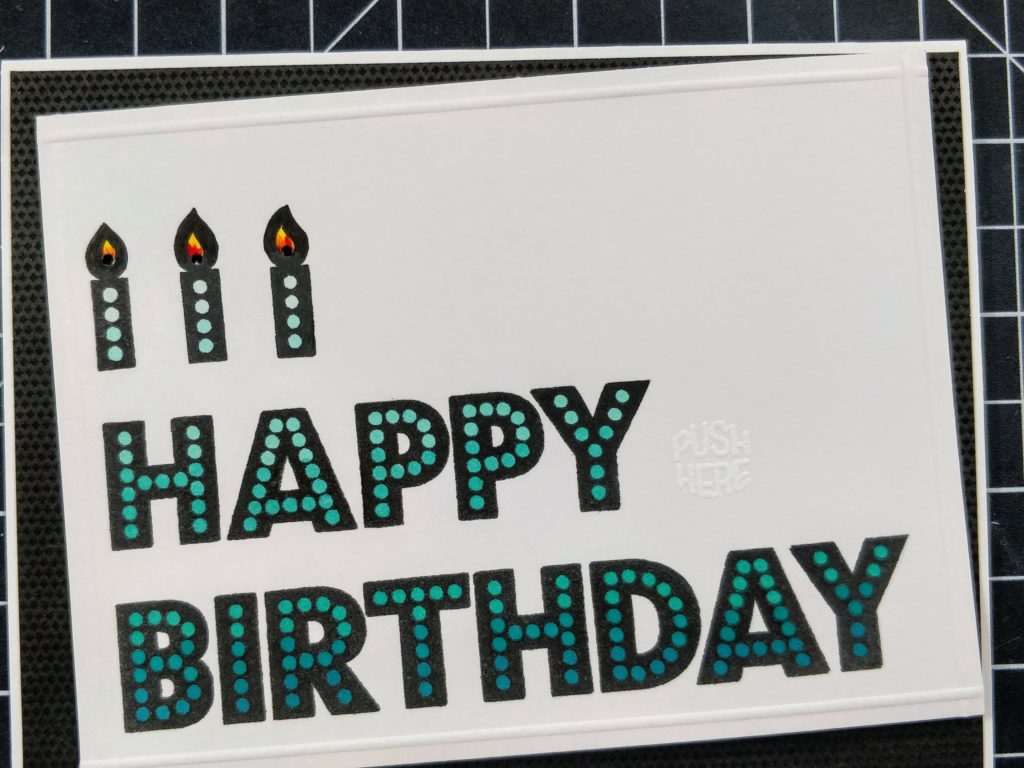
STEP THREE:

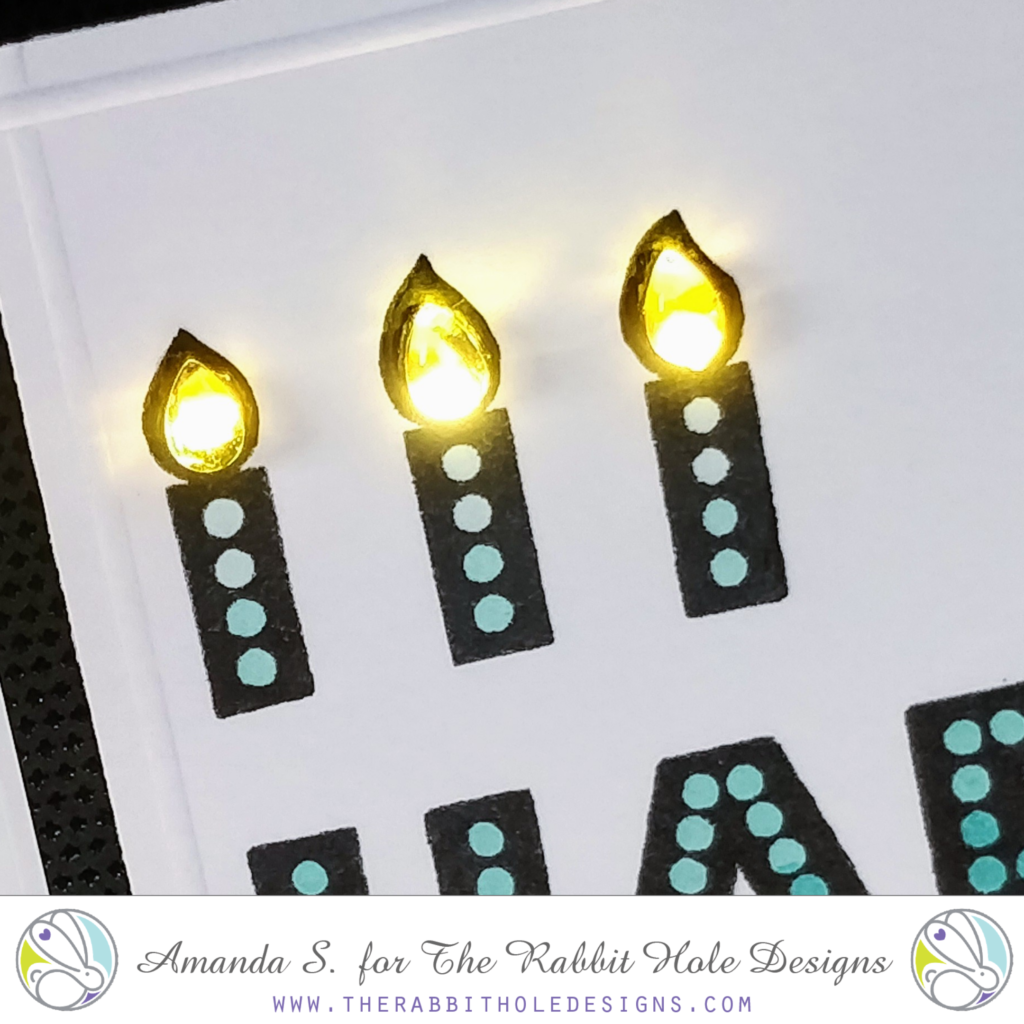
Add lights! Flip your panel over and use double-stick tape to adhere the battery of your EZ-Light to the panel, making sure to line up the button right under PUSH HERE on the other side. Line up the three LEDs with the holes in the candles and secure them with tape. Add a layer of double-thick foam tape around the edges of the panel. I promise, it's really simple. Then you can attach it to the black mat and card base.
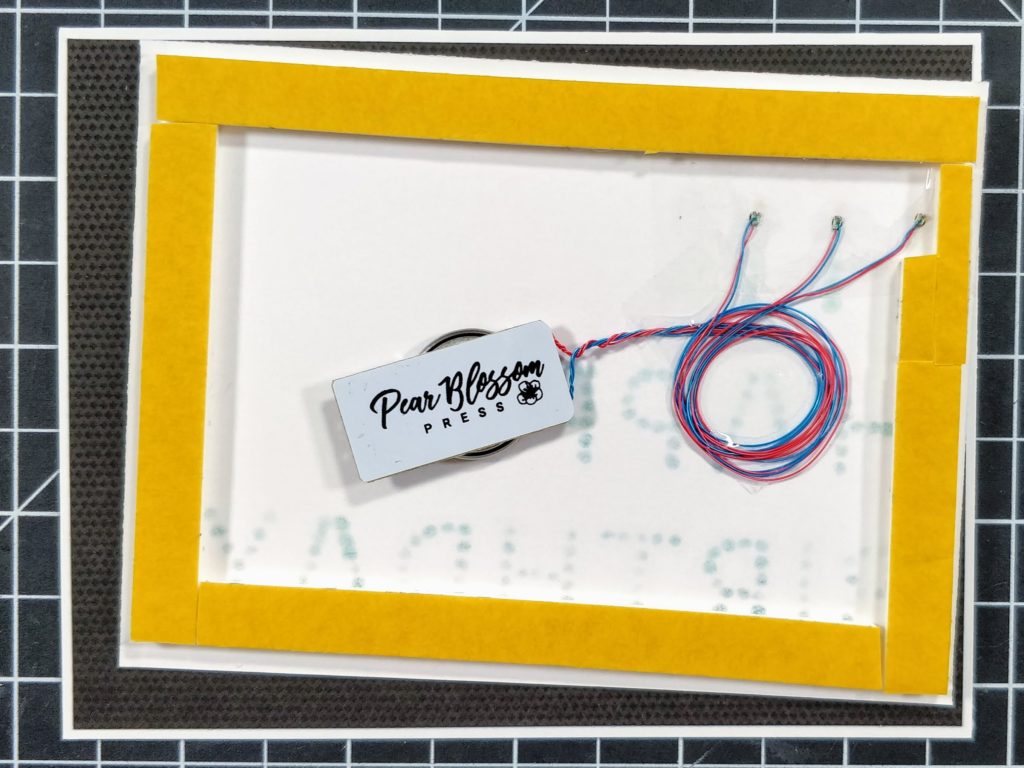
STEP FOUR:

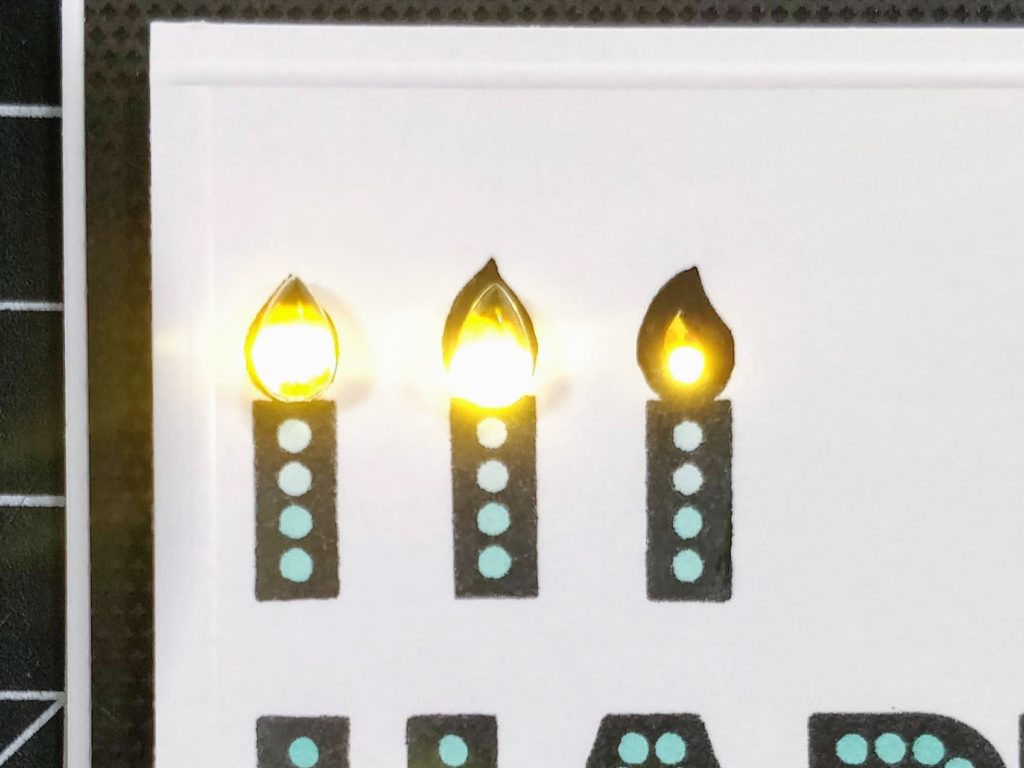
Add clear raindrop gems on top of the flames. I did this on both cards; they're a great detail whether or not they light up. In the pictures below, you can see how the entire gem will light up when you put it on top of a light. You can also see what it would look like if you don't cover up the light... 
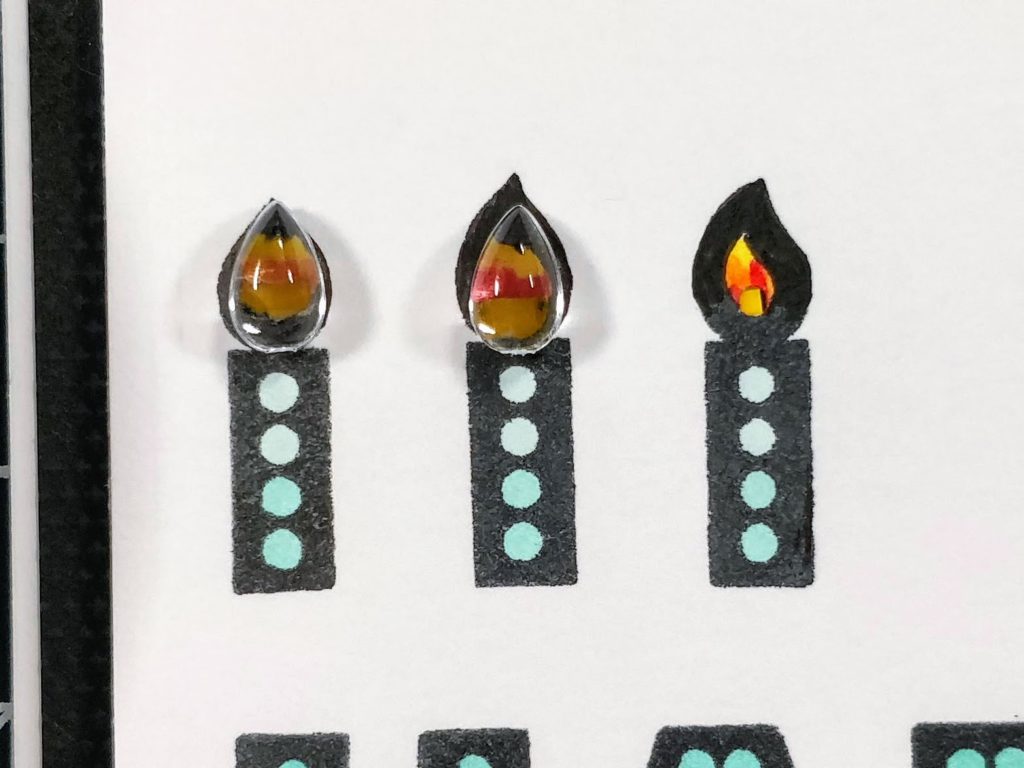
That's it. Pretty easy, right? Obviously, you can change up the colors, or even stamp on colored cardstock and fill in the dots with a white gel pen if you want a different look. Adding the lights only takes a few more minutes, but the card is great without them too. Here is a look at the finished cards. (The green doesn't have lights, the teal does.)
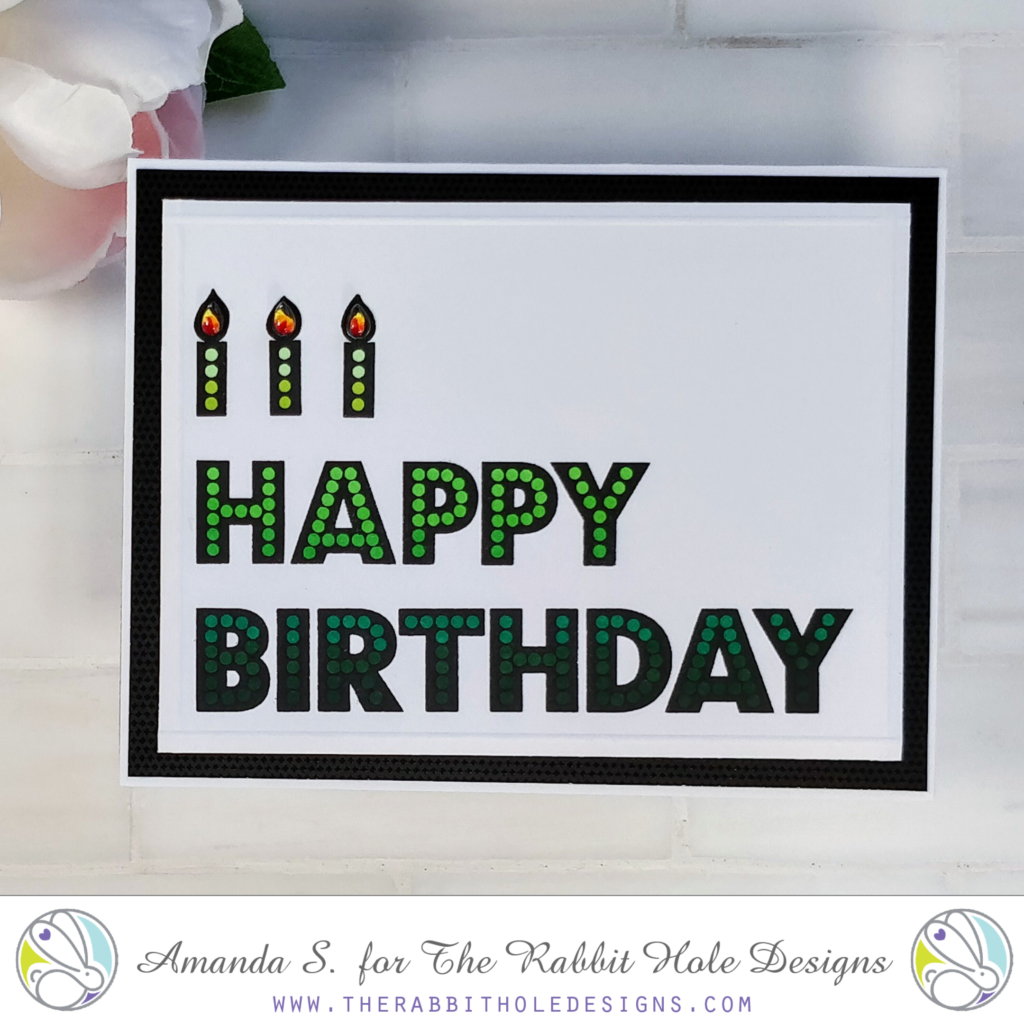
And here is a closeup of the lights, after the glue is dry. (Make sure to use a glue that will dry clear.) See how the whole gem lights up, instead of just the bottom of the flame? Pretty cool, right? You can use this same trick for other gems too, as long as they are clear or translucent (no silver paint on the back). 
What do you think of my clean and simple, masculine cards? I hope I've inspired you to give them a try. Want to see another card made using the Marquee Words stamp set? Check this out. How about another card with gems that are lit up? This Christmas card has lights under the star and Rudolph's red nose.

Thanks for stopping by today! Head on over to my blog, to read the sister article and find links to the specific products I used for today's cards. If you give this a try, tag me on social media so I can see and cheer you on! I'll be back soon with more fun cards to share. 


YOU...are Beautiful

 Happy Friday!!! Michelle here, sharing a simple card design. Today I am using two of the newest stamp sets from the September Release... Turtle Botanical, and Marquee Words.

I stamped the chrysanthemum bloom and colored with Copic Markers in shades E07, E09, R05, YR04, and YR61.  I fussy cut the flower and set aside. Next, I trimmed a piece of red cardstock and gold glitter paper. I heat embossed the sentiments with gold embossing powder on the red cardstock. I colored in the circles of the word 'YOU' with a white gel pen.

I adhered the red cardstock to the glitter paper than wrapped a piece of bakers twine and tied a bow. I adhered the two panels tot he card base with foam adhesive.  Lastly, I adhered the flower on top of the twine with foam adhesive and scattered some sequins.

Hope you enjoyed this card!
Have a great weekend!!!

Michelle