Pages

Showing posts with label Poinesttia and Pinecones. Show all posts

Merry Snowperson

Hello friends! Welcome back to the blog. Today's card features the 1 Line Snowperson 2x6 stamp set along with a sentiment from Poinsettia & Pinecones 6x8 stamp set.


Card details:
  • Stamp the image from the 1 Line Snowperson 2x6 stamp set with an alcohol-friendly black ink on a white cardstock. Die-cut with a circle die.
  • Create a snowperson mask. I stamped the image on masking paper and fussy cut the snowperson out. I didn't worry about masking the twig arms. 
  • Mask the snowperson and the area below the snowperson. I used Post-It tape for the area below. Blend light purple around the snowman to create a halo effect.
  • Remove masks and color image with alcohol markers.
  • Die-cut the largest frame from You've Been Framed dies on blue cardstock. Blend the blue panel with Candy Twist Stencil with light purple ink.
  • Trim a half-inch strip from light purple cardstock. Line up the strip with the "groundline" on the stamped image. Attach both to the blue panel.
  • Stamp the "Merry Christmas" sentiment from Poinsettia & Pinecones 6x8 stamp set with navy ink on light purple cardstock and die-cut with its coordinating dies. Adhere sentiment underneath the snowperson circle.
  • Adhere the panel to an A2 vertical card base.
  • Add bling to finish off the card.


Thanks for visiting!

Amrita

You can find me on IG @amritapettus

For more inspiration, updates, and news check out these awesome places! 


The RHD Affiliate Disclaimer:

We want to ensure transparency and honesty in our interactions with you, our valued readers. Please be aware that the links provided on The Rabbit Hole Designs Blog may be affiliate links. This means that if you make a purchase through these links, the project designer may earn a small commission at no extra cost to you. Your support means the world to us!


We kindly request that you accept the tracking cookie for the affiliate websites. Rest assured, this will not expose your computer to viruses or compromise your information. It's a necessary step for the company to attribute the sale to the affiliate, ensuring that creators like our creatives receive their rightful commissions.


Your trust and support empower our creators to continue sharing creativity and inspiration through our blog. Thank you for being an integral part of The Rabbit Hole Designs community!


Bright and Joyful Christmas Tree


Hello my crafty friends, Jenn here with a Bright and Joyful Christmas tree card featuring The Rabbit Hole Designs Warm and Cozy stamp set (illustrated by Agota Pop). I wanted to create and easy card, but som,ething that is a little bit elegant too. I hope you enjoy this twist on a traditional Christmas card.

Supply List

Other supplies (from your stash)
Paint brushes
Metalic watercolors
Bearly Arts Craft Glue
White ink
VersaMark Watermark ink
Gold Embossing Powder
Let's take a look at this simple step tutorial:
A - Use either a Bitty Blending Brush or Cottontail Blending Brush with white ink to stencil the Candy Twist stencil design in an oval shape in the center of a piece of 4' x 5 1/4" black cardstock

B - Use a paint bush and gold watercolor to add gold splatters the card front and set it aside to dry

C & D - Use the white ink and lightly stamp the Christmas tree image (from the Warm and Cozy stamp set) onto a piece of black coloring cardstock.  Watercolor the image with green, gold, red, and brown metalic and/or shift watercolors
E - Fussy cut or die cut the colored Christmas tree 

F -  Use the Cottontail Embossing Powder Tool to treat a piece of black cardstock. Stamp the Merry Christmas sentiment (from the Poinsettia and Pinecone stamp set) with VersaMark Watermark ink.  Dust it with gold embossing powder and heat set the sentiment. Use the coordinating dies to die cut the sentiment

G & H - Glue the stenciled card front on a green A2 cardbase.  Use adhesive foam squares to attach the painted Christmas tree to the center of the stenciled Candy Twist oval. Glue on the Merry Christmas sentiment above and below the tree as shown
Thank you for taking time  to visit today's blog and check out this Bright and Joyful Christmas Tree card created with The Rabbit Hole Designs' Warm and Cozy stamp set, Poinsettia and Pinecone stamp and die set, and Candy Twist stencil. I hope you are inspired to create something lovely today!

Be Creative ~ Stay Inspired

Jenn Gross


Follow me, Journey Coach Jenn, on 

Instagram - https://www.instagram.com/journeycoachjenn/

YouTube - http://www.youtube.com/c/JourneyCoachJenn

Blog - https://journeycoachjenn.blogspot.com


A Very Merry Retro Christmas Card


Hello my crafty friends and welcome to today's blog.  I created a retro Christmas card using The Rabbit Hole Designs Poinsettia & Pinecone stamps (a Kelly Taylor Cards illustration) along with the coordinating dies.
After coloring the images with OLO Markers, I die cut them with their coordinating die.  I cut apart the pine sprig to create two sprigs. Each sprig is gently shaped to bring in some depth to the the pinecones and needles.  I added splashes of white gold watercolor to create a falling snow effect on the Poinsettia flower and pine sprigs.
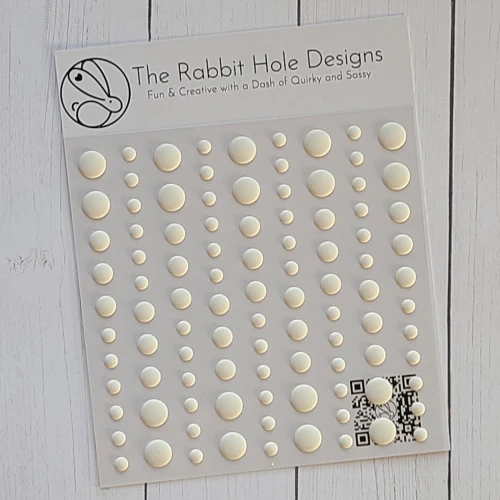
I used a pale pink ink to stamp the solo Poinsettia flower in a random pattern to  4" x 5 1/4" white card front.  I checked the placement of the sprigs and flower on the top right of the card front to see where to stamp the sentiment to the panel.  Once the sentiment is stamped, I attached the poinsettia and sprigs to the card front with glue and foam tape.  I finished the card by mounting it to a sage green A2 card base.  I colored the Matte White Enamel Dots with the white gold paint and lt them dry before adding them to the lower left corner of the card front.

Thank you for taking the time to stop by today's blog.  I hope you enjoyed this tutorial and are inspired to create something lovely today.

Be Creative ~ Stay Inspired

Jenn Gross


Follow me, Journey Coach Jenn, on 

Instagram - https://www.instagram.com/journeycoachjenn/

YouTube - http://www.youtube.com/c/JourneyCoachJenn

Blog - http://www.journeycoachjenn.com/


For more inspiration, updates, and news make sure to check out these places


The Rabbit Hole Designs

The Rabbit Hole Designs Instagram

The Rabbit Hole Designs Facebook Page

The Rabbit Hole Designs Pinterest

The Rabbit Hole Designs YouTube


Faux Embossed Poinsettia & Pinecones Card

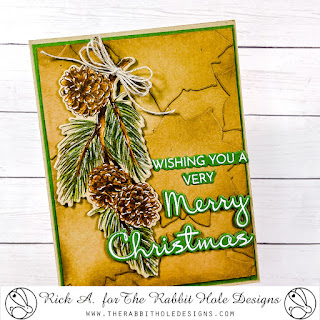
 Hello and welcome back to The Rabbit Hole Designs Blog.  It's Rick here with you again today for another fun card making adventure.  Today I am sharing a card with the Faux Embossing technique using the Poinsettia & Pinecones Stamp Set and the Poinsettia & Pinecones Dies (which is the star of my card today).   This fabulous stamp set was designed by Kelly Taylor or Kelly Taylor Cards.  

Pinecone Faux Embossed card by Rick Adkins


So, you may be wondering what in the world is faux embossing.  Well, it's a simple technique where you take die cuts and attach them to the card front.  But, you want to do the die cuts in the same color as your card front.  When you glue them down to the card front it gives the illusion off an embossed background.  I used the single poinsettia die from the Poinsettia & Pinecones Dies to cut out the shape from some Kraft colored cardstock.  I then simply glued them onto my Kraft cardstock panel and used a little brown ink to glaze over them with one of my CottonTail Blending Brushes loaded with a little ink.  

Pinecone Swag card by Rick Adkins

To finish off the card I added the pinecone swag colored with a few colored pencils and the sentiment heat embossed with white embossing powder and I cut out everything with the Poinsettia & Pinecones Dies before adhering it to the card base.  
 
Thanks for dropping by today and I hope that you found a little bit of inspiration with my card today.  

You can find me on the following Social Media Channels with more crafty inspiration: 
I hope that you have a crafty day.  For more inspiration, updates, and news make sure to check out these places.  

Have a crafty day!
Rick 

Blue is My Boyfriend...Poinsettia & Pinecones Stamps & Dies

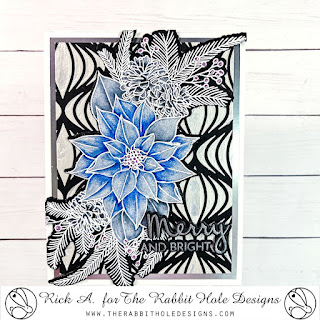
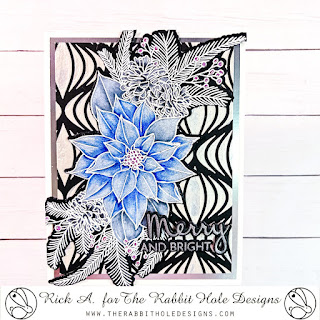
 Hello and welcome back to The Rabbit Hole Designs Blog; It's Rick back to share another fun card design with you today.  This time I am sharing a card using the Poinsettia & Pinecones Stamp Set and the coordinating dies.  The stamp set was designed by Kelly Taylor (hence the name of my blog post today).  She, says this all the time on her videos; so I thought it was only appropriate with my card design today. Speaking of which here's a look at my card.  

Poinsettia & Pinecones Card by Rick Adkins


For this card I started out by adding the Cat Eye Stencil and some Stencil Butter to create a shinny backdrop for the white heat embossed poinsettia swag.  I colored the poinsettia with a few different shades of blue colored pencils.  The sentiment was heat embossed with silver embossing powder to tie in with the shinny background. 

Poinsettia & Pinecones Card by Rick Adkins


Thanks for dropping by today and I hope that you found a little bit of inspiration with my card today.  

You can find me on the following Social Media Channels with more crafty inspiration: 
I hope that you have a crafty day.  For more inspiration, updates, and news make sure to check out these places.  

Have a crafty day!
Rick 


Elegant and Easy Christmas Card


Hi there! It's Lauren here to share an easy yet elegant Christmas card using the beautiful new Poinsettia & Pinecones stamp and die sets illustrated by Kelly Taylor.

I first prepared my white 4.23x5.48" cardstock panel for embossing by using the Cottontail Embossing Powder Tool. I then lined up and stamped my image onto the cardstock using my embossing ink pad. I covered the image with silver embossing powder, tapped off the excess and then heat set it. 

I then repeated the process, stamping the Merry Christmas words, embossing them in silver and then using the coordinating dies to cut them out. I also die cut 3 extra blank words and adhered them behind the corresponding embossed words. 

Finally, I adhered the embossed poinsettia panel onto a white, A2 sized (4.25x5.5) top folding card base. Then, I adhered the Merry Christmas words on to finish my card.


I hope this has inspired you to give this easy technique for creating a beautiful Christmas card a try. Thanks for visiting! 

Here's a link to the sets I used to create this card:

Poinsettia & Pinecones 6x8 – The Rabbit Hole Designs

Poinsettia & Pinecones Dies – The Rabbit Hole Designs


September 2023 New Release Day 1

Hello and welcome to day 1 of the inspiration hop. We are excited for you to join us as we present to you our September 2023 release. Our Brand Ambassadors will be sharing their projects over the next few days, so be sure to visit their blogs and leave them some crafty love.

The 3 stamp sets with coordinating dies are all available to purchase right now in the shop.

The products being highlighted today are:

Thank you so much for being here for day 1 of our inspiration hop.

Here is the lineup for today:


This is the graphic you are looking for on our IG and FB fan page

For more inspiration, updates, and news check out these awesome places! 

Thank you so much for stopping by today!