Pages

Showing posts with label Sentimentally Speaking Stamp Set. Show all posts

Holly Hugs

 Hello friends! Welcome back to the blog. Today's card features the 1 Line Holly 2x6 stamp set. During the hustle bustle of the holiday season sometimes we just need a kind word of encouragement. I created a "Sending Hugs" card featuring the holly image.
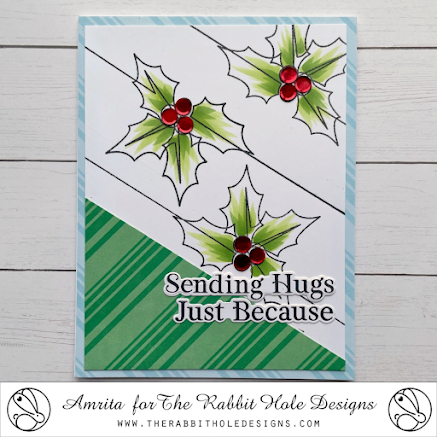


Card details:
  • Stamp the holly image from the 1 Line Holly 2x6 stamp set with an alcohol-friendly black ink on white cardstock. Stamp the image at an angle using a MISTI. Move and rotate the cardstock and stamp the same image 2 more times. Color the holly leaves with alcohol markers. Use red bling for the berries.
  • Adhere green patterned paper to the corner of the cardstock and trim the entire panel to 4"x5.25". 
  • Stamp the "Sending Hugs" and "Just Because" sentiments from the Sentimentally Speaking stamp set and die-cut with their coordinating dies. Adhere sentiments near bottom right corner of card.
  • Adhere entire panel to an A2 sized light blue patterned paper and then to an A2 sized card base.


Thanks for visiting!

Amrita

You can find me on IG @amritapettus

For more inspiration, updates, and news check out these awesome places! 


The RHD Affiliate Disclaimer:

We want to ensure transparency and honesty in our interactions with you, our valued readers. Please be aware that the links provided on The Rabbit Hole Designs Blog may be affiliate links. This means that if you make a purchase through these links, the project designer may earn a small commission at no extra cost to you. Your support means the world to us!


We kindly request that you accept the tracking cookie for the affiliate websites. Rest assured, this will not expose your computer to viruses or compromise your information. It's a necessary step for the company to attribute the sale to the affiliate, ensuring that creators like our creatives receive their rightful commissions.


Your trust and support empower our creators to continue sharing creativity and inspiration through our blog. Thank you for being an integral part of The Rabbit Hole Designs community!


You're Amazing!


 Howdy! Lauren here today sharing this quick and easy ombre card! I've been inspired by watching the Olympics to create this red and white (GO CANADA!) card celebrating how amazing the athletes are! 

I started with the Candy Twist stencil and inked blended an ombre effect in shades of red.


I then stamped the sentiment from the new Sentimentally Speaking ink the darked red I used and then die cut it out. 


I added double sided foam tape to the back and adhered it to the ombre panel.


I then added 7clear enamel dots and adhered the panel to a white top folding A2 sized card base to finish my card!


Below you will find links to the products I used, below. Thanks for visiting!


I use affiliate links when I can. This does not add any extra cost to you, but I do receive a small commission which helps keep me creating.
Thank you for visiting!

Candy Twist Stencil: https://shrsl.com/4lw4t

Cottontail Blending Brush: https://shrsl.com/3htkd

Sentimentally Speaking Stamp Set: https://shrsl.com/4lmc6

Sentimentally Speaking Coordinating Dies, The Rabbit Hole Designs: https://shrsl.com/4mpzg


 Howdy! Lauren here today sharing this quick and easy ombre card! I've been inspired by watching the Olympics to create this red and white (GO CANADA!) card celebrating how amazing the athletes are! 

I started with the Candy Twist stencil and inked blended an ombre effect in shades of red.


I then stamped the sentiment from the new Sentimentally Speaking ink the darked red I used and then die cut it out. 


I added double sided foam tape to the back and adhered it to the ombre panel.


I then added 7clear enamel dots and adhered the panel to a white top folding A2 sized card base to finish my card!


Below you will find links to the products I used, below. Thanks for visiting!


I use affiliate links when I can. This does not add any extra cost to you, but I do receive a small commission which helps keep me creating.
Thank you for visiting!

Candy Twist Stencil: https://shrsl.com/4lw4t

Sentimentally Speaking Stamp Set: https://shrsl.com/4lmc6

Sentimentally Speaking Coordinating Dies, The Rabbit Hole Designs

Uplifting Card Design with The Rabbit Hole Designs

Hello, crafty friends! It's Rick here, and I'm thrilled to be sharing a charming project on The Rabbit Hole Designs LLC blog today. This uplifting card features a dynamic background using our Pinwheel 6 x 6 Stencil and a heartfelt sentiment from the Sentimentally Speaking Stamp and Die Sets. This card was such a joy to create, and I'm excited to highlight the beautiful products from The Rabbit Hole Designs that brought this piece to life.


Creating a Vibrant Background

One of the most enjoyable parts of card making is playing with stencils and inks to create unique backgrounds. For this project, I used our Pinwheel 6 x 6 Stencil to craft a vibrant backdrop. I started by ink blending with an orange ink, using my Cotton Tail Blending Brushes to achieve a soft ombre effect. The warm gradient creates a beautiful transition that really catches the eye.

Pro Tip: When working with stencils, securing them with low-tack tape can prevent any unwanted shifting, ensuring crisp and clean lines. For smooth ink blending, start light and gradually build up the intensity—it's easier to add more color than to take it away!


Adding Texture with Dry Embossing

To give the background more dimension, I dry embossed the stenciled panel using the Pinwheel Stencil. This technique involves running the stenciled panel through a die-cutting machine with a tan embossing mat (from my stash). The result is a subtle, raised texture that adds a tactile element to the card.

Aligning the stencil with the previously inked design can be a bit challenging. A handy trick is to use washi tape (from my stash) to hold everything in place, making it easier to achieve perfect alignment.


Assembling the Card

For the card assembly, I trimmed the embossed panel to 3 3/4" x 5" and matted it with a piece of black cardstock (from my stash). This matting layer provides a striking contrast, making the vibrant background pop even more. I adhered the layered piece to a top-folding A2 card base made from white heavyweight cardstock (from my stash), which is perfect for a sturdy base.

Crafting the Sentiment

The sentiment is always a focal point, and for this card, I chose a lovely message from our Sentimentally Speaking Stamp Set. I stamped the sentiment in a rich black ink (from my stash) onto white cardstock. After letting it dry, I used the coordinating die from the Sentimentally Speaking Die Set to cut it out. To give the sentiment dimension, I cut three additional layers from scrap cardstock and adhered them together.

Aligning the sentiment on the card front can be a bit nerve-wracking, but using a T-square (from my stash) helps ensure everything is perfectly straight.


Finishing Touches

To complete the card, I added some White Enamel Dots from our collection. For a cohesive look, I colored them with an orange alcohol marker (from my stash), creating an ombre effect that matches the background. Arranging them in odd numbers around the card adds visual balance and interest.

This card was such a fun project to work on, combining vibrant colors with elegant textures. The products from The Rabbit Hole Designs made it easy to create a design that's both cheerful and heartfelt. I hope this card inspires you to try out new techniques and explore the wonderful possibilities with stencils and dies.

Thank you for joining me on the blog today! If you recreate this card or feel inspired to craft something new, please share your creations. We love seeing what you come up with!


For more inspiration, updates, and news check out these awesome places! 


Affiliate Disclaimer: Some of the links in this post are affiliate links. If you choose to make a purchase through them, I may earn a small commission at no extra cost to you. Thank you for supporting The Rabbit Hole Designs LLC and helping us continue to bring you creative inspiration!

Sparkly Congratulations Card


Hello! Lauren here today sharing this pretty, sparkly congratulations card I created using the new Paisley Bandana stencil set and Sentimentally Speaking stamp set. 

You can watch me create it in this quick video on my YT channel: 


Below you will find links to the products I used, below. Thanks for visiting!


I use affiliate links when I can. This does not add any extra cost to you, but I do receive a small commission which helps keep me creating.
Thank you for visiting!

 Paisley Bandana, 2 Layer Stencil, The Rabbit Hole Designshttps://shrsl.com/4lmc4

Sentimentally Speaking Stamp Set: https://shrsl.com/4lmc6


Just Because card with the Paisley Bandana Stencil

Hello friends. Carrianne here. I am so happy to be back on The Rabbit Hole Designs Blog! Today, I would like to share with you a card featuring the newly released Paisley Bandana Layering Stencil. This set contains two 6 x6 stencils that are easy to layer together. 


I started with an A2-sized panel of lavender colored cardstock. I inked blended two shades of purple, creating a fun paisley background. I adhered it to my card base with glue at an angle to create a fun design. I turned it over and trimmed the excess material from the edges with my craft scissors.

Pro Tip: When trimming the edges of a card, always start from the backside by flipping it over. This will prevent cutting the card base and make sure the cut is clean.


The Sentimentally Speaking Stamp Set and coordinating dies are also from the new release. I stamped the sentiment in purple ink, cut it with the matching die, and then popped it up on foam dots for dimension. I added purple sequins to complete the card.


Thank you so much for dropping in with me today! Have a Fantastic day!

Carrianne

You may also follow me: Instagram and My Blog.


For more inspiration, news, and updates, make sure to check out these places.


DISCLOSURE:

Several affiliate links may be used in my posts. This means that, if you click on one of my links and make a purchase from that company, I will receive a small percentage of the sale without any additional cost to you. I really appreciate your support.


Best Wishes - Candy Twist Stencil

Hi friends, Carrianne here. I'm thrilled to be back on the blog and sharing this delightful card featuring The Rabbit Hole Designs Candy Twist Stencil and Sentimentally Speaking Stamp with their coordinating dies. Have I mentioned how much I love stencils? I really love the simplicity and ease of creating cards with them. The result is always fabulous, and they do all the work with little effort. 


For the background, I used the Candy Twist Stencil on an A-2 size white panel and inked it with Distress Oxide Inks, Spiced Marmalade, and Twisted Citron using my Cottontail Blending Brushes. I cut the panel using the You've Been Framed Dies and adhered it to a lime green card base. 


I stamped the sentiment from Sentimentally Speaking Stamp Set with Versamark ink on black cardstock and heat embossed it with white embossing powder on black cardstock and cut it with the matching dies. I adhered it to the panel with foam dots for added dimension. The card was finished with black sequins and a few stars. 


Thank you so much for dropping in with me today! Have a Fantastic day!

Carrianne

You may also follow me: Instagram and My Blog


For more inspiration, news, and updates, make sure to check out these places.


*NOTE: THIS POST CONTAINS AFFILIATE LINKS, MEANING I GET A SMALL COMMISSION IF YOU DECIDE TO MAKE A PURCHASE THROUGH MY LINKS, AT NO COST TO YOU. THANK YOU SO MUCH FOR YOUR SUPPORT!

Pretty, Paisley Congratulations Card


Hi there! It's Lauren today with this clean and simple congratulations card that features both the new Paisley Bandana stencil set and the Sentimentally Speaking stamp set from this month's release. 

I've created a video showing how I created my card. You can watch it here:


I've linked the products I used, below. 

I use affiliate links when I can. This does not add any extra cost to you, but I do receive a small commission which helps keep me creating.
Thank you for visiting!

 Paisley Bandana, 2 Layer Stencil, The Rabbit Hole Designshttps://shrsl.com/4lmc4

Sentimentally Speaking Stamp Set, The Rabbit Hole Designs: https://shrsl.com/4lmc6

Cottontail Blending Brush: https://shrsl.com/3htkd

You can follow me here:

Colorful Creations: Crafting a Stunning Birthday Card with The Rabbit Hole Designs

Hello, fellow crafting enthusiasts! Today, Rick here at The Rabbit Hole Designs blog, and I'm thrilled to guide you through a delightful crafting project. We'll be diving into a vibrant birthday card featuring The Rabbit Hole Designs' Sentimentally Speaking Stamp Set, Sentimentally Speaking Dies, and Candy Twist 6 x 6 Stencil. This project is ideal for those looking to create a colorful and elegant card that's perfect for any special occasion.

Step-by-Step Guide

Creating the Background

To start, place the Candy Twist 6 x 6 Stencil on White 80 lbs Cardstock (from my stash). Use Mini Dye Based Ink Cubes (from your stash) to add vibrant colors to each section of the stencil using Bitty Bunny Blending Brushes. I find blending these colors reminiscent of painting as a child—each stroke adding its own excitement to the canvas!

Adding Details

Once satisfied with the blending, use a fine-lined Micron Pen to trace inside the stencil for a defined look. Remove the stencil and use Alcohol Brush Markers to add depth and refine the ink blending further.

Assembling the Card

Cut the inked panel diagonally and adhere it to a White 110 lbs Ultra Thick Cardstock card base. For a seamless finish, apply a strip of Black Cardstock over the seam using Liquid Glue.

Crafting the Sentiment

Stamp "happy birthday" from the Sentimentally Speaking Stamp Set onto White 80 lbs Cardstock using Versafine Clair Nocturne Ink. Use the coordinating Sentimentally Speaking Dies to cut it out and create dimensional layers by stacking die-cut scraps from my stash.

Finishing Touches

Complete your card with Clear Sparkle Enamel Dots for a touch of sparkle that catches the eye.

Final Thoughts

This colorful and elegant birthday card is not only enjoyable to create but also a heartfelt gift for your loved ones. Experiment with different color combinations and techniques to personalize your designs further.

Thank you for joining me on this crafting journey! Feel free to share your creations with us—I love seeing how each of you brings your unique style to life.

Rick

For more inspiration, updates, and news check out these awesome places! 


Affiliate Link Disclaimer: This post contains affiliate links. By purchasing through these links, I may earn a small commission at no additional cost to you. This helps support the blog and allows me to continue bringing you valuable crafting content.