Pages

Make a Wish - a new interactive birthday card surprise!

How crafty friends, Jenn here with an bright and cheery interactive birthday card featuring The Rabbit Hole Designs'  Pinwheel stencil and Sentimentaly Speaking stamp set with coordinating dies both from the June Release. I paired it with the Cupcake image from the Year 4 Birthday stamp set.

TRHD Supply List
Year 4 Birthday stamp set 

Other Supplies
Candle Light Pear Blossom Press 
World's Best Foam Tape 
Zero Centered Ruler 
OLO Markers
Distress Oxide inks 
White Embossing Powder
Using the Cottontail Blending Brushes I blended the Pinwheel  background on a piece of 4" x 5 1/4 Oceanside cardstock using Salvaged Patina, Salty Ocean, and Uncharted Mariner Distress Oxide inks.  I am using the new Candle Light interactive blow-out candle by Pear Blossom Press to create the interactive component.  The cupcake image is colored with OLO Markers. The sentiment is created by treating a piece of Sweet Pea cardstock with the Cottontail Embossing Powder Tool. The sentiment is the word Birthday and Wishes is heat embossed with white embossing powder and then die cut with the coordinating dies.
I positioned the cupcake image and Candle Light on the card front to locate the placement. I use a no-photo blue pencil to mark important areas, 1) where the candle flame will light up and 2) the hole needed for the action to blow out the candle flame. I glued the cupcake  onto the card front with liquid glue. I created a die placement template by die cutting the top 1/2 of the small flame (from the PB Press Stamp & Die set) onto a small piece of scrap cardstock This template helps to position the tiny flame die in place. I secure the die with low tack tape and die cut the flame.
 I punched a small hole in the right side of the candle for the small activator to turn off the light. Turning the card front over to the backside, I glue a small piece of yellow vellum over the flame. I lined up the candle light and created a double thick foam channel to slide the light into position. I removed the release paper and cover the channel with a piece of cardstock.  This channel allows the candle to slide into position and helps guide the air you blow at the candle light to extinguish the candle flame.
I framed out the card with The World's Best Foam Tape. I also creating a door opening in the pink card base allowing you to change the battery if needed.  I use a zero centered ruler and the blue pencil to mark the location for the hidden door. 
After die cutting the hidden door, I removed the release paper from the foam tape and centered the card front onto the card base.  I folded a small bit of washi tape over the bottom flap of the door for easy battery changing access.
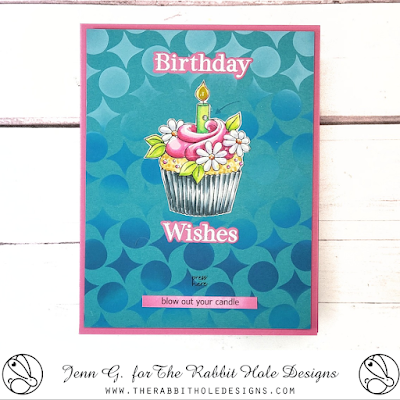
I stamped the words "press here" in black ink over the candle''s on button.  I typed and printed out the sentiment "blow out your candle". It is ink blended it in pink ink and glued to the card front.

Make sure to visit my Instagram - @journeycoachjenn to see this card in action!

Thank you for stopping by to check out this fun Rabbit Hole Designs interactive blow out candle Birthday card. I hope you are inspired to create something lovely today!

Be Creative ~ Stay Inspired

Jenn Gross


Follow me, Journey Coach Jenn, on 

Instagram - https://www.instagram.com/journeycoachjenn/

YouTube - http://www.youtube.com/c/JourneyCoachJenn

Blog - https://journeycoachjenn.blogspot.com/  


For more inspiration, updates, and news make sure to check out these places


The Rabbit Hole Designs

The Rabbit Hole Designs Instagram

The Rabbit Hole Designs Facebook Page

The Rabbit Hole Designs Pinterest

The Rabbit Hole Designs YouTube


Bright and Cheery Summer Card!


 I used the Candy Twist stencil with the Aloha Pineapple stamp set to create my cheery summertime card! 

You can watch me create it in this quick video on my YT channel!


I've linked the products I used below. 

I use affiliate links when I can. This does not add any extra cost to you, but I do receive a small commission which helps keep me creating.
Thank you for visiting!

Candy Twist Stencil: https://shrsl.com/4lw4t
Bitty Bunny Blending Brush: https://shrsl.com/3l8fi
Aloha-Pineapple Stamp Set: https://shrsl.com/4lw4v
Aloha Pineapple Die Set: https://shrsl.com/4lw4w
Sentimentally Speaking Stamp Set: https://shrsl.com/4lmc6

Best Wishes - Candy Twist Stencil

Hi friends, Carrianne here. I'm thrilled to be back on the blog and sharing this delightful card featuring The Rabbit Hole Designs Candy Twist Stencil and Sentimentally Speaking Stamp with their coordinating dies. Have I mentioned how much I love stencils? I really love the simplicity and ease of creating cards with them. The result is always fabulous, and they do all the work with little effort. 


For the background, I used the Candy Twist Stencil on an A-2 size white panel and inked it with Distress Oxide Inks, Spiced Marmalade, and Twisted Citron using my Cottontail Blending Brushes. I cut the panel using the You've Been Framed Dies and adhered it to a lime green card base. 


I stamped the sentiment from Sentimentally Speaking Stamp Set with Versamark ink on black cardstock and heat embossed it with white embossing powder on black cardstock and cut it with the matching dies. I adhered it to the panel with foam dots for added dimension. The card was finished with black sequins and a few stars. 


Thank you so much for dropping in with me today! Have a Fantastic day!

Carrianne

You may also follow me: Instagram and My Blog


For more inspiration, news, and updates, make sure to check out these places.


*NOTE: THIS POST CONTAINS AFFILIATE LINKS, MEANING I GET A SMALL COMMISSION IF YOU DECIDE TO MAKE A PURCHASE THROUGH MY LINKS, AT NO COST TO YOU. THANK YOU SO MUCH FOR YOUR SUPPORT!

Candy Twist on a Gelli Plate

Hello friends! Welcome back to the blog. Today's card features the new Candy Twist Stencil and Sentimentally Speaking stamp set and coordinating dies.
I created this soft background using dye inks and the Candy Twist Stencil on a gelli plate. First, I swiped the pink and yellow ink pads directly across the gelli plate. I used a brayer on the plate to smooth out the inks. I pressed a smooth white typing paper onto the press to create a solid print. Then I repeated the inking process but placed the Candy Twist Stencil on the gelli plate before pressing the same solid print onto the plate. I trimmed the print down and adhered it to an A2 card base. The sentiment is from the new Sentimentally Speaking stamp set. To ground the sentiment I cut a strip from the You've Been Framed die set.

Thanks for visiting!

Amrita

You can find me on IG @amritapettus

For more inspiration, updates, and news check out these awesome places! 


The RHD Affiliate Disclaimer:

We want to ensure transparency and honesty in our interactions with you, our valued readers. Please be aware that the links provided on The Rabbit Hole Designs Blog may be affiliate links. This means that if you make a purchase through these links, the project designer may earn a small commission at no extra cost to you. Your support means the world to us!


We kindly request that you accept the tracking cookie for the affiliate websites. Rest assured, this will not expose your computer to viruses or compromise your information. It's a necessary step for the company to attribute the sale to the affiliate, ensuring that creators like our creatives receive their rightful commissions.


Your trust and support empower our creators to continue sharing creativity and inspiration through our blog. Thank you for being an integral part of The Rabbit Hole Designs community!


Pretty, Paisley Congratulations Card


Hi there! It's Lauren today with this clean and simple congratulations card that features both the new Paisley Bandana stencil set and the Sentimentally Speaking stamp set from this month's release. 

I've created a video showing how I created my card. You can watch it here:


I've linked the products I used, below. 

I use affiliate links when I can. This does not add any extra cost to you, but I do receive a small commission which helps keep me creating.
Thank you for visiting!

 Paisley Bandana, 2 Layer Stencil, The Rabbit Hole Designs: https://shrsl.com/4lmc4

Sentimentally Speaking Stamp Set, The Rabbit Hole Designs: https://shrsl.com/4lmc6

Cottontail Blending Brush: https://shrsl.com/3htkd

You can follow me here: