Pages

Acorn-y Card - Clean and Simple Card

Hello my crafty friend!  I hope your day is light and filled with laughter.  Let me start you with a pun and share acorn-y card with you!   This A2 card is a clean and simple design.  You can achieve a lovely looking card with a  simple colored image and crisp stamped sentiment.  I am using The Rabbit Hole Designs' new Tenting with Tailette stamp set

I positioned and stamped the squirrel roasing an acorn image and the sentement in Memento Tuxedo Black ink in the middle of a 4" x 5 1/4" piece of coloring cardstock.  I colored the squirrel in OLO Markers;  Blues - B0.2, B0.3, B4.3, and B4.6.  I added fire highlights to the squirrel using Y1.2.  The acorn and fire are colored in OLO dark oranges (O and OR) and red (R) for the flames.  The card front is mounted on a light blue A2 card base.

Supply List

Thank you, I appreciate you taking time from your day to stop by and check out today’s The Rabbit Hole Design project.  I hope you are inspired to create something lovely today!


Be Creative ~ Stay Inspired

Jenn Gross


Follow me, Journey Coach Jenn, on 

Instagram - https://www.instagram.com/journeycoachjenn/

YouTube - http://www.youtube.com/c/JourneyCoachJenn

Blog - https://journeycoachjenn.blogspot.com/  


For more inspiration, updates, and news make sure to check out these places


The Rabbit Hole Designs

The Rabbit Hole Designs Instagram

The Rabbit Hole Designs Facebook Page

The Rabbit Hole Designs Pinterest

The Rabbit Hole Designs YouTube

Discover the Adventure: Creating a Clean and Simple Card with the Let's Wander Stamp Set

Hello, wonderful crafters! Rick here from The Rabbit Hole Designs, bringing you another exciting and heartwarming project. Today, we're celebrating "Let's Wander Where the Wi-Fi Is Week" with a delightful card design featuring our very own Let's Wander Stamp Set. This stamp set is perfect for those who love adventure and the great outdoors. Let's dive into the details of this clean and simple card design that’s sure to bring a smile to anyone's face.


The Inspiration Behind the Card

When I first got my hands on the Let's Wander Stamp Set, it immediately reminded me of my childhood camping trips with my family. We’d pack up the car, leave the bustling city behind, and head into the woods for a weekend of hiking, storytelling around the campfire, and sleeping under the stars. This stamp set perfectly captures that sense of adventure and nostalgia, making it an absolute joy to work with.


Crafting the Card

The Perfect Stamping

To start, I stamped the charming image from the Let's Wander Stamp Set onto high-quality white cardstock using a reliable black ink. This combination ensures crisp, clean lines that are ideal for coloring.

Adding Vibrant Colors

Next, I brought the stamped image to life using my favorite brush markers. Coloring is such a therapeutic process, allowing me to infuse the scene with vibrant hues and personal touches. It's like painting a picture with markers, and I love seeing the image come to life with each stroke.


Creating a Beautiful Frame

After coloring, I trimmed the cardstock to 4" x 5 1/4". To add a subtle but effective detail, I brushed the edges with a rich blue ink. This technique adds a hint of color that frames the image beautifully, drawing the eye inward.

Stamping the Sentiment

For the sentiment, I chose Versafine Clair Nocturne Ink that provides deep, crisp impressions. Stamping the sentiment directly onto the card front adds a finishing touch that ties the entire design together.

Preparing the Card Base

I crafted the card base from sturdy kraft cardstock, cut to 4 1/4" x 11" and scored at 5 1/2" for a top-folding design. Before folding, I stamped the same image from the Let's Wander Stamp Set on the inside using a soft brown ink. This adds a delightful surprise when the card is opened, showing that extra bit of thought and care.


Assembling the Card

I attached the card front to the base using 3D Foam Squares, which add wonderful dimension to the design. This is a great tip for adding depth and interest to your cards – the raised effect can really make your design pop.

Finishing Touches

To complete the card, I added a few Clear Sparkle Enamel Dots around the sentiment. These little embellishments catch the light beautifully and add just the right amount of sparkle without overpowering the design.

Final Thoughts

This project is a fantastic example of how a few thoughtful details can transform a simple design into something truly special. The Let's Wander Stamp Set from The Rabbit Hole Designs is a joy to work with, capturing the essence of outdoor adventure and childhood memories.


Creating cards is more than just a hobby – it’s a way to share a piece of your heart with someone else. I hope this project inspires you to embrace your creativity and perhaps take a moment to wander where the Wi-Fi is weak. Happy crafting, friends! I can't wait to see what you create. Feel free to share your projects and stories in the comments below.

Stay inspired and keep crafting!

Rick

For more inspiration, updates, and news check out these awesome places! 


The RHD Affiliate Disclaimer:

We want to ensure transparency and honesty in our interactions with you, our valued readers. Please be aware that the links provided on The Rabbit Hole Designs Blog may be affiliate links. This means that if you make a purchase through these links, the project designer may earn a small commission at no extra cost to you. Your support means the world to us!


We kindly request that you accept the tracking cookie for the affiliate websites. Rest assured, this will not expose your computer to viruses or compromise your information. It's a necessary step for the company to attribute the sale to the affiliate, ensuring that creators like our creatives receive their rightful commissions.


Your trust and support empower our creators to continue sharing creativity and inspiration through our blog. Thank you for being an integral part of The Rabbit Hole Designs community!

Mountain View, Creating a Light up Card


Hello crafty friends! It's Lauren here today.
One of my favorite memories of when I lived near Seattle was watching the sun "wink out" as the sun set behind the mountains. It was so pretty. I was reminiscing about that memory as I created my card that features the new Let's Wander stamp set illustrated by Agota Pop.

You can watch me create my light up card in this quick video here:


Adding a light up element to your cards is so easy and really add something special!  I love the way this card came out and the memory that inspired it! I've linked the stamp set I used, below. Thanks for visiting! 

I use affiliate links when I can. This does not add any extra cost to you, but I do receive a small commission which helps keep me creating.
Thank you for visiting!

Let's Wander Stamp Set, The Rabbit Hole Designs: https://shrsl.com/4kaeg


Wishing You the Happiest Adventure!


Hello crafty friends!  Jenn Gross here with an easy slimline card created with The Rabbit Hole Designs June Release. I am using these beautiful camping images illustrated by Agota Pop from both the Glamping with Tailette stamp set and Tenting with Tailette stamp set.  I love how stamping and heat embossing the line images create an simple background.

Supply List 


The only thing I colored on this card is (believe it or not) the Matte White Enamel Dots. They take colored pencil beautifully 
The background is a piece of medium green cardstock cut to 3 1/4" x 8 1/4". I treated the paper with the Cottontail Embossing Powder Tool. Once you treat the cardstock, the embossing powder only adheres only to the stamped images. The camping images are stamped in a random pattern using VersaMark Watermark ink then dusted with white embossing powder and heat set to create the background.

The word Adventure is die cut from light green cardstock  and the shadow layer is die cut from dark green cardstock.  The "Wishing You the Happiest" is from the Birthday Word stamp set and the "Adulting optional" is from Sassy Sentiment stamp set.  Both of these are stamped on the dark green cardstock with VersaMark Watermark ink and heat set with white embossing powder. I cut these sentiments into strips.  The sentiments and Adventure word are positioned and glued on to the left side of the card.


I chose a dark green colored pencil and colored a small, medium, and large Matte White Enamel Dots and attached them to the card front.  Attach the completed card front to a slimline card base and you have a finished card. 

Thank you, I appreciate you taking time from your day to stop by and check out today’s The Rabbit Hole Design project.  I hope you are inspired to create something lovely today!


Be Creative ~ Stay Inspired

Jenn Gross


Follow me, Journey Coach Jenn, on 

Instagram - https://www.instagram.com/journeycoachjenn/

YouTube - http://www.youtube.com/c/JourneyCoachJenn

Blog - https://journeycoachjenn.blogspot.com/  


For more inspiration, updates, and news make sure to check out these places 

The Rabbit Hole Designs

The Rabbit Hole Designs Instagram

The Rabbit Hole Designs Facebook Page

The Rabbit Hole Designs Pinterest

The Rabbit Hole Designs YouTube

Whimsical Camping Adventure Card: Glamping with Tailette & Tenting with Tailette Stamp Sets

Hello, fellow card makers! Rick here, bringing you another whimsical project for The Rabbit Hole Designs Blog. Today, I’m excited to share a fun and unique card design that combines the charming Tenting with Tailette and Glamping with Tailette Stamp Sets. This project is perfect for those who love a bit of adventure and whimsy in their card making. The process involves some delightful masking techniques to make our focal images pop, and I have a few pro tips to help you along the way! 

Tenting with Tailette & Glamping with Tailette Card by Rick Adkins flat lay view


The Inspiration Behind the Card

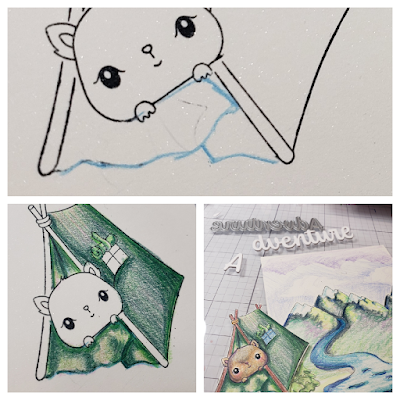
I’ve always enjoyed the idea of combining different stamp sets to create a cohesive scene. The Tailette character is irresistibly cute, especially when she's roasting an acorn by the campfire or peeking from behind a stack of logs. This card design was inspired by a recent camping trip, where we spent our evenings around the fire, sharing stories and roasting marshmallows. I wanted to capture that cozy, adventurous spirit in a card that could be perfect for any occasion.

Tenting with Tailette & Glamping with Tailette Card by Rick Adkins

Stamping and Coloring:

I began by stamping the adorable Tailette characters and the campfire on alcohol marker friendly cardstock using alcohol marker friendly ink from my stash. Coloring these images with my favorite alcohol brush markers was such a relaxing experience! 

Pro Tip: Always stamp your images first and then color them. It’s easier to correct any stamping mistakes on a blank piece of cardstock rather than one you’ve already spent time coloring.

Tenting with Tailette & Glamping with Tailette Card by Rick Adkins Front View

Building the Background: 

For the background, I used the a set of nesting arches dies from my stash to create a mask with masking paper. This allowed me to do some ink blending within a specific area of the cardstock, giving it a defined and clean look. Using two different muted blue inks from my stash created a soft, dreamy sky.

Next, I added some texture and depth with the Falling Leaves Stencil. Blending a lighter and darker green ink over the stencil gave a lovely leafy pattern that complemented the outdoor theme perfectly.  I then took the Falling Leaves 6 x 6 Stamp and stamped over the ink blended background to add a details to the leaves.

Pro Tip: When ink blending, start with lighter colors and gradually build up to the darker shades. This helps in creating a smooth transition and avoids harsh lines.

Tenting with Tailette & Glamping with Tailette Card by Rick Adkins Side View

Creating the Card Base: 

I dry embossed a piece of ivory cardstock using a leaf embossing folder from my stash. To add a bit of definition, I brushed the edges with one of the green inks I used for the ink blending. This panel was then adhered to a top-folding A2 card base.

Pro Tip: Dry embossing adds a beautiful texture to your cards without much effort. If you don’t have an embossing folder, you can achieve a similar effect with stencils and an embossing pad.

Tenting with Tailette & Glamping with Tailette Card by Rick Adkins Over Head View

Layering the Elements: 

Once my ink-blended panel was dry, I attached it to a piece of green cardstock for a nice contrast.  The fun part was arranging the focal images. The campfire went in the background with liquid glue, while the Tailette images were popped up with Foam Adhesive for a bit of dimension.

Finishing Touches: 

The sentiment “I’d be lost without you” was heat embossed on a scrap of the same green cardstock. Adding a subtle shimmer to certain parts of the stamped images so that they would catch the light beautifully.

Tenting with Tailette & Glamping with Tailette Card by Rick Adkins

Creating this card was such a joy, and I hope it inspires you to combine different stamp sets and techniques in your own projects. Masking and layering can seem a bit daunting at first, but with a bit of practice, it opens up so many creative possibilities.

Don’t forget to share your creations and tag us at The Rabbit Hole Designs—we love seeing what you come up with! Until next time, happy crafting and enjoy every creative moment.

Warmly, Rick

For more inspiration, updates, and news check out these awesome places! 


The RHD Affiliate Disclaimer:

We want to ensure transparency and honesty in our interactions with you, our valued readers. Please be aware that the links provided on The Rabbit Hole Designs Blog may be affiliate links. This means that if you make a purchase through these links, the project designer may earn a small commission at no extra cost to you. Your support means the world to us!


We kindly request that you accept the tracking cookie for the affiliate websites. Rest assured, this will not expose your computer to viruses or compromise your information. It's a necessary step for the company to attribute the sale to the affiliate, ensuring that creators like our creatives receive their rightful commissions.


Your trust and support empower our creators to continue sharing creativity and inspiration through our blog. Thank you for being an integral part of The Rabbit Hole Designs community!

Purple Magnolias

Hello friends, I'm excited to be here for my very first post on The Rabbit Hole Design Team! Today I have a card to share with you featuring the Mindful Magnolia stamp set.

I chose the largest floral cluster from the set and stamped it on a larger white panel with a alcohol friendly black ink. Then I colored it with alcohol markers in various purple and green shades.

Next I cut my panel with the smallest rectangle from You've Been Framed - Layering Dies. I matted this on a A2 sized beige panel.

I chose a sentiment from Friend - Scripty stamp set and its coordinating die. I cut those in two shades of purple cardstock to compliment the floral cluster.

Thanks for visiting!

Amrita

You can find me on IG @amritapettus

For more inspiration, updates, and news check out these awesome places! 


Gathering Memories on my last day


Hi friends!  On this beautiful summer day, I am sharing this card I made with The Rabbit Hole Designs supplies.  This is a very special one because it will be my last blog post while I'm on the design team.  The last two years being on this team has been absolutely great.  I have made so many friends, gotten so much inspiration and learned so many things.  For those that don't know, this is my first design team and I am thankful Mary Ann had the trust in me to be able to handle it.  I hope I was exactly what she expected or even more.  Even though, I am not going to be officially designing for TRHD, I will always have them in my heart and in my craft room. This company will always be special to me. ALWAYS.💕

Items used:

I challenge you to recreate this. Make sure to tag me @craftwithme101 and The Rabbit Hole Designs on Instagram if you do. 

For more inspiration, updates, and news make sure to check out these awesome places! 


Happy Trails, A Cute CAS Card


Hi there! It's Lauren on the blog today sharing my cute clean and simple card featuring the fun Glamping with Tailette stamp set illustrated by Agota Pop! I had such fun coloring these images and creating my card! 

I started out by stamping my camper image using a fade out/no line ink. I then covered it with a mask I created and stamped my first trio of trees. I masked those off and stamped another trio, moved my mask to the new trees and stamped a final trio of trees. I then colored all the images using my colored pencils.


Once I had everything colored and added some shading/shadows below the camper and trees, I stamped on my sentiment.


 To finish my card, I trimmed my colored panel to 4.20x5.45". Then, I adhered it to a black cardstock panel measuring 4.23x5.48" and adhered that onto a white A2 (4.25x5.5") card base.

Really loved creating this card and how it turned out. I hope I've inspired you to create a similar card! I've linked the products I used below. Thanks for visiting!! 


I use affiliate links when I can. This does not add any extra cost to you, but I do receive a small commission which helps keep me creating.
Thank you for visiting!

*You can use code Lauren10 at checkout to save on your purchase. *

Glamping With Tailette Stamp Set, The Rabbit Hole Designs: https://shrsl.com/4ka9l


Camping Adventure

Hello crafty friends! Jenn Gross here sharing an adventure card today, you can also follow me on Social media @journeycoachjenn. I love this vibrant card.  I pulled out my colored pencils for a coloring adventure. The images are from The Rabbit Hole Designs New June Release. The three stamp sets; Glamping with Tailette, Tenting with Tailette, and Let's Wander are all illustrated by Agota Pop.

I masked off the cute squirrel head from the Glamping with Tailette stamp set and put her inside the tent from the Tenting with Tailette stamp set.  You can see how I drew the tent flap to place it in Tailette hands.  She is taking a look outside to appreciate her surrounding.  

The background is created by extending the Let's Wander stamp set by masling and stamping an extra mountain. 

The sky is  created with color pencils and the Clouds in My Coffee stencil.  I die cut the word "Adventure" from the Adventure Word with Shadow Layer die glueing three word layers together.  The "awaits" sentiment is from the Adventure Word stamp set.  The sentiment is glued to the top of the card front following the mountain's ascent.
I added the Tented Tailette to the bottom right of the card front using foam squares.

Supplies List
Liquid glue 
Colored pencils 

Thank you for taking the te to checkout  today's vibrant card camping adventure with Tailette.  I hope you are inspired to create something lovely today!

Be Creative ~ Stay Inspired

Jenn Gross


Follow me, Journey Coach Jenn, on 

Instagram - https://www.instagram.com/journeycoachjenn/

YouTube - http://www.youtube.com/c/JourneyCoachJenn

Blog - https://journeycoachjenn.blogspot.com/  


For more inspiration, updates, and news make sure to check out these places


The Rabbit Hole Designs

The Rabbit Hole Designs Instagram

The Rabbit Hole Designs Facebook Page

The Rabbit Hole Designs Pinterest

The Rabbit Hole Designs YouTube


Feel Better Soon

Hello, crafty friends! Carrianne here today, and I hope you're having a wonderful day! Today, I am sharing a card that I created using The Rabbit Hole Designs Mindful Magnolia Stamp Set.


I began by die-cutting a white panel using The Rabbit Hole Designs You've Been Framed Layering Dies. It was adhered to a red mat layer and then adhered to a white A2 card base.

I then stamped the smallest floral image from the set several times in black ink and colored it with alcohol markers from my stash. I fussy cut them out, but a matching die set is available. I popped them up on foam squares for dimension. 


The sentiment is from the same set Mindful Magnolia Stamp Set and was heat embossed, then popped up on foam strips. I added some dark splatter to complete the card.

Thank you for visiting. Happy crafting!

Carrianne